Page is loading ...

Ruckus Wireless
™
ZoneFlex
™
SmartCell
™
8800
(SC8800-S) Outdoor Access Point
Installation Guid e
Part Numbe r 800-70420-001 Rev B
Publishe d Ap ril 2013
www.ruckuswirele ss.com


i
1 About this Installation Guide . . . . . . . . . . . . . . . . . . . . . . . . . . . . . . . . . . . . . . . . . . . . . . . . . 1
Using this Installation Guide . . . . . . . . . . . . . . . . . . . . . . . . . . . . . . . . . . . . . . . . . . . . . . . 1
Related Documentation . . . . . . . . . . . . . . . . . . . . . . . . . . . . . . . . . . . . . . . . . . . . . . . . . . . 3
Documentation Feedback . . . . . . . . . . . . . . . . . . . . . . . . . . . . . . . . . . . . . . . . . . . . . . . . . 3
2 Planning the SC8800-S AP Installation . . . . . . . . . . . . . . . . . . . . . . . . . . . . . . . . . . . . . . . . . 4
About the AP . . . . . . . . . . . . . . . . . . . . . . . . . . . . . . . . . . . . . . . . . . . . . . . . . . . . . . . . . . . . 4
AP Connectors and LEDs . . . . . . . . . . . . . . . . . . . . . . . . . . . . . . . . . . . . . . . . . . . . . . . . . . 6
Pointing the Internal GPS Antenna . . . . . . . . . . . . . . . . . . . . . . . . . . . . . . . . . . . . . . . . . 10
Performing a Site Survey . . . . . . . . . . . . . . . . . . . . . . . . . . . . . . . . . . . . . . . . . . . . . . . . . 11
Planning the Physical Installation . . . . . . . . . . . . . . . . . . . . . . . . . . . . . . . . . . . . . . . . . . . 12
Notes on Power Sources . . . . . . . . . . . . . . . . . . . . . . . . . . . . . . . . . . . . . . . . . . . . . . . . 12
Deciding How to Power the AP . . . . . . . . . . . . . . . . . . . . . . . . . . . . . . . . . . . . . . . . . . . 12
3 Preparing the SC8800-S AP at the Depot and Shipping to the Field . . . . . . . . . . . . . . . . 13
Unpacking the AP . . . . . . . . . . . . . . . . . . . . . . . . . . . . . . . . . . . . . . . . . . . . . . . . . . . . . . . 13
Package Contents . . . . . . . . . . . . . . . . . . . . . . . . . . . . . . . . . . . . . . . . . . . . . . . . . . . . . . 13
Mounting Kit Contents . . . . . . . . . . . . . . . . . . . . . . . . . . . . . . . . . . . . . . . . . . . . . . . . . . 14
Powering the AP . . . . . . . . . . . . . . . . . . . . . . . . . . . . . . . . . . . . . . . . . . . . . . . . . . . . . . . . 14
Checking LED Operation . . . . . . . . . . . . . . . . . . . . . . . . . . . . . . . . . . . . . . . . . . . . . . . . 14
Configuring the AP for Management by ZoneDirector . . . . . . . . . . . . . . . . . . . . . . . . . 15
Connecting the AP to ZoneDirector . . . . . . . . . . . . . . . . . . . . . . . . . . . . . . . . . . . . . . . 15
Verifying the AP Registration . . . . . . . . . . . . . . . . . . . . . . . . . . . . . . . . . . . . . . . . . . . . . 15
Configuring the AP for Management by FlexMaster or for Standalone Operation . . 17
Configuring the Administrative Computer . . . . . . . . . . . . . . . . . . . . . . . . . . . . . . . . . . 17
Connecting the AP to the Administrative Computer . . . . . . . . . . . . . . . . . . . . . . . . . 19
Logging In to the Access Point’s Web Interface . . . . . . . . . . . . . . . . . . . . . . . . . . . . . 19
Configuring Common Wireless Settings . . . . . . . . . . . . . . . . . . . . . . . . . . . . . . . . . . . 20
Configuring Wireless # Settings . . . . . . . . . . . . . . . . . . . . . . . . . . . . . . . . . . . . . . . . . . 22
(Optional) Setting the FlexMaster Server Address . . . . . . . . . . . . . . . . . . . . . . . . . . . 23
Contents

ii
Verifying AP Operation . . . . . . . . . . . . . . . . . . . . . . . . . . . . . . . . . . . . . . . . . . . . . . . . . . . 25
Connecting the AP to the Network . . . . . . . . . . . . . . . . . . . . . . . . . . . . . . . . . . . . . . . . 25
Associating a Wireless Client with the AP . . . . . . . . . . . . . . . . . . . . . . . . . . . . . . . . . . 26
Checking the TR069 Status (FlexMaster Management Only) . . . . . . . . . . . . . . . . . . . 26
Disconnecting the AP from the Power Source and the Network . . . . . . . . . . . . . . . . 27
Disconnecting the AP from the Administrative Computer . . . . . . . . . . . . . . . . . . . . . 27
Restoring the Administrative Computer’s Network Settings . . . . . . . . . . . . . . . . . . . 27
Shipping the AP to the Field . . . . . . . . . . . . . . . . . . . . . . . . . . . . . . . . . . . . . . . . . . . . . . 28
4 Installing the SC8800-S AP in the Field . . . . . . . . . . . . . . . . . . . . . . . . . . . . . . . . . . . . . . . . 29
Installation Components and Constraints . . . . . . . . . . . . . . . . . . . . . . . . . . . . . . . . . . . 29
Deploying the Access Point . . . . . . . . . . . . . . . . . . . . . . . . . . . . . . . . . . . . . . . . . . . . . . . 32
Connecting and Sealing the RJ-45 Cables . . . . . . . . . . . . . . . . . . . . . . . . . . . . . . . . . . 33
Preparing the Power Connections . . . . . . . . . . . . . . . . . . . . . . . . . . . . . . . . . . . . . . . . 34
Mounting the Access Point . . . . . . . . . . . . . . . . . . . . . . . . . . . . . . . . . . . . . . . . . . . . . . . 37
Mounting the U-Joint Bracket to the Main Mounting Bracket . . . . . . . . . . . . . . . . . . 39
Attaching the Main Mounting Bracket to a Flat Surface . . . . . . . . . . . . . . . . . . . . . . . 39
Attaching the Main Mounting Bracket to a Wooden Pole . . . . . . . . . . . . . . . . . . . . . 40
Attaching the Main Mounting Bracket to a Metal Pole . . . . . . . . . . . . . . . . . . . . . . . . 42
Mounting the Hook Bracket to the U-Joint Bracket . . . . . . . . . . . . . . . . . . . . . . . . . . 43
Assembling the AP Attachment Bracket and the Access Point . . . . . . . . . . . . . . . . . 44
Attaching the AP Attachment Bracket and AP to the Hook Bracket . . . . . . . . . . . . . 45
Safety-Cabling the AP . . . . . . . . . . . . . . . . . . . . . . . . . . . . . . . . . . . . . . . . . . . . . . . . . . 46
Mounting External Antennas (Optional) . . . . . . . . . . . . . . . . . . . . . . . . . . . . . . . . . . . . 48
Verifying Access Point Operation . . . . . . . . . . . . . . . . . . . . . . . . . . . . . . . . . . . . . . . . . . 50
Powering the AP . . . . . . . . . . . . . . . . . . . . . . . . . . . . . . . . . . . . . . . . . . . . . . . . . . . . . . . 50
Connecting the AP to the Network . . . . . . . . . . . . . . . . . . . . . . . . . . . . . . . . . . . . . . . . 53
Configuring the External Antenna Gain . . . . . . . . . . . . . . . . . . . . . . . . . . . . . . . . . . . . 54
Associating a Wireless Client with the AP . . . . . . . . . . . . . . . . . . . . . . . . . . . . . . . . . . 59
Checking the TR069 Status (FlexMaster Management only) . . . . . . . . . . . . . . . . . . . 59
5 What to Do Next . . . . . . . . . . . . . . . . . . . . . . . . . . . . . . . . . . . . . . . . . . . . . . . . . . . . . . . . . . 60
Changing the Administrative Password . . . . . . . . . . . . . . . . . . . . . . . . . . . . . . . . . . . . . 60
Configuring the Security Settings . . . . . . . . . . . . . . . . . . . . . . . . . . . . . . . . . . . . . . . . . . 60
Configuring Advanced Settings and Features . . . . . . . . . . . . . . . . . . . . . . . . . . . . . . . . 60
Reading Related Documentation . . . . . . . . . . . . . . . . . . . . . . . . . . . . . . . . . . . . . . . . . . 60

iii
Appendix A: Ruckus Wireless-Supplied and Customer-Ordered Parts . . . . . . . . . . . . . . . . . 61
Appendix B: Resetting the Access Point to Factory Default Settings . . . . . . . . . . . . . . . . . . 65
Appendix C: Installer Mounting Dimensions . . . . . . . . . . . . . . . . . . . . . . . . . . . . . . . . . . . . . . 66

iv

1
1 About this Installation Guide
This Installation Guide provides information on how to add the Ruckus Wireless
TM
Smart-
Cell™ 8800 Access Point (SC8800-S AP, or AP) to your Ruckus Wireless network. Topics
covered in this guide include installing, basic configuring, and device mounting.
This guide is intended for use by those responsible for installing and setting up network
equipment. Consequently, it assumes a basic working knowledge of local area networking,
wireless networking, and wireless devices.
Using this Installation Guide
The AP installation is completed with four main steps. Each step includes some substeps.
Figure 1 shows the main steps, and Tab l e 1 includes the substeps.
Figure 1. Adding an SC8800-S AP to an existing Ruckus Wireless network flowchart
Planning
the Installation
Preparing at the Depot
and Sending to the Field
Installing the
SC8800-S in the Field
What to Do
Next

2
About this Installation Guide
Using this Installation Guide
NOTE: The AP can be managed using an AP web browser interface, an AP command line
interface (CLI), and using a simple network management protocol (SNMP) interface, such
as Ruckus Wireless ZoneDirector
TM
or FlexMaster
TM
. This document contains configuring
instructions using these interfaces, as appropriate.
Table 1. Adding an SC8800-S AP to an Existing Ruckus Wireless network
Section Heading
2
Planning the SC8800-S AP Installation
• About the AP
• AP Connectors and LEDs
• Pointing the Internal GPS Antenna
• Performing a Site Survey
• Planning the Physical Installation
3
Preparing the SC8800-S AP at the Depot and Shipping to the Field
• Unpacking the AP
• Powering the AP
• Configuring the AP for Management by ZoneDirector
• Configuring the AP for Management by FlexMaster or for Standalone
Operation
• Verifying AP Operation
• Shipping the AP to the Field
4
Installing the SC8800-S AP in the Field
• Installation Components and Constraints
• Deploying the AP
• Mounting the AP
• Verifying AP Operation
5
What to Do Next
• Changing the Administrative Password
• Configuring the Security Settings
• Configuring Advanced Settings and Features
• Reading Related Documentation

3
About this Installation Guide
Related Documentation
Related Documentation
In addition to this guide, each Ruckus Wireless SC8800-S AP documentation set includes
the following:
■ User Guide: Provides detailed information on how to configure the AP. The ZoneFlex
Outdoor AP User Guide is available for download on the Ruckus Wireless Support Web
site at
https:// support.ruckuswireless.com/documents
(login required)
■ Release Notes: Provides late-breaking information about the current software release,
including new features, enhancements, and known issues. If the information in the
Release Notes differs from the information in this guide, follow the instructions in the
Release Notes.
■ Online Help: Accessible from the AP’s web interface, the Online Help provides
information that helps you configure the device from the web interface.
Documentation Feedback
Ruckus Wireless is interested in improving its documentation and welcomes your
comments and suggestions. You can email your comments to Ruckus Wireless at
docs@ruckuswireless.com
When contacting us, please include the following information:
■ Document title
■ Document part number (on the cover page)
■ Page number (if appropriate)
For example:
■ ZoneFlex SmartCell SC8800-S Outdoor Access Point Installation Guide
■ Part number: 800-70420-001 Rev B
■ Page 29

4
Planning the SC8800-S AP Installation
About the AP
2 Planning the SC8800-S AP Installation
Before installing the SC8800-S AP, it is helpful to verify the version and to plan the AP
installation:
■
About the AP
■ Pointing the Internal GPS Antenna
■ Performing a Site Survey
■ Planning the Physical Installation
■ Deciding How to Power the AP
About the AP
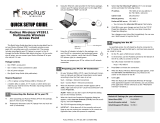
The AP is equipped with 120-Degree Sector 2.4GHz and 5GHz internal antennas, and these
antennas can be deployed where 2.4GHz and 5GHz horizontal beamforming can provide
extended reach and throughput to a 120-degree coverage area. See
Figure 2
.
Figure 2. Internal antenna 120-Degree sector coverage
Extended
120º Reach
Azimuth Plane Coverage, Top View
Extended
30º Vertical
Beamwidth
Elevation Plane Coverage
, Side View

5
Planning the SC8800-S AP Installation
About the AP
The AP is equipped with two 5GHz N-type connectors, which allow operators to use up
to two customer-supplied external 5GHz antennas instead of the internal 5GHz antennas.
These external antennas can support operator-defined coverage areas and point-to-point
deployments. For instance,
Figure 3
shows an AP used with omni external antennas, and
Figure 4 shows two APs used in a point-to-point backhaul deployment.
Figure 3. Typical AP omni deployment with an external antenna
Figure 4. Typical AP long-range point-to-point deployment with external antennas
Good Reach
Excellent
Reach
Excellent
Reach
Elevation Plane Coverage, Side View
Azimuth Plane Coverage, Top View
SC8800-S
Panel
Antenna
SC8800-S
Panel
Antenna

6
Planning the SC8800-S AP Installation
AP Connectors and LEDs
AP Connectors and LEDs
Figure 5 identifies the top-panel connectors on the AP. Tab l e 2 describes these connectors.
Figure 5. Top-panel connectors
Figure 6 identifies the AP bottom-panel connectors and LED locations on the AP. Tab l e 3
describes these connectors and LEDs.
1
23
4
Table 2. Top-panel connectors
No. Label Description
15GHz
ANT 0 port
5GHz 50-ohm N-type connector. Can be used with an external antenna for
operator-defined coverage areas and point-to-point deployments.
22.4GHz
ANT 2 port
2.4GHz 50-ohm N-type connector. Can be used with an external antenna for
operator-defined coverage areas and point-to-point deployments.
32.4GHz
ANT 0 port
2.4GHz 50-ohm N-type connector. Can be used with an external antenna for
operator-defined coverage areas and point-to-point deployments.
45GHz
ANT 2 port
5GHz 50-ohm N-type connector. Can be used with an external antenna for
operator-defined coverage areas and point-to-point deployments.

7
Planning the SC8800-S AP Installation
AP Connectors and LEDs
Figure 6. Bottom-panel connectors and LED locations
1 2 3
4
5 6
7
Table 3. Bottom-panel connectors
No. Label Description
1 Earth
ground
screw
Use this screw to attach an earth ground to the AP as required by local
regulations.
2AC power
connector
You can use AC to supply power to the AP, in addition to using PoE.
3PoE OUT
RJ45 data
connector
Supports 10/100/1000Mbps connections and PoE out. If the AP is powered using
AC or the Ruckus Wireless PoE injector (ordered separately), then this port can
supply 802.3af (15.4W) PoE to a connected PoE-capable device (for example, an
IP-based surveillance camera). This port alternatively can supply 802.3at (25.5W)
PoE when used with 20m (65.6 ft.) or shorter CAT5e UTP or better cable.
4RESET
button
This button resets the AP to its factory defaults, and is mounted under the
RESET/ PoE OUT RJ-45 waterproof gland. Refer to
“ Appendix B: Resetting the
Access Point to Factory Default Settings” on page 65 to access the reset button
and reset the AP.
5PoE IN
RJ45 data
connector
Supports 10/ 100/1000Mbps connections, connects to the network and receives
Power over Ethernet (PoE) from the Ruckus Wireless 60W PoE injector. (Refer to
“ Appendix A: Ruckus Wireless-Supplied and Customer-Ordered Parts” on
page 61 to order a Ruckus Wireless 60W PoE injector.)
6FIBER port This waterproof gland allows you to run a fiber-optic cable into the SC8800-S
chassis to an optional fiber modem.
7 LEDs See
Figure 7.

8
Planning the SC8800-S AP Installation
AP Connectors and LEDs
Figure 7 identifies the AP bottom-panel LED locations on the AP. Tab l e 4 describes these
connectors and LEDs.
Figure 7. LEDs
1
2
3
4
5
Table 4. LED descriptions
No. Label Description
1PWR LED
• Off: No power is available, or the AP is not connected to a power source.
• Solid Red: The AP is powering on.
• Solid Green: The AP is connected to a power source and has completed its
power-on sequence.
2DIR LED
• Off: The AP is NOT managed by ZoneDirector (standalone mode).
• Solid Green: The AP is managed by ZoneDirector and connection to
ZoneDirector has been established.
• Fast Flashing Green (0.5Hz): The AP is managed by ZoneDirector and is
currently receiving configuration settings (provisioning) or a firmware update.
• Slow Flashing Green (2Hz): The AP is managed by ZoneDirector, but is
currently unable to communicate with ZoneDirector.

9
Planning the SC8800-S AP Installation
AP Connectors and LEDs
3AIR LED
• Off: The AP is in standalone mode, or acting as a Root AP if in mesh mode.
• Solid Green: The AP is functioning as a Mesh AP (MAP) and the uplink signal
quality is good (> 24dBm).
• Fast Flashing Green (0.5Hz): The AP is functioning as a Mesh AP (MAP) and
the wireless signal to its uplink AP is fair.
• Slow Flashing Green (2Hz): The AP is in mesh mode, but the AP is still
searching for a mesh uplink.
42.4G LED
• Off: WLAN service is down.
• Amber (Yellow): WLAN service is up but with no client connected.
• Solid Green: WLAN service is up with at least one client connected.
55G LED
• Off: WLAN service is down.
• Amber (Yellow): WLAN service is up but with no clients or downlink MAPs
associated/connected.
• Solid Green: WLAN service is up with at least one client is associated. No
downlink MAPs are connected.
• Fast Flashing Green (0.5Hz): The WLAN is up, at least one downlink MAP is
connected, and at least one client is associated.
• Slow Flashing Green (2Hz): The WLAN is up and at least one downlink MAP
is connected. No clients are associated.
Table 4. LED descriptions (Continued)
No. Label Description

10
Planning the SC8800-S AP Installation
Pointing the Internal GPS Antenna
Pointing the Internal GPS Antenna
The AP includes an internal GPS antenna. When the AP is to be used with the optional
GPS feature enabled, the GPS antenna must be mounted outdoors and have as clear a
view of the sky as possible (as close as possible to 360 degrees, and with no obstructing
trees or buildings). The GPS antenna must not be installed where it can be covered with
snow buildup to avoid attenuating the GPS signal. These requirements must be met to
ensure that the GPS module can obtain lock and provide accurate GPS time and position.
If the GPS antenna has less than a clear 360-degree view of the sky, then the GPS module
may experience degraded performance.
Figure 8. GPS Antenna Location under Radome
Figure 9. Mounted GPS Antenna Position
Keep Clear
Sky View

11
Planning the SC8800-S AP Installation
Performing a Site Survey
Performing a Site Survey
Perform a site survey to determine the optimal AP placement or maximum range,
coverage, and network performance. Ruckus Wireless Support can supply Site Survey best
practices information.
The location and orientation that you choose for the AP play a critical role in the
performance of your wireless network. In general, Ruckus Wireless recommends installing
the AP away from obstructions and sources of interference and ensuring that the AP’s best
coverage zone (refer to
“ About the AP”
on page 4) is pointing in the general direction of
its wireless clients or associated bridge units.
When performing a site survey, consider the following factors:
■ Data rates: Range is generally inversely proportional to data rates. The maximum radio
range is achieved at the lowest workable data rate. Higher data rates will generally be
achieved at closer distances.
■ Antenna type and placement: Proper antenna configuration is a critical factor in
maximizing radio range. As a general rule, radio range is increased by mounting the
radio higher off of the ground with the AP oriented so that the dome is facing down
(for recommended orientation examples, refer to
“ About the AP”
on page 4).
■ Physical environment: Clear or open areas provide better radio range than closed or
filled areas. The less cluttered the operating environment, the greater the wireless
range.
■ Obstructions, building materials, and sources of interference: Physical obstructions,
such as concrete pillars, steel beams, filing cabinets, buildings and trees, can block or
hinder wireless communication. Avoid installing the AP in an environment where there
is an obstruction between sending and receiving devices. A number of machines and
electronic devices that emit radio waves, such as cranes, wireless phones, microwave
ovens, and satellite dishes, interfere with and block wireless signals. Building materials
used in construction also influence radio signal penetration. For example, drywall
construction permits greater range than concrete blocks.
■ GPS Considerations: If the AP is to be used with the optional GPS feature enabled,
then the AP must be mounted outdoors and have as clear a view of the sky as possible
(as close as possible to 360 degrees) to help the GPS module obtain lock and provide
accurate GPS time and position. (Refer to
“ Pointing the Internal GPS Antenna”
on
page 10.) The GPS antenna must not be installed where it can be covered with snow
buildup to avoid attenuating the GPS signal. If the GPS antenna has less than a clear
360-degree view of the sky, then the GPS module may experience degraded perfor-
mance.

12
Planning the SC8800-S AP Installation
Planning the Physical Installation
Planning the Physical Installation
The AP can be installed indoors or outdoors, such as on an interior wall or ceiling, on the
exterior roof overhang of a building, or on a streetlight pole. The GPS antenna must be
installed outdoors for proper GPS operation.
Notes on Power Sources
■ The AP only requires one power source (either AC or PoE), but can be powered by AC
and PoE at the same time.
■ The AP may be powered by AC power or by PoE input using an Ruckus Wireless 60W
PoE injector (part number 902-0180-XX00, where XX is the country code).
■ PoE OUT supports 802.3af (15.4W output) loads when the AP is operating off AC input
power or when operating off the PoE input port using a high-power 60W PoE Injector.
■ When AC powered and PoE is present, the AP draws power from the AC connection.
■ The AP PoE Output supports high power peripheral d evices up t o 25W, such as a small
cell or micro cell radio but only with the follow restrictions: the PoE Output cable length
between the AP and peripheral device is less than 8m (25 feet) and that the AP is
operating off of AC Input power. High-power peripherals (up to 25W) may also be
powered by an AP operating from the PoE Input using a high power 60W injector,
provided that the PoE input cable length between the injector and AP is less than 8m
(25 feet) and that the DC voltage at the AP PoE input connector is at least 44 VDC.
Deciding How to Power the AP
The AP can be powered using either AC power and/or Power over Ethernet (PoE). Use this
information and the information in
“ Installation Components and Constraints” on page 29
to determine how to power the AP.
AC Power
Ruckus Wireless supplies an AC power cable connector with the AP. The customer supplies
the country-specific 3-wire AC power cable. The supported input voltages are 90-264 VAC
at 50/60Hz.
The APs used in a mesh network generally use AC power.
Power over Ethernet
The customer orders a Ruckus Wireless 60W PoE injector (part number 902-0180-XX00,
where XX is the country code).
The AP can be powered by 60W PoE to support 802.3at PoE Out to 27W. 802.3at (25.5W)
PoE can be supported with 8m (25 ft.) or shorter CAT5e UTP or better cable, and an 8m
(25 ft.) or shorter CAT5e UTP or better input cable. When AC powered and PoE is present,
the AP draws power from the AC connection.

13
Preparing the SC8800-S AP at the Depot and Shipping to the Field
Unpacking the AP
3 Preparing the SC8800-S AP at the Depot
and Shipping to the Field
■ Unpacking the AP
■ AP Connectors and LEDs
■ Powering the AP
■ Configuring the AP for Management by ZoneDirector
■ Configuring the AP for Management by FlexMaster or for Standalone Operation
■ Verifying AP Operation
■ Shipping the AP to the Field
Unpacking the AP
1. Open the ZoneFlex SC8800-S package, and then carefully remove the contents.
2. Return all packing materials to the shipping box, and put the box away in a dry location.
3. Verify that all items listed in
“ Package Contents” and “ Mounting Kit Contents” are
included in the package. Check each item for damage. If any item is damaged or
missing, notify your authorized Ruckus Wireless sales representative.
NOTE: “ Appendix A: Ruckus Wireless-Supplied and Customer-Ordered Parts” on
page 61 includes pictures and descriptions of these and other factory-orderable and
customer-supplied parts.
Package Contents
A complete SC8800-S AP package contains all of the items listed below:
• SC8800-S Outdoor Access Point
• One AC power cable input end connector and cap
• Two M 25 data cable glands
• Service Level Agreement/Limited Warranty Statement
• Regulatory Statement
• Registration card
• Declaration of Conformity
• This Installation Guide
• Mounting kit (refer to
“ Mounting Kit Contents”
for details)

14
Preparing the SC8800-S AP at the Depot and Shipping to the Field
Powering the AP
Mounting Kit Contents
NOTE: “ Appendix A: Ruckus Wireless-Supplied and Customer-Ordered Parts” on
page 61 includes pictures and descriptions of these and other factory-orderable and
customer-supplied parts.
• Main mounting bracket (1 piece)
• U-Joint Bracket (1 piece)
• Small 10mm M6 x 1 Hex Bolt with Lock and Flat Washers (9 sets)
• Hook Bracket (1 piece)
• Large 70mm M8x1.25 hex bolt with spring lock and flat washers (1 set)
• AP Attachment Bracket (1 piece)
• SAE32 steel clamps, 2.5-inch diameter (4 pieces)
Powering the AP
NOTE: You only need to connect one type of power source at this point, even if you are
planning to use both PoE and AC power in your final deployment.
Apply power to the AP using one of these two methods:
•
“ Powering the AP with AC” on page 51
• “ Powering the Access Point with PoE” on page 52
Checking LED Operation
Perform a spot-check using the LEDs to verify that the AP is operating normally. When the
AP is operating normally and no wireless clients are associated with it:
■ The PWR LED is green.
■ The 2.4G and 5G LED shows slow blinking green. This indicates that there are no
wireless clients connected to the AP’s WLAN services.
You have checked the LED operation. Continue with
“ Configuring the AP for Management
by ZoneDirector” on page 15 or “ Configuring the AP for Management by FlexMaster or
for Standalone Operation” on page 17.
/