Page is loading ...

Ruckus Wireless
™
ZoneFlex
™
7762-S Dual-Band 802.11n
Smart Wi-Fi Outdoor Sector Access Point
Installation Guide
Part Number 800-70293-001 Rev B
Published April 2011
www.ruckuswireless.com


i
1 About This Installation Guide . . . . . . . . . . . . . . . . . . . . . . . . . . . . . . . . . . . . . . . . . . . . . . . . 1
Related Documentation . . . . . . . . . . . . . . . . . . . . . . . . . . . . . . . . . . . . . . . . . . . . . . . . . . . 1
Using ZoneDirector or FlexMaster to Manage the Access Point . . . . . . . . . . . . . . . . . . 1
2 Unpacking the ZoneFlex Access Point . . . . . . . . . . . . . . . . . . . . . . . . . . . . . . . . . . . . . . . . . 2
Package Contents . . . . . . . . . . . . . . . . . . . . . . . . . . . . . . . . . . . . . . . . . . . . . . . . . . . . . . . . 2
Mounting Kit Contents . . . . . . . . . . . . . . . . . . . . . . . . . . . . . . . . . . . . . . . . . . . . . . . . . . . 4
3 Before You Begin . . . . . . . . . . . . . . . . . . . . . . . . . . . . . . . . . . . . . . . . . . . . . . . . . . . . . . . . . . 5
Prepare the Required Hardware and Tools . . . . . . . . . . . . . . . . . . . . . . . . . . . . . . . . . . . 5
Get to Know the Access Point Features . . . . . . . . . . . . . . . . . . . . . . . . . . . . . . . . . . . . . . 6
5GHz Antenna Connectors . . . . . . . . . . . . . . . . . . . . . . . . . . . . . . . . . . . . . . . . . . . . . . . 8
Perform a Site Survey . . . . . . . . . . . . . . . . . . . . . . . . . . . . . . . . . . . . . . . . . . . . . . . . . . . . . 9
Determine the Optimal Mounting Location and Positioning . . . . . . . . . . . . . . . . . . . . . 9
Physical Obstructions and Sources of Interference . . . . . . . . . . . . . . . . . . . . . . . . . . . . 9
Sector Coverage and Recommended Downtilt . . . . . . . . . . . . . . . . . . . . . . . . . . . . . . 10
360º Coverage of Deployment Area . . . . . . . . . . . . . . . . . . . . . . . . . . . . . . . . . . . . . . . 12
Become Familiar with the Installation Components . . . . . . . . . . . . . . . . . . . . . . . . . . . 12
Decide How You Will Supply Power to the Access Point . . . . . . . . . . . . . . . . . . . . . . . 14
Connecting Colocated 7762-S Access Points . . . . . . . . . . . . . . . . . . . . . . . . . . . . . . . . . 14
4 Configuring the Access Point. . . . . . . . . . . . . . . . . . . . . . . . . . . . . . . . . . . . . . . . . . . . . . . . 17
Configuring for Management by ZoneDirector . . . . . . . . . . . . . . . . . . . . . . . . . . . . . . . 17
What You Will Need . . . . . . . . . . . . . . . . . . . . . . . . . . . . . . . . . . . . . . . . . . . . . . . . . . . . 17
Step 1: Connect the Cables to the Access Point . . . . . . . . . . . . . . . . . . . . . . . . . . . . . 18
Step 2: Connect the Access Point to the Same Subnet as ZoneDirector . . . . . . . . . 22
Step 3: Disconnect the Access Point from the Power Source . . . . . . . . . . . . . . . . . . . 22
Contents

ii
Configuring for Standalone Operation or for Management by FlexMaster . . . . . . . . 22
What You Will Need . . . . . . . . . . . . . . . . . . . . . . . . . . . . . . . . . . . . . . . . . . . . . . . . . . . . 22
Step 1: Prepare the Administrative Computer . . . . . . . . . . . . . . . . . . . . . . . . . . . . . . . 23
Step 2: Connect the Access Point to the Administrative Computer . . . . . . . . . . . . . 25
Step 3: Log In to the Access Point’s Web Interface . . . . . . . . . . . . . . . . . . . . . . . . . . . 28
Step 4: Configure the Wireless Settings . . . . . . . . . . . . . . . . . . . . . . . . . . . . . . . . . . . . 29
Step 5: Disconnect the Access Point from the Administrative Computer . . . . . . . . . 35
Step 6: Restore the Administrative Computer’s Network Settings . . . . . . . . . . . . . . 35
5 Verifying Access Point Operation . . . . . . . . . . . . . . . . . . . . . . . . . . . . . . . . . . . . . . . . . . . . 37
Connect the Access Point to the Network . . . . . . . . . . . . . . . . . . . . . . . . . . . . . . . . . . . 37
Check the LEDs . . . . . . . . . . . . . . . . . . . . . . . . . . . . . . . . . . . . . . . . . . . . . . . . . . . . . . . . . 37
Associate a Wireless Client with the Access Point . . . . . . . . . . . . . . . . . . . . . . . . . . . . . 37
Check the TR069 Status (FlexMaster Management Only) . . . . . . . . . . . . . . . . . . . . . . . 38
Disconnect the Access Point from the Network . . . . . . . . . . . . . . . . . . . . . . . . . . . . . . . 38
6 Deploying the Access Point . . . . . . . . . . . . . . . . . . . . . . . . . . . . . . . . . . . . . . . . . . . . . . . . . 39
Step 1: Connect and Seal the RJ-45 Cable . . . . . . . . . . . . . . . . . . . . . . . . . . . . . . . . . . . 39
Step 2: Complete the Power Connections . . . . . . . . . . . . . . . . . . . . . . . . . . . . . . . . . . . 40
Step 3: Connect the Access Point to the Network . . . . . . . . . . . . . . . . . . . . . . . . . . . . . 44
7 Attaching the Mounting Brackets . . . . . . . . . . . . . . . . . . . . . . . . . . . . . . . . . . . . . . . . . . . . 46
What You Will Need . . . . . . . . . . . . . . . . . . . . . . . . . . . . . . . . . . . . . . . . . . . . . . . . . . . . . 46
Step 1: Attach the Static Bracket to the Mounting Surface . . . . . . . . . . . . . . . . . . . . . 46
Attaching the Bracket to a Flat Surface . . . . . . . . . . . . . . . . . . . . . . . . . . . . . . . . . . . . 46
Attaching the Bracket to a Pole . . . . . . . . . . . . . . . . . . . . . . . . . . . . . . . . . . . . . . . . . . . 48
Step 2: Attach the Dynamic Bracket to the Access Point . . . . . . . . . . . . . . . . . . . . . . . 51
8 Mounting the Access Point . . . . . . . . . . . . . . . . . . . . . . . . . . . . . . . . . . . . . . . . . . . . . . . . . 53
9 (Optional) Mounting and Connecting the 5GHz External Antennas . . . . . . . . . . . . . . . . 56
Configuring the 5GHz Antenna Gain . . . . . . . . . . . . . . . . . . . . . . . . . . . . . . . . . . . . . . . 57
Maximum Antenna Gain Value . . . . . . . . . . . . . . . . . . . . . . . . . . . . . . . . . . . . . . . . . . . 57
Configure the Antenna Gain from the AP CLI . . . . . . . . . . . . . . . . . . . . . . . . . . . . . . . 57
Configure the Antenna Gain from the ZoneDirector Web Interface . . . . . . . . . . . . . 57

iii
10 Resetting the Access Point to Factory Default Settings . . . . . . . . . . . . . . . . . . . . . . . . . . 59
11 What to Do Next . . . . . . . . . . . . . . . . . . . . . . . . . . . . . . . . . . . . . . . . . . . . . . . . . . . . . . . . . . 63
Change the Administrative Password . . . . . . . . . . . . . . . . . . . . . . . . . . . . . . . . . . . . . . . 63
Configure the Security Settings . . . . . . . . . . . . . . . . . . . . . . . . . . . . . . . . . . . . . . . . . . . . 63
Read Related Documentation . . . . . . . . . . . . . . . . . . . . . . . . . . . . . . . . . . . . . . . . . . . . . 63

iv

1
1 About This Installation Guide
This Installation Guide provides information on how to set up the Ruckus Wireless ZoneFlex
7762-S Dual-Band 802.11n Smart Wi-Fi Outdoor Sector Access Point on your network.
Topics covered in this guide include installation, basic configuration, and device mounting.
This guide is intended for use by those responsible for installing and setting up network
equipment. Consequently, it assumes a basic working knowledge of local area networking,
wireless networking, and wireless devices.
Related Documentation
In addition to this Getting Start Guide, each Ruckus Wireless ZoneFlex 7762-S Outdoor
Access Point documentation set includes the following:
■ User Guide: Provides detailed information on how to configure the Access Point. The
User Guide is available for download on the Ruckus Wireless Support Web site at:
http://support.ruckuswireless.com/documents
■ Release Notes: Provides late-breaking information about the current software release,
including new features, enhancements, and known issues. If the information in the
Release Notes differs from the information in this guide, follow the instructions in the
Release Notes.
■ Online Help: Accessible from the Access Point’s Web interface, the Online Help
provides information that helps you configure the device from the Web interface.
Using ZoneDirector or FlexMaster to Manage the
Access Point
If you are planning to use either Ruckus Wireless FlexMaster or Ruckus Wireless
ZoneDirector to manage the Access Point, this guide describes the required steps that will
enable the Access Point to report to and communicate with FlexMaster or ZoneDirector
successfully.
■ To set up the Access Point for management by ZoneDirector, refer to “Configuring for
Management by ZoneDirector” on page 17.
■ To set up the Access Point for management by FlexMaster, refer to “Configuring for
Standalone Operation or for Management by FlexMaster” on page 22.

2
Unpacking the ZoneFlex Access Point
Package Contents
2 Unpacking the ZoneFlex Access Point
1. Open the Access Point package, and then carefully remove the contents.
2. Return all packing materials to the shipping box, and put the box away in a dry location.
3. Verify that all items listed in Package Contents
below are included in the package.
Check each item for damage. If any item is damaged or missing, notify your authorized
Ruckus Wireless sales representative.
Package Contents
A complete Access Point package contains all of the items listed below:
■ ZoneFlex 7762-S Access Point
■ Small plastic bag containing the Ruckus Wireless PoE injector for ZoneFlex 7762-S AP
■ Box containing the power adapter for the PoE injector
■ Box containing the mounting kit (see “Mounting Kit Contents” for details)
■ Small plastic bag containing the DC connector pins and DC cord connector assembly
(see Figure 1
)
■ Two small plastic bags each containing an RJ-45 waterproofing assembly (see Figure 2)
■ Small plastic bag containing an electrical shunt (for resetting the Access Point to factory
default settings, see Figure 3
)
■ Ground screw
■ Service Level Agreement / Limited Warranty Statement
■ Regulatory Statement
■ This Installation Guide
WARNING: The Ruckus Wireless PoE injector and power adapter (if supplied with your
Access Point) are for indoor use only. Never mount the PoE injector and power adapter
outdoors.

3
Unpacking the ZoneFlex Access Point
Package Contents
Figure 1. DC connector pins and DC cord connector assembly
Figure 2. RJ-45 waterproofing assembly
Boot DC cord connector Coupling ring Connector pins (4 pieces)
Cable clamp housing
RJ-45 connector (on
AP)
Clamping ring
assembly
Rubber O-ring Sealing nut

4
Unpacking the ZoneFlex Access Point
Package Contents
Figure 3. Electrical shunt for resetting the Access Point to factory default settings
Mounting Kit Contents
■ Dynamic bracket
■ Static bracket
■ Steel clamp (2 pieces)
■ Machine screws (8 pieces)
■ Hex bolts (4 pieces)
■ Flat washers (4 pieces)
■ Split lock washers (4 pieces)
■ Wall anchors (4 pieces)
Figure 4. Mounting kit contents
Dynamic bracket Static bracket Steel clamp (2 pieces) Machine screw (8 pieces)
Hex bolt (4 pieces) Flat washer (4
pieces)
Split lock washer (4
pieces)
Wall anchor with metal
cone and hex nut
(4 pieces)

5
Before You Begin
Prepare the Required Hardware and Tools
3 Before You Begin
Before installing and setting up the Access Point, Ruckus Wireless recommends that you
first complete the following pre-installation tasks:
■ Prepare the Required Hardware and Tools
■ Get to Know the Access Point Features
■ Perform a Site Survey
■ Determine the Optimal Mounting Location and Positioning
■ Become Familiar with the Installation Components
■ Decide How You Will Supply Power to the Access Point
Prepare the Required Hardware and Tools
You must supply the following tools and equipment:
■ A notebook computer running Windows 7/Vista/XP/2000 with one wireless 802.11b/
g/n network card (integrated or external) and one Ethernet card (or port) installed
■ A pair of long nose pliers
■ 6mm flathead screwdriver
■ 6mm Phillips screwdriver
■ 10mm ratchet wrench
■ Electric drill with 8mm drill bit (if mounting on a flat surface)
NOTE: At the beginning of each procedure, this guide lists the specific tools, accessories,
and equipment that you will need to complete the procedure.

6
Before You Begin
Get to Know the Access Point Features
Get to Know the Access Point Features
Figure 5 and Figure 6 identify the Access Point features that are relevant to the installation
and mounting instructions that this guide provides. Before you begin the installation
process, Ruckus Wireless recommends that you become familiar with these features.
Figure 5. Access Point parts
Power LED
Status LED
5GHz External
Antenna
Connectors
RJ-45/PoE
Connectors
DC Connector
Ground Screw
PoE IN
PoE OUT

7
Before You Begin
Get to Know the Access Point Features
Table 1. LEDs and connectors on the Access Point
Label Description
Power LED
•Off: No power is available or the Access Point is not connected
to a power source.
•Red: The Access Point is powering on.
• Green: The Access Point is connected to a power source and
has completed its power-on sequence.
Status LED If the Access Point is operating in standalone mode:
• Amber: The WLAN service is up and at least one wireless client
is associated with the AP.
• Flashing amber: The WLAN service is up and no wireless clients
are currently associated with the AP.
If the Access Point is being managed by Ruckus Wireless
ZoneDirector:
• Green: The AP is part of a mesh network (either as a Root AP or
Mesh AP) and is connected to an uplink with good signal. If
mesh networking is disabled but the WLAN service is available,
the Status LED is also green.
• Fast flashing green: The AP is part of a mesh network (as Mesh
AP) and is connected to an uplink with a fair or good signal.
• Slow flashing green: This Mesh AP is searching for an uplink or
is attempting to establish communication with ZoneDirector.
• Off: Mesh networking is disabled and the WLAN service is
unavailable.
RJ45 Connectors Two LAN ports that support Power over Ethernet (PoE):
• PoE IN port: Supports 10/100/1000Mbps connections, connects
to the network and receives 802.at PoE from the supplied PoE
injector (if connected).
• PoE OUT port: Supports 10/100/1000Mbps connections. If the
supplied PoE injector is used, this port can supply 802.af PoE to
the connected PoE-capable device (for example, another
ZoneFlex 7762-S AP or an IP-based surveillance camera). To use
this port to supply PoE, you first need to enable the PoE feature
on the Web interface.
For more information, refer to “(Optional) Enable PoE for the
PoE OUT Port” on page 34.

8
Before You Begin
Get to Know the Access Point Features
5GHz Antenna Connectors
If you want to enable the 5GHz sections of the AP (for access or meshing), you can connect
external high gain antennas (5GHz only) to the standard N-type radio frequency (RF)
antenna connectors on the top panel of the Access Point. For more information, refer to
“(Optional) Mounting and Connecting the 5GHz External Antennas”
on page 56.
Figure 6. The 5GHz antenna connectors are protected by metal caps
DC Connector In addition to PoE, you can also use direct current or DC (from a
battery, for example) to supply power to the Access Point.
NOTE: If you connect the Access Point to both PoE and DC power
sources at the same time, it will use PoE as the primary power
source and DC power as the backup power source.
Table 1. LEDs and connectors on the Access Point
Label Description
Metal caps
Before you install the AP, make a
note of the MAC address on this
label. You will need it later.

9
Before You Begin
Perform a Site Survey
Perform a Site Survey
Before installing the Access Point, perform a site survey to determine the optimal Access
Point placement for maximum range, coverage, and network performance. When
performing a site survey, consider the following factors:
■ Data rates: Range is generally inversely proportional to data rates. The maximum radio
range is achieved at the lowest workable data rate. Higher data rates will generally be
achieved at closer distances.
■ Antenna type and placement: Proper antenna configuration is a critical factor in
maximizing radio range. As a general rule, radio range is increased by installing the
radio higher above the ground with the Access Point mounted in a vertical position
with a 10º to 15º downtilt.
■ Physical environment: Clear or open areas provide better radio range than closed or
filled areas. The less cluttered the operating environment, the greater the wireless
range.
■ Obstructions, building materials, and sources of interference: Physical obstructions,
such as concrete pillars, steel beams, filing cabinets, buildings, or trees, can block or
hinder wireless communication.
For more Access Point placement guidelines, refer to “Determine the Optimal Mounting
Location and Positioning”.
Determine the Optimal Mounting Location and
Positioning
The location and orientation that you choose for the Access Point play a critical role in the
performance and range of your wireless network. Follow these recommendations and
guidelines to determine where to install and how to position the Access Point.
Physical Obstructions and Sources of Interference
In general, Ruckus Wireless recommends that you install the Access Point away from
obstructions and sources of interference.
Avoid installing the Access Point in an environment where obstructions exist between
sending and receiving devices. A number of machines and electronic devices that emit
radio waves – cranes, wireless phones, microwave ovens, satellite dishes – interfere with
and/or block wireless signals. Building materials used in construction also influence radio
signal penetration. For example, drywall construction permits greater range than concrete
blocks.

10
Before You Begin
Determine the Optimal Mounting Location and Positioning
Sector Coverage and Recommended Downtilt
The 7762-S AP uses a built-in 120-degree sector antenna with a 30-degree vertical
beamwidth for its 2.4GHz radio. To enable the AP to cover its immediate area effectively
and, at the same time, extend its wireless coverage farther using this radio, Ruckus Wireless
recommends mounting the AP in a vertical position with a 10- to 15-degree downtilt (see
Figure 7
).
Figure 7. Recommended downtilt and orientation for maximum horizontal plane
coverage
30º vertical
beamwidth
10º-15º downtilt
recommended for
extended coverage

11
Before You Begin
Determine the Optimal Mounting Location and Positioning
Figure 8. The 7762-S provides a 120º horizontal beamwidth
120º horizontal
beamwidth

12
Before You Begin
Become Familiar with the Installation Components
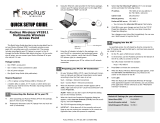
360º Coverage of Deployment Area
If your deployment scenario requires wireless coverage in all directions, you can deploy
three colocated 7762-S APs and mount them on the same pole or mast in such as way that
together they provide 360 degrees of coverage.
Figure 9
illustrates how three 120-degree sector antennas (that are built into the 7762-S
APs) provide 360-degree coverage. These three sector antennas provide higher gain than
a single omnidirectional antenna can offer while having a broad vertical radiation angle.
Figure 9. Three colocated 7762-S APs provide 360-degree coverage
NOTE: If you are deploying colocated APs to provide a 360-degree area of coverage,
make sure you read “Connecting Colocated 7762-S Access Points” on page 14.
Become Familiar with the Installation Components
The Access Point can be installed in an indoor or outdoor environment, such as an interior
wall or ceiling or on the exterior roof overhang of a building or on a streetlight pole. Refer
to Figure 10
for the components involved in a typical installation.
Take note of the components that must be installed indoors or outdoors. The PoE injector
and power adapter that are shipped with the Access Point are for indoor use only. Ruckus
Wireless also strongly recommends that you form a drip loop on any cable that is
connected to devices that are installed outdoors under the Access Point. It is also a good
idea to include a drip loop at the entry point going through a wall.
120º coverage
120º coverage
120º coverage

13
Before You Begin
Become Familiar with the Installation Components
Figure 10. Typical installation components using both PoE and DC power sources
NOTE: The 7762-S has a built-in surge protector that is based on the GR-1089 standards.
If your deployment requires a higher level of surge protection, you can install an external
surge protector.
WARNING: Only trained and qualified personnel should be allowed to install, replace,
or service this equipment.
WARNING: Installation of this equipment must comply with local and national electrical
codes.
CAUTION: Make sure that you form a 3”-5” drip loop in any cable that is attached to the
Access Point (form the drip loop near the AP). This will prevent water from running along
the cable and entering the Access Point. Also add a second drip loop at the point of entry
through the wall.
CAUTION: Be sure that grounding is secure at both ends, that it connects to a reliable
ground, and that it meets local and national electrical codes. For additional lightning
protection, use lightning rods and lightning arrestors.
.
INDOOR
OUTDOOR
DC power
source
Router or switch
PoE injector
ZoneFlex 7762-S
Outdoor AP
PoE power
adapter
Outdoor-
rated Cat5e
FTP cable
Drip
loop
DC cable
Ground rod
Ground
screw
18 AWG
min green-
and-yellow
wire
18 AWG min
green-and-
yellow wire
Ground rod
Ground rod
Outdoor-
rated Cat5e
FTP cable
Drip
loop
Drip
loop
Drip
loop
18 AWG min
green-and-
yellow wire

14
Before You Begin
Decide How You Will Supply Power to the Access Point
WARNING: The Ruckus Wireless PoE injector (if supplied with your Access Point) is for
indoor use only. Never mount the PoE injector outdoors with the Access Point.
Decide How You Will Supply Power to the Access
Point
The Access Point supports Power over Ethernet (PoE) and 12V DC power and can be
connected to both power sources at the same time. If you connect the Access Point to
both PoE and DC power sources at the same time, it will use 12V DC power as the primary
power source and PoE as the backup power source.
Connecting Colocated 7762-S Access Points
If you are deploying colocated 7762-S APs, Ruckus Wireless strongly recommends that you
provide a separate Ethernet connection for each of the APs, instead of daisy-chaining
them. Separate Ethernet connections for each AP will help ensure maximum backhaul and
client throughput.
/