Page is loading ...

3
When working with Access for the first time, it is tempting to start filling tables
right away and querying data to get fast results, but it is important to under-
stand the basics of the relational database concept before pounding away at
data. A good understanding of how a relational database works will help
you take full advantage of Access as a powerful data analysis solution. This
chapter covers the fundamentals of Access and methods to bring data into the
program.
Access Table Basics
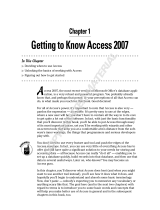
Upon opening Access, you notice that the Database window, shown in Figure
1-1, has seven sections. Each section represents one of the seven database
objects: tables, queries, forms, reports, pages, macros, and modules. The
“Tables” selection is at the top of the list, because it is the precise location
where your data will be stored. All other database objects will refer to the
Access tables for data, whether asking questions of the data or creating reports
based on the data. This section covers the basics to get you working with
Access tables immediately.
Access Basics
CHAPTER
1
05_59978X ch01.qxp 12/1/05 7:46 PM Page 3
COPYRIGHTED MATERIAL

Figure 1-1 The Database window has seven main sections you can
work with: Tables, Queries, Forms, Reports, Pages, Macros, and Modules.
What is a table?
One way to think of a table is as a collection of data concerning a specific entity
(for example, customers, branches, transactions, products, and so on). You
want each of these entities to have its own unique table. Among the many
advantages to storing your data using this approach is eliminating or signifi-
cantly decreasing duplicate information. Later in the chapter, you learn about
the dangers inherent in storing data with excessive duplications.
Opening a table in Datasheet view
Open your sample database, click the Tables section (highlighted in Figure
1-1), and then double-click the CustomerMaster table. When the table opens, it
is in the Datasheet view. In this view, you are able to directly view and edit the
contents of the table. As you can see in Figure 1-2, the names of the columns
are at the top.
Identifying important table elements
Access tables consist of rows, with each row representing a single instance of
the table name or entity. In CustomerMaster, each row represents a single dis-
tinct customer with which the firm does business. In proper database termi-
nology, a row is called a record.
The table also comprises columns, with each column representing a particu-
lar piece of information common to all instances of the table’s entity. In Cus-
tomerMaster, each column represents some attribute of the customer that you
want to record. In proper database terminology, a column is known as a field.
4 Chapter 1
05_59978X ch01.qxp 12/1/05 7:46 PM Page 4

Figure 1-2 Opening the table in Datasheet view allows you to view and edit
the data stored in the table.
TIP The number of records in a table is visible at the bottom left of the
Datasheet view, next to the record selectors.
Opening a table in Design view
Through the Design view of a table, you are able to set the field names and
data types. To get to the Design view of the CustomerMaster table, right-click
the CustomerMaster table and select Design View. As you can see in Figure
1-3, the Design view shows you the fields that comprise the CustomerMaster
table in an easy-to-manage view. Note how each field has a field name and a
data type. Data types are discussed later in this chapter.
The field name is the descriptive text string given to a particular column of a
table. It is what appears at the top of the table when it is in the Datasheet view.
Follow these guidelines when naming your fields:
■■
The maximum length of a field name is 64 characters.
■■
Your field name cannot include a period (.), an exclamation point (!), an
accent grave (`), or brackets ([ ]).
■■
You can begin your field name with leading spaces.
TIP It is good practice not to put any spaces in your field names. When
constructing queries or referring to tables in VBA code, spaces in the field
names can lead to problems. If you need to indicate a space in your field name,
use the underscore character.
Access Basics 5
05_59978X ch01.qxp 12/1/05 7:46 PM Page 5

Figure 1-3 Opening the table in Design view allows
you to add field names or change existing ones.
Exploring data types
The field’s data type ensures that only a certain type of data is allowed in the
field. If a data type is tagged as a number, Access will not allow any text to be
entered into that field. By setting the data type of each column, you go a long
way toward ensuring the integrity and consistency of the data. The concept of
the data type is crucial to not only understanding Access, but also to unlocking
the power of the programming language behind Access, VBA. Quite simply,
computers process and store data and that data is categorized by its type.
With the CustomerMaster table left open in Design view, place your cursor
in the Data Type section of the first field and click the drop-down arrow shown
in Figure 1-3. Alist of predefined data type choices becomes visible. These data
types are Text, Memo, Number, Date/Time, Currency, AutoNumber, Yes/No,
OLE Object, and Hyperlink. The following sections describe these data types
in more detail.
Text
Any combination of letters, numbers, spaces, and characters is considered
Text. This is by far the most common data type. Although Text can be a num-
ber, it should not be a number used in a calculation. Examples of the Text data
type are customer names, customer numbers (using customer numbers in cal-
culations would have no meaning), and addresses. The maximum number of
characters allowed in a Text field is 255.
6 Chapter 1
05_59978X ch01.qxp 12/1/05 7:46 PM Page 6

Memo
If you need to store text data that exceeds the 255-character limit of the Text
field, you should use the Memo field. Long descriptions or notes about the
record can be stored in fields of this type.
Number
The Number type is used for all numerical data that will be used in calcula-
tions, except money or currency (which has its own data type). Actually, Num-
ber is several data types under one heading. When Number has been selected
as a data type in the Design view of the table, go to the Field Size field at the
top of the General tab. When you select the down arrow, you get the following
options: Byte, Integer, Long Integer, Single, Double, Replication ID, and Deci-
mal. Probably the most common field sizes of the Number data type are Long
Integer and Double. Long Integer should be selected if the numbers are whole
numbers that do not have any non-zeros to the right of the decimal point. Dou-
ble should be selected if decimal numbers need to be stored in that field.
Date/Time
Another data type often used in calculations is Date/Time. Recording the time
that certain events occurred is among the more important uses of this data
type. Recording dates and times allows you to compare data by time dura-
tions, be it months, years, or whatever. In the business world, the Date field
can be crucial to analysis, especially when identifying seasonal trends or mak-
ing year over year comparisons.
Currency
Currency is a special calculation data type, ideal for storing all data that repre-
sents amounts of money.
AutoNumber
This data type is actually a Long Integer that is automatically and sequentially
created for each new record added to a table. The AutoNumber can be one
mechanism by which you can uniquely identify each individual record in a
table. You will not enter data into this field.
Yes/No
In some situations, the data that needs to be represented is in a simple Yes/No
format. Although you could use the Text data type for creating a True/False
field, it is much more intuitive to use Access’s native data type for this purpose.
Access Basics 7
05_59978X ch01.qxp 12/1/05 7:46 PM Page 7

OLE Object
This data type is not encountered very often in data analysis. It is used when
the field must store a binary file, such as a picture or sound file.
Hyperlink
When you need to store an address to a Web site, this is the preferred data type.
Preparing to create a table
Before you start creating a table, you need to answer the following questions:
■■
What is the name of the table? What is the entity for which you would
like to collect and store data?
■■
What are the names and types of columns or fields? Which attributes of
this particular entity do you need to record/store? What are the appro-
priate data types of these fields?
■■
How can you identify each instance of the entity uniquely?
Keep in mind that to take full advantage of Access, you may have to split
data that was previously stored in one large dataset into separate tables. For
example, think of a flat-file list of invoice details in Excel. Typically, this list
would repeat Invoice Header information for each individual detail of that
invoice. In order to eliminate as much of the duplicate data as possible, you
would divide the single list into two logical parts: InvoiceHeaders and
InvoiceDetails. Each unique Invoice will be listed only once in the Invoice-
Headers table. All of the details for that invoice will be in the InvoiceDetails
table. Given this structure, Access will be able to recognize a relationship
between the two tables.
Different methods for creating a table
Access provides different methods for creating a table. You can, for example,
use the Datasheet view, the Design view, or the Table Wizard. For users new to
Access, the Table Wizard provides an excellent opportunity to walk through
the process. Tables are also created automatically when you import data from
an outside source, such as an Excel spreadsheet. An Access table can also be a
link to a table outside of the database. Importing and linking are covered later
in this chapter.
8 Chapter 1
05_59978X ch01.qxp 12/1/05 7:46 PM Page 8

If you are neither importing nor linking data, the ideal way to create a table
in Access is with the Design view. You looked at the Design view previously
and saw that it is essentially a list of columns and data types in the table. Here
you can enter the names of every column and its matching data type.
Creating a table with Design view
Imagine that a company’s human resources department asks you to create a
simple list of employees in Access. To create a table in Design view, select
Insert → Table. This opens the New Table dialog box shown in Figure 1-4.
You must now create a list of attributes, or fields, that describe each
employee in a particular way. Among the more common attributes in this sit-
uation are the following: EmployeeNumber, FirstName, LastName, Address,
City, State, Zip, and HourlyWage. You begin by entering the names of the
columns going down the list.
Default data type
As you enter the field names, you may notice that the data type defaulted to
the most common data type, Text. You now want to set the data types for each
field, or at least change the data type of each non-text field. Choosing the cor-
rect data type for the first field, EmployeeNumber, may be initially confusing.
With the word “Number” in the field, you might think that Number would be
the logical choice for the data type. Actually, the rule of thumb is that if the
field will not be used in a calculation, it is best to set its data type to Text. There
is no logical meaning to performing calculations on the EmployeeNumber
field. It is highly unlikely that adding two values from this column would give
you information of any significance. Another reason for using the Text data
type in the EmployeeNumber field is that there could be alpha characters or
letters in the field.
Data types for calculations
The field names for this particular table should make it fairly obvious that you
will want to set all of the fields to Text, except when it comes to HourlyWage.
This field will almost certainly be used in calculations. For example, multiply-
ing an employee’s hourly wage by 40 will get you his or her weekly salary. So,
because this field will certainly be used in calculations, and because it will rep-
resent a monetary value, you should change the data type to Currency. At this
point, your Design view should look similar to the screen shown in Figure 1-5.
Access Basics 9
05_59978X ch01.qxp 12/1/05 7:46 PM Page 9

Figure 1-4 Open the New Table dialog
box and double-click Design View.
Now you can save and name your table by selecting File → Save. Give the
table an appropriate name, such as “Employees” or “EmployeeMaster.” Keep
in mind that at this point, this table contains no data. You can start entering
employee information directly into the table through the Datasheet view. If
you have a table with a small number of records, you can enter your records
manually. However, most sets of data are quite large, so other techniques of
bringing data into Access are covered later in the chapter.
Figure 1-5 After entering the field name, the data
type defaults to Text.
10 Chapter 1
05_59978X ch01.qxp 12/1/05 7:46 PM Page 10

Tricks of the Trade: Working with the Field Builder
A great tool for beginning Access users is the Field Builder. It works as a wizard
to help you build your table and also gives you practice selecting data types. In
the Design view, select the column for which you would like to build a field and
click the Build button on the toolbar. In Figure 1-6, you can see what the Field
Builder looks like.
Figure 1-6 The Field Builder utility can help you build your table with just a few
clicks of the mouse.
The Field Builder provides a collection of sample tables, each with their own
sample fields. It is very likely that you will find a field equivalent to what you
would like to create in this list. When you select a field, not only will the name
of the field be added to the Design view of the table, but the suggested data
type will be added for you as well. This can be a great way to teach yourself
about data types. Simply create a dummy table and choose the fields that
interest you or that you might potentially need in the future. Then, after
selecting each item, check to see what data type was automatically populated
in the list. Look at different Number fields and pay attention to different
settings for the Field Size in the Number data type.
Advanced Table Concepts
Now that you can create a table and manually enter data into it, this section
turns to more advanced table concepts. When working with data in tables, you
may encounter situations in which you want to restrict or default data that is
entered in particular columns. There is also the question of being able to
uniquely identify each record in any given table.
Access Basics 11
05_59978X ch01.qxp 12/1/05 7:46 PM Page 11

Field properties
After entering field names, data types, and descriptions, you can set individ-
ual field properties for each column, which will affect how the data is stored
and presented, among other things. The list of field properties is dependent on
the data type chosen for that field. Some field properties are specific to Text
fields, and others are specific to Number fields. The field properties are located
in the Design view of a table on the General tab at the lower left. The following
sections cover the more important ones.
NOTE Note that the properties shown on the General tab change to reflect
the data type you choose.
Field Size
You encountered Field Size before, when working with the Number data type.
This property also exists for the common Text data type. This property allows
you to set a maximum size limit on data entered in that column. For the Text
data type, size refers to the length (number of characters and spaces) of the
Text data in that column. For example, if you look at the Employees table, you
see a field for State. Your company tells you that the names of states should be
recorded using their two-letter designation. If you therefore set the field size to
“2” for the State column, the user will be unable to type any text longer than
two characters. So with Access, you are not only able to force a certain data
type in a particular column, but you can also customize that individual col-
umn to accept data only in the rigid format that you specify.
Format
The Format property enables you to customize the way numbers, dates, times,
and text are displayed and printed. As with the Field Size property, the format
available for selection will depend on the data type of that column. For exam-
ple, with a Currency field, you can display the data in a form that uses a dollar
sign, or a Euro sign, or no sign at all. The data itself will not be changed with
these settings, just how the data is displayed. Format is especially useful when
it comes to Date/Time data types. Whether you want to display data in the
long format or short format, this property allows you to set that option.
12 Chapter 1
05_59978X ch01.qxp 12/1/05 7:46 PM Page 12

Input Mask
The Input Mask property can be useful in data entry situations. Whereas For-
mat controls how data is displayed, Input Mask controls how data is entered
into a particular field. Input Mask is available for the following data types:
Text, Number, Date/Time, and Currency. For example, if a user needs to enter
a telephone number, Input Mask can create the characters and structure with
which everyone is familiar. As the user types, the number automatically
assumes a phone number format: (###) ###-####.
Decimal Places
In number fields, you can set the number of decimal places that will be
recorded to the right of the decimal point. There is an Auto setting, which will
defer to the Format setting to determine the correct number of places. Apart
from Auto, you are able to select 0 to 15 for the number of decimal places.
Access Basics 13
USING THE INPUT MASK WIZARD
There is an extremely helpful tool called the Input Mask Wizard. To call this
wizard, place your cursor inside the field for which you need an input mask.
This will make visible a button with the ellipsis dots (...). Click the newly visible
button to activate the Input Mask Wizard. The wizard provides the most
common examples of Input Masks and even allows you to test their behavior.
Figure 1-7 shows the Input Mask Wizard.
Figure 1-7 The Input Mask Wizard enables you to
specify the structure of data being entered into a field.
05_59978X ch01.qxp 12/1/05 7:46 PM Page 13

Default Value
An important database concept, Default Value can help save time in the data
entry process. The default value is automatically placed in a column every
time a new record is added. Defaults can be overridden, so your column is not
forced to have only that particular value.
Required
Another important property, Required simply forces a user to enter some
value, using the proper data type, in the designated field. A new record will
not be added if the Required field is not properly filled. As with Input Mask,
this property is an excellent mechanism for asserting more control over the
data entry process.
Primary key
You will recall that earlier in the chapter, you needed to ask yourself three
questions to determine just how a new table was to be created. The third ques-
tion specified that you need a way to identify or reference every record. In
other words, there needs to be some unique text or number column that will
have no duplicate values, in much the same way that Social Security numbers
uniquely identify individuals. Each person has one and only one Social Secu-
rity number. By definition, you cannot have a Social Security number that rep-
resents two people. This unique column is known as a primary key and it is the
mechanism by which you relate different tables to each other.
To set the primary key, right-click the field that could be a primary key can-
didate and select Primary Key.
At this point, Access will automatically determine if that particular field
contains duplicate data—that is, data items that exist in more than one row.
If there are duplicates, Access informs you with an error message. You must
remove any duplicates if that column is indeed to become the primary key for
the table.
TIP Access provides its own automatic primary key with the AutoNumber data
type. The AutoNumber simply increments one for each record added, so there
will be no duplicates. However, it is preferable to use actual data for a primary
key and not just some number that indicates the record’s position in a table.
If every employee has a unique employee number, that field would be an ideal
primary key. If you have a situation where there is no unique single column,
consider using a combination of columns that together make up a unique
record. You can set multiple columns to be the primary key; this is called a
Compound Key. It has the effect of combining separate columns to represent a
single, unique value.
14 Chapter 1
05_59978X ch01.qxp 12/1/05 7:46 PM Page 14

Tricks of the Trade: Sorting and Filtering for On-the-fly Analysis
There is inherent functionality within Access that can assist you in performing
quick, impromptu data analysis.
SORTING
It is significantly safer to sort data in an Access table than in an Excel
spreadsheet. One of the potential problems with sorting data in Excel has to do
with the free-form nature of a spreadsheet, which allows you to inadvertently
sort only one column in your dataset. With Access, you do not have to worry
about the impact on presentation when you sort. The data is separate from the
presentation.
Open up a table in the Datasheet view and select the column you want to
sort. That is, click the gray box with the column name once. This action should
highlight the entire column. Once your column is highlighted, right-click and
then select Sort Ascending or Sort Descending from the popup menu shown in
Figure 1-8.
Figure 1-8 From the right-click menu, you can choose to
sort a column in ascending or descending order.
FILTERING
Another extremely useful table function is Filter By Selection and Filter
Excluding Selection. The idea behind these filters is that you will click a single
data value in a record. Choosing Filter By Selection then hides all records that
do not have that particular value in that particular column. This can be an
excellent method to perform fast analysis.
Suppose you have a list of employees and you want to quickly know how
many are in California. Find a record—any record—whose state is California,
then click in the State column of that record. After filtering by selection, only
records with California as the state will be visible. The non-California records
are not deleted; they are just temporarily hidden by the filter.
continues
Access Basics 15
05_59978X ch01.qxp 12/1/05 7:46 PM Page 15

To demonstrate this functionality in action, open the CustomerMaster table
and right-click in the State column. The popup menu shown in Figure 1-9
activates. Type CA in the Filter For text field to filter only those customers based
in California.
Figure 1-9 The Filter For functionality
allows you to filter your data on-the-fly.
You can easily remove the filter and restore the table to its natural state by
clicking the following: Records → Remove Filter/Sort. Another useful filter
works in the opposite manner. The Filter Excluding Selection hides all records
that have the same value in the column that you clicked. Going back to our
example, if a user selects a record with California as its state, the Filter
Excluding Selection hides all records where the state is California. All records
with that data value have been temporarily hidden from view.
Getting Data into Access
Now that you have learned basic and advanced table concepts, you are ready
to bring data from outside sources into Access. Apart from creating a table
from scratch and manually entering the data, the two main methods for bring-
ing data into Access are importing and linking.
16 Chapter 1
05_59978X ch01.qxp 12/1/05 7:46 PM Page 16

Importing
With importing, you are making a copy of the data and filling a newly created
table with the copied data. After importing, the data is disconnected from the
source from which it was imported. If any future changes are made to the out-
side source, they will not be reflected in the Access data. This is true in the
other direction, in that changes to your Access data will not affect the original
source. After importing a table, it is common to treat that Access data as the
true data source. Any updating, appending, or deleting will be done to the
Access data. Then, when it is time to analyze the data, you can be sure it
reflects the latest, most accurate version of that data.
Linking
When you link a table to Access, you are creating a pointer to another data
source. When the Access database is opened, it establishes links to its outside
data source and displays the data as if it were a regular local Access table.
However, there is no data residing in Access. The data is physically located on
another computer, server, or source. If you change the data in the Access table,
the true data source will reflect that change. If you change the original data
source, those changes will be reflected when you reopen the linked table.
Things to remember about importing data
Your decision whether to import or link data depends on the situation. When
you import data, it resides directly in the Access file, so operations on that data
perform much faster. With linked tables, you may be dependent on the speed
of the connection with the data source or the speed of the database engine at
the other end.
One important point to remember is that when importing data, you can select
to create a new table or import your data into an existing table. If you choose to
create a new table, Access makes a copy of the data to import, then attempts to
determine the column names and field data types. Access may make an incor-
rect assumption about the data type, but you can go back and make the neces-
sary changes. If you choose to import data to an existing table, you must make
sure that the data types of the fields are compatible. If you attempt to import a
text string into a number field, for example, an error will occur.
Access Basics 17
05_59978X ch01.qxp 12/1/05 7:46 PM Page 17

WARNING It is important to remember that Access does not let go of disk
space on its own. This means that as time goes on, all the file space taken up
by the data you imported will be held by your Access file, regardless of whether
or not the data is still there. With that in mind, it is critical that you “compact
and repair” your Access database regularly to ensure that your database does
not grow to an unmanageable size, or even worse, become corrupted. To
compact and repair your database, simply select Tools → Database Utilities →
Compact and Repair Database.
Importing data from Excel spreadsheets
You can import data from a wide variety of sources into Access tables: Excel
spreadsheets, text files, or another database table. Access provides a set of
easy-to-use Import wizards, such as the one illustrated in Figure 1-10, that
guide you through the process of importing data.
If you are importing a properly formatted Excel flat file, the wizard prompts
you to ask if the top line is the location of the column names. Another
extremely useful feature of this wizard is that it lets you select a column to
serve as the primary key of the table or it will add an AutoNumber primary
key. If you select a column to serve as the primary key, the wizard performs a
test on the column to ensure against duplicate values. If duplicate values exist
in that column, the wizard informs you that it cannot set that column as the
primary key and the table is imported anyway.
Figure 1-10 The Import Spreadsheet Wizard displays
sample data from the worksheet selected in the display.
18 Chapter 1
05_59978X ch01.qxp 12/1/05 7:46 PM Page 18

TIP The Import Spreadsheet Wizard attempts to make an educated guess as
to what data type to set for each column. Still, it is a good idea to check the
data type of each column after importing the data, because you may need to
make some changes.
Importing data from text files
Similar to importing data from spreadsheets, the data in text files must be in a
consistent format in order for the wizard to extract the information correctly.
Typically, the data in text files is delimited (separated) by commas. Access will
properly interpret this and separate the data located between the commas into
their appropriate fields. Usually someone in I.T. will prepare a text file of data
for the analyst, or it can be an output of a mainframe application.
The Relational Database Concept
A relational database is a database that is structured around shared attributes
between two or more datasets. In a relational database, data is stored in tables
based on logical characteristics to minimize redundancy and to improve data
integrity. Access is a relational database. If you want to understand just how
Access works, you need to understand the relational database concept.
Excel and the flat-file format
The term flat file is used to describe a single table that has a two-dimensional
structure consisting of rows and columns. Although flat files are generally
easy to use and understand, they contain lots of redundant data and virtually
no inherent mechanisms to protect data integrity. When you are working with
data in an Excel file, you are working with a flat file.
Some data analysis scenarios are not terribly complex, which means that a
flat-file representation of the data to be analyzed is adequate. However, most
data-analysis scenarios require analyzing data that is much more multi-
dimensional. One of the main reasons the flat file can prove inadequate is that
it is two-dimensional. Real-world business data rarely falls into a convenient,
two-dimensional format. Of course, it can be forced into that format by the
Excel guru who wants all analysis to fit into the spreadsheet. Take a look at a
typical example of a flat file. Figure 1-11 shows a typical flat-file list of invoices.
Access Basics 19
05_59978X ch01.qxp 12/1/05 7:46 PM Page 19

Figure 1-11 Data is usually stored in an Excel spreadsheet using the flat-file format.
In order to get the customer information for each invoice, several fields exist
for customer-specific information: customer name, address, city, and so on.
Because most firms sell to customers more than once, you can see that cus-
tomer information is often repeated. Duplicate information is one of the main
drawbacks of the flat-file format.
What is wrong with duplicate data? Initially, the duplicate data may not
appear to be a potential source of future problems, but upon further examina-
tion, you discover the shortcomings. First is file size. Duplicate data wastes
space, both on the computer hard drive, where the file is stored, and in the
computer’s memory, where the data resides when it is being operated on.
Although the enormous amounts of memory that are standard with today’s
machines go a long way toward handling excessive demands, having dupli-
cate data wastes valuable computer space and resources. The duplicate infor-
mation is not valuable to us. In fact, it leads to problems, particularly when
data needs to be updated. As you can see in Figure 1-11, a number of different
invoices have been recorded for CORRUL Corp. You can also see that the
information for CORRUL Corp. is repeated for every invoice. What if COR-
RUL Corp.’s customer information changes, though? What if it acquires new
office space and you want to reflect this change of location in your data? You
would have to update the change in several different places, ensuring that
every invoice correctly maps back to its relevant customer information.
Although excellent functions are available that can find and replace data in
Excel, there is still a danger that you might not make all of the updates cor-
rectly. Whenever you are changing the same, duplicate information, the risk of
introducing unintentional errors is always present. This could significantly
affect your data analysis. For example, suppose that CORRUL Corp. moved to
a different city. Figure 1-12 demonstrates how easy it is to incorrectly update
the data.
20 Chapter 1
05_59978X ch01.qxp 12/1/05 7:46 PM Page 20

Figure 1-12 The last record of CORRUL Corp. was not correctly updated to the new
address.
If the City data is not properly updated everywhere, when you attempt a by
city filter/analysis, you will not get accurate results. Some of the invoice
records could reflect the incorrect state locations of the customer. The attrib-
utes of data can and often do change, and if these changes are not accurately
recorded, your data analysis will provide an incorrect picture of the actual
situation.
Splitting data into separate tables
Data must be consistent if analysis is to have any true value in the decision-
making process. Duplicate data is the bane of consistent data. If an entity is
changed in one place, it must be changed everywhere. Wouldn’t it be more
logical and efficient to record the name and information of a customer only
once? Instead of recording the same customer information repeatedly, you
could simply have some form of customer reference number, which could then
send you to another list where the information is unique and written once.
This brings us back to the relational database concept, which enables you to
have separate, carefully designed unique lists of data that are related to one
another by their unique identifiers (primary key).
Many Excel users, in fact, without realizing it, make great efforts to make the
data on their spreadsheets “relational.” For example, the use (or overuse) of
the VLOOKUP or HLOOKUP helps you match data from separate lists that
have some data field or key in common. Although much is possible with these
functions, they do have their limitations. Furthermore, the functions are not
very intuitive. They attempt to solve a problem that Access was designed from
the ground up to address. When Excel users use these functions to bring data
from separate lists onto a single row, they are in essence creating a relationship
Access Basics 21
05_59978X ch01.qxp 12/1/05 7:46 PM Page 21

of that data. The problem is that the data has not really been related; it has
simply been shown how it could relate to each other on a particular spread-
sheet tab. A different tab may choose to “relate” the data in a completely dif-
ferent way.
The problem for the analyst is that if there were relationships between the
data that were consistent or even permanent, it would be easier to somehow
reflect them in a behind-the-scenes representation of the data. Some of the data
relationships can be quite complex, and if the analyst is forced to remember
and manually enforce all of them, analysis is detracted from and the possibil-
ity of mistakes increased.
Foreign key
To set relationships between tables, you take a primary key field from one
table and use it to relate that entity to records in another table. When the
primary key is used in a different table in order to establish relationships,
it is called a foreign key. In the TransactionMaster table, for example, you
see a Customer_Number field. This is the same primary key field from the
CustomerMaster table.
Relationship types
Three types of relationships can be set in a relational database:
■■
One-to-one relationship. For each record in one table, there is one and
only one matching record in a different table. It is as if two tables have
the exact same primary key. Typically, data from different tables in a
one-to-one relationship will be combined into one table.
■■
One-to-many relationship. For each record in a table, there may be
zero, one, or many records matching in a separate table. For example, if
you have an invoice header table related to an invoice detail table, and
the invoice header table uses Invoice Number as the primary key, the
invoice detail will use the Invoice Number for every record represent-
ing a detail of that particular invoice. This is certainly the most common
type of relationship you will encounter.
■■
Many-to-many relationship. Used decidedly less often, this type of
relationship cannot be defined in Access without the use of a mapping
table. This relationship states that records in both tables can have any
number of matching records in the other table.
In the sample database, relationships have already been established
between the tables. Take a look at some of these relationships in order to get a
better idea of how they can be set and changed. In the Tools menu, select Rela-
tionships so you can view the relationships that have already been set. As
shown in Figure 1-13, the lines between the tables signify the relationships.
22 Chapter 1
05_59978X ch01.qxp 12/1/05 7:46 PM Page 22
/