Black & Decker GL650 Owner's manual

Category
Grass trimmers
Type
Owner's manual

This manual is also suitable for

2
English 8
Svenska 16
Norsk 23
Dansk 30
Suomi 37
Copyright Black & Decker
8
ENGLISH
GRASS TRIMMER
GL650/GL660/GL660P/GL670/GL670P
CONGRATULATIONS!
You have chosen a Black & Decker tool. Our aim is
to provide quality tools at an affordable price.
We hope that you will enjoy using this tool for
many years.
EC DECLARATION OF CONFORMITY
GL650/GL660/GL660P/GL670/GL670P
Black & Decker declares that these
products conform to: 98/37/EC,
89/336/EEC, 73/23/EEC, EN 60335,
EN 55014, EN 61000
Level of sound pressure, measured according to
84/538/EEC:
GL650 GL660 GL670
GL660P GL670P
L
pA
(sound pressure) dB(A) 83 83 83
L
WA
(acoustic power) dB(A) 96 96 96
Always wear ear protection if the sound
pressure exceeds 85 dB(A).
Hand/arm weighted vibration value according to
98/37/EC:
GL650 GL660 GL660P GL670 GL670P
< 2.5 m/s
2
< 2.5 m/s
2
< 2.5 m/s
2
< 2.5 m/s
2
< 2.5 m/s
2
Brian Cooke
Director of Engineering
Spennymoor, County Durham DL16 6JG,
United Kingdom
INTENDED USE
Your Black & Decker grass trimmer GL650/GL660/
GL660P/GL670/GL670P has been designed for
trimming and finishing lawn edges and to cut
grass in confined spaces. This tool is intended for
consumer use only.
SAFETY INSTRUCTIONS
Warning symbols
The following symbols are used in this manual:
Denotes risk of personal injury, loss of life
or damage to the tool in case of non-
observance of the instructions in this
manual.
Denotes risk of electric shock.
Read the manual prior to operation.
Know your appliance
Warning! When using mains-powered
appliances, basic safety precautions,
including the following, should always
be followed to reduce the risk of fire,
electric shock and personal injury.
Read all of this manual carefully before
operating the appliance.
Before operating the appliance, make
sure that you know how to switch it off
in an emergency.
The intended use is described in this
manual. The use of any accessory or
attachment or performance of any
operation with this appliance other than
those recommended in this instruction
manual may present a risk of personal
injury.
Retain this manual for future reference.
9
ENGLISH
Work area
Do not expose the appliance to rain. Do not
use the appliance in damp or wet conditions.
Only use the appliance in daylight or good
artificial light.
Personal protection
Wear stout shoes or boots to protect your feet.
Do not operate the appliance wearing open-
toed sandals or when barefoot.
Wear long trousers to protect your legs.
Using your appliance
Be sure that the appliance is switched off when
plugging in.
Stay alert. Watch what you are doing.
Use common sense.
Do not operate the appliance when you are
tired.
If the appliance begins to vibrate abnormally,
switch it off and remove the plug from the
socket. Allow rotating parts to stop and inspect
the appliance for damage and loose parts.
Never pull the cord to disconnect the plug
from the socket. Keep the cord away from
heat, oil and sharp edges.
If the mains cable is damaged during use,
switch the appliance off and disconnect the
plug from the mains immediately. Do not
touch the mains cable before disconnecting
from the mains.
Safety of others
Do not allow children or any person unfamiliar
with these instructions to operate the appliance.
Do not allow children, visitors or animals to
come near the work area or to touch the
appliance or mains cable.
Remember that the operator may be held
responsible for accidents or hazards occurring
to other people or their property.
After use
Switch off, remove the plug from the socket
and ensure that moving parts have stopped
rotating before leaving the appliance
unattended and before changing, cleaning or
inspecting any parts of the appliance.
When not in use, the appliance should be
stored in a dry place. Children should not have
access to stored appliances.
Inspection and repairs
Before use, check the appliance for damaged
or defective parts. Check for misalignment and
seizure of moving parts, breakage of parts,
damage to guards and switches and any other
conditions that may affect its operation.
Do not use the appliance if any part is damaged
or defective. Do not use the appliance if the
switch does not turn it on and off.
Never use the appliance when any guard or
enclosure is damaged or not in place.
Ensure that the appliance will operate properly
and perform its intended function.
Have any damaged or defective parts repaired
or replaced by an authorised repair agent.
Before use, check the mains cable for signs of
damage, ageing and wear.
Do not use the appliance if the mains cable is
damaged or defective.
If the mains cable is damaged or defective it
must be repaired by an authorised repair agent
to avoid a hazard.
Never attempt to remove or replace any parts
other than those specified in this manual.
Additional safety instructions for grass trimmers
The following warning symbols are found on the
appliance:
Wear safety glasses or goggles when
operating this tool.
The cutting line will continue to run for a
few seconds after switching the appliance
off. Never attempt to force the line to
come to a standstill.
360˚
6m/20ft
Keep people and animals at least 6 m
away from the cutting area.
Do not expose the appliance to rain or
high humidity.
10
ENGLISH
Switch off, remove the plug from the
socket and ensure that moving parts have
stopped rotating before leaving the
appliance unattended and before
changing, cleaning or inspecting any parts
of the appliance.
Before using the appliance, check that your
cutting path is free from sticks, stones,
wire and any other objects.
Only use the appliance in the correct position,
with the cutting line near the ground, as shown
in the illustrations. Never switch the appliance
on in any other position.
Switch on the appliance only when hands and
feet are away from the cutting line.
Avoid body contact with the cutting line while
the appliance is running.
Do not work on steep slopes. Be sure of your
footing. Be aware that freshly cut grass is
damp and slippery.
Take care when trimming near borders and
gravel paths or roads, as stones and soil may
be moved by the cutting line.
Do not put the appliance down until the
cutting line has come to a complete standstill.
Use only the appropriate type of
Black & Decker cutting line. Never use metal
cutting line or fishing line.
Take care to avoid injury from the line
trimming blade. Do not touch the blade.
After extending new cutting line, always return
the appliance to its normal operating position
before switching on.
Take care to keep the mains cable away from
the cutting line. Always be aware of the
position of the cable.
ELECTRICAL SAFETY
The appliance has been designed for one voltage
only. Always check that the power supply
corresponds to the voltage on the rating plate.
This appliance is designed for use on AC
(mains) power supplies only. Do not
attempt to use on any other supply.
This appliance is double insulated in
accordance with EN 60335; therefore no
earth wire is required.
Prevent body contact with earthed or
grounded surfaces (e.g. metal railings,
lamp-posts etc.).
Electric safety can be further improved by
using a high-sensitivity (30 mA / 30 mS)
residual current device (RCD).
Mains plug replacement (U.K. & Ireland only)
Should your mains plug need replacing and you
are competent to do this, proceed as instructed
below. If you are in doubt, contact an authorised
repair agent or a qualified electrician.
Disconnect the plug from the supply and
remove the fuse from the plug.
Cut off the plug and dispose of it safely; a plug
with bared copper conductors is dangerous if
engaged in a live socket outlet.
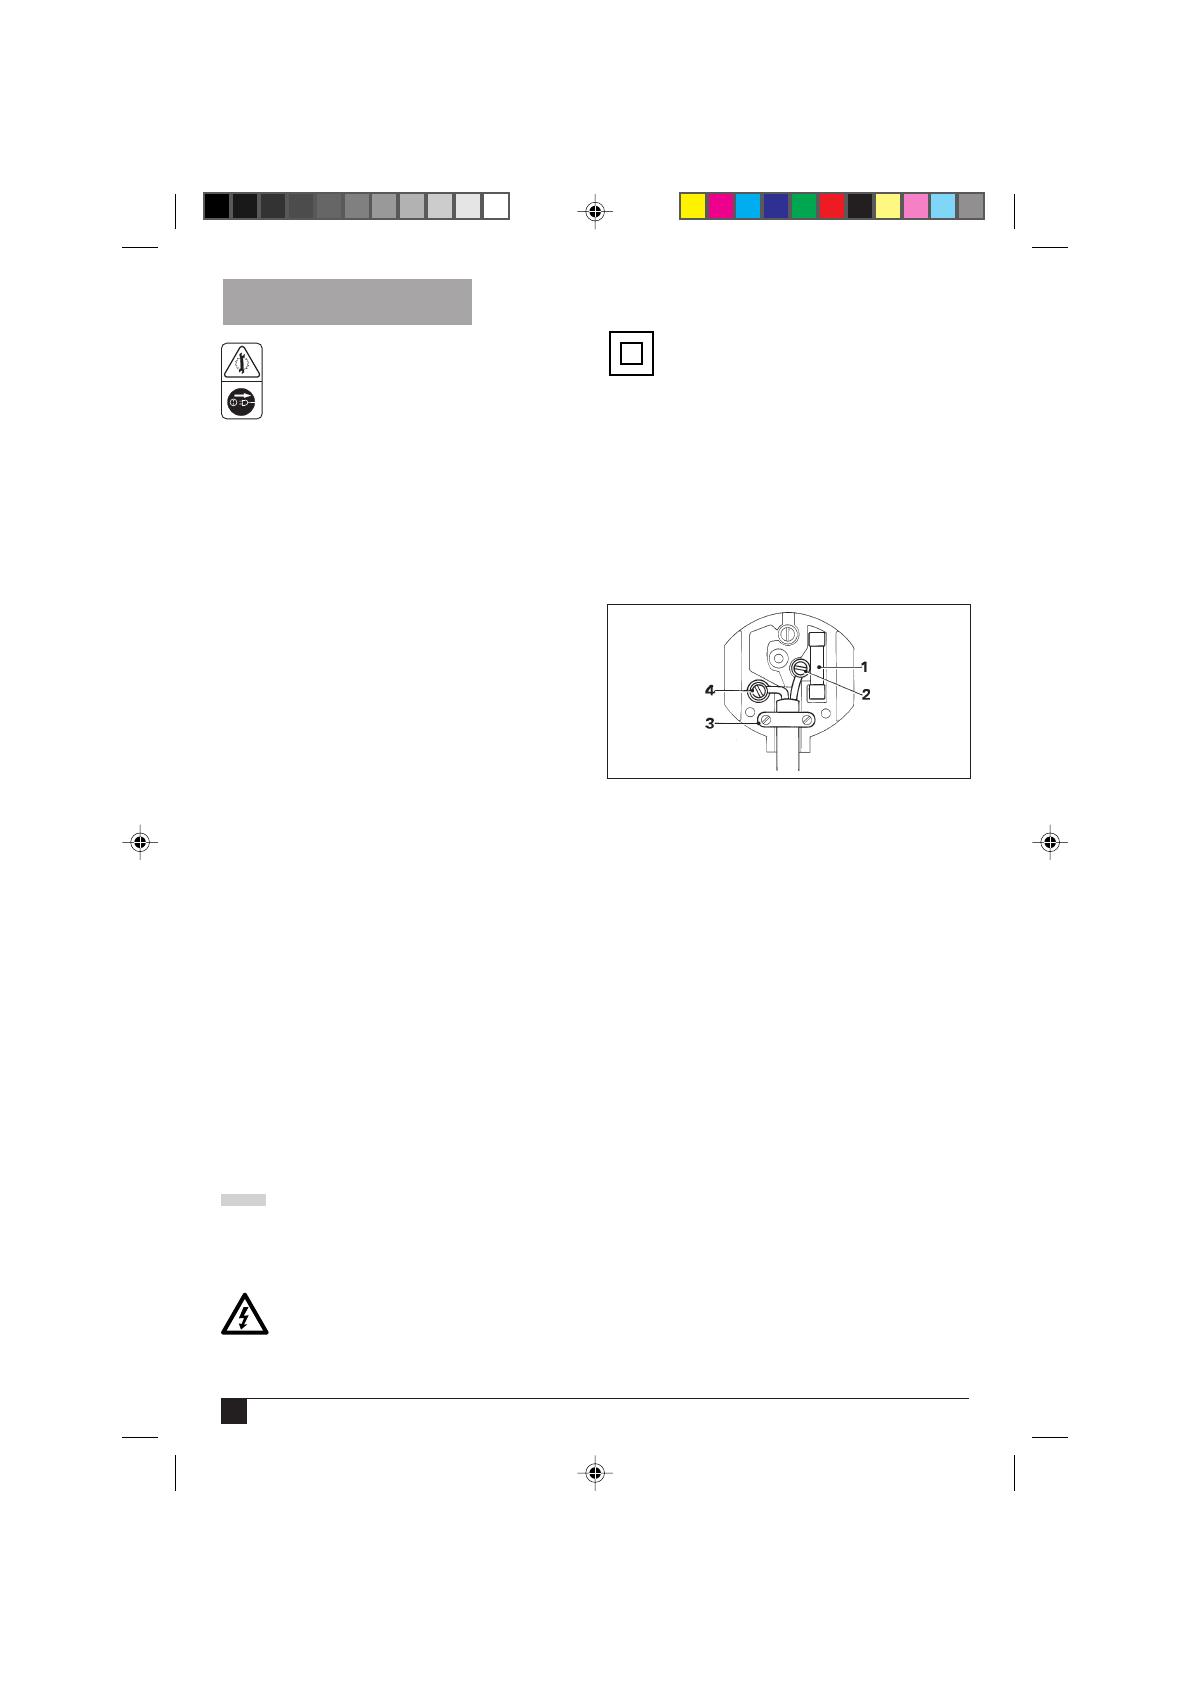
Only fit 13 Amperes BS1363A approved plugs
fitted with the correctly rated fuse (1).
Use 5 Amperes fuses.
The cable wire colours, or a letter, will be marked
at the connection points of most good quality
plugs. Attach the wires to their respective points
in the plug (see above). Brown is for Live (L) (2),
blue is for Neutral (N) (4).
Before replacing the top cover of the mains
plug ensure that the cable restraint (3) is
holding the outer sheath of the cable firmly
and that the leads are correctly fixed at the
terminal screws.
If the plug has a fuse cover, make sure that the
fuse cover is fitted. Do not use the plug if the
fuse cover is missing or damaged.
11
ENGLISH
Never use a light socket.
Using an extension cable
Always use an approved extension cable suitable
for the power input of this appliance (see rating
plate). The extension cable must be suitable for
outdoor use.
Before use, inspect the cable for signs of
damage, wear and ageing. Replace the
extension cable if damaged or defective.
When using a cable reel, always unwind the
cable completely.
Take care to keep the cable away from the
cutting line. Always be aware of the position of
the cable.
CARTON CONTENTS
The carton contains:
1 Grass trimmer
1 Guard with mounting screw
1 Plant protector incl. parts pack
(GL660P/GL670P only)
1 Instruction manual
Carefully unpack all parts.
OVERVIEW (fig. A)
1. On/off switch
2. Handle
3. Cable restraint
4. Power inlet (not for UK)
5. Secondary handle
6. Handle button (GL670/GL670P)
7. Locking ring
8. Cable storage hooks
9. Motor housing
10. Pedal (GL670/GL670P)
11. Guard
12. Line trimming blade
13. Edge guide
14. Spool housing
15. Cutting line
ASSEMBLY
Before assembly, make sure that the tool
is switched off and unplugged.
Fitting the guard (fig. B)
Unplug the tool.
Remove the screw (16) from the housing.
Place the guard (11) onto the tool as shown.
Firmly press the guard until it snaps into place.
Secure the guard with the screw (16).
Never use the tool unless the guard is
properly fitted.
Releasing the cutting line (fig. A)
In transit, the cutting line is taped to the spool
housing.
Remove the tape holding the cutting line (15)
to the spool housing (14).
Fitting the plant protector (fig. C)
The plant protector is supplied as a standard
accessory with the GL660P & GL670P. For other
models, it is available as an optional accessory.
Place the plant protector (17) over the guard as
shown. Make sure that the orientation is correct.
Place the two plastic caps (18) onto the plant
protector, aligning any of the marks (19) on the
caps with those on the guard (11).
Secure the caps using the screws (20). Do not
overtighten the screws.
Wait until the cutting line has come to a
standstill before adjusting the plant
protector.
Connecting the tool to the mains (fig. A)
Connect the female plug of a suitable
extension cable to the power inlet (4).
Loop the cable through the cable restraint as
shown in fig. O.
Insert the mains plug into a mains outlet.
The extension cable must be suitable for
outdoor use.
USE
Let the tool work at its own pace.
Do not overload.
12
ENGLISH
Setting the tool to trimming or edging mode
(fig. D, E & F)
The tool can be used in trimming mode as shown
in fig. D or in edging mode to trim overhanging
grass along lawn edges and flower beds as shown
in fig. E.
Trimming mode (fig. D & F)
For trimming, the trimmer head should be in the
position shown in fig. D. If it is not:
Turn the locking ring (7) counterclockwise.
Rotate the trimmer body counterclockwise
until the trimmer head engages in the
trimming position.
Tighten the locking ring by turning it clockwise.
Edging mode (fig. E & F)
For edging, the trimmer head should be in the
position shown in fig. E. If it is not:
Turn the locking ring (7) counterclockwise.
Rotate the trimmer body clockwise until the
trimmer head engages in the edging position.
Tighten the locking ring by turning it clockwise.
GL670/GL670P - Adjusting the position of the
secondary handle (fig. A & G)
The secondary handle can be adjusted to provide
optimum balance and comfort.
Let the guard (11) rest on the ground.
While keeping the handle button (6) depressed,
move the handle (5) into the desired position.
Release the handle button.
GL660/GL660P/GL670/GL670P -
Adjusting the height of the tool (fig. A & H)
This tool has a telescopic body, allowing you to
set it to a comfortable height.
Let the guard (11) rest on the ground.
Turn the locking ring (7) counterclockwise.
Move the switch handle up or down to the
desired height.
Tighten the locking ring by turning it clockwise.
GL670/GL670P -
Adjusting the trimmer head angle (fig. I)
The adjustable trimmer head angle allows you to
set the optimum trimming angle regardless of
your length. It also allows you to trim under
benches and shrubs.
Let the guard (11) rest on the ground.
Keeping the pedal (10) depressed with your
foot, move the switch handle up or down as
required.
Release the pedal.
Switching on and off (fig. A)
To switch the tool on, push the on/off switch (1).
To switch the tool off, release the the on/off
switch.
Never attempt to lock a switch in the on
position.
Hints for optimum use
Trimming
Hold the tool as shown in fig. D.
Gently swing the trimmer from side to side as
shown in fig. D.
When cutting long grass, work in stages from
the top. Take small cuts.
Keep the tool away from hard objects and
delicate plants.
If the tool starts running slowly, reduce the load.
Edging
Optimum cutting results are achieved on edges
deeper than 50 mm.
Do not use the tool to create edges. To create
edges, use an edging spade.
Guide the tool as shown in fig. E. Keep the
edge guide against the lawn edge.
To make a closer cut, slightly tilt the tool.
General
In order to achieve optimum cutting results,
only cut dry grass.
GL660P/GL670P - Using the plant protector (fig. J)
The plant protector will help you to protect plants
while trimming along lawn edges.
13
In trimming mode, set the plant protector to
position A.
In edging mode, set the plant protector to
position B or C.
When there are no plants near the cutting
area, set the plant protector to position D.
MAINTENANCE
Your Black & Decker tool has been designed to
operate over a long period of time with a
minimum of maintenance. Continuous satisfactory
operation depends upon proper tool care and
regular cleaning.
Before performing any maintenance,
switch off and unplug the tool.
Regularly clean the ventilation slots in your tool
using a soft brush or dry cloth.
Regularly clean the cutting line and spool
using a soft brush or dry cloth.
Regularly use a blunt scraper to remove grass
and dirt from the underneath of the guard.
Fitting a new spool of cutting line (fig. K & L)
Replacement spools of cutting line are available
from your Black & Decker dealer (cat. no. A6441).
Complete cassettes containing a spool of cutting
line are also available (cat. no. A6442).
Unplug the tool.
Keep the tabs (21) depressed and remove the
spool cover (22) from the housing (23) (fig. K).
Remove the empty spool (24) from the
spool cover.
Remove any dirt and grass from the spool
cover and housing.
Take the new spool and push it onto the boss
in the spool cover. Rotate the spool slightly
until it is seated.
Unclip the end of one of the cutting lines and
guide the line into one of the eyelets (25) (fig. L).
The line should protrude approx. 9 cm from the
spool cover.
Unclip the end of the other cutting line and
guide the line into the other eyelet. The line
should protrude approx. 9 cm from the
spool cover.
Align the tabs (21) on the spool cover with the
holes (26) in the housing (fig. K).
Push the cover onto the housing until it snaps
securely into place.
If the cutting lines protrude beyond the
trimming blade (12), cut them off so that
they just reach the blade.
Winding new line onto an empty spool
(fig. M, N & P)
You may wind new cutting line onto an empty
spool. Replacement packs of cutting line are
available from your Black & Decker dealer
(cat. no. A6440).
Remove the empty spool from the tool as
described above.
Remove any remaining cutting line from
the spool.
First wind new line onto the uppermost part of
the spool:
- Feed 2 cm of cutting line into one of the slots
in the upper section of the spool as shown.
- Wind the cutting line onto the spool in the
direction of the arrow. Make sure to wind the
line on neatly and in layers. Do not criss-cross.
- When the wound cutting line reaches the
recesses (28), cut the line.
- Temporarily park the line in the slots (27) on
one side of the spool as shown.
Repeat the above procedure for the second
cutting line on the lower section of the spool.
Park the line in the unused slots (27).
Proceed as described above to fit the spool on
the tool. Do not forget to release the cutting
line from the parking slots (27).
Only use the appropriate type of
Black & Decker cutting line. Ensure that
cutting line is present in both sections of
the spool (fig. P).
TROUBLESHOOTING
If your tool seems not to operate properly, follow
the instructions below. If this does not solve the
problem, please contact your local Black & Decker
repair agent.
ENGLISH
14
Before proceeding, unplug the tool.
Tool runs slowly
Check that the spool housing can rotate freely.
Carefully clean it if necessary.
Check that the cutting line does not protrude
more than 9 cm from the spool housing. If it
does, cut it off so that it just reaches the line
trimming blade.
Automatic line feed does not work
Keep the tabs depressed and remove the
spool cover from the housing.
Pull the cutting line until it protrudes 9 cm from
the housing. If insufficient cutting line is left on
the spool, install a new spool of cutting line as
instructed above.
Align the tabs on the spool cover with the
holes in the housing.
Push the cover onto the housing until it snaps
securely into place.
If the cutting line protrudes beyond the
trimming blade, cut it off so that it just reaches
the blade.
If the automatic line feed still does not work or the
spool is jammed, try the following suggestions:
Carefully clean the spool cover and housing.
Remove the spool and check if the lever can
move freely.
Remove the spool and unwind the cutting line,
then wind it on neatly again as described
above. Replace the spool as instructed.
PROTECTING THE ENVIRONMENT
Should you find one day that your tool
needs replacement, or if it is of no further
use to you, think of the protection of the
environment. Black & Decker repair agents
will accept old Black & Decker tools and
ensure that they are disposed of in an
environmentally safe way.
GUARANTEE
The Black & Decker lawn and garden guarantee
provides: 36 months parts and 12 months
labour cover in the UK, 24 months parts and
labour cover in South Africa, Australia and New
Zealand. Proof of purchase will be required.
Should your Black & Decker product become
defective within the guarantee period due to
faulty materials or workmanship, we guarantee to
either replace all defective parts or -at our
discretion- to replace the unit free of charge,
provided that:
The product is returned to us or one of our
authorised repair agents with proof of purchase.
The product has been used within the
parameters of its consumer classification.
The product has not been used for hire purposes.
Repairs have not been attempted by anyone
other than our authorised repair agents.
The failure represents normal wear and tear.
This guarantee is offered as an extra benefit and
does not affect your statutory rights.
The guarantee policy
The following failures are not covered by the
above guarantee:
Replacing worn or damaged blades, nylon
lines, chains and power cables. These items
are regarded as replacement items which wear
during normal usage.
Failures as a result of sudden impact or
obvious abuse.
Failures due to usage not in accordance with
instructions and recommendations contained
in this manual.
The use of other than genuine Black & Decker
accessories and parts may cause decreased
performance or damage to the product and will
render the guarantee void.
AFTER SALES SERVICE
Full details on our after-sales service are available
on the Internet at www.2helpU.com.
Alternatively, contact our Service and Information
Centre at the address towards the back of this
manual.
ENGLISH
15
It is our aim that all Black & Decker customers
should be totally satisfied with their
Black & Decker product and our after sales service.
If any help or advice is needed, please contact
your local Black & Decker repair agent.
If your product needs repair, please take or send it
to an authorised repair agent, providing proof of
purchase if claiming a guarantee repair.
Black & Decker offers a nationwide network of
authorised repair agents.
Full details on our after sales service can be
obtained from any of our authorised repair agents.
OTHER OUTDOOR TOOLS
Black & Decker has a full range of outdoor power
tools that make life in the garden easy. If you
would like further information on the following
products, please contact our Service and
Information Centre (see the address page towards
the end of this manual) or your local
Black & Decker retailer.
String trimmers Chainsaws
Cordless shear Hedgetrimmers
Lawnmowers Lawnrakers
Leafbusters Shredders
Not all products are available in all countries.
ENGLISH
44
TYP.
1
E13015
GL650
123
GL660
117
120
119
118
106
108
117
122
144
121
143
141
140
144
122
142
131
109
116
132
106
117
117
110
111
101
114
115
GL660P
07 - 08 - 2000
104
113
112
www.2helpU.com
GL660P
147
148
149
837
836
45
TYP.
E13016
GL670
119
106
118
106
117
107
124
125
117
109
107
108
121
103
105
117
105
128
126
127
129
120
102
122
123
131
837
132
110
111
114
115
104
113
112
101
07 - 08 - 2000
www.2helpU.com
116
117
GL670P
133
134
135
GL670P
1
46
Australia DEWALT Industrial Power Tool Company Tel. 03 9895 9200
7 Clarice Road, Box Hill, Victoria 3128 Fax 03 9899 7465
Belgique/België Black & Decker (Belgium) N.V. Tel. 02/719.07.11
Weihoek 1, 1930 Zaventem Fax 02/719.08.10
Danmark Black & Decker Tel. 70 20 15 10
Hejrevang 26B, 3450 Allerød Fax 48 14 13 99
Internet: www.blackdecker.dk
Deutschland Black & Decker GmbH Tel. 06126/21 24 83
Black & Decker Str. 40, D - 65510 Idstein Fax 06126/21 26 01
EÏÏ¿˜ Black & Decker (EÏÏ¿˜) ∞.E. ∆ËÏ. (01) 8981-616
™ÙÚ¿‚ˆÓÔ˜ 7 & µÔ˘ÏÈ·Á̤Ó˘ 159 º·Í (01) 8983-570
°Ï˘Ê¿‰· 16674, EÏÏ¿‰· Service (01) 8982-630
España Black & Decker Spain Tel. 934 797 400
Parque de Negocios “Mas Blau” Fax 934 797 419
Edificio Muntadas, c/Bergadá, 1, Of. A6
08820 El Prat de Llobregat (Barcelona)
France Black & Decker (France) S.A.S. Tel. 04 72 20 39 20
B.P. 21, 69571 Dardilly Cédex Fax 04 72 20 39 00
Helvetia Eduard Luggen Tel. 01/854 01 01
Black & Decker-Service Schweiz Fax 01/854 02 02
Industriestrasse 1 / Postfach 323
8157 Dielsdorf
Italia Black & Decker Italia SpA Tel. 039-23871
Viale Elvezia 2 Fax 039-2387592/2387594
20052 Monza (MI) Numero verde 800-213935
Nederland Black & Decker (Nederland) BV Tel. 076-5082000
Florijnstraat 10, 4879 AH Etten-Leur Fax 076-5038184
New Zealand Black & Decker Tel. 09 579 7600
81 Hugo Johnson Drive Fax 09 579 8200
Penrose, Auckland, New Zealand
Norge Black & Decker (Norge) A/S Tlf. 22 90 99 00
Postboks 248, Leirdal, 1011 Oslo Fax 22 90 99 01
Internet: www.blackdecker.no
Österreich Black & Decker Vertriebsges.m.b.H Tel. 01 66116-0
Erlaaerstraße 165, 1231 Wien Fax 01 66116-14
Portugal Black & Decker Tel. 214667500
Rua Egas Moniz 173, Fax 214667575
2766-651 S. João do Estoril
South Africa Black & Decker South Africa (Pty) Ltd Tel. (011) 653-1400
Physical address: Fax (011) 653-1499
146 Lechwe Street, Corporate park
Randjiesfontein, Midrand
Postal address:
Postnet Suite 107, Private Bag X65
Halfway House 1685
Suomi Black & Decker Oy Puh: (09) 825 4540
Palotie 3, 01610 Vantaa Fax: (09) 825 45 444
Black & Decker Oy, Tel: (09) 825 4540
Brandvägen 3, 01610 Vanda Fax: (09) 825 45 444
Sverige Black & Decker AB Tel: 031-68 60 00
Box 603, 421 26 Västra Frölunda, Fax: 031-68 60 08
Besöksadr. Ekonomivägen 11
Türkiye Black & Decker Merkez Servis Tel. 0216 455 89 73
Dudullu Cad. Kerembey Sok. No. 1 Faks 0216 455 20 52
Küçükbakkalköy/Istanbul
United Kingdom Black & Decker Tel. 01753 511234
210 Bath Road Fax 01753 551155
Slough, Berkshire SL1 3YD Helpline 01753 574277
806620-10
48
GUARANTEE CARD
GARANTIEKARTE
CARTE DE GARANTIE
TAGLIANDO DI GARANZIA
GARANTIEKAART
TARJETA DE GARANTÍA
CARTÃO DE GARANTIA
GARANTIBEVIS
GARANTI KORT
GARANTI KORT
TAKUUKORTTI
∫∞ƒ∆∞ E°°À∏™∏™
Español Después de haber comprado su herramienta envíe
usted, por favor, esta tarjeta a la central de
Black & Decker en su país.
Português Por favor, recorte esta parte, coloque-a num envelope
selado e endereçado e envie-o logo após a compra do
seu produto para o endereço da Black & Decker do
seu país.
Svenska Var vänlig klipp ur denna del och sänd den i ett frankerat
kuvert till Black & Deckers adress i Ditt land.
Norsk Vennligst klipp ut denne delen umiddelbart etter du
har pakket ut ditt produkt og legg det i en adressert
konvolutt til Black & Decker (Norge) A/S.
Dansk Venligst klip denne del ud og send frankeret til
Black & Decker i dit land.
Suomi Leikkaa irti tämä osa, laita se kuoreen ja postita kuori
paikalliseen Black & Decker osoitteeseen.
EÏÏËÓÈη ¶·Ú·Î·ÏÒ Îfi„ÂÙ ·˘Ùfi ÙÔ ÎÔÌÌ¿ÙÈ Î·È Ù·¯˘‰ÚÔÌ‹Û·ÙÂ
ÙÔ ·Ì¤Ûˆ˜ ÌÂÙ¿ ÙËÓ ·ÁÔÚ¿ ÙÔ˘ ÚÔ˚fiÓÙÔ˜ Û·˜ ÛÙËÓ
‰È‡ı˘ÓÛË Ù˘ Black & Decker ÛÙËÓ EÏÏ¿‰·.
English Please complete this section immediately after the
purchase of your tool and send it to Black & Decker in
your country. If you live in Australia or New Zealand,
please register by using the alternative guarantee card
supplied.
Deutsch Bitte schneiden Sie diesen Abschnitt ab, stecken ihn in
einen frankierten Umschlag und schicken ihn an die
Black & Decker Adresse Ihres Landes.
Français Découpez cette partie et envoyez-la sous enveloppe
timbrée à l’adresse de Black & Decker dans votre pays,
ceci immédiatement après votre achat.
Italiano Per favore ritagliate questa parte, inseritela in una
busta con francobollo e speditela subito dopo
l’acquisto del prodotto all’indirizzo della
Black & Decker nella vostra nazione.
Nederlands Knip dit gedeelte uit en zend het direct na aankoop in
een gefrankeerde, geadresseerde envelop naar het
adres van Black & Decker in uw land.
806620-10
  • Page 1 1
  • Page 2 2
  • Page 3 3
  • Page 4 4
  • Page 5 5
  • Page 6 6
  • Page 7 7
  • Page 8 8
  • Page 9 9
  • Page 10 10
  • Page 11 11
  • Page 12 12
  • Page 13 13
  • Page 14 14
  • Page 15 15
  • Page 16 16
  • Page 17 17
  • Page 18 18
  • Page 19 19
  • Page 20 20
  • Page 21 21
  • Page 22 22
  • Page 23 23
  • Page 24 24
  • Page 25 25
  • Page 26 26
  • Page 27 27
  • Page 28 28
  • Page 29 29
  • Page 30 30
  • Page 31 31
  • Page 32 32
  • Page 33 33
  • Page 34 34
  • Page 35 35
  • Page 36 36
  • Page 37 37
  • Page 38 38
  • Page 39 39
  • Page 40 40
  • Page 41 41
  • Page 42 42
  • Page 43 43
  • Page 44 44
  • Page 45 45
  • Page 46 46
  • Page 47 47
  • Page 48 48

Black & Decker GL650 Owner's manual

Category
Grass trimmers
Type
Owner's manual
This manual is also suitable for

Ask a question and I''ll find the answer in the document

Finding information in a document is now easier with AI