Page is loading ...

RD-60
Multi-CODEC Receiver / Decoder
Includes demodulator versions - ADV, LB, STD and PRM
USER GUIDE
02.01.2015 - v1.13.00

Contents
Contents
Trademarks & Copyrights
Electrical Device Compliance Notices
Safety Warnings and Cautions
Compliance Notices
FCC
Industry Canada
European Union EMC Directive Conformance Statement
Chapter 1 - Product Introduction
Covered Equipment
Front Panel
Front Panel LCD
Transport LED Indicators
Audio Decode Indicators
System Indicators
Controls
Reset
Front Panel Menu Structure
Services Menu
RF Rx Menu ( ADV Advanced / PRM Premium )
RF Rx Menu ( LB L - Band )
IP Rx Menu
Video Menu
Audio Menu
VBI Menu
CAS Menu
System Menu
Login
Duration
Network
Time
NTP
Alarm
SNMP Menu
Com 2
Host Name
Firmware
Feature Menu
Back Panel
DB 9- M Analog audio output pinout
COM 1/ COM 2 to DB 9 serial adapter pinout
GPIO and Parport information
GPIO pinout

Parport pinout
Chapter 2 - Getting Connected
Introduction to the Control Application
Compatible browsers
Ethernet Access
Zero Configuration Access
Login
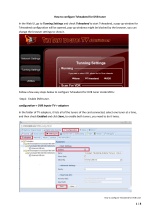
Firmware Upgrade via Web User Interface
Demodulator Firmware Upgrade via Web User Interface
Upgrading Via FTP & Telnet
In Field Feature Upgrades
Permanent Key Instructions
Temporary Key Instructions
Feature Key Descriptions
Chapter 3 - Operational How - Tos
DVB - S / DVB - S 2 AUTO Modes ( ADV and PRM )
DVB - S / DVB - S 2 AUTO Modes ( LB option )
DVB - S 2 - Recommended use of Pilots
How to use RF Profiles ( LB option )
UDP / RTP / FEC / TCP IP Rx
Multicast Reception - Address
Unicast Reception - Address
Unicast / Multicast Reception
Dolby E , Dolby D , LPCM , and Mpeg 1 Layer 2
AFD - Active Format Description
Genlock System
TS Out Decrypt
Chapter 4 - Appendix
Appendix A - GNU General Public License
Appendix B - Technical Specifications
Base Model ( RD 60-09)
Inputs
Outputs
Communications
Video and Audio
Physical and Operational
Premium Demodulator ( PRM option )
Advanced Demodulator ( ADV option )
L - Band Demodulator ( LB option )
Standard Demodulator ( STD option , discontinued )
Appendix C - Adtec Digital Support & Service
Telephone and Email Support
Preparing for Support
SLA Options

Trademarks & Copyrights
Copyright: (c) 2011-13 Adtec Digital. All rights reserved. This document may not, in whole
or in part, be copied, photocopied, reproduced and translated, or reduced to any electronic
medium or machine-readable form without prior written consent from Adtec Digital.
Trademarks: RD-60 is a trademark of Adtec Digital. Dolby, Dolby Digital, AC-3 and the
double-D symbol are registered trademarks of Dolby Laboratories. Other product and
company names may be trademarks or registered trademarks of their respective companies.
The information in this document is subject to change without notice.

Electrical Device Compliance
Notices
Safety Warnings and Cautions
For your safety and the proper operation of the device:
● This unit must be installed and serviced by suitably qualified personnel only.
● Do not break the warranty seals on the device or open the lid. Only approved service
technicians are permitted to service this equipment.
● Disconnect all power before servicing the unit.
● Do not expose this device to rain or other moisture. Clean only with a dry cloth.
● If not installed in an equipment rack, install the product securely on a stable surface.
● Install the product in a protected location where no one can step or trip over the
supply cord, and where the supply cord will not be damaged.
● If a system is installed in a closed or multi-unit rack assembly, the operating ambient
temperature of the rack environment may be greater than the room ambient
temperature.
● Consideration should be given to installing the unit in an environment compatible
with the maximum recommended ambient temperature of 50 degrees Celsius (122
degrees Fahrenheit).
● Install the unit in a rack so that the amount of airflow required for safe operation is
not compromised.
○ The recommended clearance on the top and sides of the unit is at least ½ “
(one half inch/one centimeter).
● Mounting of the unit in a rack should be such that no hazardous condition is achieved
due to uneven mechanical loading.
● Use only a grounded electrical outlet when connecting the unit to a power source.
● Reliable earth grounding of rack-mount equipment should be maintained.
○ Particular attention should be given to supply connection other than direct
connections to the branch circuit (e.g., use of power strips).
Compliance Notices
FCC
Note: This equipment has been tested and found to comply with the limits for a
Class B digital device, pursuant to Part 15 of the FCC Rules. These limits are designed to
provide reasonable protection against harmful interference in a residential installation. This
equipment generates, uses and can radiate radio frequency energy and, if not installed and
used in accordance with the instructions, may cause harmful interference to radio

communications. However, there is no guarantee that interference will not occur in a
particular installation. If this equipment does cause harmful interference to radio or
television reception, which can be determined by turning the equipment off and on, the user
is encouraged to try to correct the interference by one or more of the following measures:
● Reorient or relocate the receiving antenna.
● Increase the separation between the equipment and receiver.
● Connect the equipment into an outlet on a circuit different from that to which the
receiver is connected.
● Consult the dealer or an experienced radio/TV technician for help.
Warning: Changes or modifications to this device not expressly approved by Adtec Digital
could void the user’s authority to operate the equipment.
Industry Canada
This Class B digital apparatus meets all requirements of the Canadian Interference
Causing Equipment Regulations. Operation is subject to the following two conditions:(1) this
device may not cause harmful interference, and (2) this device must accept any interference
received, including interference that may cause undesired operation.
Cet appareillage numérique de la classe B répond à toutes les exigences de l'interférence
canadienne causant des règlements d'équipement. L'opération est sujette aux deux
conditions suivantes: (1) ce dispositif peut ne pas causer l'interférence nocive, et (2) ce
dispositif doit accepter n'importe quelle interférence reçue, y compris l'interférence qui peut
causer l'opération peu désirée.
European Union EMC Directive Conformance Statement
This product is in conformity with the protection requirements of EU Council Directive
2004/108/EC on the approximation of the laws of the Member States relating to
electromagnetic compatibility. Adtec Digital cannot accept responsibility for any failure to
satisfy the protection requirements resulting from a user modification of the product. This
product has been tested and found to comply with the limits for Class B Information
Technology Equipment according to CISPR 22 / EN 55022.

Chapter 1 - Product Introduction
Covered Equipment
RD-60: MPEG 4 / MPEG 2 Capable IRD. Transport Stream inputs standard on ALL RD
models include ASI and GigE. Video outputs standard on ALL models include Composite and
HD-SDI (x4 Bank A and B). Standard audio decode includes two (2) Dolby E pass-through
and four (4) stereo pairs (8 mono) of MPEG 1 Layer 2 with an optional upper 4 stereo pairs
(8 stereo pairs or 16 mono channels). BISS 1 / E decryption included. Includes Genlock &
Redundant AC power supplies. Optional DVBS/S2 demodulator packages available.
**VERSION 06 and HIGHER DOES NOT SUPPORT HDMI OUTPUT**
RD-60 w/ Standard Demodulator (RD60-XX-DMOD-STD): RD60 (as configured above)
+ Standard Demodulator. Supports L-Band, DVB-S/S2, QPSK 1 - 45 Mbaud and 8PSK 1 - 30
Mbaud.
RD-60 w/ L-Band Demodulator (RD60-XX-DMOD-LB): RD60 (as configured above) +
LB Demodulator. Supports L-Band, DVB-S 1 - 62 Mbaud, DVB-S2 1 - 65 Mbaud.
* Software Key field upgradeable to high symbol rate (>30Msym/s), 16APSK, and 32APSK.
RD-60 w/ Advanced Demodulator (RD60-XX-DMOD-ADV): RD60 (as configured
above) + Advanced Demodulator which adds 7072 Newtec Demodulator. Supports L-Band,
DVB-S 1 - 30 Mbaud, DVB-S2 1 - 30 Mbaud.
* Software Key field upgradeable to 16APSK.
RD-60 w/ Premium Demodulator (RD60-XX-DMOD-PRM): RD60 (as configured above)
+ Premium Demodulator which adds 7044 Newtec Demodulator. Supports L-Band, DVB-
S/S2, QPSK/8PSK 256kbaud - 45Mbaud*. Unit is CCT capable* ( 5%, 10%, and 15% roll-
off ).
* Software Key field upgradeable to 16APSK, 32APSK, and 45 Mbaud. CCT capability may
require software update for older demodulators.
Front Panel
The front panel LCD and keypad can be used to configure and monitor your device.

Front Panel LCD
1) Feedback State: There are several quick view menu screens available when in regular
feedback state. You can view any of these quick view status screens by using the up and
down arrow buttons.

2) Disabled Product State: When the product is in a disabled state, the LCD will relay the
following information. This state is generally only used when a factory restore is performed.
If that is the case, note that all of the configurations have been returned to factory defaults
including Network configurations. To reapply network configurations simply press the Down
arrow when in this state to navigate through the network menu.
Transport LED Indicators
Indicator Function
Decode Off - Decoder is idle.
On - Decoder is active.
ASI / IP /RF Off - No services detected on the input.
On - Services detected on the input.
Lock 1 / Lock 2 Off - Tuner is not locked
On - Tuner is locked
IP Out Off - IP Egress is idle.
On - IP Egress is active.
* IP Output is not applicable for RD-60 products
Bars Off - All B/T/ID options are disabled.
On - B/T/ID options are enabled.
Audio Decode Indicators
Indicator Function
A1 through A8 Off - Audio engine is not active.
On - Audio engine is actively decoding or performing pass-through.
Blinking - Audio engine is in a failure mode ( no pass-through or audio
decoding )

System Indicators
Indicator Function
Alarm Off - No system alarms.
On - System alarm.
(NTP or FAN alarm)
BISS Off - Decryption configuration is turned OFF
On - Decryption configuration is set to BISS1 or BISSE
Link Off - Network communication link not detected
On - Network communication link detected
Busy Off - No network activity
On - Network traffic present
Controls
Using the Mode, Select, Enter, Escape, and directional buttons, the user can control the
unit via the front panel.
Control Function
Mode button Mode will cycle through top layer menus.
Select Select will enter into edit mode.
Enter Enter submits any edited configurations.
Escape Escape returns to the previous menu layer.
Cursor Arrows Arrows will navigate you within submenus
Programming
Keypad
For value entry. F1 functions as a “+” or “-” operator. F2 functions
as a “.” decimal or period.
Reset
Should you need to reset your device, you can do so via the front panel by pressing the MODE,
ESCAPE and RIGHT ARROW keys simultaneously.

Front Panel Menu Structure
Services Menu
Item Function Options
Select Service Allows service selection from a list of services
per input.
ALL ASI RF1 RF2 IP
Select First Found Allows you to configure the RD-60 to
decode the first valid program found on a
given input.
ASI RF1 RF2 IP

RF Rx Menu (ADV Advanced / PRM Premium)
Item Function Options
Select
Tuner*
Selects RF1 or RF2 as the RF acquisition source RF1
RF2
Local
Oscillator
The Local Oscillator (L.O.) control specifies the
frequency of the LNB local oscillator. The
standard L.O. frequencies for “C” and “Ku” bands
are 5150MHz and 10750MHz respectfully
although, some other variants are included. If
the desired L.O. frequency is not listed, select
either C: Manual or Ku: Manual and enter the
L.O. frequency in the Manual L.O. field.
C: 5150
KU: 11300
KU: 10750
KU: 10600
KU: 10000
KU: 9750
KU: 9600
C: MANUAL
KU: MANUAL
Manual LO Allows manual entry of the LNB Local Oscillator
frequency provided that either C: Manual or Ku:
Manual is selected from the Local Oscillator
pulldown menu.
Downlink Allows the operator to enter the satellite
downlink frequency. The value for the Downlink
frequency is used with the Local Oscillator
frequency to calculate the L-Band frequency. The
Downlink and Local Oscillator frequencies can be
used to determine if spectrum inversion occurs
using the following rules. If the Downlink
frequency is less than the Local Oscillator
frequency, then spectrum inversion does occur.
If the Downlink frequency is greater than the
Local Oscillator frequency, then spectrum
inversion does not occur.
Range dependent upon LO
configuration
L-Band Allows the operator to enter the L-Band
frequency within the range from 950MHz to
2.15GHz. The value entered in this field is used
with the Local Oscillator frequency to calculate
the Downlink frequency using the following rules.
If Downlink < Local Oscillator, then Downlink -
Local Oscillator = │L-Band│. If Downlink > Local
Oscillator, then Downlink - Local Oscillator = L-
Band.
note: 2150MHz may not be available on
older premium demods, 1750MHz
maximum.
950MHz - 2150MHz
Modulation
Type
Allows the selection of the mod type. DVBS
DVBS-2
CCM Mode* When the Constant Coding and Modulation (CCM)
option is selected, the same modulation mode
and FEC is used for all physical layer framing.
CCM
AUTO-CCM

The advantage of using DVB-S2 in the CCM
mode is the improved protection that is achieved
by utilizing the new inner and outer codes.
Another advantage is the 30 percent increase in
capacity that is realized while using the method.
If Auto-CCM is selected, the receiver will detect
and configure the Modulation Mode, Pilot, and
Frame Type.
Adaptive Coding and Modulation (ACM) is
available for receivers with the appropriate
hardware and feature key. In this mode,
modulation and coding can vary on a DVB-S2
frame by frame basis. Auto-CCM is the preferred
method to automatically detect modcod, pilots
and frame type. **This configuration is not
available via front panel at this time.
note: this field is not applicable for DVB-S.
Similar functionality (AUTO MODCOD detection)
can be used in DVB-S by using QPSK_AUTO or
8PSK_AUTO modulation modes.
Modulation
Mode
This control allows the operator to select the
desired modulation mode and FEC code rate.
note: This is a configuration value. When in
DVB-S2 AUTO-CCM mode, actual detected
modulation can be found in the Quick View
status. QPSK_AUTO and 8PSK_AUTO
configurations are only valid in DVB-S. See how
to appendix for automatic detection instructions.
We display all possible ranges
available via our device in the
Front Panel. This list will differ
from the list found in the web UI
as it only shows those options
available based on the hardware
and feature keys found.
QPSK-1/2
QPSK-2/3
QPSK-3/4
QPSK-5/6
QPSK-6/7
QPSK-7/8
QPSK-1/4
QPSK-1/3
QPSK-2/5
QPSK-3/5
QPSK-4/5
QPSK-8/9
QPSK-9/10
QPSK_AUTO*
8PSK-3/5
8PSK-2/3
8PSK-3/4
8PSK-5/6
8PSK-8/9
8PSK-9/10
8PSK_AUTO*
16QAM-3/4
16QAM-7/8
16APSK-2/3
16APSK-3/4
16APSK-4/5
16APSK-5/6
16APSK-8/9
16APSK-9/10
32APSK-3/4
32APSK-4/5
32APSK-5/6
32APSK-8/9
32APSK-9/10
Symbol Rate The number of symbols transmitted per second.
The amount of data per symbol is dependant
upon the modulation type, e.g. QPSK, 8PSK, etc.
Range can be determined by
feature key.

Acquisition
Range
Acquisition Range is defined as the range of
frequencies that the tuner will scan in order to
achieve carrier synchronization. Allows the
operator to select the range of frequencies that
the RF tuner will sweep through to acquire the
carrier. e.g. If the desired carrier is at 1.080GHz
and the Acquisition Range is set to 5MHz, the RF
tuner will sweep through 1.080GHz ± 2.5MHz to
acquire the carrier. Units are in MHz.
note: Actual acquisition range available is
symbol rate dependent for advanced and
premium demods. If symbol rate < 5MBaud,
maximum range is 1.5 * symbol rate. If
symbol rate > 5Mbaud, maximum range is
7.5MHz.
0 - 7.5MHz
Rolloff The rolloff selection will determine the shape of
the input filter. The occupied bandwidth of the
modulated signal is the symbol rate multiplied by
(1+α) where alpha (α) is the rolloff factor (%).
By using a lower alpha, carriers can be spaced
closer together on a given transponder or an
increased symbol rate can be realized for a given
bandwidth.
note: 5%, 10%, and 15% rolloff is only
applicable in DVB-S2 with premium
demodulators. AUTO is only available in DVB-S.
If required for demodulators, contact support for
firmware upgrade.
5%
10%
15%
20%
25%
35%
AUTO*
Pilot DVB-S2 allows the option of inserting bursts of
pilot tones that are very robust and prevents the
carrier recovery system from failing prematurely.
However, when pilots are enabled, the total data
rate throughput is reduced by approximately
3.0%.
note: Pilot is not applicable in DVB-S or AUTO-
CCM modes.
On
Off
N/A
FEC Frame
Type*
When operating in DVB-S2, the Frame Type
options are either Normal or Short. The Normal
64,800-bit FEC frame provides better protection
but introduces more latency compared to the
Short 16,200-bit FEC frame. Therefore, the Short
FEC frame type should be selected in
applications where latency is critical and the
longer frame type should be used to optimize
protection.
note: FEC Frame type is not applicable in DVB-S
or AUTO-CCM modes.
Short
Normal
N/A

LNB Menu
LNB State This configuration will enable or disable power on
the input connector to power the LNB. If on, the
user selected voltage and tone will be placed on
the connector via the Polarity and Tone
configurations.
ON
OFF
LNB Polarity This control is primarily used in “Universal” LNB
applications. The LNB Polarity control allows for
LNB polarization selection; the 13VDC source will
select the Vertical polarity and the 18VDC source
will select the horizontal polarity. For typical “C”
and “Ku” band applications, the 18 VDC option is
recommended.
H(18V)
V(13V)
LNB Tone This control is used only for Universal LNB
applications. A universal LNB can route the high
or low band from either polarity to the IRD. The
high band is selected by enabling the 22 kHz
tone and the low band is selected when the 0 Hz
tone is enabled.
0KHz
22KHz
Profile
Menu
Save Allows user to save currently running RF
configuration to a profile. Press <select> then
use keypad for custom name entry. Press
<enter> to confirm name and save profile.
Select Allows user to load profile from list. Press
<select> then <up> and <down> arrows to list
profiles. press <enter> to load selected profile.
Delete Allows user to delete profile from list. Press
<select> then <up> and <down> arrows to list
profiles. press <enter> to delete selected
profile.
RF Rx Menu (LB L-Band)
Item Function Options
Tuner State Enables or Disables RF input.
note: When RF1 and RF2 are both enabled,
maximum tuner performance is affected. Please
view table in Appendix A for symbol rate and
modcod resource limitations.
DISABLED
ENABLED
Downlink Allows the operator to enter the satellite
downlink frequency. The value for the Downlink
Range dependent upon LO
configuration

frequency is used with the Local Oscillator
frequency to calculate the L-Band frequency. The
Downlink and Local Oscillator frequencies can be
used to determine if spectrum inversion occurs
using the following rules. If the Downlink
frequency is less than the Local Oscillator
frequency, then spectrum inversion does occur.
If the Downlink frequency is greater than the
Local Oscillator frequency, then spectrum
inversion does not occur.
Local
Oscillator
The Local Oscillator (L.O.) control specifies the
frequency of the LNB local oscillator. The
standard L.O. frequencies for “C” and “Ku” bands
are 5150MHz and 10750MHz respectfully
although, some other variants are included. If
the desired L.O. frequency is not listed, select
either C: Manual or Ku: Manual and enter the
L.O. frequency in the Manual L.O. field.
C: 5150
KU: 11300
KU: 10750
KU: 10600
KU: 10000
KU: 9750
KU: 9600
C: MANUAL
KU: MANUAL
Manual LO Allows manual entry of the LNB Local Oscillator
frequency provided that either C: Manual or Ku:
Manual is selected from the Local Oscillator
pulldown menu.
L-Band Allows the operator to enter the L-Band
frequency within the range from 950MHz to
2.15GHz. The value entered in this field is used
with the Local Oscillator frequency to calculate
the Downlink frequency using the following rules.
If Downlink < Local Oscillator, then Downlink -
Local Oscillator = │L-Band│. If Downlink > Local
Oscillator, then Downlink - Local Oscillator = L-
Band
950MHz - 2150MHz
Acquisition
Range
Acquisition Range is defined as the range of
frequencies that the tuner will scan in order to
achieve carrier synchronization. Allows the
operator to select the range of frequencies that
the RF tuner will sweep through to acquire the
carrier. e.g. If the desired carrier is at 1.080GHz
and the Acquisition Range is set to 5MHz, the RF
tuner will sweep through 1.080GHz ± 2.5MHz to
acquire the carrier.
0 - 5MHz
LNB Polarity This control is primarily used in “Universal” LNB
applications. The LNB Polarity control allows for
LNB polarization selection; the 13VDC source will
select the Vertical polarity and the 18VDC source
will select the horizontal polarity. For typical “C”
and “Ku” band applications, the 18 VDC option is
recommended.
OFF
H(18V)
V(13V)
LNB Tone This control is used only for Universal LNB
applications. A universal LNB can route the high
0KHz
22KHz

or low band from either polarity to the IRD. The
high band is selected by enabling the 22 kHz
tone and the low band is selected when the 0 Hz
tone is enabled.
Modulation
Type
Allows the selection of the mod type. AUTO
DVBS
DVBS-2
Symbol Rate The number of symbols transmitted per second.
The amount of data per symbol is dependant
upon the modulation type, e.g. QPSK, 8PSK, etc.
Set this field to 0 for automatic Symbol Rate.
0 = AUTO
Range can be determined by
feature key.
ISI ISI (input stream identifier) is required for
multistream applications. If a multistream RF
source is detected, BBHeaders containing this
value will be demodulated and output to the
receiver. This value has no effect during single
stream applications.
0 - 255
RF Stats
Menu
RF Stats General RF Lock Status is provided via the RF
quickview menu, but a detailed list of further
information can be found in this menu.

IP Rx Menu
Item Function Options
Multicast Rx IP Multicast IPA sets the multicast receive
Group IP address. IP Multicast receiving is
supported from compatible streamers. The
range of the multicast group IP is
224.XXX.XXX.XXX to 239.XXX.XXX.XXX -
XXX represents any number 0 through 255.
This can be either regular class A, B, C IP
address or a multicast IP address.
0.0.0.0 -
255.255.255.255
Multicast Rx
Port
Port number are used for receiving UDP/RTP
transfers in conjuction with Multicast IPA.
The valid range is 0-65535. If the port
number is set to 0, then no UDP transfers
will take place. 2000 is default.
0 - 65535
Source Specific
Multicast
Address
Configures the multicast receive Source
Specific IP Address. This configuration
should be configured to 0.0.0.0 (any source
multicast) in most IGMPv2 multicast
applications. This configuration is an
advanced configuration used for
redundancy, security, or IGMPv3 multicast
applications. It does not function for unicast
reception.
0.0.0.0 -
255.255.255.255
Multicast
Connector
The multicast connector configuration
determines the physical port of where the IP
stream will be received, the ethernet
(10/100) or GigE (10/100/1000) ethernet
port.
ETHERNET
GIGE
Latency Multicast Latency sets the latency delay
before the decoder begins playback from the
multicast source and should be argued as a
millisecond value.
If the MULTICASTLATENT delay time is too
large, and the internal delay buffer is about
to overflow, the system will start the
multicast playback early to prevent the
overflow. A log message is generated when
this condition occurs.
Multicast
Timeout
Sets the timeout value for return to normal
video playback after video multicast packets
are no longer detected. The default timeout

value is 300 milliseconds. If the timeout
value is set too low, the multicast receive
may timeout during normal reception if the
packet transmission is bursty.
Video Menu
Item Function Options
Output Menu
Fault Mode Display or Modify the current SDI
video fault setting. This setting
sets the video resolution when in
video fault.
This setting will be applied on
startup when no video is present.
If video becomes present, the
setting will be overridden by the
current video setting.
480i59.94
576i50
720p59.94
720p50
1080i59.94
1080i50
Video Loss When video is not detected on
the configured input, this setting
will define the output.
OFF:No video output on fault
BLANK:Only blanking on fault
BLANKTONES: Blanking and tones
on fault
BLANKOVERLAY: Blanking and
overlay on fault
BLANKTONESOVERLAY
Blanking, tones and overlay
on fault
When a type with BLANK is selected,
the current bars/matte setting will
be applied.
When a type with TONES is
selected, the current tones setting
will be applied.
When a type with OVERLAY is
selected, the current device name

will be used.
Downscaling
SDI
The Downscaling SDI setting
determines whether the SDI
bank ( SDI Output 1 and 2 ) will
be output natively or downscaled
to SD.
OFF
SD
Downscaling
SDIALT
The Downscaling SDI setting
determines whether the SDI
bank ( SDI Output 3 and 4 ) will
be output natively or downscaled
to SD.
OFF
SD
Genlock Menu
Genlock Mode Configures the genlock operation
of the decoder. SLAVE is
primarily used for 3D applications
and REMOTE is used in standard
genlock operation.
OFF - Disables genlock
SLAVE - Enable Genlock, Decode
source is synchronous to SYNC IN
signal
REMOTE - Enable genlock, Decode
source is NOT synchronous to SYNC
IN signal
Horizontal
Adjust
Horizontal adjustment defines
the difference in the SYNC IN
HSYNC and output HSYNC.
Typically, this should be in the
range of 0 to +1 line in clocks.
For example, a 1080I output
could be adjusted from 0 to
2200.
0 - 2200
Vertical Adjust Vertical adjustment defines the
difference in the SYNC IN VSYNC
and output VSYNC. Typically, this
should be in the range of 0 to +1
frame in lines. For example, a
1080I output could be adjusted
from 0 to 1125.
0 - 1125
Pixel Phase Pixel Phase adjustment is a very
fine grain adjustment that can
adjust within a single clock. The
increments are 1/64th of a clock.
The valid range is 0 to 63.
0 - 63
Genlock Status Shows if GENLOCK input is
currently being used for the
decoder or in FREE RUN mode
Genlock CVBS This configuration is used VIDEO - CVBS output is video
/