97-06 JEEP TJ ADJUSTABLE TRACK ROD KIT
Thank you for choosing Rough Country for all your suspension needs.
Rough Country recommends this system be installed by a certified technician. In addition to these instructions, profes-
sional knowledge of disassemble/reassembly procedures as well as post installation checks must be known. Attempts to
install this system without this knowledge and expertise may jeopardize the integrity and/or operating safety of the vehi-
cle.
PRODUCT USE INFORMATION
We strongly recommend, because of rollover possibility that seat belts and shoulder harnesses should be worn at all
times. Avoid situations where a side rollover may occur. Do not add, alter, or fabricate any factory or after-market parts
to increase vehicle height over the intended height of the Rough Country product purchased. Mixing component brands
is not recommended. Rough Country makes no claims regarding lifting devices and excludes any and all implied claims.
We will not be responsible for any product that is altered.
If question exist we will be happy to answer any questions concerning the design, function, and correct use of our prod-
ucts.
92757200
INSTALLATION INSTRUCTIONS
1. Place vehicle on a level surface and face tires in a straight forward position.
2. Place vehicle in park and set e-brake. Chock wheels to prevent movement. Vehicle will remain on ground with
suspension at ride height for installation.
3. Remove the factory bolt and nut on the passengers side axle mount and remove the nut and cotter pin from the
frame mount end.
4. Remove the factory track rod.
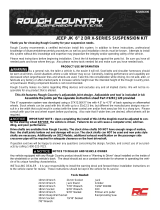
5. Add anti-seize to the tie rod end sleeve and adjust the new adjustable track rod to the starting position
measurement, as shown on the next page, by turning the threaded tie rod end in or out to fit in the stock mounting
location.
Photo 1 Photo 2
INSTALL ON AXLE WITH STOCK HARWDARE INSTALL ON FRAME WITH STOCK HARWDARE

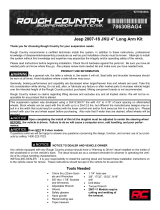
7. Using a plumb bob or similar tool, place against coil hat, adjusting to where string does not interfere with coil.
8. Take a measurement from the line of plumb bob and brake caliper and record measurement. See photo 3.
9. Repeat procedure on opposite side of vehicle.
10. Compare the two measurements.
11. If not centered, disconnect rod end and adjust
accordingly using the difference from the compared
dimensions to correctly adjust the tracking.
12. Repeat plumb bob step until tracking is centered.
13. After adjustments have been made and tracking is
centered, tighten jam nut firmly torquing to 75 ft lbs.
14. After installation is complete, test drive vehicle and repeat
the measuring procedure, verifying tracking is centered.
• Re torque all fasteners after 500 miles and periodically check for tightness.
MEASURE WITH PLUMB & CENTER TRACKING
Photo 3
POST INSTALLATION
/