Page is loading ...

INSTALLATION AND SETUP GUIDE
V-6052WD
Wi-Fi Fixed Dome Network Camera

V-6052WD Installation and Programming Guide | Digital Monitoring Products 1
GET STARTED
The V-6052WD is a 2 Megapixel indoor/outdoor video camera that allows users to view live and recorded HD video
clips in Virtual Keypad™.
To activate the camera, you need an active Dealer Admin account at dealer.securecomwireless.com.
Compatibility
▶Any active Virtual Keypad account with Cameras & NVRs enabled
▶The Tech APP must be used to connect the camera to Wi-Fi
What’s Included
▶One V-6052WD Camera
▶12 VDC Power Supply
▶Mounting Template
▶Hardware Pack with Security Torx L-Key
▶One 32 GB SD Card
Procedure
This guide walks you through the required steps needed to install a V-6012WD camera. They are:
1. Wire the camera.
2. Connect the camera to Wi-Fi.
3. Mount the camera.
4. Configure motion detection regions.

V-6052WD Installation and Programming Guide | Digital Monitoring Products 2
WIRE THE CAMERA
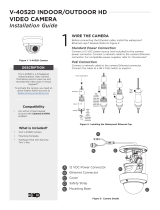
Refer to Figure 1 for the location of the power and Ethernet connectors.
Standard Power Connection
To use this camera with a Wi-Fi connection, connect a 12 VDC power source to the camera power connector. You
can optionally connect a network cable to the camera Ethernet connector. For compatible power supplies, refer to
“Accessories”.
Note: The V-6052WD does not support POE.
Figure 1: Camera Power Details
A
B
C
12 VDC Power Connector
Ethernet Connector
Mounting Base
A
B
C
ECover
E

V-6052WD Installation and Programming Guide | Digital Monitoring Products 3
CONNECT THE CAMERA TO WI-FI
Ensure that you know the Wi-Fi network and password that you wish to connect the camera to.
1. Log into Tech APP and select Video.
2. Tap the Add icon in the Cameras section.
3. When prompted to select a connection type, tap Wi-Fi.
4. Enter the Wi-Fi SSID and passphrase. Press Next.
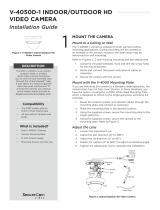
5. The camera will flash a red LED when it is ready to connect to the Wi-Fi network. Hold the QR code 6-12 inches
in front of the camera lens until the red LED flashes faster. The QR code must be facing the camera lens. The
LED will turn o once it has been connected to the Wi-Fi network. Press Next.
6. Enter the camera MAC Address. Press Next.
7. Wait for the camera to be added to the system in Tech APP. This may take several minutes.
8. Enter a name for the camera.
9. Under Advanced, you can configure the following basic settings:
▶Video Quality
▶Flip Image
▶Record on Alarm
▶Time Zone
▶Observe DST
10. Press Save.
Note: If the LED flashes red quickly (around three times per second), it means that the network connection has
failed. Press and hold the reset button for 10 seconds until the camera restarts, then try again.
Figure 2: Connect the Camera to Wi-Fi with Tech APP
STATUS INDICATOR
Camera is starting up Steady red
Ready for Wi-Fi connection Flashing red (around once every second)
Wi-Fi connection successful LED turns o
Wi-Fi connection failed Flashing red quickly (around three times per second)
Press and hold the reset button Flashing red (around once every second)

V-6052WD Installation and Programming Guide | Digital Monitoring Products 4
MOUNT THE CAMERA
Standard Ceiling Mount
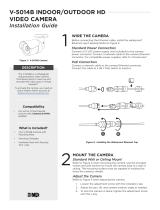
Refer to Figure 3 when mounting the camera.
1. Place the mounting template at the location you want to mount the camera.
2. Drill holes into the mounting template.
3. Use the included L-key to remove the camera’s cover.
4. Use the included screws and wall anchors to mount the camera base to the ceiling.
5. Use the included L-key to reattach the camera’s cover.
Note: The mounting surface must be capable of holding five times the camera’s weight.
Adjust the Camera
Refer to Figure 4 when adjusting the camera.
1. Use the included L-key to remove the camera’s cover.
2. Use the camera’s 3-axis gimbal to adjust the tilt and rotation as needed.
3. Use the tension screws to adjust the pan as needed.
4. Use the included L-key to reattach the camera’s cover.
Pan
0° ~ 352°
Tilt
0° ~ 70°
Rotate
0° ~ 350°
Figure 3: Mount the Camera Figure 4: Adjust the Camera

V-6052WD Installation and Programming Guide | Digital Monitoring Products 5
CONFIGURE MOTION DETECTION REGIONS
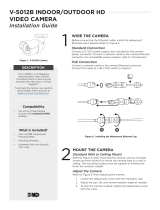
After mounting the camera, configure the camera motion detection regions in Dealer Admin.
1. Navigate to Dealer Admin and select the camera you want to add a motion detection region to.
2. In the Regions & Analytics section, select +Region and give it a Name.
3. Select the sensitivity of the region. Default is 50.
4. Dealer Admin will populate a 4-point rectangle in camera view screen. Click and drag an endpoint to change
the size of the region.
Figure 5: Select a V-6000 Camera in Dealer Admin
Figure 6: Configure a Motion Detection Region in Dealer Admin

V-6052WD Installation and Programming Guide | Digital Monitoring Products 6
ADDITIONAL INFORMATION
Video Privacy in Dealer Admin and Virtual Keypad
In Virtual Keypad, end users can choose to allow video access to technicians and dealers. When video access is
enabled, all Administrator level app users will receive a notification email. To enable video access, follow the steps
below.
1. Navigate to Virtual Keypad.
2. Go to Settings and select Video Privacy.
3. Use the toggle to grant technicians and dealers unlimited access to the video feed. Use the Grant Access
button to give temporary access. The default is 12 hours, although access can be revoked instantly by pressing
the Revoke Access button.
Note: All cameras brought online will immediately be granted access to the video feed for 12 hours.
Replace the SD Card
Refer to Figure 7 for the location of the SD card slot.
1. Locate the replacement SD card and place it to the side.
2. Use the included L-key to remove the camera’s cover.
3. Insert the replacement SD card into the slot behind the camera lens.
4. Use the included L-key to reattach the camera’s cover.
ORDERING INFORMATION
V-6052WD 2 MP Wi-Fi Fixed Dome Network Camera
Accessories
V-6040-TP Fixed Dome Transfer Plate
V-6000-PS 12 VDC Power Supply
V-SD32G 32 GB Replacement SD Card
V-SD64G 64 GB Replacement SD Card
CERTIFICATIONS
▶FCC Part 15 Registration ID: CCK-V6052WD
▶Industry Canada: 5251A-V6052WD
Figure 7: Camera Details
SD Card Slot

18205
Designed, engineered, and
manufactured in Springfield, MO
using U.S. and global components.
LT-2733 23231
INTRUSION • FIRE • ACCESS • NETWORKS
2500 North Partnership Boulevard
Springfield, Missouri 65803-8877
800.641.4282 | DMP.com
© 2023
SPECIFICATIONS
Sensor and Lens
Image Sensor 2 MP, 1/2.9” CMOS
Network
Protocols IPv4
Wi-Fi
Wireless Standards IEEE 802.11b/g/n
Frequency Range 2.4 GHz ~ 2.4835 GHz
Frequency Bandwidth 20 MHz Support
Hardware
Power Consumption
12 VDC Max 4.0 W
Weight 0.71 lbs (0.32 kg)
Dimensions 4.29” x 3.3” (10.9 cm x 8.3 cm)
Housing Material Metal + Plastic
Environmental
Operating Temperature -22°F to 140°F (-30°C to 60°C)
Operating Humidity Less than 95% RH, non-condensing
FCC Information
This device complies with Part 15 of the FCC Rules. Operation is subject to the following two conditions:
1. This device may not cause harmful interference, and
2. This device must accept any interference received, including interference that may cause undesired operation.
Changes or modifications made by the user and not expressly approved by the party responsible for compliance could void the user’s authority to
operate the equipment.
Note: This equipment has been tested and found to comply with the limits for a Class B digital device, pursuant to part 15 of the FCC Rules. These
limits are designed to provide reasonable protection against harmful interference in a residential installation. This equipment generates, uses and
can radiate radio frequency energy and, if not installed and used in accordance with the instructions, may cause harmful interference to radio
communications. However, there is no guarantee that interference will not occur in a particular installation. If this equipment does cause harmful
interference to radio or television reception, which can be determined by turning the equipment o and on, the user is encouraged to try to correct
the interference by one or more of the following measures:
• Reorient or relocate the receiving antenna.
• Increase the separation between the equipment and receiver.
• Connect the equipment into an outlet on a circuit dierent from that to which the receiver is connected.
• Consult the dealer or an experienced radio/TV technician for help.
Industry Canada Information
This device complies with Industry Canada License-exempt RSS standard(s). Operation is subject to the following two conditions:
1. This device may not cause interference, and
2. This device must accept any interference, including interference that may cause undesired operation of the device.
Le présent appareil est conforme aux CNR d’Industrie Canada applicables aux appareils radio exempts de licence. L’exploitation est autorisée aux deux
conditions suivantes:
1. l’appareil ne doit pas produire de brouillage, et
2. l’utilisateur de l’appareil doit accepter tout brouillage radioélectrique subi, même si le brouillage est susceptible d’en compromettre le
fonctionnement.
/