Page is loading ...

JEEP JK SWAY BAR SKID
Thank you for choosing Rough Country for your suspension needs.
Rough Country recommends a certified technician install this system. In addition to these instructions, professional
knowledge of disassemble/reassembly procedures as well as post installation checks must be known. Attempts to install
this system without this knowledge and expertise may jeopardize the integrity and/or operating safety of the vehicle.
Please read instructions before beginning installation. Check the kit hardware against the parts list. Be sure you have all
needed parts and know where they go. Also please review tools needed list and make sure you have needed tools.
PRODUCT USE INFORMATION
Rough Country makes no claims regarding lifting devices and excludes any and all implied claims. We will not be re-
sponsible for any product that is altered.
If question exist we will be happy to answer any questions concerning the design, function, and correct use of our prod-
ucts by calling 1-800-222-7023.
This JK sway bar skid is designed to work with any JK.
Tools Needed
9/16” Socket
15mm Socket
16mm Socket
17mm Socket
13/32” drill bit
Install Instructions
1. Park the jeep on a flat level surface.
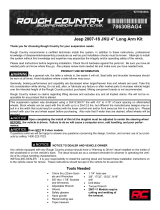
2. Remove the passenger side sway bar bracket bolts with a 16mm socket. See Photo 1.
3. Locate the mounting bolt for the disconnect motor and loosen with a 15mm wrench. See Photo 2. Only Rubicon
model JK’s will have the electric disconnect motor.
92776000
Photo 1 Photo 2
PHOTO 1 PHOTO 2

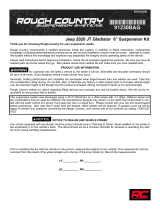
4. Install the mounting bracket between the sway bar mount and the frame. Use factory bolts and a 16mm socket to
reinstall sway bar mount to the frame. See Photo 3. Repeat on driver side.
5. These next steps will be used if you have a factory electrical dis-connect on your jeep. If not skip to step 10. Remove
the shoulder bolt that holds the disconnect motor in place. See Photo 4.
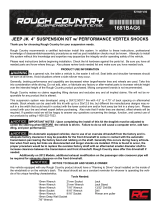
6. Rotate the motor upwards and remove next bolt to the right of the shoulder bolt with a 15mm socket. See Photo 5.
7. Place two of the supplied lock washers on the motor housing and insert the new relocation bracket. See Photo 6.
8. Using the supplied .375” x 1” bolt and the .375” x 1.5’ bolt with washers tighten the new bracket to the disconnect
motor with a 14mm wrench. See Photo 7.
9. Slide the factory shoulder bolt into the rubber mount and through the new relocation bracket. Secure with the sup-
plied 10mm lock nut and washer. Tighten with a 17mm wrench. See Photo 8.
PHOTO 3
PHOTO 5 PHOTO 6
PHOTO 7 PHOTO 8
PHOTO 4

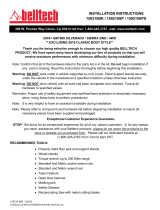
10. Hold the skid plate up to the mounting brackets and install the 3/8” bolts, washers, and lock nuts using a 9/16”
socket and wrench. See Photo 9.
11. Using a 13/32” drill bit, drill through the front support bar and insert flag nuts on the back side. Use the skid plate as
a template to drill the holes. Use supplied 3/8” bolts, washers, and lock washers and tighten with a 9/16” socket.
See Photos 10 & 11.
PHOTO 9
PHOTO 11
PHOTO 10

Thank you for choosing Rough Country products.
By purchasing any item sold by Rough Country, LLC, the buyer expressly warrants that he/she is in compliance with all
applicable Federal, State, and Local laws and regulations regarding the purchase, ownership, and use of the item. It
shall be the buyers responsibility to comply with all Federal, State and Local laws governing the sales of any items listed,
illustrated or sold. The buyer expressly agrees to indemnify and hold harmless Rough Country, LLC for all claims result-
ing directly or indirectly from the purchase, ownership, or use of the items.
Kit Picture
/