Page is loading ...

SCOPE OF MANUAL
This manual contains information concerning the
installation, operation and maintenance of the Model
2100R+ flow meter. To ensure proper performance of the
meter, the instructions given in this manual should be
thoroughly understood and followed.
Keep the manual in a readily accessible location for
future reference.
Changes and additions to the original edition of this
manual will be covered by a "CHANGE NOTICE"
supplied with the manual. The change notice will explain
any differences between the product described in this
manual.
Model 2100R+
TABLE OF CONTENTS
Page Page
Unpacking and Inspection................................. 1-1 OPERATION
General Specifications ...................................... 1-2 Recorder Status and Calibration Modes............ 3-1
INSTALLATION PROCEDURE Recorder Options and Error Screens................. 3-7
Enclosure Mounting ....................................... 2-1 Flow Meter Status and Calibration Modes........ 3-8
Wiring Connections.......................................... 2-2 Flow Meter Option Screens.............................. 3-15
Sensor Mounting............................................... 2-4 Chart Pen Zero & Span Adjustment ................. 3-16
Sensor Cable Connection.................................. 2-10 Hexadecimal Conversions................................. 3-19
Chart Installation and Pen Alignment............... 2-12 Illustrated Parts List.......................................... 3-21
To avoid damage in transit, Badger products are
shipped to the customer in special shipping containers.
Upon receipt of the product, perform the following
unpacking and inspection procedures:
NOTE: If damage to the shipping container is
evident upon receipt, request the carrier to be present
when the product is unpacked.
a. Carefully open the shipping container following
any instructions that may be marked on the box. Remove
all cushioning material surrounding the product and
carefully lift the product from the container.
UNPACKING &
INSPECTION
Retain the container and all packing material for
possible use in reshipment or storage.
b. Visually inspect the product and applicable
accessories for any physical damage such as scratches,
loose or broken parts, or any other sign of damage that
may have occurred during shipment.
NOTE: If damage is found, request an inspection by
the carrier's agent within 48 hours of delivery and file
a claim with the carrier. A claim for equipment
damage in transit is the sole responsibility of the
customer.
941181
03/96
1-1

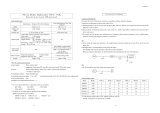
GENERAL SPECIFICATIONS
Recorder:
2 line, 24 alphanumeric character per line Liquid Crystal Display. Displays
instantaneous flow rate, totalization, alarm indication and is used to program the
recorder through menu driven prompts.
DISPLAYS
Flow Meter:
2 line, 24 alphanumeric character per line Liquid Crystal Display. Displays
instantaneous flow rate, level, alarm indication and is used to program the flow
meter
through menu driven prompts.
RECORDING 12 inch circular chart with 24 hour, 7 day or 31 day selectable chart speed, single
disposable red ink pen.
PROGRAMMING Menu driven display prompt with 5 key tactile feedback keypad.
Recorder:
4-20 mADC signal into max. 1000 ohms
2 dry contact SPDT relays assignable to any of the following:
High or low alarms, contact integrator, loss of 4-20 mA signal,
EEPROM failure. Rated for 0.25 amp @ 120 VAC or 0.5 amp @ 24 VDC
OUTPUTS
Flow Meter:
4 dry contact SPDT relays assignable to any of the following:
High or low alarms, loss of echo, transmit failure, EEPROM failure,
overrange and loss of 4-20 mA signal.
Rated for 0.25 amp @ 120 VAC or 0.5 amp @ 24 VDC.
ENCLOSURE Indoor: NEMA 12, metallic; Outdoor: NEMA 4X, non-metallic
TEMPERATURE Indoor: 32° F to 150° F (0° C to 65° C)
LIMITS Outdoor: -40° F to 150° F (-40° C to 65° C)
POWER Standard: 117 VAC, 50/60 Hz +/- 10%, 20 watts
REQUIREMENTS Optional: 230 VAC, 50/60 Hz +/- 10%
Heater & Thermostat: 220 watts
Recording Indicating Totalization
Accuracy: +/- 0.5% of span +/- 1% or 1 LSD +/- 0.25%
Linearity: +/- 0.5% of span +/- 0.5%
PERFORMANCE Hysteresis: +/- 0.5% of span
Repeatability: +/- 0.5% of span
1-2

ENCLOSURE DESCRIPTION
The Model 2100R+ ultrasonic flow meter with circular
chart recorder is housed in either a NEMA 12 or NEMA 4X
enclosure.
The NEMA 12 enclosure is suitable for indoor use and
is designed to be panel mounted. It can be supplied with
heater and thermostat for indoor installations in buildings
that are not heated in the winter. Mounting hardware is
provided for panel mounting of the enclosure. Care
should be taken when selecting the mounting location so
that the recorder door can be opened completely for
access when changing charts.
INDOOR ENCLOSURE DIMENSIONS
The NEMA 4X enclosure is suitable for outdoor use
and can be wall or pole mounted. It comes equipped with
heater and thermostat. The door can be supplied with or
without a window. The door is provided with two
lockable latches. Caution should be used when mounting
the enclosure so that it is not exposed to direct sunlight. A
sun shield is recommended to prevent the temperature
inside the enclosure from reaching above the maximum
rating of the electronics (see temperature specification
under General Specifications). Viewing window is
optional.
INSTALLATION
OUTDOOR ENCLOSURE DIMENSIONS
16"
20"
7-7/8"
INDOOR PANEL MOUNTING
15-5/8"
19-3/16"
8-13/16"
7 "
Prior to mounting the enclosure, it is recommended that
the knockouts for the conduit fittings be removed. This
should be done with the enclosure resting on a solid
surface.
A hole 17-7/8" high by 14-1/4" wide is required for
inserting the enclosure in a panel. Slide the recorder into
the panel. Install the four mounting brackets into the slots
in the sides of the enclosure as shown below. Tighten the
mounting screws until the enclosure is secure to the panel.
14-1/4 "
17-7/8 "
PANEL
OPENING
CUTOUT
MOUNTING
BRACKETS
4 EACH
2-1

OUTDOOR ENCLOSURE MOUNTING
The NEMA 4X outdoor enclosure is provided with four
mounting feet which are to be installed by the user at the
orientation desired. Pictured below is the installation
detail of the feet and the mounting hole dimensions.
If the outdoor enclosure has the window option, do not
mount facing the sun or install a sun shade to prevent
overheating of the electronics inside the enclosure.
MOUNTING FEET
14.55 "
17.03 "
10.40 "
20.96 "
WIRING CONNECTIONS
The indoor case has six 7/8" diameter knockouts for
use of 3/4" conduit connections. Three are located on the
bottom of the case and three on the back of the case. The
three you use will depend on whether you panel or wall
mount the enclosure. The outdoor enclosure has three
7/8" diameter knockouts located at the bottom of the case.
Local regulations for proper grounding and connection
of the power to the recorder should be strictly followed.
The power wires are connected to the terminals located
on the inside back of the enclosure (see Figure 2-1). To
gain access, open the enclosure door and loosen the two
screws at the top and bottom left side of the chart plate
and swing out the chart plate. The AC voltage for which
the unit has been set up for will be clearly marked near
the terminal strip. Verify that you are connecting the proper
voltage to the recorder. The terminal labeled H is the High
(black) wire, the terminal labeled N is the Neutral (white)
wire and the terminal labeled G is the Ground (green)
wire. The power wires from the terminal strip to the
recorder circuit board and the flowmeter power board are
prewired from the factory.
The terminal blocks on the recorder circuit board have
snap-on connectors. To connect the output wires for the
relays or 4-20 mA retransmission, pull off the connectors
from the terminal strips. Route the signal wires through
the wiring clips. Loosen the screws on the connectors.
Strip off about 1/4 inch of insulation from the wires.
Insert the wire into the proper connector and tighten the
screw securely. After connecting all of the wires to the
connector, snap the connector back on the terminal strip.
DRY CONTACT
RELAYS MAX
LOAD 250 MA
+ 4-20 MA
OUTPUT
NO
C SW 1
NC
NO
C SW 2
NC
1
2
3
4
5
6
7
8
TB5
RECORDER RELAY OUTPUT
S
2-2

+ 4-20 MA
OUTPUT
NO
C SW 1
NC
NO
C SW 2
FACTORY WIRED
FROM 2100 4-20MA
AN1
AN2
AN3
NOT
USED
+
FREQ IN
PWR
PWR
117/230VAC
FACTORY
WIRED
TB1
1
2
3
NC
1
2
3
4
5
6
7
8
1
2
3
4
5
6
1
2
3
TB5
TB4
TB3
TB2
HNG
117/230 VAC
CONNECTIONS
MODEL 2100
FLOWMETER
FIGURE 2-1
The recorder relay outputs are located on TB5 of the
recorder circuit board. The relays are assignable to
different functions. See the Recorder Operating Section
of this manual.
RECORDER 4-20 mADC OUTPUT
The 4-20 mADC output is a retransmitted output of the
flow signal which can be connected to other external
devices. The wiring connections must be connected in
series with the load, as shown above.
RELAY OUTPUTS - TB2 also is the terminal block
for the connections for the relay outputs. Terminal
connections 7 through 18 are used for the four relays
which are marked SW1, SW2, SW3 and SW4. These
relays are single pole double throw with a 1.0 amp 24
VDC or 0.5 amp 120 VAC current rating.
The wiring connections are marked on the printed
circuit board below the terminal block. Each relay
terminal is marked NC (normally closed), C (common)
and NO (normally open). The normally open and
normally closed positions are with the relay de-energized.
The relays are energized when they are tripped by the
assigned level or alarm. The relays can be assigned for
different functions which are explained in the Model
2100 Operation Section of this manual on Page 3-13.
MAX. 1000
OHM LOAD
+
FREQ IN
PWR
PWR
TB2
1
2
3
+ 4-20 MA
OUTPUT
NO
C SW 1
NC
NO
C SW 2
NC
1
2
3
4
5
6
7
8
TB5
+
2-3

FB-1 (FULL FACE)
SENSOR INSTALLATION
GENERAL DESCRIPTION
The Model 2100 FB-1 sensor has a PVC plastic
housing. The sensor is back filled with an epoxy resin.
The sensor head has a 3/4 inch NPT mounting nipple to
secure the sensor to the mounting bracket and attaching a
conduit fitting for routing the sensor cable back to the
electronic enclosure. Metallic conduit must be used to run
the sensor cable back to the electronics. The sensor must be
mounted level. An 'L' mounting bracket is supplied with
the sensor.
The sensor is supplied with 100 feet of triaxial cable.
The sensor can be ordered with 300 feet of continuous
cable, or additional cable (up to 1000 feet total) may be
spliced onto the cable from the sensor.
Only Belden 9222
cable should be used.
A component change in the electronics is required
depending on the length of the cable. This is done at the
factory based on the amount of cable ordered with the meter.
The critical lengths of cable for the component change are
150 feet and 750 feet. If the user increases or decreases the
length of cable, and the length change steps above or below
the critical length points, the factory should be contacted for
information regarding the correct component change.
3 - 1/8 "
4 "
INSTALLATION
The meter is normally programmed at the factory to a
specific application. The sensor must be installed to the
proper mounting dimensions to ensure the accuracy of the
flow meter. Refer to the Data Sheet in the front of this
manual for these dimensions.
MOUNTING BRACKET
4 - 1/8 "
1/8 "
3/8 "
DIA.
1 -1/4 " 3 "
6 - 1/8 "
Mounting Hole
The dimension that is used when mounting the sensor is
the vertical calibrated (Vcal) mounting distance. This is
the distance from the surface of the fluid at no (zero)
flow, to the face (bottom) of the sensor. There are two
regions that make up the Vcal distance. These are the
sensor offset and the customer selected full scale
headrise.
2-4

Sensor
Offset
Customer
Selected
Full scale
Headrise
Vcal
Sensor
Mounting
Dimension
Level of fluid at no flow
6° Beam Angle
NOTE:
If sensor is exposed to sunlight, a sun shield should be used
The sensor offset is the distance from the maximum
level of the fluid to the face of the sensor. The minimum
offset is 12 inches.
The full scale headrise is the level of the fluid at the
customer's selected full scale flow for the flume or weir.
The minimum full scale headrise is 4 inches and the
maximum is 132 inches.
Therefore,
Sensor vertical mounting distance (Vcal) =
Customer full scale headrise + sensor offset
When the Model 2100 is programmed at the factory,
the Vcal is determined by taking the full scale headrise of
the maximum capacity of the flume or weir plus 12 inches
for the offset. This is done so that the flow meter can be
rescaled to a higher full scale flow in the future without
having to move the sensor. This is reflected on the
Mounting and Calibration Data Sheet in the front of the
manual by the Max. Capacity (Element) and Customer
Maximum Headrise. When the Customer Max. Flow is
less than the Max. Flow (Element) then the sensor offset
will be 12 inches plus the difference between Max. Flow
(Element) and the Customer Max. Headrise.
The other mounting dimension that is important is the
Horizontal (H) dimension. This is the horizontal distance
from a reference point on the flume or weir to the sensor.
Pages 2-6 through 2-9 show this dimension for the
commonly used flumes and weirs.
Another aspect that must be considered when mounting
the sensor is the distance of the sensor from the walls
2-5

of the structure in which the fluid is flowing. If the sensor
is too close to the wall, reflections may occur which could
cause inaccuracies in the level measurement. The beam
angle of the transmitted signal from the sensor face is a
maximum of 6 degrees. To determine the distance the
sensor must be mounted from the wall, multiply the Vcal
distance times 0.0524. This will give the distance required
from the wall to the sensor housing.
The exit hole for the sensor cable on the top of the
housing is a 3/4" NPT nipple which is used to mount the
sensor to the mounting bracket and connecting the
conduit for the cable. The cable must be run in metallic
conduit to prevent any stray noise interference from
affecting the meter's operation.
The mounting bracket provided with the sensor can be
mounted directly to the wall for Vcal distances of 60
inches or less. An extension or mounting brace to the
mounting bracket will be required for Vcal distances
greater than 60 inches.
When installing the sensor, it is imperative that it be
level. A level should be placed on top of the sensor and
adjustments made to the mounting bracket to ensure the
sensor face is level to fluid.
This completes the FB-1 sensor installation procedure.
Refer to the Electronic Wiring Section for connecting the
sensor cable to the electronics.

PARSHALL FLUME INSTALLATION
Vcal
H
FLOW
H
Size H Dim. Vcal Full Scale (GPM) Full Scale Head Rise
(in.) (in.) (in.) Min. Max. Max (in.)
2 11.00 21.46 60 210 9.46
3 12.00 30.21 85 850 18.21
6 16.00 30.29 180 1800 18.29
9 22.50 38.01 280 4500 26.01
12 35.25 42.70 375 7500 30.70
18 37.25 43.70 550 12000 31.70
24 39.25 43.47 700 16000 31.47
36 43.25 43.98 1100 25000 31.98
48 47.00 44.75 1350 35000 32.75
The H dimension is straight back from the entrance of the throat and not along the flume wall.
MANHOLE FLUME INSTALLATION
Vcal
FLOW
H
Size H Dim. Vcal Full Scale (GPM) Full Scale Head Rise
(in.) (in.) (in.) Min. Max. Max (in.)
4 5.75 17.86 45 90 5.86
6 7.75 20.94 60 250 8.94
8 9.75 24.32 75 550 12.32
10 11.75 27.58 80 1000 15.58
12 13.75 29.99 100 1500 17.99
2-6

OPEN FLOW NOZZLE INSTALLATION
Vcal
FLOW
H
Size H Dim. Vcal Full Scale (GPM) Full Scale Head Rise
(in.) (in.) (in.) Min. Max. Max (in.)
6 21.00 16.79 125 180 4.79
8 23.00 18.66 150 400 6.66
10 25.00 10.77 165 800 8.77
12 29.00 21.55 145 1100 9.55
14 31.00 24.75 85 1600 12.75
16 35.00 25.87 100 1900 13.87
18 38.00 28.16 85 2600 16.16
20 40.00 30.78 90 3400 18.78
24 46.00 35.07 95 7000 23.07
PALMER-BOWLUS FLUME INSTALLATION
Vcal
FLOW
H
Size H Dim. Vcal Full Scale (GPM) Full Scale Head Rise
(in.) (in.) (in.) Min. Max. Max (in.)
6 3.00 17.16 130 200 5.16
8 4.00 18.77 145 400 6.77
10 5.00 20.46 175 700 8.46
12 6.00 22.15 200 1100 10.15
15 7.50 24.96 220 2000 12.96
18 9.00 27.13 270 3000 15.13
21 10.50 29.85 300 4500 17.85
24 12.00 32.77 325 6500 20.77
2-7

RECTANGULAR & V-NOTCH WEIR INSTALLATIONS
Vcal
FLOW
H
Weir
Plate
Weir
Crest
crest
Rectangular w/end contractions
crest
crest
V-Notch
Cippoletti
RECTANGULAR WEIR WITH END CONNECTIONS
Size H Dim. Vcal Full Scale (GPM) Full Scale Head Rise
(in.) (in.) (in.) Min. Max. Max (in.)
12 * 19.96 280 700 7.96
18 * 24.71 420 2100 12.71
24 * 26.52 600 3500 14.52
36 * 29.27 850 7000 17.27
48 * 35.17 1200 14500 23.17
60 * 40.69 1500 25000 28.69
72 * 46.78 1800 40000 34.78
84 * 53.17 2000 60000 41.17
96 * 59.54 2400 85000 47.54
V-NOTCH WEIRS
Size H Dim. Vcal Full Scale (GPM) Full Scale Head Rise
(in.) (in.) (in.) Min. Max. Max (in.)
22.5 * 36.00 15 1261 24.00
30 * 48.00 20 4729 36.00
45 * 48.00 30 7241 36.00
60 * 48.00 42 10096 36.00
90 * 48.00 72 17491 36.00
2-8

LEOPOLD LAGCO FLUME INSTALLATION
Vcal
FLOW
H
Size H Dim. Vcal Full Scale (GPM) Full Scale Head Rise
(in.) (in.) (in.) Min. Max. Max (in.)
6 * 16.91 10 140 4.91
8 * 17.98 135 250 5.98
10 * 20.16 180 500 8.16
12 * 21.06 210 700 9.06
15 * 23.19 250 1200 11.19
18 * 24.77 300 1750 12.77
21 * 28.45 360 3000 16.45
24 * 29.05 400 3600 17.05
30 * 34.84 500 7000 22.84
36 * 37.70 600 10000 25.70
42 * 42.38 675 15000 30.38
48 * 43.48 750 18000 31.48
(*) HORIZONTAL MOUNTING DIMENSIONS; LOCATE SENSOR
JUST UPSTREAM OF CONVERGENCE ON ALL SIZES
2-9

SENSOR CABLE CONNECTION
To wire the sensor head cable, the front half of the
Model 2100 enclosure, mounted in the back of the Model
2100R+ housing, must be removed. Use the 5/32 inch
Allen wrench supplied in the mounting hardware package
to loosen and remove all four hex bolts in the front of the
housing (see Figure 2-3). Separate the front and back
housings. CAUTION: THERE IS A COAX SIGNAL WIRE
AND A RIBBON CABLE CONNECTED FROM THE
POWER SUPPLY BOARD TO THE FRONT HOUSING
THAT MUST BE DISCONNECTED WHEN REMOVING
THE FRONT HOUSING. Place the front housing in a pro-
tected area so it will not be damaged. Figure 2-4 shows
the back housing with the power circuit board and
terminal connections. As mentioned before, the AC input
power has been wired from the factory. The sensor cable
connections are on the right side of the circuit board.
The cable for the sensor should be run in a separate
metallic conduit. Refer to Figure 2-2 and prepare the
cable ends in the following manner.
2-1/2"
2"
1-1/4"
3/4"
5/8"
5/8"
1/2"
3/4"
1/2"
1/8"
Remove
outer
cover
Remove
outer
shield
Remove
middle
cover
Remove
middle
shield
Remove
inner
cover
Completed
cable
123
45
6
FIGURE 2-2
1.
Remove outer cable cover. Measure 2-1/2" from the
end of the cable. With a cutting tool, carefully cut through
the outer covering completely around the cable making sure
not to cut into the outer shield. Make another cut from the
first cut to the end of the cable and remove the outer cover.
2.
Remove outer shield. Measure 2" from the end of
the cable. With a pair of small wire cutters, cut the shield
around the cable at the measured point and remove the cut
off shield.
3.
Remove middle cover. Measure 1-1/4" from the end
of the cable. With a cutting tool, carefully cut through the
middle covering completely around the cable making sure
not to cut into the middle shield. Make another cut from the
first cut to the end of the cable and remove the middle
cover.
4.
Remove middle shield. Measure 3/4" from the end
of the cable. With a pair of small wire cutters, cut the
shield around the cable at the measured point and remove
the cut off shield.
5.
Remove inner cover. Measure 5/8" from the end of
the cable. With a cutting tool, or pair of wire strippers,
carefully cut the inner covering completely around the
cable, making sure not to cut into the center conductor
and remove the inner cover.
After the ends of the cables have been prepared, loosen
the screws on the terminal for the center conductor.
Remove the two cable clamps. Insert the center conductor
of the sensor cable into the center conductor terminal and
tighten the screw. Slightly pull on the cable to ensure the
wire is secured to the terminal.
Place the two pairs of clamps over the middle and outer
shields and secure them into place. Verify that the clamps
are making good contact with the shields and that no
wires of the shields are extending beyond their own
clamp down area.
2-10

Badger Meter
Compu-Sonic
FLOW 1234 X 10 GPM
FLUID LEVEL = 23.35 IN
MODEL 2100
HLG
117VAC
ENCLOSURE
HOUSING
HEX
BOLTS
ENCLOSURE
HOUSING
HEX
BOLTS
FIGURE 2-3
BACK HOUSING POWER SUPPLY BOARD
POWER
OUTPUTS
4-20
MADC
TEST POINTS
SENSOR
FIGURE 2-4
2-11

FIGURE 2-5
CENTER CONDUCTOR
MIDDLE SHIELD
OUTER SHIELD
SENSOR HEAD CABLE
FUSE
SW1 SW2 SW3
SW4
P2
P1
H L G
VAC
Bat 4-20 mA
Front housing installation. After the wiring of the back
housing is completed, the front housing can be
reinstalled. Connect the ribbon cable plug S1 coming
from the front housing into the socket connector P1 on
the power supply in the back housing.
Connect the coax cable coming from the electronic
board in the front housing to the connector P3 on the
power supply board in the back housing.
Secure the front housing to the back housing with the
four hex bolts.
This completes the Enclosure Installation and Wiring
Procedure.
INSTALLATION OF CHART AND PEN ALIGNMENT
Open the recorder door and unscrew the knob from the
chart hub Lift the pen arm with the pen lifter off the chart
plate. Remove the protective cap from the fiber tipped
pen. Lower the pen close to the chart plate and adjust the
pen until it aligns with the reference scribe on the chart
plate.
Lift the pen back up with the pen lifter. Place a chart on
the chart hub and screw the knob onto the hub loosely.
Slide the edge of the chart under the five plastic holders.
Rotate the chart until the proper time line is aligned with
the pen. Tighten the knob to the hub assembly. Remove
the backlash by turning the chart knob counterclockwise.
Lower the pen arm until the pen is touching the chart.
PEN ARM
REFERENCE SCRIBE
CHART PLATE
2-12

GENERAL DESCRIPTION
The Model 2100R+ combines the Model 2100
ultrasonic flow meter and Model 3000+ circular chart
recorder into one enclosure package.
The recorder unit is supplied with a 2 line 24 character
per line LCD display for indicating rate and totalization.
The rate is displayed with 4 digits and its multiplier and
unit of measurement. The totalizer is displayed with 8
digits and its multiplier and unit of measurement.
The flow meter unit is supplied with a 2 line 24
character per line LCD display for indicating rate and
level. The rate is displayed with 4 digits and its multiplier
and unit of measurement. The level is displayed with 4
digits and its unit of measurement.
The displays for each unit are also used to program the
units through menu driven prompts. The programming is
activated via front panel keys. Each unit has five keys that
are used to access meter status information or to program
the meter. These keys are the MENU, ENTER, UP arrow,
DOWN arrow and RIGHT arrow.
The MENU key allows access to the Status Mode or
Calibration Mode of the meter. It also can be used to
return to normal operation any time you are in the Status
or Calibration Mode. If you press the MENU key while in
the Calibration Mode, the processor will store any
programming changes made up to that point, but will
retain the previous programming after that point.
The ENTER key is used to store any data changes that
are made in the Calibration Mode and advance the
screens in the Status Mode.
The UP, DOWN and RIGHT arrow keys are used for
selecting or making changes in the various screens of the
meter Calibration Mode.
OPERATION
The following will describe in detail the various
functions of the Model 2100R+ and programming steps to
recalibrate the meter in the field if necessary. The
operating instructions will be divided into two parts. The
first will cover the recorder operating and programming
instructions and the second will cover the flow meter
operating and programming instructions.
The Model 2100R+ is normally programmed at the
factory for your specific application. Refer to the Data
Sheets in the front of this manual for information
pertaining to how your unit is programmed.
Certain parameter s such as relay assignments will be
set in the field at the user's discretion. It is recommended
that the complete operating instructions be read before
attempting to make any changes to the meter.
RECORDER OPERATION
INITIAL POWER UP
After installation and wiring of the Model 2100R+,
power may be turned on by the power switch on the lower
right hand corner of the chart plate.
When power is applied, the display screen will have a
solid line across the top of the display for a few seconds.
Then the following screen will appear:
3000+ RECORDER
BADGER METER INC
3-1

This screen informs the user of the Model of the
recorder. This screen will be displayed for a few seconds.
The next screen to be displayed is the following:
SOFTWARE REVISION X.XX
SERIAL NUMBER 12345678
This screen identifies the software revision the recorder
is operating with and the serial number of the unit. This
screen will be displayed for a few seconds.
The next screen shown is the screen that will be
displayed during normal operation of the recorder.
*FLOW 1234 X 10,000 GPM
12345678 X 100,000 GAL
The top line displays the flow rate with its multiplier
and the unit of measurement. The second line displays the
totalized flow (8 digits) with its multiplier and unit of
measurement.
In the upper left corner of the display there will be
either a '—' or '*'. The '—' indicates that the meter is
functioning properly and that there are no alarms or relays
tripped. The '*' indicates that there are alarms or relays
tripped.
The recorder should be fully operational if there is an
input signal from a transmitter. The recorder is
programmed at the factory with the information supplied
by the user and the Zero and Span have been calibrated.
If the flashing asterisk is present, proceed to the Status
Mode Section to determine the cause and proper action.
STATUS MODE
The Status Mode contains the Alarms Tripped screen
and the Self Test screen. To enter into the Status Mode,
press the MENU key and the following screen will
appear:
PRESS UP FOR CALIBRATION
PRESS DOWN FOR STATUS
Press the DOWN key will allow entry into the Status
Mode screens. If you decide not to enter the Status Mode,
press the MENU key and you will return to the normal
operating screen.
Press the DOWN key and the following screen appears:
- ALARMS TRIPPED -
IN LO HI CHT INT EE
The Alarms Tripped screen will display any alarm
conditions that that occurred.
To clear the alarms, press the DOWN key. Should an
alarm still be tripped it will still be shown on the display.
The definitions of the alarms are as follows:
IN = There is no 4-20 mA input signal or the input
current is below the pen zero current value.
LO = This indicates that the low alarm setpoint has been
tripped. This setpoint may be changed, refer to the
Calibration Section of this manual.
CHT = This indicates that the chart has made a complete
rotation and the chart needs to be changed.
INT = Indicates a contact integrator pulse output has
occurred.
EE = EEPROM read/write error which indicates a
failure in the microprocessor. Consult the factory.
To return to the normal operating screen, press the
MENU key.
To enter into the Self Test screen, press the ENTER
key and the following screen will appear:
- SELF TEST -
PRESS UP TO ACTIVATE
If you decide not to enter into the Self Test section,
press the MENU key and you will return to the normal
display screen.
To enter into the Self Test section, press the UP arrow
key and the following screen will appear:
3-2

- SELF TEST -
EEPROM TEST => PASSED
This tests the EEPROM and indicates if it passed or
failed. This takes a few seconds. The following screen
will appear:
- SELF TEST -
VREF TEST => PASSED
This tests the reference voltage and indicates if it
passed or failed. The following screen will then appear:
- SELF TEST -
SERVO TEST => PASSED
This tests the servo drive system and indicates if it
passed or failed.
Should any of the screens indicate a failure, contact the
factory for the appropriate action to be taken.
Upon completion of the Self Test the unit will return to
the normal operating display screen. This completes the
Status Mode Section.
CALIBRATION MODE
The Calibration Mode allows the user to reprogram the
3000+ recorder to different parameters, calibrate the Zero
and Span, and assign and set the relay outputs.
To enter into the Calibration Mode, press the MENU
key and the following display screen will appear:
PRESS UP FOR CALIBRATION
PRESS DOWN FOR STATUS
If you decide not to enter the Calibration Mode, press
the MENU key and the display will return to the normal
operating screen.
When in the Calibration Mode and the desired change
has been made and no other changes are desired, you may
skip to the end of the calibration screens by pressing the
MENU key.
To enter the Calibration Mode, press the UP arrow key
and the following screen will appear:
SECURITY ID
INPUT 4 DIGIT ID 0000
This screen is the security identification which requires
a security code to be entered before access is allowed into
the Calibration Mode. This code is set to 0000 at the
factory. You may set a new code when in the Calibration
screen.
To enter a security code use the RIGHT arrow key to
move the cursor under the digit to be changed and use the
UP or DOWN arrow keys to change the digit to the
desired value. The values can be from 0 to 9 and A to F.
After entering the security code, press the ENTER key.
If the code is incorrect the display will return to the
normal operating screen. If the code is correct, the
following screen will appear:
MEASUREMENT UNITS
UNIT INITIALS=GPM
This screen allows the user to select the engineering
unit of measure for the flow rate. To change the units,
press the UP or DOWN arrow keys until the desired unit
is shown. The engineering units available are:
GPM = Gallons per Minute
GPD = Gallons per Day
MGD = Million Gallons per Day
CFS = Cubic Feet per Second
CFM = Cubic Feet per Minute
CFH = Cubic Feet per Hour
CMM = Cubic Meters per Minute
OPTION = Any three letters can be entered
After you have selected the unit desired, press the
ENTER key. If you have selected OPTION, skip to the
section titled OPTION on Page 3-7.
The next screen allows the selection of the multiplier
for the unit of measurement and will appear as follows:
UNIT MULTIPLIER
GPM X 1,000
When the UP or DOWN arrow keys to select the
desired flow multiplier. The following multipliers are
available:
X.001
X.01
X.1
X1
X10
X100
X1,000
X10,000
3-3

FULLSCALE UNITS=GPM
FULLSCALE=
0
000 X 1,000
This screen allows the setting of the full scale range.
Press the UP or DOWN arrow keys to change each digit
to the desired value and the RIGHT arrow key to move
the cursor under each digit. Press the ENTER key and the
following screen will appear:
TOTALIZER MULTIPLIER
X 1,000
This screen allows the selection of the totalizer
multiplier. Press the UP or DOWN arrow keys to select
the desired multiplier and then the ENTER key. The
following multipliers are available:
X.01 X100
X.1 X1000
X1 X10,000
X10 X100,000
The following screen will appear:
CHART REVOLUTION SPEED
1 REVOLUTION IN 1 DAY
This screen allows the selection of the chart rotation
speed. The following speeds are available:
1 REVOLUTION IN 2 MINUTES
1 REVOLUTION IN 24 MINUTES
1 REVOLUTION IN 1 HOUR
1 REVOLUTION IN 1 DAY
1 REVOLUTION IN 7 DAYS
1 REVOLUTION IN 31 DAYS
- - - - - -
- - -
The two dash line positions are positions for future
chart revolution speeds.
Press the UP or DOWN arrow keys to select the desired
chart speed and press the ENTER key. The following
screen will appear:
RECORDER DAMPING
DAMPING TIME = 6 SECS.
This screen allows the selection of the amount of
damping in the response of the recorder. The damping
times available are:
NONE 6
16 40
100 240
600
These times are in seconds. Higher damping produces
smoother pen lines. Press the UP or DOWN arrow key to
select the desired value and then the ENTER key. The
following screen will appear:
-FUNCTION SELECTION-
POWER=>LINEAR
This screen allows the selection of linearization
functions for use with differential pressure transmitters,
open channel flow measurement devices or any definable
function. Linear should be selected for the Model 2100R+.
Check the output specification of the device that is being
connected to the recorder to determine the proper power
election. The functions available are: s
POWER=>LINEAR
POWER=>1.55
POWER=>1.58
POWER=>1.9
POWER=>1/2
POWER=>3/2
POWER=>5/2
POWER=>OPTION
The linear function is used where the transmitter output
is proportional to flow.
The 1.55 power is used with 1", 2", 3", 24" Parshall
flumes and all Lagco flumes.
The 1/58 power is used with a 6" Parshall flume.
The 1.9 power is used with Badger Meter Manhole
flumes.
The 1/2 power is used with differential pressure
transmitters where the output does not have the square
root extracted.
The 3/2 power is used with all Rectangular and
Cippoletti weirs.
The 5/2 power is used with all V-Notch weirs.
The OPTION power allows a 16 point HQ curve to be
programmed into the recorder. Consult the factory for
programming details.
Press the UP or DOWN arrow keys to select the linear
function and then the ENTER key. The following screen
will then appear:
3-4

INPUT SELECTION
CHANNEL=ANALOG #1
This screen allows the selection of the desired input
channels to be used as the input to the recorder. For the
Model 2100R+, ANALOG #1 should be selected. There are
four channels available to connect the input(s) signal(s):
ANALOG #1, ANALOG #2, ANALOG #3, AND
FREQUENCY.
Press the UP or DOWN arrow keys to select the
ANALOG #1 input channel and then the ENTER key.
The following screen will appear:
PRESS UP FOR PEN
ARM CALIBRATION
This screen allows access into the zero and span pen
arm calibration. Do not enter unless the meter needs
calibration. Press the UP arrow key and the following
screen will appear:
-CHART PEN ZERO-
UP OR DOWN TO MOVE PEN
This screen calibrates the pen zero point on the chart
paper to the zero of the input signal. This adjustment
should be made in connection with the Model 2100. See
Recorder Zero/Span adjustment procedure on Page 3-17.
Do not press the UP or DOWN key at this time or an
improper Zero capture may occur. Press the ENTER key
and the following screen will then appear:
-CHART PEN SPAN-
UP OR DOWN TO MOVE PEN
This screen calibrates the pen span point on the chart
paper to the span of the input signal. This adjustment
should be made in conjunction with the Model 2100. See
Recorder Zero/Span adjustment procedure on Page 3-17.
Do not press the UP or DOWN key at this time or
an improper Zero capture may occur. Press the ENTER
key and the following screen will then appear:
-RELAY ASSIGNMENT-
RELAY 01=> LO
This screen allows the assignment of the relays for any
of the alarm functions. The available alarm functions are:
IN - Loss of input signal
LO - Low alarm trip
HI - High alarm trip
CHT - Completion of one chart rotation
INT - Contact integrator pulse
EE - Failure of EEPROM
- - -
- - -
There are two blank alarm positions which are
represented by the dashed lines. Press the UP or DOWN
arrow keys to select desired alarm and then press the
ENTER key. The second relay assignment will appear
with the same alarm functions to be selected as above.
After assigning the desired alarm, the following screen
will appear:
CONTACT INTEGRATOR
0000 X 1,000 GAL
This screen allows the setting of the contact integrator
to the desired amount of flow per each pulse output. For
example, if the desire is to have a contact closure every
10,000 gallons, then the number to be entered above is
0010.
Press the UP or DOWN arrow keys to change the value
of the digit and the RIGHT arrow key to move the cursor
under the digit to be changed. Press the ENTER key. The
following screen will appear:
INTEGRATOR PULSE WIDTH
ON FOR
0000 X .0328 SEC.
This screen allows the setting of the pulse width of the
contact integrator output pulse. If the device being
connected to the contact integrator output requires an
input with a minimum pulse width of 50 milliseconds,
then the multiplier would be set to 2. Use the RIGHT
arrow key to move the cursor under the digit to be
changed and the UP or DOWN arrow key to set the
desired value and press the ENTER key. The following
creen will appear: s
SET POINT ADJUSTMENT
HI ALARM = 99 PERCENT
This screen allows the setting of the High and Low
alarm set pints. Press the UP or DOWN arrow keys to the
desired value and then press the ENTER key. The LO
alarm screen set point will appear. Follow the same
procedure above to set the low alarm. The following
screen will then appear:
SET POINT ADJUSTMENT
HYSTERESIS = 03 PERCENT
3-5
/