Page is loading ...

www.adb-air.com
Airfield Lighting
Product Solutions Catalog
User ManualUser Manual
L-862S Stop Bar Elevated
Light
96A0246, Rev. G,

L-862S Stop Bar Elevated Light
96A0246 Rev. G
DISCLAIMER / WARRANTY
© ADB Airfield Solutions All Rights Reservedii
A.0 Disclaimer /
Standard Warranty
A.1 CE certification The equipment listed as CE certified means that the product complies with the essential requirements
concerning safety and hygiene. The directives that have been taken into consideration in the design are
available on written request to ADB.
A.2 ETL certification The equipment listed as ETL certified means that the product complies with the essential requirements
concerning safety and FAA Airfield regulations. The directives that have been taken into consideration in
the design are available on written request to ADB.
A.3 LED Product
Guarantee
Where applicable, per FAA EB67(applicable edition), ADB L858(L) Airfield Guidance Signs are warranted
against electrical defects in design or manufacture of the LED or LED specific circuitry for a period of 4
years. ADB LED light fixtures (with the exception of obstruction lighting) are warranted against
mechanical and physical defects in design or manufacture for a period of 12 months from date of
installation; and are warranted against electrical defects in design or manufacture of the LED or LED
specific circuitry for a period of 4 years per FAA EB67 (applicable edition).
NOTE: See your sales order contract for a complete warranty description. In some specific cases,
deviations are (to be) accepted in the contract, which will supersede the standard warranty.
A.4 Standard Product
Guarantee
Products of ADB manufacture are guaranteed against mechanical, electrical, and physical defects
(excluding lamps) which may occur during proper and normal use for a period of one year from the date
of installation or 2 years from date of shipment and are guaranteed to be merchantable and fit for the
ordinary purposes for which such products are made. ADB L858 Airfield Guidance Signs are warranted
against mechanical and physical defects in design or manufacture for a period of 2 years from date of
installation per FAA AC 150/5345-44 (applicable edition).
NOTE: See your sales order contract for a complete warranty description.
A.5 All Products LED Products of ADB, manufactured and sold by ADB or its licensed representatives, meets the
corresponding requirements of FAA, ICAO and IEC.
ADB will correct by repair or replacement per the applicable guarantee above, at its option, equipment or
parts which fail because of mechanical, electrical or physical defects, provided that the goods have been
properly handled and stored prior to installation, properly installed and properly operated after installation,
and provided further that Buyer gives ADB Airfield Solutions written notice of such defects after delivery of
the goods to Buyer. Refer to the Safety section for more information on Material Handling Precautions
and Storage precautions that must be followed.
ADB reserves the right to examine goods upon which a claim is made. Said goods must be presented in
the same condition as when the defect therein was discovered. ADB Airfield Solutions furthers reserves
the right to require the return of such goods to establish any claim.
ADB’s obligation under this guarantee is limited to making repair or replacement within a reasonable time
after receipt of such written notice and does not include any other costs such as the cost of removal of
defective part, installation of repaired product, labor or consequential damages of any kind, the exclusive
remedy being to require such new parts to be furnished.
ADB’s liability under no circumstances will exceed the contract price of goods claimed to be defective.
Any returns under this guarantee are to be on a transportation charges prepaid basis. For products not
manufactured by, but sold by ADB Airfield Solutions, warranty is limited to that extended by the original
manufacturer.
This is ADB’s sole guarantee and warranty with respect to the goods; there are no express warranties or
warranties of fitness for any particular purpose or any implied warranties of fitness for any particular
purpose or any implied warranties other than those made expressly herein. All such warranties being
expressly disclaimed.

© ADB Airfield Solutions All Rights Reserved iii
L-862S Stop Bar Elevated Light
96A0246 Rev. G
DISCLAIMER / WARRANTY
A.6
Liability
ADB cannot be held responsible for injuries or damages resulting from non-standard, unintended uses of
its equipment. The equipment is designed and intended only for the purpose described in the manual.
Uses not described in the manual are considered unintended uses and may result in serious personal
injury, death or property damage.
Unintended uses includes the following actions:
— Making changes to equipment that have not been recommended or described in this manual or
using parts that are not genuine ADB replacement parts or accessories.
— Failing to make sure that auxiliary equipment complies with approval agency requirements, local
codes, and all applicable safety standards if not in contradiction with the general rules.
— Using materials or auxiliary equipment that are inappropriate or incompatible with your ADB
equipment.
— Allowing unskilled personnel to perform any task on or with the equipment.
WARNING
Use of the equipment in ways other than described in the catalogue leaflet and the manual may result in personal
injury, death, or property and equipment damage. Use this equipment only as described in the manual.

L-862S Stop Bar Elevated Light
96A0246 Rev. G
DISCLAIMER / WARRANTY
© ADB Airfield Solutions All Rights Reservediv
A.7 © ADB BVBA This manual or parts thereof may not be reproduced, stored in a retrieval system, or transmitted, in any
form or by any means, electronic, mechanical, photocopying, recording, nor otherwise, without ADB
BVBA’s prior written consent.
This manual could contain technical inaccuracies or typographical errors. ADB BVBA reserves the right to
revise this manual from time to time in the contents thereof without obligation of ADB BVBA to notify any
person of such revision or change. Details and values given in this manual are average values and have
been compiled with care. They are not binding, however, and ADB BVBA disclaims any liability for
damages or detriments suffered as a result of reliance on the information given herein or the use of
products, processes or equipment to which this manual refers. No warranty is made that the use of the
information or of the products, processes or equipment to which this manual refers will not infringe any
third party’s patents or rights. The information given does not release the buyer from making their own
experiments and tests.

© ADB Airfield Solutions All Rights Reserved v
TABLE OF CONTENTS
A.0 Disclaimer / Standard Warranty.............................................................................................................................II
A.1 CE certification ..................................................................................................................... ii
A.2 ETL certification ................................................................................................................... ii
A.3 LED Product Guarantee ........................................................................................................... ii
A.4 Standard Product Guarantee ..................................................................................................... ii
A.5 All Products ......................................................................................................................... ii
A.6 Liability ..............................................................................................................................iii
A.7 © ADB BVBA .........................................................................................................................iv
1.0 Safety.......................................................................................................................................................................1
1.1 HAZARD Icons used in the manual ............................................................................................... 1
1.1.1 Qualified Personnel ......................................................................................................... 1
1.2 To use this equipment safely: .................................................................................................... 2
1.2.1 Additional Reference Materials: .......................................................................................... 2
1.2.2 Intended Use ................................................................................................................. 2
1.2.3 Fasteners ..................................................................................................................... 2
1.2.4 Operation ..................................................................................................................... 3
1.2.5 Storage ........................................................................................................................ 3
1.2.6 Material Handling Precautions .............................................................................................3
1.2.7 Action in the Event of a System or Component Malfunction .......................................................... 4
1.2.8 Maintenance .................................................................................................................. 4
1.2.9 Maintenance and Repair ....................................................................................................4
2.0 Elevated Stop Bar Light.......................................................................................................................................... 5
2.1 Record of Changes ................................................................................................................. 5
2.2 Introduction ......................................................................................................................... 6
2.2.1 L-862S Light Fixture: Required Equipment .............................................................................. 7
2.2.2 Specifications ................................................................................................................ 7
2.2.2.1 Input..................................................................................................................... 7
2.2.2.2 Lamp..................................................................................................................... 7
2.2.2.3 Rated Lamp Life ....................................................................................................... 7
2.2.2.4 Lens Color .............................................................................................................. 7
2.2.2.5 Environmental Operating Conditions ............................................................................... 7
2.2.2.6 Temperature ........................................................................................................... 7
2.2.2.7 Wind..................................................................................................................... 7
2.2.2.8 Altitude ................................................................................................................. 7
2.2.2.9 Relative Humidity ..................................................................................................... 7
2.2.2.10 Exposed Materials.................................................................................................... 7
2.2.2.11 Photometric Data .................................................................................................... 7
2.2.2.12 Minimum Beam Coverage ........................................................................................... 7
2.2.2.13 Minimum Average Intensity......................................................................................... 8
2.2.2.14 Lamp Current and Percent Brightness ............................................................................ 8
2.3 Installation .......................................................................................................................... 9
2.3.1 Unpacking .................................................................................................................... 9
2.3.2 Installation Instructions .................................................................................................... 9
2.3.3 Light Fixture Placement .................................................................................................... 9
2.3.4 Base Mounting ................................................................................................................ 9
2.3.5 Base Installation ............................................................................................................11
2.3.6 Light Fixture Installation .................................................................................................. 12
2.3.7 Optional Stake Installation ................................................................................................14
2.4 Maintenance .......................................................................................................................16
2.5 Troubleshooting ...................................................................................................................17
2.6 Repair ...............................................................................................................................18
2.6.1 Lamp Replacement ......................................................................................................... 18

L-862S Stop Bar Elevated Light
96A0246 Rev. G
TOC
© ADB Airfield Solutions All Rights Reservedvi
2.6.2 Lens, Reflector, and Gasket Replacement ............................................................................. 18
3.7 Parts ................................................................................................................................ 21
3.7.1 L-862S Light Fixture Part Numbering System .......................................................................... 21
3.7.2 L-862S Light Fixture Parts List ...........................................................................................21
3.7.3 Possible Spare Parts ....................................................................................................... 22

© ADB Airfield Solutions All Rights Reserved 1
1.0 Safety This section contains general safety instructions for installing and using ADB Airfield
Solutions equipment. Some safety instructions may not apply to the equipment in this
manual. Task- and equipment-specific warnings are included in other sections of this manual
where appropriate.
1.1 HAZARD Icons
used in the manual
For all HAZARD symbols in use, see the Safety section. All symbols must comply with ISO
and ANSI standards.
Carefully read and observe all safety instructions in this manual, which alert you to safety
hazards and conditions that may result in personal injury, death or property and equipment
damage and are accompanied by the symbol shown below.
1.1.1 Qualified Personnel
WARNING
• Failure to observe a warning may result in personal injury, death or equipment damage.
DANGER - RISK OF ELECTRICAL SHOCK OR ARC FLASH
• Disconnect equipment from line voltage. Failure to observe this warning may result in
personal injury, death, or equipment damage. ARC Flash may cause blindness, severe
burns or death.
WARNING - WEAR PERSONAL PROTECTIVE EQUIPMENT
• Failure to observe may result in serious injury.
WARNING - DO NOT TOUCH
• Failure to observe this warning may result in personal injury, death, or equipment
damage.
CAUTION
• Failure to observe a caution may result in equipment damage.
IMPORTANT INFORMATION
The term qualified personnel is defined here as individuals who thoroughly understand the equipment and its safe
operation, maintenance and repair. Qualified personnel are physically capable of performing the required tasks,
familiar with all relevant safety rules and regulations and have been trained to safely install, operate, maintain and
repair the equipment. It is the responsibility of the company operating this equipment to ensure that its personnel meet
these requirements.
Always use required personal protective equipment (PPE) and follow safe electrical work practices.

L-862S Stop Bar Elevated Light
96A0246 Rev. G
To use this equipment safely:
© ADB Airfield Solutions All Rights Reserved2
1.2 To use this
equipment safely:
1.2.1 Additional Reference
Materials:
1.2.2 Intended Use
1.2.3 Fasteners
WARNING
Read installation instructions in their entirety before starting installation.
• Become familiar with the general safety instructions in this section of the manual before installing, operating,
maintaining or repairing this equipment.
• Read and carefully follow the instructions throughout this manual for performing specific tasks and working with
specific equipment.
• Make this manual available to personnel installing, operating, maintaining or repairing this equipment.
• Follow all applicable safety procedures required by your company, industry standards and government or other
regulatory agencies.
• Install all electrical connections to local code.
• Use only electrical wire of sufficient gauge and insulation to handle the rated current demand. All wiring must meet
local codes.
• Route electrical wiring along a protected path. Make sure they will not be damaged by moving equipment.
• Protect components from damage, wear, and harsh environment conditions.
• Allow ample room for maintenance, panel accessibility, and cover removal.
• Protect equipment with safety devices as specified by applicable safety regulations.
• If safety devices must be removed for installation, install them immediately after the work is completed and check
them for proper functioning prior to returning power to the circuit.
Failure to follow these warnings may result in serious injury or equipment damage.
IMPORTANT INFORMATION
• IEC - International Standards and Conformity Assessment for all electrical, electronic and related technologies
• IEC 60364 - Electrical Installations in Buildings
• FAA Advisory: AC 150_5340_26 (current edition) Maintenance of Airport Visual Aid Facilities
• ANSI/NFPA 79, Electrical Standards for Metalworking Machine Tools.
• National and local electrical codes and standards.
WARNING
IMPROPER USE
Using this equipment in ways other than described in this manual may result in personal injury, death or property and
equipment damage. Use this equipment only as described in this manual.
THESE WARNINGS MAY RESULT IN SERIOUS INJURY OR EQUIPMENT DAMAGE.
WARNING
FOREIGN OBJECT DAMAGE - FOD
• Only use fasteners of the same type as the one originally supplied with the equipment.
• Always tighten the fasteners to the recommended torque. Use a calibrated torque wrench and apply the
recommended adhesive type.
• Obey the instructions of the adhesives necessary for the fasteners.
Failure to follow these warnings may cause the fasteners to loosen, damage the
equipment, potentially to loosen the equipment. This can lead to a highly dangerous
situation of FOD, with potential lethal consequences.

© ADB Airfield Solutions All Rights Reserved 3
1.2.4 Operation
1.2.5 Storage
1.2.6 Material Handling
Precautions
CAUTION
IMPROPER OPERATION
• Only qualified personnel, physically capable of operating the equipment and with no impairments in their judgment
or reaction times, should operate this equipment.
• Read all system component manuals before operating this equipment. A thorough understanding of system
components and their operation will help you operate the system safely and efficiently.
• Before starting this equipment, check all safety interlocks, fire-detection systems, and protective devices such as
panels and covers. Make sure all devices are fully functional. Do not operate the system if these devices are not
working properly. Do not deactivate or bypass automatic safety interlocks or locked-out electrical disconnects or
pneumatic valves.
• Protect equipment with safety devices as specified by applicable safety regulations.
• If safety devices must be removed for installation, install them immediately after the work is completed and check
them for proper functioning.
• Route electrical wiring along a protected path. Make sure they will not be damaged by moving equipment.
• Never operate equipment with a known malfunction.
• Do not attempt to operate or service electrical equipment if standing water is present.
• Use this equipment only in the environments for which it is rated. Do not operate this equipment in humid,
flammable, or explosive environments unless it has been rated for safe operation in these environments.
• Never touch exposed electrical connections on equipment while the power is ON.
Failure to follow this instruction can result in equipment damage.
CAUTION
IMPROPER STORAGE
If equipment is to be stored prior to installation, it must be protected from the weather and kept free of condensation
and dust.
Failure to follow this instruction can result in equipment damage.
CAUTION
ELECTROSTATIC SENSITIVE DEVICES
This equipment may contain electrostatic sensitive devices.
• Protect from electrostatic discharge.
• Electronic modules and components should be touched only when this is unavoidable e.g. soldering, replacement.
• Before touching any component of the cabinet you should bring your body to the same potential as the cabinet by
touching a conductive earthed part of the cabinet.
• Electronic modules or components must not be brought in contact with highly insulating materials such as plastic
sheets, synthetic fiber clothing. They must be laid down on conductive surfaces.
• The tip of the soldering iron must be grounded.
• Electronic modules and components must be stored and transported in conductive packing.
Failure to follow this instruction can result in equipment damage.
WARNING
UNSTABLE LOAD
• Use extreme care when moving heavy equipment.
• Verify that the moving equipment is rated to handle the weight.
• When removing equipment from a shipping pallet, carefully balance and secure it using a safety strap.
Failure to follow these instructions can result in death, serious injury, or equipment
damage.

L-862S Stop Bar Elevated Light
96A0246 Rev. G
To use this equipment safely:
© ADB Airfield Solutions All Rights Reserved4
1.2.7 Action in the Event
of a System or Component
Malfunction
1.2.8 Maintenance
1.2.9 Maintenance and
Repair
DANGER
ARC FLASH AND ELECTRIC SHOCK HAZARD
• Do not operate a system that contains malfunctioning components. If a component malfunctions, turn the system
OFF immediately.
• An open airfield current circuit is capable of generating >5000 Vac and may appear OFF to a meter.
• Never unplug a device from a constant current circuit while it is operating. Arc flash may result.
• Disconnect and lock out electrical power.
• Allow only qualified personnel to make repairs. Repair or replace the malfunctioning component according to
instructions provided in its manual.
Failure to follow these warnings will result in death or equipment damage.
WARNING
ELECTRIC SHOCK HAZARD
• Do not operate a system that contains malfunctioning components. If a component malfunctions, turn the system
OFF immediately.
• Disconnect and lock out electrical power.
• Allow only qualified personnel to make repairs. Repair or replace the malfunctioning component according to
instructions provided in its manual.
Failure to follow these warnings will result in death or equipment damage.
DANGER
ARC FLASH AND ELECTRIC SHOCK HAZARD
Allow only qualified personnel to perform maintenance, troubleshooting, and repair tasks.
• Only persons who are properly trained and familiar with ADB Airfield Solutions equipment are permitted to service
this equipment.
• An open airfield current circuit is capable of generating >5000 Vac and may appear OFF to a meter.
• Never unplug a device from a constant current circuit while it is operating. Arc flash may result.
• Disconnect and lock out electrical power.
• Always use safety devices when working on this equipment.
• Follow the recommended maintenance procedures in the product manuals.
• Do not service or adjust any equipment unless another person trained in first aid and CPR is present.
• Connect all disconnected equipment ground cables and wires after servicing equipment. Ground all conductive
equipment.
• Use only approved ADB Airfield Solutions replacement parts. Using unapproved parts or making unapproved
modifications to equipment may void agency approvals and create safety hazards.
• Check the interlock systems periodically to ensure their effectiveness.
• Do not attempt to service electrical equipment if standing water is present. Use caution when servicing electrical
equipment in a high-humidity environment.
• Use tools with insulated handles when working with airfield electrical equipment.
Failure to follow these warnings will result in death or equipment damage.

© ADB Airfield Solutions All Rights Reserved 5
2.0 Elevated Stop
Bar Light
This service bulletin cover the Elevated Stop Bar Light installation and maintenance.
2.1 Record of
Changes
Page Rev Description Checked Approved Date
All A Initial Release WT ED 10/7/99
All B
Changed to new title page. Changed ADB
to Siemens Airfield Solutions.
WT ED 5/16/01
All C/D
Changed to new title page. Changed
Siemens to ADB Airfield Solutions.
RW ER 5/21/11
All E Updated format/ drawings RW JC 8/12/14
3 F updated transformers RW JC 9/4/14
All G New format, updated intro RW JC 3/20/15

L-862S Stop Bar Elevated Light
96A0246 Rev. G
Introduction
© ADB Airfield Solutions All Rights Reserved6
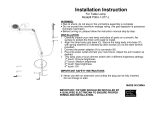
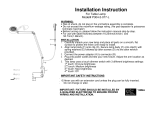
2.2 Introduction See Figure 1 for the standard L-862S light fixture for installation on a base plate with a 2 NPT
threaded hub.
This section describes the L-862S elevated stop bar fixture. The ADB Airfield Solutions L-
862S light fixtures are installed in-line with in-pavement stop bar lights on each side of the
taxiway. Refer to FAA specification AC 150/5340-30.
USES: For SMGCS operations (Cat. III) below 600 feet RVR on all lighted taxiways at runway
hold lines in conjunction with L-852S in-pavement stop bar light.
Figure 1: Figure 1. L-862S Stop Bar
The L-862S light fixture consists of the following:
• A traffic signal red lens
• Lens retaining ring
• Inner spring clip to hold lamp
• Frangible column that threads into a 2 NPT tapped hole in a 12-inch-diameter L-867 base
cover plate
The cast aluminum head and base assembly can be mounted on a standard
L-867 base plate or on a steel stake. Base mounting is easier to maintain and provides added
protection for the equipment. Stake-mounted lights require transformers, cables, and
connectors that are designed for direct earth burial.
NOTE: Refer to Table 1 for mounting heights.
NOTES: The measurements in Table 1 are taken from the grade to the top of the light fixture.
Table 1: Mounting Heights
The L-862S light fixture is available only with unidirectional red lens.
Type Height (in.) Height (mm)
Standard (FAA minimum) 14 355.6
Standard 24 610
Standard (FAA maximum) 30 762

© ADB Airfield Solutions All Rights Reserved 7
2.2.1 L-862S Light Fixture:
Required Equipment
Refer to Table 2 for required equipment that is supplied. Refer to Table 3 for required
equipment that is not supplied. Refer to the Parts section for ordering information.
Table 2: Required Equipment Supplied
Table 3: Required Equipment Not Supplied
Table 4: Isolation Transformers
2.2.2 Specifications This subsection provides specifications for the L-862S light fixtures.
2.2.2.1 Input 6.6 amps
2.2.2.2 Lamp 150 W/6.6 A PK30d
2.2.2.3 Rated Lamp Life 500 hours (minimum)
2.2.2.4 Lens Color Traffic signal red
2.2.2.5 Environmental
Operating Conditions
The L-862S light fixture is designed to operate under the conditions presented below for
temperature, wind, altitude, and relative humidity.
2.2.2.6 Temperature 55 °C (-67 °F to +131 °F)
2.2.2.7 Wind Velocities up to 300 mph (482 kph)
2.2.2.8 Altitude Sea level to 10,000 feet (3048 m)
2.2.2.9 Relative Humidity Up to 100 %
2.2.2.10 Exposed Materials Protected with aviation yellow gloss alkyd enamel paint
2.2.2.11 Photometric Data This subsection provides the following photometric data for the L-862S light fixture: minimum
beam coverage, minimum average intensity, and lamp current and percent brightness.
2.2.2.12 Minimum Beam
Coverage
+7 degrees horizontal
4 degrees vertical
Description Quantity
L-862S light fixture (includes lamp, frangible coupling, and L-823
cordset)
1
Instruction manual 1 per order
Description Quantity
Torque wrench (0200 inch-pounds) with 9/16 socket 1
Screwdriver, #2 Phillips 1
L-867 base, 12 or 16 inches in diameter. Used only when base
mounted.
1
Stake assembly, 30-inch galvanized steel. Used only when stake
mounted.
1
L-830 isolation transformer for series circuit. Refer to Table 4 for
the appropriate transformer.
1
Single conductor (primary) connector kit 1
Two-conductor (secondary) plug connector kit 1
Two-conductor (secondary) receptacle connector kit 1
Loctite Grade AV or equivalent As required
When you use this series circuit... Then use this isolation transformer...
6.6 A L-830-18
L-830-6
20 A L-830-19
L-830-7

L-862S Stop Bar Elevated Light
96A0246 Rev. G
Introduction
© ADB Airfield Solutions All Rights Reserved8
2.2.2.13 Minimum Average
Intensity
Refer to Table 5 for minimum average intensity.
Table 5: Minimum Average Intensity
2.2.2.14 Lamp Current and
Percent Brightness
Refer to Table 6 for lamp current and percent brightness.
Table 6: Lamp Current and Percent Brightness
Lens Input Power
Minimum Average Intensity
(Candelas)
Traffic signal red 6.6 A 2,000
Lamp Current (Amperes) Percent Brightness
6.6 100
5.2 25
4.1 5
3.4 1.2
2.8 0.15

© ADB Airfield Solutions All Rights Reserved 9
2.3 Installation
This section provides instructions for installing the L-862S light fixture. Refer to the airport
project plans and specifications for the specific installation instructions.
2.3.1 Unpacking The equipment is shipped ready for installation. Handle equipment very carefully to prevent
component damage. Unpack the carton upon receipt and check the contents and their
condition. Note any exterior damage to the carton that might lead to detection of equipment
damage.
If you note any damage to any equipment, file a claim with the carrier immediately
The carrier may need to inspect the equipment.
2.3.2 Installation
Instructions
This subsection describes procedures for installing the L-862S light fixture. Installing the light
fixture involves placing the light fixtures, mounting the base, installing the base, and installing
the light fixture.
NOTE: Check the packing list with the parts list to verify that all parts are present before
proceeding. Refer to the Parts section.
2.3.3 Light Fixture
Placement
L-862S elevated stop bar lights are installed with the in-pavement stop bar lights on each side
of the taxiway. They are located not more than 10 feet (3 m) from the defined edge of the
taxiway. For airports that perform any snow removal operations, if taxiway edge lights are
present, the elevated stop bar light should not be installed closer to the taxiway edge than the
line of taxiway edge lights. This is to help prevent the elevated stop bar light from being struck
by snow removal equipment.
To avoid conflicts with taxiway edge lights or undesirable spots, the elevated stop bar lights
may be moved up to 10 feet (3 m) farther from the runway, but may not be moved toward the
runway. Refer to FAA specification AC 150/5340-30.
2.3.4 Base Mounting This subsection provides installation instructions for mounting the L-867 light base.
See Figure 2. The L-862S light fixtures (1) can be mounted on an L-867 light base (3) with a
2-inch hub mated with a base plate (2) with a diameter and bolt-hole circle corresponding to
either a 12-inch (304.8-mm) or 16-inch (406.4-mm) L-867 base. The base plate has a female
thread to receive a frangible column. A gasket is used with the base plate to form a
watertight seal between the base plate and the L-867 base.
WARNING
Allow only qualified personnel to perform the following tasks. Observe and follow the safety
instructions in this document and all other related documentation.

L-862S Stop Bar Elevated Light
96A0246 Rev. G
Installation
© ADB Airfield Solutions All Rights Reserved10
Figure 2: Base Mounting/Installation
To install the L-867 base, perform the following procedure:
1. See Figure 2. Install the L-867 light base (5) on undisturbed soil. If the soil is unsuitable,
remove soil to an adequate depth and replace with compacted acceptable material.
NOTE: In closed duct systems, install in soil conditions with good drainage. Use light
bases having a drain hole to prevent water accumulation.
2. Orient the cable entrance hubs of the base in the proper directions.
3. Level the light base so that the mounting flange surface is level with the finished grade.
4. With the base at the proper orientation and held at proper elevation, place approximately 4
inches (10.16 cm) of concrete backfill (4) around the outside base.
NOTE: If the concrete backfill is omitted, the earth backfill must be compacted to maintain
proper elevation and orientation of the base.
5. Slope the top of the concrete away from the flange portion of the base so the sloped outer
edges of the concrete are at surface grade.
1. L-862S Stop Bar 4. Base Plate 7. L-830 Transformer
2. Hex Bolt (for Vertical Alignment) 5. L-867 Base 8. L-830 Transformer Secondary Female Plug
3. Locking Hex Nut
6. Four Inches Concrete
Backfill Recommended
9. L-823 Cordset Secondary Male Plug
1
4
5
6
7
8
9
2
3

© ADB Airfield Solutions All Rights Reserved 11
2.3.5 Base Installation To prepare the base for installation of the light fixtures, perform the following procedure:
1. See Figure 2. Connect the primary power line to the appropriate L-830 isolation
transformer (7). Refer to Table 4 for the appropriate transformer.
NOTE: Use a brick to raise the isolation transformer so that it is about 3 inches (76.2 mm)
above the bottom surface of the L-867 base plate (5) to avoid the possibility of the
transformer being partially immersed in water in case water accumulates under the level
of the ducts or pipes.
2. After you have connected the transformer, check the continuity of the series loop.
3. Wrap the connector joints in the primary circuit with at least one layer of rubber or
synthetic rubber tape and one layer of plastic tape one-half lapped, extending at least 1-
1/2 inches (3.81 mm) on each side of the joint.
4. Clamp the female secondary plug from the L-830 transformer to the L-867 base plate
retainer clamp.
5. Bolt the base plate (5) with the base plate gasket to the L-867 base using six 3/816
stainless steel bolts. Apply a drop of Loctite Grade AV to each bolt thread and use a
torque wrench to torque bolts to 100 inch-pounds (11.3 Nt-m).

L-862S Stop Bar Elevated Light
96A0246 Rev. G
Installation
© ADB Airfield Solutions All Rights Reserved12
2.3.6 Light Fixture
Installation
Figure 3: L-862S Light Fixture Assembly
To install the L-862S light fixture, perform the following procedure:
1. See Figure 3. Put the L-823 cordset (7) through the frangible column (6).
2. See Figure 2. Insert the L-823 male plug (9) into the secondary female plug (8) from the L-
830 transformer (7).
3. See Figure 3. Screw the frangible column (6) into the female thread on the L-867 base
plate (8).
CAUTION
See Figure 3. Do not tighten the hex nuts (10) and hex bolts (9) until the frangible column (6) is
threaded into the L-867 light base flange (8). If you attach the slip fitter (5) to the frangible column
(6) before threading the frangible column into the light base (8), you may twist the cordset (7) off
the socket or break the socket prongs. Refer to “Base Mounting” on page 9 and “Optional Stake
Installation” on page 14.
1. Spacer 5. Slip Fitter 9. Hex Bolts 13. Screw
2. Lamp Retaining Bracket 6. Frangible Column 10. Hex Nuts 14. Gasket
3. Back Door 7. L-823 Cordset 11. Lens 15. Reflector
4. Lamp 8. Base Plate 12. Lens Retaining Ring 16.
1
2
4
3
5
6
7
11
13
12
8
9
10
14
15

© ADB Airfield Solutions All Rights Reserved 13
4. Secure the light fixture head to the frangible column (6) by tightening the three hex bolts
(9) and locking the fixture into place by tightening three hex nuts (10).
5. Align the light fixture horizontally and vertically by performing the following procedure:
a. Align the light fixture head horizontally by loosening three hex bolts (9) and three hex
nuts (10). Rotate the head to provide the desired horizontal alignment. After aligning
the light fixture horizontally, tighten and apply Loctite to the hex bolts (9) and hex nuts
(10).
b. See Figure 2. Align the light fixture head vertically by loosening two hex bolts (2) and
two hex nuts (3). Rotate the head to provide the desired vertical alignment. After
aligning the light fixture vertically, tighten and apply Loctite to the hex bolts (2) and hex
nuts (3).
NOTE: Horizontal and vertical alignment parameters are specified in AC 150/5340-30.
CAUTION
Do not tighten the hex nuts (10) and hex bolts (9) until the frangible column (6) is threaded into
the L-867 light base flange (8). If you attach the slip fitter(s) (5) to the frangible column (6) before
threading the frangible column into the light base (8), you may twist the cordset (7) off the socket
or break the socket prongs. Refer to “Base Mounting” on page 9 and “Optional Stake Installation”
on page 14.

L-862S Stop Bar Elevated Light
96A0246 Rev. G
Installation
© ADB Airfield Solutions All Rights Reserved14
2.3.7 Optional Stake
Installation
This subsection provides instructions for optional stake mounting. The light fixture is mated
with a 30-inch (762-mm) steel stake with a fitting attached at the top to receive the male
thread of the frangible coupling. Stake mounting requires transformers, cables, and
connectors that are designed for direct earth burial.
To install a stake, perform the following procedure:
1. See Figure 4. Install the stake (6) in 6-inch (152.4-mm) diameter holes at a depth of 30
inches (762 mm) so that the mounting hub of the stake is level.
Figure 4: Stake Mounting
CAUTION
Do not drive stakes. Driving a stake may damage the stake and cause light fixture misalignment.
Refer to FAA specification AC 150/5340-30.
1. Frangible Column and
Disconnect Plug
4. Connectors
7. Concrete Anchor (Recommended 6
x 6 x 12-in.)
2. Stake Hub 5. 5 KV, L-824 Cable
8. Optional Bare Copper Counterpoise
Wire
3. Cable Connector Support 6. Metal Stake (30 in.) 9. L-830 Transformer
1
4
5
6
7
8
9
2
3
/