Page is loading ...

2-wire installation
Guard Unit
Wi-Fi connectivity
TCE-ART 7W/G2+ EN REV.0323 V01
CE-ART 7W/G2+
09 : 27
12 1 3-0 -202 Jue
Placa Intercomunicación Grabaciones Ajustes
USER MANUAL
TECHNOLOGY

CE-ART 7W/G2+ GUARD UNIT 2
CONTENTS
Contents ....................................................................................................................................................................2
Set-up warnings .........................................................................................................................................................2
Compatible with the guard unit....................................................................................................................................2
Characteristics...........................................................................................................................................................3
System operation .......................................................................................................................................................3
CE-ART 7W/G2+ guard unit.................................................................................................................................4 - 25
Description ......................................................................................................................................................4
Installation .......................................................................................................................................................5
I ........................................................................................................................................5nstallation terminals
Configuration switches.....................................................................................................................................5
Configuration as guard unit of "building" and operation .....................................................................................6
Configuration as guard unit of "general door panels" and operation ..................................................................7
Main menu .......................................................................................................................................................8
Settings menu ...........................................................................................................................................9 - 12
Door panel call screen....................................................................................................................................13
Communication screen ..................................................................................................................................14
Image and communication settings ................................................................................................................15
Intercom menu ........................................................................................................................................16 - 71
Recordings menu .................................................................................................................................... 8 - 201
Lost call screen........................................................................................................................................21 - 22
Contacts list and configuration "NEXA_CODE_PANEL.CSV" file ............................................................23 - 25
Cleaning the monitor ................................................................................................................................................26
Special codes ....................................................................................................................................................27 - 29
Installation diagrams with guard unit of "building"......................................................................................................30
Installation diagrams with guard unit of "general door panels" and operation modes (block mode) .........................3 - 31 3
Compliance..............................................................................................................................................................34
- before installing or marking modifications to the devices.Always disconnect the power supply
- The fitting and handling of these devices must be carried out by .authorised personnel
- The wiring must run at least .40cm away from any other wiring
-Do not overtighten the screws .of the guard unit connector
- Install the guard unit in a dry protected location free from the risk of dripping or splashing water.
- Do not place in humid, dusty or smoky locations, or near sources of heat.
-Before connecting the device to the mains, check the connections between the door panel, power supply unit,
distributors monitors, and guard unit(s).
- U Golmar (2x1mm²).se the cableRAP-GTWIN/HF
- Always follow the instructions contained in this manual.
SET-UP WARNINGS
COMPATIBLE WITH THE GUARD UNIT
- EL632/G2+ SE module, product version and later, EL642/G2+ product version and later.V08 + V066587.2
- RD/G2+ module, product version and later ( product version and later for general door panels guard unit).V03 V04
-ART 1/G2+ terminal, product version and later.V07
- T-ART/G2+ telephone, product version and later.V05
-ART4/G2+ monitor, product version and later ( product version and later for general door panels guard unit).V05 V06
-ART4 LITE/G2+ monitor, product version and later.V03
-ART 4B LITE/G2+ monitor, product version and later.V05
-ART 4H LITE/G2+ monitor, product version and later.V03
-ART 4TH LITE/G2+ monitor, product version and later.V01
-ART 7H/G2+ monitor, product version and later.V01
-ART 7LITE/G2+ monitor, product version and later ( product version & later for general door panels guard unit).V01 V02
-ART 7W/G2+ monitor, product version and later ( product version & later for general door panels guard unit).V06 V07
-ART 7T/G2+ Handset monitor, product version and later.V01
-ART 7T/G2+/TS Handset Touch Scree, product version and later.V01

3
SYSTEM OPERATION
CHARACTERISTICS
- Hands-free guard unit (Monitor manos libres, (also allows communication with a handset).
- 7" TFT colour screen.
- Touch screen for access and selection of menu function.
- Wifi transmission guard unit to call transfer to mobile smartphone. (Only the master guard unit can activate Wi-Fi
transmission).
Building installation with ART 7W apartments and Wi-Fi activated ( power supply unit required forFA-ART 7W
apartment / guard unit of building, (see page 29 )) .
General door panels installation with ART 7W apartments and Wi-Fi activated ( power supply unitFA-ART 7W
required for apartment) the guard unit connected between the RD-G2+ and the ART-G2+ power supply of the
general door panels, no additional power supply FA-ART 7W required, (see pp. 30-31). Scroll from guardNote:
unit, only general door panels & CCTV of general door panels.
General door panels installation with ART 7W apartments and Wi-Fi activated ( power supply unitFA-ART 7W
required for apartment/ guard unit of building, see page 32). Scroll from guard unit of building, door panels &Note:
CCTV of the building door panels and door panels & CCTV of the general door panels.
- Guard unit with simple installation (non-polarised 2 wires bus).
- of (building) or guard unit (general door panels), only one mode of guard unit in the installation.Guard unit of
- Up to 4 guard units as master and slave for (concierge "building" or "general door panels").
- User menu.
- Installer menu.
- .Image and communication settings menu
- Output to auxiliary call repeater (maximum 50mA/12Vdc).
- "HZ" input for calls from door.
- Door release 1 and 2 activation icons screen.
- Notification leds.
- Configuration switches (address1 and end of line)to set the guard unit .
12
CE-ART 7W/G2+ GUARD UNIT
-To make a call , the visitor must press the button ; an audible soundto guard unit corresponding call to guard unit
indicates that the call is being made and LED will turn on. If vocal synthesis is enabled, a 'Call is in progress'
message appears indicating that a call is being made. At this moment, the receive the call. If anotherguard unit call
button press correct call to guard unitis ed by mistake, press the button and the first call will be cancelled.
- Upon receiving the call, the image will appear on the screen of the master (and slave 1, if it exists) withoutguard unit
the visitor knowing and icon displayed on the screen will blink green. To view the image from slave 2 orguard units
3, press the screen for the image to appear. If the call is not answered within 45 seconds, LED will turn off and the
system will become free.
- If call transfer to your mobile phone has been programmed, you can cancel the transfer at any time from the monitor,
with it being necessary to communicate with the door panel from the main menu.
- To establish communication, press off-the-hook icon on the screen . Door panelor (lift the handset) of any guard unit
LED will .will turn off and the led turn on
- Connection will last for 90 seconds or until on-the-hook icon is pressed on the screen or (hang up the handset only
if communication has been established by lifting the ) on guard unithandset . When communication ends, LED will
turn off and the system will become free. If vocal synthesis is enabled, a 'Communication is finished' message will
indicate that the call is over.
- , press the corresponding icon during the call or communicationTo open door or of the door panel on the screen
processes: one press will activate the lock release for seconds and LED will also turn on for sec . If vocal3 3 onds
synthesis is enabled, a 'Door open' message will be indicated on the door panel.is
- guard unit 6-25.Detailed operation of theand configuration is described on pp.

4
CE-ART W/G7 2+ GUARD UNIT
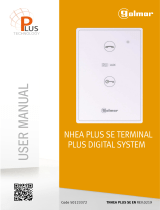
Description
A. Handset.
B. Notification icons:
Power on indicator.
Do not disturb.
Auxiliary relay activated.
Door opening.
New image/video.
Wi-Fi transfer activated.
C. Hidden start/stop communication button: For(icon)
the visually impaired, by default deactivated (see p.
27 8-2 'special codes').
D. Raised dots for the visually impaired.
E. Cable slot.
F. Speaker (hands-free communication mode).
G. Touch screen.
H. (icon)Hidden door opening button.For the visually
impaired, by default disabled (see p. -2 'special27 8
codes').
I. MicroSD card slot (not included).
Type: MicroSD Class 10 from 4Gb to 128Gb
(speed 90Mb/s or higher).
J. Microphone (hands-free communication mode).
K. Wall mounting connector fixing (x4).
L. Configuration switches.
M. Installation terminals.
N. Speaker (communication with handset).
O. UID code label of the guard unit.
P. ophone (communication with handset).Micr
SA
GND
HZ
HZ
BUS
BUS
24V
GND
ON
1 2 3 4 5 6 7 8
UID: 2111n022g7qu
DIP 1 to 7
Monitor address
SA
GND
HZ
HZ
DIP 8
EOL resistor
OFF = 0
ON = 1
128
codes
BUS
BUS
24V
GND
N
O
E
P
K
K
L
MM
A
I
CE-ART 7W/G2+ GUARD UNIT
A
G
B
C
J
D
H
E
F
I

5
Instal al tion
CE-ART W/G7 2+ GUARD UNIT
Installation terminals ( )M
For ease of installation, the installation terminals are removable and supplied in a separate bag. Once the
terminals are wired, place them in position.
BUS BUS, : communications bus (non-polarised).
24V, : local power input.GND
SA GND, : auxiliary call repeater output (maximum 50mA/12V).
HZ HZ, : apartment front door button input:
Connect only on the master guard unit. The signal received is
then transmitted to the slave in the same apartmentguard units
through the BUS.
SA
GND
HZ
HZ
BUS
BUS
24V
GND
ON
1 2 3 4 5 6 7 8
Configuration switches (L)
Avoid dusty or smoky environments or locations near sources of heat.
For proper installation, use the template supplied with the product.
1. Position the top of the template at a height of 1.65m.
2. If you are going to use an embedding box to pass the wiring through, make sure that it is in line with the holes
corresponding to the box model chosen and fix the connector. If you prefer to fix the connector directly to the
wall, make four 6mm holes at the points indicated (A), insert the wall plugs supplied and screw in the connector.
3. Pass the installation wires through the middle hole and connect them to the removable terminals as shown in the
wiring diagrams. Before connecting the removable terminals to , configure the switch as indicatedguard unit
below.
4. Connect the removable terminals to the and place the in front of the connector, makingguard unit guard unit
sure the fixings line up. Move the downwards to secure it.guard unit
Note: HZ push button function mode: When HZ push button is pressed will be call tone and activate the output of
auxiliary call repeater with standby guard unit, call process, communication process (HZ tone with lower audio
level), intercom process and "Do not disturb" mode.
If there are more than one of the guard unit (up to 4 guard units), to define whether the guard unit is master or slave
(see special codes page 27 to 28) Only one master guard unit for (concierge "building" or "general doorNote:
panels").
Important: Only the master guard unit can activate the Wi-Fi transmission.
Address 1
1 2 3
ON
4 5 86 7
Dip1 to Dip7: Sets the guard unit with address 1, (Dip1 to ON and dip2-Dip7 to OFF).
123
ON
4 5 6 7 8
Dip to8 OFF
123
ON
4 5 6 7 8
Dip to8 ON
Dip8: This activates the end-of-line resistance in the ON position. Activate it in where the bus cableguard unit
guard unitsends. Deactivate it only in intermediate .
To define whether the guard unit is master or slave:
CE-ART 7W/G2+ GUARD UNIT

6
CE-ART 7W/G2+ GUARD UNIT
"Settings as guard unit of "building"
The guard unit/s to set as guard unit of "buiding" (Up to 4 guard units), must be configured with and asaddress 1
master slave 1 slave 2 slave 3, , or ., the installation must be connected all guard units, monitors, telephones and
door panels (the monitor/s of apartment 1 must be set with a address call different to 1)."free" Then enter the
special code " in a master guard unit (see special codes on pages 27 to 28), the guard unit/s with address 1"5001
will be now a guard unit/s of building with and displaying the symbol at the top of the main menuaddress 129 left
screen The access door panel will auto-configure the(now set with adress 1 the monitor/s of the aparment 1). Note:
button P1 call address 129on the EL632/G2+ SE module with the .
Important: Guard unit compatible with the EL632/G2+ SE V08 + 6587.2 and later.
CE-ART 7W/G2+ GUARD UNIT
- The master and slave guard units/s receive the call from the access door panel/s (by pressing button P1 on the
sound module).
-The master and slave guard unit/s can be autoswitch-on with the access door panel 1.
- ,The master and slave guard unit/s receive calls from the apartments (by pressing the button below icon on
the main menu of the apartment monitor).
- , or lost callThe master and slave guard monitor(s) can be used to call the apartmets (intercom menu contacts list
screen).
-It allows internal intercommunication between the guard units.
- allow the capture of apartment calls make from the selected building doorThe master and slave guard unit/s,
panel/s (see special codes page 27 to 28). If the "night mode" of operation is enabled for the guard unit/s (see
special codes page 27 to 28), calls to apartments from the building door panel/s are not captured by the guard
unit/s when the door panel where the call is made detects "low light conditions".
- The master and slave guard units allow intercommunication with a monitor in an apartment, displaying the image
of a door panel or the connected camera of a door panel (see special codes page 27 to 2 ).9
Operation of guard unit of "building":
Note: If there are more than one of the guard unit (up to 4 guard units), to define whether the guard unit is master
slave 1, slave 2 or slave 3 (see special codes page 27 to 28) Only one master guard unit in the conciergeNote:
"building".
Important: Only the master guard unit can activate the Wi-Fi transmission.
Address 1
1 2 3
ON
4 5 86 7
Dip1 to Dip7: Sets the guard unit with address 1, (Dip1 to ON and dip2-Dip7 to OFF).
1 2 3
ON
4 5 6 7 8
Dip to8 OFF
1 2 3
ON
4 5 6 7 8
Dip to8 ON
Dip8: This activates the end-of-line resistance in the ON position. Activate it in where the bus cableguard unit
guard unitsends. Deactivate it only in intermediate .

Settings as guard unit of "general door panels"
The guard unit/s to set as guard unit of "general door panels" (up to 4 guard units), must be configured with
address 1 and as , , or .master slave 1 slave 2 slave 3 , the installation must be connected all guard units, monitors,
telephones and general door panels (the building/s door panels with EL632/G2+ SE sound module, must be
disconnected and the monitor/s of apartment 1 of differents buildings must be set with a address call"free"
different to 1). Then enter the special code " in a master monitor (see special codes on pages 27 to 28), the"5002
guard unit/s with address 1 will be now a guard unit/s of general door panels with and displaying theaddress 129
symbol at the top of the main menu screenleft (connect the building/s door panels and now set with adress 1
the monitor/s of the aparment 1 of the differents buildings). Note: The access door panel will auto-configure the
button P1 call address 129on the EL632/G2+ SE module with the .
Important: Guard unit compatible with the EL632/G2+ SE V08 + 6587.2 and later.
- The master and slave guard units/s receive the call from the general door panel/s (by pressing button P1 on the
sound module).
-The master and slave guard unit/s can be autoswitch-on with the general door panel 1.
- ,The master and slave guard unit/s receive calls from the apartments (by pressing the button below icon on
the main menu of the apartment monitor).
- , or lost callThe master and slave guard monitor(s) can be used to call the apartmets (intercom menu contacts list
screen).
-It allows internal intercommunication between the guard units.
- allow the capture of apartment calls make from the selected general doorThe master and slave guard units/s,
panel/s (see special codes page 27 to 28). If the "night mode" of operation is enabled for the guard unit/s (see
special codes page 27 to 28), calls to apartments from the general door panel/s are not captured by the guard
unit/s when the general door panel where the call is made detects "low light conditions".
The master and slave guard units allow intercommunication with a monitor in an apartment, displaying the image
of a door panel or the connected camera of a door panel (see special codes page 27 to 2 )9 .
Notes:
- Scroll from guard unit of (general door panels), only general door panels & CCTV of general door panels (see
pages 31-32).
- Scroll from (building) guard unit, door panels & CCTV of building panels and door panels & CCTV of general door
panels, (see page 33).
Operation of guard unit of "general door panels":
Note: If there are more than one of the guard unit (up to 4 guard units), to define whether the guard unit is master or
slave (see special codes page 27 to 28). Only one master guard unit for (concierge "building" or "generalNote:
door panels").
Important: Only the master guard unit can activate the Wi-Fi transmission.
Address 1
1 2 3
ON
4 5 86 7
Dip1 to Dip7: Sets the guard unit with address 1, (Dip1 to ON and dip2-Dip7 to OFF).
1 2 3
ON
4 5 6 7 8
Dip to8 OFF
1 2 3
ON
4 5 6 7 8
Dip to8 ON
Dip8: This activates the end-of-line resistance in the ON position. Activate it in where the bus cableguard unit
guard unitsends. Deactivate it only in intermediate .
7
CE-ART 7W/G2+ GUARD UNIT
CE-ART 7W/G2+ GUARD UNIT

8
CE-ART W/G7 2+ GUARD UNIT
Main menu
If the device is in standby (screen off), touch any part of the screen to activate it and bring up the main menu. The
device will return to standby mode after 20 seconds without activity.
Display the image from the door panels and cameras connected to the system.
This enables the door panel camera to be changed, the audio of the corresponding door panel to be
activated and the door to be opened.
The icon can be set to disable or enable in the main menu, the icon will change colour (grey off, white on).
See special codes pages (programmable by the installer).
Access the menu for intercom with others guard unit/s (internal intercom) r with apartmentso
( )external intercom .
Display the list of images recorded in the device memory. If there are new or unseen images, the
number will be displayed in the top right of the icon and notification will illuminate. If theled
number is greater than 9, three points will be displayed.
Change the system settings.
Indicates that the inserted MicroSD card must be formatted from the monitor. Press to access the
storage functions menu and format the card.
Press for 3 seconds to activate/deactivate Wi-Fi transmission The icon will change colour (white on,.
grey off) and notification icon will illuminate depending on the status.
Important: Only the master can activate Wi-Fi transmission.guard unit
Press for 3 seconds to activate or 1 second to deactivate the 'Do not disturb' function (the
guard unit see note a e( “HZ”p g 5)does not sound when a call is received). The
notification icon will illuminate depending on the status.
2 ...
By setting the CE-ART 7W/G2+ as guard unit of (building) or of (general door panels), the icon will
appear on main menu of the apartment’s monitors. Press to make a call to the guard unit, (see special
codes pages 27 to 28).
Press to " " + &staircase light activation (SAR-G2 SAR-12/24 modules required).
12 1 3-0 -202 Thur
Door panel Intercom Recordings Settings
09:27PM
Show the list contacts,it allows intercom calls to apartments (micro SD card must be inserted, see
pages 23 to 25).
Show the list lost call to guard unit make from the apartment/s or of the door panel/s, indicating the
date and time when they were make. Allows you to answer and delete from the list of lost calls
(recorded in the unit's memory), see pages 21-22.
CE-ART 7W/G2+ GUARD UNIT

9
CE-ART W/G7 2+ GUARD UNIT
Settings menu
Use icon to return to the main menu.
Settings
Do not disturb
Language
Storage
Time & Date
WiFi
Ringtone
About
Screen
CE-ART 7W/G2+ GUARD UNIT
Select one of the 16 languages available for the user interface. Once selected, confirm by pressing
icon , and the monitor returns to the settings menu.
Italiano Magyar
Nederlands Norsk Português
русский Slovenský Svenska
English Español Eλληνικά Français
ﺔ"ﺑ$ﻌﻟا Čeština
Dansk
Deutsch
Language

10
CE-ART W/G7 2+ GUARD UNIT
Customise the guard unit with one of the six available wallpapers, display the guard buttons (no
function), light and the date/time on the main menu screen. Validate the changes made with
icon , and the monitor will return to the settings menu.
Settings menu
Access
wallpapers:
The option selected
is shown in the main
menu.
Screen
Background
Guard button
Light button
time and date
Click play to start wipe the screen
Access code
CE-ART 7W/G2+ GUARD UNIT
Use with Access door panel
with version V05 & later.
Max. one Soul Access door
panel in the installation).
(Note: The Soul Access door
panel, not allow that guard
capture of apartmentunit
calls).
22 / 02 / 2022
02
03
01
Month
22
23
21
Day
2022
2023
2021
Year
24H
00
01
23
Hour
14
15
13
Min
Date and time
Set the date and time of the system, and the presentation format. Change the values by sliding up or
down, and use the arrows to change the formats. Validate the changes made with icon , and
the will return to the settings menu.guard unit
Adjust the call volume and identify the origin of the calls when you are not in front of the ,guard unit
select the desired volume and melodies using the arrows. Once finished, confirm your selection
with icon .
Call ringtone
1st ringtone screen 2nd ringtone screen
Access the 2nd screen Access the 1st screen
Call ringtone
Call volume
05 / 06
02 / 04
05 / 06
05 / 06
05 / 06
Door panel 1
Door panel 2
Door panel 3
Door panel 4
2
1
3
4
Bell
Intercom function
Guard
01 / 06
03 / 06
03 / 06

11
CE-ART W/G7 2+ GUARD UNIT
In the 'Do not disturb' settings, you can set a period of time during which the will not soundguard unit
(“HZ”p g 5)see note a e when receiving calls. To do so, select the do not disturb function and
choose the time period. From the main menu, you can enable and disable the 'Do not disturb'
function regardless of the timer status.
If you wish to be contacted from another monitor in another apartment, activate the intercom function.
To activate the automatic door opening function (3 seconds after receiving a call from the door panel),
select the 'Automatic door opening' function. Then choose the time period. (This function is
disabled by default. Programmable by the installer).
Validate the changes made with icon , and the monitor will return to the settings menu.
Settings menu
Not :e Allow disable enable images recording,/ ( ).Programmable by the installer
CE-ART 7W/G2+ GUARD UNIT
Do not disturb
2 : 001 07 : 00
Do not disturb
Activate intercom
07 : 00 07 : 00
Automatic door opening
In some countries, the law does not permit the storage of images or videos for more than 30 days after
recording. The automatic deletion function performs this task for you. You can disable this function if
your country's legislation does not require it, or under your responsibility.
If you have not inserted a MicroSD card into your monitor, only still images can be recorded in the
internal memory of the monitor (up to 100). If you have inserted one, the images and videos will
always be recorded on the card, and the images in the internal memory cannot be displayed until
you copy them to the card.
From this menu, you can delete contents, copy from the internal memory to the SD card and format
the card.Any of these actions will require confirmation.
Use icon to return to the settings menu.
Storage
Automatic deletion
Recording format
Internal memory
SD Card

12
CE-ART W/G7 2+ GUARD UNIT
Settings menu
Wi Fi-
Activ Wi-Fite
UID vpks9mfkrpxk
Network SSID Golmar WiFi
Call forwarding Instant
Access the call
transfer modes:
Off
No answer
About
FW
Monitor address
Instructions manual
Apps
129/M
1.01
During the first startup of the device, we recommend resetting the Wi-Fi parameters using icon .
Note that .only the master can activate Wi-Fi transmissionguard unit
The Wi-Fi menu shows information about the identity of the (UID), the name of the network toguard unit
which it is connected (SSID) and the signal strength. To connect the monitor to your Wi-Fi network,
you must use the app G2Call+:
G2Call+: For the configuration and settings of the app, click on the following link to access the
"TAPP G2Call+" manual
https://doc.golmar.es/search/manual/50123137:
Using icon , select the desired transfer mode ('instant' start of the call transfer to the mobile phone
within 3 seconds of making the call on the door panel, 'No answer' start of the call transfer to the
mobile phone 50 seconds after making the call on the door panel, "15s" start of the call transfer to the
mobile phone seconds after making the call on the door panel y "Do not divert" there is no call18
transfer to the mobile phone. Validate the changes made with icon , and the monitor will return to
the settings menu.
The 'About' screen provides information about the device, such as the version andguard unit firmware
its address.
Press 'Instructions manual' or 'Apps' to display the QR code that will take you to the updated downloads
of this instruction manual and the app for your mobile phone.G2Call+
Use icon to restore factory settings, such as language, melodies, etc. Wi-Fi parameters will not be
modified.
Use icon to return to the settings menu.
15s
CE-ART 7W/G2+ GUARD UNIT

13
CE-ART W/G7 2+ GUARD UNIT
Door panel call screen
This screen is displayed when receiving a call or pressing icon of the main menu. During a call, icon .
displayed on the screen will blink green (during the call process). In the top centre of the screen, the date and
time are shown and, on the right, the source of the image is displayed. The call has a duration of 45 seconds.
The ringtone ends.
Access the image and communication settings menu.
Start or end audio communication with the door panel displayed. Communication
has a maximum duration of 90 seconds. Once communication has ended, the screen will
turn off.
Change the source of the image as long as the system has more than one door panel or has an
external camera connected and display has been activated (see p. ). It is possible to make27-28
the change during display, call and communication processes.
if you have a MicroSD card inserted, it starts recording a 15-second video within a few seconds of
receiving the call. Otherwise, it will take a photograph. In the top left of the screen, icon is
displayed and indicator will illuminate.
By pressing, it records a video. (See p. to set the recording mode).11
1
2
12-01-20 32 Door panel 111:17
12
A few seconds after receiving a call, it automatically takes a photograph. In the top left of the screen,
icon is displayed and indicator will illuminate.
By pressing, it takes a photograph. (See p. to set the recording mode).11
Activate the lock release (or device connected to the relay output of the door panel) for 3 seconds1
(factory setting, programmable by the installer . During activation, indicator will illuminate.)
Activate the lock release (or device connected to the relay output of the door panel) for 3 seconds2
(factory setting, programmable by the installer . During activation, indicator will illuminate.)
CE-ART 7W/G2+ GUARD UNIT

14
CE-ART W/G7 2+ GUARD UNIT
Communication screen
This screen is displayed during a communication process. In the top centre of the screen, the date and time are
shown and, on the right, the source of the image is displayed. Communication has a maximum duration of 90
seconds.
End audio communication with the door panel displayed and then show the main menu.
12 1 0 3-0 -2 2 Door panel 111:17
12
Access the image and communication settings menu.
Change the source of the image as long as the system has more than one door panel or has an
external camera connected and display has been activated (see p. ). It is possible to make27-28
the change during display, call and communication processes.
1
2
Start or end audio communication with the door panel displayed. Communication
has a maximum duration of 90 seconds. Once communication has ended, the screen will
turn off.
CE-ART 7W/G2+ GUARD UNIT
Activate the lock release (or device connected to the relay output of the door panel) for 3 seconds1
(factory setting, programmable by the installer . During activation, indicator will illuminate.)
Activate the lock release (or device connected to the relay output of the door panel) for 3 seconds2
(factory setting, programmable by the installer . During activation, indicator will illuminate.)
if you have a MicroSD card inserted, it starts recording a 15-second video within a few seconds of
receiving the call. Otherwise, it will take a photograph. In the top left of the screen, icon is
displayed and indicator will illuminate.
By pressing, it records a video. (See p. to set the recording mode).11
A few seconds after receiving a call, it automatically takes a photograph. In the top left of the screen,
icon is displayed and indicator will illuminate.
By pressing, it takes a photograph. (See p. to set the recording mode).11

0 -04-2 207 0 Door panel 111:17
12
15
CE-ART 7W/G2+ GUARD UNIT
Image and communication settings
0 -04-2 207 0 Door panel 111:17
12
CE-ART 7W/G2+ GUARD UNIT
During the communication process, it is possible to adjust the image parameters (brightness, contrast and colour),
and the audio level of the monitor speaker.
Press icon and use the slider bars to adjust the settings. By pressing icon again, the settings window will
disappear.
During the display or call process, it is possible to adjust the image parameters (brightness, contrast and colour).
Press icon and use the slider bars to adjust the settings. By pressing the icon again, the settings window will
disappear.

16
CE-ART W/G7 2+ GUARD UNIT
Intercom menu
From this menu, you can contact other (internal intercom) or (external intercom). Toguard unit/s with apartments
do so, your and the monitor called must have the intercom function activated from the 'Do not disturb'guard unit
menu (see p. ).11
Use icons and to switch between internal and external intercom screens.
If during an intercom process with another a call is received from the door panel, the intercom processguard unit
will be terminated, and the door panel call will be received on the monitor.guard unit or corresponding
Use icon to return to the main menu.
Intercom
Internal intercom.
Select the monitor you wish to communicate with. The monitor that appears selected by default is your own. You
will find information about the address of the monitor in the 'About' menu (see p. 1 ). If you select the 'All' option,2
the rest of the monitors will receive the call, with communication established with the first one that answers.
To make a call, press icon , and the 'Call in progress' message will appear on the screen. The monitor(s) that
receives the call will display the 'Incoming call' message, followed by the monitor making the call. To cancel the
call, press icon , and the 'Communication completed' message will appear. To establish communication,
press icon communication will end after 90 seconds or when icon is pressedlift the handset hang
or , or( ) (
up the handset only if communication has been established by lifting the handset).
M
S2
S3
S1
Master
Slave 1
Slave 2
Slave 3 All
Guard unit making the call Guard unit receiving the call
Intercom
Call in progress
45"
Slave 1
Intercom
Incoming call
45"
Master
To perform an internal broadcast process, select the to and then pressguard unit establish communication
icon ; it is now possible to talk, listen, and raise and lower the communication volume from each of these 2
guard units. Communication will last for 90 seconds or until icon is pressed.
CE-ART 7W/G2+ GUARD UNIT
Continued overleaf

Intercom
17
CE-ART W/G7 2+ GUARD UNIT
Intercom menu
External intercom.
Enter the code of the apartment with which you wish to communicate using the keypad.
To make a call, press icon , and the 'Call in progress' message will appear on screen The masterguard unit .
monitor of the apartment called will display the 'Incoming call' message, followed by the . To"guard" message
cancel the call, press icon , and the 'Communication completed' message will appear. To establish
communication, press icon ; communication will end after 90 seconds or when icon islift the handset
or ( )
pressed hang up the handset only if communication has been established by lifting the
or ( ).handset
002
1
4
2
5
3
6
7 8
0
9
Guard unit making the call Apartment monitor 002 receiving the call
Intercom
Call in progress
45"
002
Intercom
Incoming call
45"
Guard
Guard unit in communication Apartment monitor 002 in communication
Communication established
90"
002
Intercom
Communication established
90"
Guard
Intercom
CE-ART 7W/G2+ GUARD UNIT
Continued from previous page.

18
CE-ART W/G7 2+ GUARD UNIT
Recordings menu
This menu displays the list of images saved in the or on the SD card if inserted. Press icon to accessguard unit
the video recordings saved on the SD card and icon to return to the images list. There are 10 recordings per
page and the number of pages is shown at the bottom of the screen. Use the scroll arrows to access the rest of
the pages.
Symbol indicates that the recording has not been displayed.
Use icon to return to the main menu.
To delete one or more recordings from the list, use icon . Press on the recordings you wish to delete or use
icon to select all of them. Confirm your selection using icon : a warning screen will request your final
confirmation.
Use icon to return to the image recordings list.
Delete picture
20-04-2020 10-04-2020
18-04-2020 08-04-2020
16-04-2020 06-04-2020
14-04-2020 04-04-2020
12-04-2020 02-04-2020
11:17:10 11:17:10
11:17:10 11:17:10
11:17:10 11:17:10
11:17:10 11:17:10
11:17:10 11:17:10
Picture
20- -204 020 11-04-2020
20-04-2020 08-04-2020
17-04-2020 04-04-2020
15-04-2020 01-04-2020
12-04-2020 22-03-2020
1 :1 :238 2 20:27:25
12:27:22 11:17:10
16:41:33 15:43:50
09:55:42 22:11:00
23:00:00 08:07:06
0 00301 /
0 00301 /
CE-ART 7W/G2+ GUARD UNIT
Continued overleaf

19
CE-ART W/G7 2+ GUARD UNIT
Recordings menu
Video
20-04-2020 11-04-2020
20-04-2020 08-04-2020
17-04-2020 04-04-2020
15-04-2020 01-04-2020
12-04-2020 22-03-2020
1 :1 :238 2 20:27:25
12:27:22 11:17:10
16:41:33 15:43:50
09:55:42 22:11:00
23:00:00 08:07:06
0 00301 /
To delete one or more recordings from the list, use icon . Press on the recordings you wish to delete or use
icon to select all of them. Confirm your selection using icon : a warning screen will request your final
confirmation.
Use icon to return to the video recordings list.
Delete video
20-04-2020 10-04-2020
18-04-2020 08-04-2020
16-04-2020 06-04-2020
14-04-2020 04-04-2020
12-04-2020 02-04-2020
11:17:10 11:17:10
11:17:10 11:17:10
11:17:10 11:17:10
11:17:10 11:17:10
11:17:10 11:17:10
0 00301 /
Press icon to access the video recordings.
CE-ART 7W/G2+ GUARD UNIT
Continued from previous page.
Continued overleaf

20
CE-ART W/G7 2+ GUARD UNIT
Recordings menu
07-04-2020
Door panel 1
11:17:10014 / 020 00
CE-ART 7W/G2+ GUARD UNIT
Continued from previous page.
07-04-2020 Door panel 111:17:10
To view an image recording, select it in the list. The recording will be displayed full screen. Use the scroll arrows to
display the next or previous recording. From this screen, you can also delete the recordings individually,
which always requires your confirmation. Use icon to play the images in sequence; press icon to stop
image playback.
Use icon to return to the image recordings list.
014 / 020
To view a video recording, select it in the list. The recording will be displayed full screen. Use the scroll arrows to
display the next or previous recording. From this screen, you can also delete the recordings individually,
which always requires your confirmation. Use icon to start playback of the video selected; press icon to
stop video playback.
Use icon to return to the recordings list.
/