Page is loading ...

RCH-MARK-90BL
0 3- 6 2 8 6 - 9 0 0 0

12

Dear valued customer,
Thanks for your purchase of our product.
PLEASE READ & KEEP THIS USER MANUAL
SPECIFICATIONS ………………………………………………………………......
PRODUCT DIMENSION ………………………………………………………........
PRODUCT PART DIAGRAM ……………………………………………………....
INSTALLATION REQUIREMENT …………………………………………….........
INSTALLATION PROCEDURES ……………………………………………......
CHARCOAL FILTER INSTALLATION & REPLACEMENT …………………....
OPERATING INSTRUCTIONS ………………………………………………….....
MAINTENANCE ………………………………………………………………….....
TO REPLACE LED LAMP ……. ……………………………………………….......
IMPORTANT SAFETY INSTRUCTIONS …………………………………..….
TROUBLESHOOTINGS ………………………………………………………......
WARRANTY CARD ……………………………………………………………......
....
CONTENTS
Please note that this product is marked with this symbol:
According to Waste of Electrical and Electronic Equipment (WEEE)
directive, WEEE should separately collect and treat. If in future you need to
dispose this product, PLEASE DO NOT disposes it with household waste.
Please send it to WEEE collection point.
1
1
2
3
4-6
7
7
8
8
9-10
11
12
11
TROUBLESHOOTINGS
CAUTION:Disconnect the power supply before servicing.
STATUS
CAUSE & METHOD OF REPAIRING
TOOL
Damaged of
power supply
a)Take off the filter and check the connection
between air inlet and wind chamber whether it is
sealed or not.
b)Check the connection between air exhaust pipe
and wind chamber whether there is leakage of oil or
not. If YES, please fill it up with the varnish or thinner.
c)If the motor stops running and has a bad odor after
a moment of operation, the motor wires may be
burnout. Please replace motor
d)If the starting wire (yellow) is disengaged from the
condenser, it needs to be rewired
e)If the condenser is damaged, please replace with
a new one.
a)If the motor were not firmly screwed, tighten the
screw up.
b)If the vane is damaged or unbalanced, replace
with a new one.
a)The distance is too far between the cooker hood
and hob.
b)There are many windows (doors) causes strong
wind convection.
c)If due to the position of cooker hood install upon
the window, you may put a three-ply board on the
back of the cooker hood to cover the spaces.
a)Adjust the height of the model where it is hung on
the ceiling.
b)If the model tilt forward, lock the wall with wood
screw again (the screw peep out around 0.5~1 cm
from the wall), or check the screw that fixing the
model are loose or not.
If the power supply is damaged, please call
technician to repair.
“+” type
screwdriver
sharp pincers
“+” type
screwdriver
“+” type
screwdriver
“+” type
screwdriver“+”
“+” type
screwdriver
“+” type
screwdriver
The lamp works
but the motor
does not run
Machine
vibration
Weak suction
Tilting hood
Lamp does not
light-up
Take the screw off from the lamp shade and replace
with a new light bulb, then fix the lamp shade back.

1
SPECIFICATIONS
Model Name:RCH-MARK-90BL
Total Power:240W
Motor Power:238W
LED Lamp:1×2W
Voltage:220-240V
Frequency:50Hz
Control Panel: Sensor Touch Control
PRODUCT DIMENSION
896
1318 Adjustable
380
310
400
775 Adjustable
443
513
503
Unit: mm
435
30
10
To clean the motor
fan should be undertaken
by a qualified person,pay top
attention to avoid any distortion
of the fan during carrying
out the clearance.
Never pull the plug
out of the power supply by
wet hand to avoid the
possibility of electric
shock.
Disconnect the
cooker hood from the
power supply if this
appliancewill not be used
for a long time.
Glove
Dress the protective
glove before you start to
clean the hood.Remove the
components gently during
carrying out the
clearance.
Never wash the
control switch with water
or other kind of liquid for
the liquid might cause
electrical problem to
the hood.

2
PRODUCT PARTS DIAGRAM
Motor House
Charcoal Filter
Screw
Electrical Box
Bottom Cover
Assembly
Screw
PCB
Screw
PCB fix board
Cable
Screw
Glass Panel
Oil Cup
Filter
LED Lamp
Inner telescopic duct
Hook
Outer telescopic duct
Hook
Switch Assembly
Lamp Box
Manual
Do not leave naked
flames under this hood.
IMPORTANT SAFETY INSTRUCTIONS:
9
Do not connect the air
outlet to chimney flues or
combustion gas ducts.
In case of any
damage to power cable,
replace the broken cable with
a new one by qualified
person.
Do clean the hood
correctly in accordance
with instruction stated or it
might cause the possibility
of fire accident.
To replace the bulb
should be undertaken by a
qualified electrician or a
competent person. Always
use the bulb no more
than rating.
Switchbox

3
Fig.4
Fig.1 Fig.2 Fig.3
INSTALLATION REQUIREMENT
1.Do not install the cooker hood where there are many doors or windows in
order to avoid affecting the exhaust efficiency of the hood caused by air
convection. (refer Fig. 1)
2.Install the cooker hood right above the hob. The recommended distance
between the hob and the lower edge of the cooker hood is minimum 300
mm and maximum 350mm. (Fig. 2)
3.In order to get the optimum performance, do not elongate the exhaust
pipe too long, avoid over-bending of exhaust. Ensure the connection is
airproof. (Fig. 3)
4.After hanging the unit on the wall, ensure the hood’ level is vertically
straight. (Fig. 4)
5.The air outlet must not be connected to chimney flues or combustion gas
ducts. The air outlet must be under no circumstances, be connected to
ventilation ducts in which fuel-burning appliances are installed.
300~35 0mm
8
MAINTENANCE
CAUTION: NEVER PUT YOUR HAND INTO THE AREA WHILE THE FAN
IS OPERATING. TO GAIN OPTIMAL LEVEL OF HOOD PEFORMANCE,
CLEAN THE COOKER HOOD SURFACE, FAN AND OIL FILTER
REGULARLY.
1.Use only mild soap or detergent solutions to clean the cooker hood surface.
2.Clean the filter depending to usage or at least once a week. Press the
buckle of the filter slightly, take off the filter and put it into warm soapy
water using mild detergent, lightly brush the filter with soft brush. Place the
filter back after it is dry.
3.Clean the fan motor and others internal parts twice a year or depending to
usage by QUALIFIED PERSONNEL.
4.DO NOT clean the motor with water or other liquid.
TO REPLACE LED LAMP
CAUTION: The lamp may be hot! Wait until unit is cool. If the lamps
malfunction, please replace it with a new lamp. Make sure all the control is
switches off and the cooker hood is unplugged!
Please follow below instructions:
1.Take out the filters,and cut off the wire connection of the lamp.
2.Press the spring according to the arrow direction,then you can take off
the lamp unit.
3.You can replace a new LED lamp unit no more
than rating!
4.Then put the lamp unit to the hood in reverse
direction.Connect the wire of the lamp.
5.Fit on the filters.

4
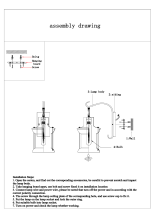
INSTALLATION PROCEDURES
please carefully read the following diagram before installation, and
install in accordance with the steps to ensure the smooth installation
of the product.
According to the dimension of
installing bracket, on the walls in the
corresponding position to accurately
determine the position of an installing
hole, use a Φ10 impact drilling out
the mounting holes, and firmly buried
expanding tube, then use the M5x50
wood screws fastening the installing
bracket tothe wall.
Remove the pan head screw with
the air outlet cross slot at the top of
the box, and then fix the hole position
of the outlet component, and fasten
the outlet component on the box with
the removed screw respectively.
≥30mm
Hole size
Φ180mm
Exhaust pipe(longest tensile 1500mm)
Hanging
wall case
Hanging
wall case
CabinetCabinet
Unit: mm
Metal Screw
5×50
Expanding Tube
Installing Bracket
435mm
28mm
Box
Air Outlet
Screw
Ring
7
CHARCOAL FILTER INSTALLATION & REPLACEMENT
1 The charcoal filters should be replaced
when it is noticeably dirty or discolored,
usually after 6 to 12 months depending
on the conditions of use.
2. These filters are not washable and
cannot be restored. To ensure that this
appliance functions effectively, regular
maintenance is necessary as clogged
filters restrict airflow and may cause the
motor to overheat.
.
3. Removing and inserting the charcoal filter:
Take the baffle filter apart, hold onto the air intakes and turn slightly.
Once the charcoal filter turns out of the screw, remove directly.
OPERATING INSTRUCTIONS
ON/OFF
LIGHT
SPEED SETTING
When it is Power-Up state, press this
button into standby mode and the
indicator lamp flashes; At the motor
working state, press this button and the
indicator lamp flashes, then the range
hood continue to operate 3 min. After the
delay, power will be cut off automatically;
At the delay state, press this button and
the power will be cut off.
Touch to select low speed.
Touch to select high speed.
Touch to turn on/off the light.
Charcoal Filter
Mounting Screw
Mounting Slot

Exhaust pipe
Air Outlet Assembly
Embed the clasp on the outlet joint
with a step at one end, then align the
clasp on the outlet and press the
clasp to the bottom.
Ring
5
Pick the cooker hood up,the hanging
hole at the back of the box assembly
is aligned with the hanger on the
installing braket, and the limiting
screw in the accessory bag is fixed
on the hole of the installing bracket to
prevent the accidental fall of the hood.
Limiting Screw
If you need connect the common flue,
please do not put the exhaust pipe too
deeply,so as to not affect the effect.
6
Installation confirmation: after installation, check the hood whether it is
solid,turn the power on and test it, examin the function whether it is normal
and whether there is abnormal vibration of the body,after confirmation,can
be used.
If you connect the exhaust pipe to
outdoor,please push it out of the wall
at least 30mm, the air outlet should be
slightly adown,to avoid rain water
intrustion.
≥30mm
Fasten the perforated end of the
Outer telescopic duct to the screw on
the top plate and gently push the
Outer telescopic duct back, then
connect the Outer telescopic duct
with the hood and fix it.
/