Page is loading ...

COOKER HOOD
RCH-22WM-RS90
RCH-19WM-RS90
TM
AFTER-SALES SERVICE
(Including Spare Part Request)
1800-282-093
603-6286 900003
www.rubine.com.my
FIAMMA TRADING SDN BHD(330476-P)
9-2, Wisma Fiamma
No 20 Jalan 7A/62A, Bandar Manjalara
52200 Kuala Lumpur, Malaysia

CONTENTS
Specifications ..............................................................1
Dimensions ...................................................................................1
Parts Diagram .......................................................................2-3
Installation Requirements ...............................................4
Installation Procedures .............................................5-7
Operating Instructions ....................................................7
Maintenance ......................................................................8
......................................................................8
Important Safety Instructions .....................................9-10
Trouble Shooting .................................................................................11
To replace LED lamp
Read and save this instruction manual
Please note th a t t h i s p r o d u c t i s m a r k e d w i t h t h i s s y m b o l :
According to Waste of Electrical and Electronic Equipme n t
(WEEE) dire c t i v e , WEEE should be separately col l e c t e d a n d
treated. If a t a n y t i m e i n f u t u r e y o u n e e d t o d i s p o s e o f t h i s
product, Ple a s e DO NOT dispose of this p r o d u c t w i t h h o u s e h o l d
waste. Pleas e s e n d t h i s p r o d u c t t o WEEE collecting p o i n t s w h e r e
available .
TROUBLE SHOOTING
CAUTION: Disconnect the power supply before servicing.
PROBLEM
CAUSE/METHOD OF REPAIRING
REQUIRED
TOOL(S)
Damaged power
supply
If the power supply is damaged, please call
technician for repair.
"+" type
Screwdriver
Sharp Pincers
Lamp works
but the motor
does not run
a) Remove the vane guard and rotate the vane by
hand. If the vane cannot move smoothly, the core
or bearings of the motor may be damaged. In this
case, replace with a new motor.
b) If the motor stops running and has a bad odor
after a moment of operation, the motor wires may
be burnout. Replace the motor.
c) If the starting wire (yellow) is disengaged from
the condenser, it needs to be rewired.
d) If the condenser is damaged, replace with a new
one.
"+" type
Screwdriver
Lamp works
but the motor
does not run
a) Take off the filter and check the connection
between air inlet and wind chamber is sealed or
not.
b) Check the connection between air exhaust pipe
and wind chamber leaks oil or not. If YES, please
fill it up with the varnish or the thinner.
"+" type
Screwdriver
Vibrating hood
a) If the motors were not firmly screwed, screw tigh
-ten them up.
b) If the vane is damaged or unbalanced, replace
with a new one.
"+" type
Screwdriver
Weak suction
a) The distance is too far between the Cooker Hood
and the Gas Cooker.
b) There are many windows (doors) cause wind con
-vection is too strong.
c) Because of the Cooker Hood is set upon the win
-dow, the best solution is that put one three-ply
board on the back of the Cooker Hood for covering
the hollow of window.
"+" type
Screwdriver
Tilting hood
a) Adjust the height of the model where is hang on
the ceiling.
b) If the model tilt forward, lock into the wall with
wood screw again (the screw peep out around 0.5
~1 cm from the wall), or check the screws for fix
-ing the model are loose or not.
"+" type
Screwdriver
Bulb does not
light
Just screw off the lamp shade and replace with a new
bulb,then put the lamp shade back.
"+" type
Screwdriver
11

1
Dear consumer,
Thank you for your purchase of our products.To ensure you use the appliance with the
best effect, please read this instruction manual with care before using and save it for
future reference.
MODEL : □ □
TOTAL POWER:
THREE SPEED MOTOR: 190W
LED lights: 2×2W
VOLTAGE: 220V~240V
FREQUENCY: 50HZ
FILTER: SLOPE filter
CONTROL:
RCH-22WM-RS90 RCH-19WM-RS90
194 W
Soft touch control
SPECIFICATIONS
DIMENSIONS
RCH-22WM-RS90
RCH-19WM-RS90
The manufacturer declines all responsibilites for damage to person(s) or thing(s)
caused by non-observance of the above prescriptions or by interference with
any part of the appliance or by the use of non-original spares
!
500mm
335mm
370mm
530mm
980mm
1066-1446
3 0
8
3 6 0
10
Glove
Put on protective
glove before you start to
clean the hood. Remove the
components gently when
cleaning.
Never wash the
control switch with water
or any kind of liquid.
Liquid might cause
electrical problem to
the hood.
Cleaning of the motor
fan should be undertaken
by a qualified person.Be careful
to avoid any distortion
of the fan when
cleaning.
Never pull the plug
out of the power supply with
wet hand, to avoid the
possibility of electric
shock.
Disconnect the
cooker hood from the
power supply if this appliance
is not in use for a long period
time.

2
Parts Diagram
RCH-22WM-RS90
Inner duct cover
Outer duct cover
Air outlet
Electrical box
Bottom cover 2
LED lamp
Oil collector
Plastic pipe
Gasket for shutter
Blower assembly
Motor
Blower
Blower fixing screw
Bottom cover
Switch panel
Oil baffle plate
Filter
Bracket
Switch(Sensor touch)
Bottom cover 1
Glass panel
9
Manual
2
IMPORTANT SAFETY INSTRUCTIONS:
Do not connect the air
outlet to chimney flues or
combustion gas ducts.
Do not leave bare
flames under this hood
In case of any
damage to power cable,
replace the broken cable with
a new one by a qualified person.
Do clean the hood
correctly in accordance
to instruction stated or it
might cause the possibility
of fire accident
replacement of the bulb
should be undertaken by a
qualified electrician or a
competent person. Always
use bulb no more
than 2W.

3
RCH-19WM-RS90
Blower cover
Seal of blower assembly
Blower fixing screw
Blower
Shockproof gasket of motor
Motor
Electrical box
Plastic pipe
Seal of blower box
Blower assembly
Air outlet
PCB
Filter
Rotating shaft
Glass panel
Protruding screw for filter
LED lamp
Oil collector
Bottom cover
Switch(Sensor touch)
8
3. Clean the filter once a week or according to use status. Press the buckle of
the filter slightly, take off the filter and put it into warm soapy water using
mild detergent, lightly brush the filter with soft brush. Replace the filter after
it is dry.
4. Clean the motor fan and other inside parts twice a year or according to use
by QUALIFIED PERSON.
5. DO NOT clean motor with water or other liquid.
MAINTENANCE
1. Use only mild soap or detergent solutions to clean the cooker hood surface.
Dry surfaces using soft cloth.
2. Use a stainless steel cleaning solution to bring the glow back into a
stainless steel finish.
Caution: Never put your hand into the area housing
while the fan is operating.
For the optimal level of operation, clean the cooker
hood surface, fan and aluminium filter regularly.
To replace LED lamp
Caution: LED lamp can not replace a new bulb, just can replace a new LED lamp.
Make sure all the control switches are off, and cooker hood is unplugged. Please
follow below instructions:
1.Take out the filters, and cut off the wire connection of the lamp.
2.Press the spring according to the arrow direction, then you can take off the lamp unit.
3.You can replace a new LED lamp unit no more then rating.
4. Then put the lamp unit to the hood in reverse direction. Connect the wire of the lamp.
5. Fit on the filters.

4
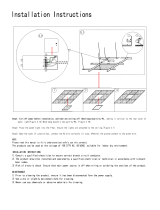
INSTALLATION REQUIREMENTS
1. Do not install the cooker hood where there are many doors or windows
in order to avoid affecting the exhaust efficiency of the hood caused
by air convection. (Fig. 1)
2. Install the cooker hood right above the hob.The recommended distance
between the hob and the lower edge of the cooker hood is minimum
350mm and maximum 400mm. (Fig. 2)
3. In order to get the optimum performance, do not elongate the exhaust
pipe too long, avoid over-bending of exhaust pipe. Ensure the
connection is airproof.(Fig. 3)
4. After hanging the unit on the wall, ensure the hood is level and vertically
straight.(Fig. 4)
5. The air outlet must not be connected to chimney flues or combustion gas
ducts. The air outlet must be under no circumstances, be connected to
ventilation ducts in which fuel-burning appliances are installed.
LEVEL
350~400mm
Fig.1 Fig.2 Fig.3
Fig.4
LEAN
OPERATING INSTRUCTIONS
7
1、How to use the soft touch control
1.Touch this button one time,it can
set time as timer to one minute,
touch each one more time can
add one minute. The longest
time you can set is 60 mins.
2.When the cooker hood non-
working,touch this button 3
seconds,you can use lighting
and high speed button to set time
like a clock .Lighting can set hour,
speed can set minute.
Timer Lighting
Touch this button
one time,the lamp
will be lighted.
Touch again,the
lamp will extinguish
Motor On/Off
1.Touch this button
one time when the
hood is working,it
will prolong working
time one minute.
2.Touch two times, it
will turn off.
Speed
Touch this button
one time
Touch this button
one time
Touch this button
one time
Step 9:
CHARCOAL FILTER INSTALLATION
Match the charcoal filter to the blower
cover and rotate charcoal filter to ward the
direction of arrow.
Blower cover
Charcoal filter
Screw
ONLY FOR RCH-19WM-RS90

5
INSTALLATION PROCEDURES
Step 3:
Insert the inner duct cover into the
outer duct cover.
Step 2:
Match the bracket to the holes
of the inner duct cover and fix it
well with M4 screws.
Match the bracket to the holes
of the Outer duct cover and fix it
well with M4 screws.
Step 4:
Match the holes of outer duct
cover and blower box, fix the outer
duct cover to the blower box using
8pcs M4 × 10 screw provided with
the fixing tool as illustrated.
Bracket
Inner duct
cover
M4 Screw
Inner duct cover
Outer duct cover
Inner duct cover
Outer duct cover
Exhaust pipe
Fix the air outlet to the blower box with four
screws.
Place the exhaust pipe to the air outlet as
illustrated and use one ST3.9X10 screw to fix
the exhaust to air outlet pipe.
Step 1:
Air outlet
Safety warning
Hood may have very sharp edges; please wear protective
gloves if it is necessary to remove any parts for installing,
cleaning or servicing.
6
Step 6:
Hang the entire hood unit onto the hook,
ensure the hood is level and vertical.
Step 7:
1. Draw the inner duct cover up to the suitable
height, mark on the wall two keyhole of the
outer duct cover bracket with pen .
2. Put down the inner duct cover gently, drill
the keyholes in 60-70 mm depth on the
horizontal level using 8mm drill.
3. Press the expanding tube provided into the
holes.
4. Match the inner duct cover with the holes,
tighten the inner duct cover with two 5x60
wood screw provided
Drill holes into wall using an 8 mm drill bit.
Use three screws to fit the hook on the wall in
the screw holes 1,2,3 .Then use one M4X20
screw fit the appliance on the screw hole 4 and
hole 5 to make sure the appliance is fixed and
can not be moved!
Step 5:
Wood Screw
5x60
Expanding Tube
Hook
1
2
3
5
4
Step 8:
Extend the air outlet of the exhaust pipe
outdoors. Try to make the bend of the
exhaust pipe to more than 120°.
5x60
Wood Screw
Expanding Tube
5x60
Wood Screw
Expanding Tube
/