Page is loading ...

WTI Part No.14360
Rev. L
WMU
WTI Management Utility
User's Guide

Page-1
1. Introduction
The WTI Management Utility (WMU) allows you to manage multiple WTI units from a
single centralized interface. The WMU eliminates the need to individually access WTI
units in order to perform firmware updates, control power switching functions, edit user
accounts and perform other functions.
2. Installation
To install the WMU on a PC or network drive, proceed as follows:
Notes:
• IftheWMUwillbesharedbymultipleusers,thenthedriveandfolderwhere
theWMUisinstalledmustbeaccessibletoallapplicableusers.
• TheWTIManagementUtilityiscompatiblewithWindowsXPandaboveand
WindowsServer2003andabove.
• InordertoruntheWTIManagementUtility,Microsoft.NetFramework3.5or
highermustbeinstalled
1. In order for the WMU to communicate with WTI devices on your network, it may
be necessary to update all target devices to the appropriate firmware version. For
Console Server products and Hybrid products, use firmware version 6.23 and
above. For Switched PDU and switched contact products, use firmware version
1.48 and above.
2. Download the WMU installer at:
ftp://wtiftp.wti.com/pub/TechSupport/WMU/WtiManagementUtilityInstall.exe
3. Run the WMU installer program. When the Software License Agreement is
displayed, select Agree to proceed with the installation.
4. During installation, the installer program will prompt you to enter a Data Location
and a Log Location. Note the following:
a) Data Location: Selects the drive/directory where saved device inventory data,
saved Plug Group information, saved Device Group information and other
saved WMU information will be stored. The Data Location must allow read/
write access by Administrator level WMU user accounts and read access by all
other WMU user accounts. (Default = Windows My Documents folder.)
b) Log Location: Selects the drive/directory where saved Audit Log records will
be stored. The Log Location must provide all WMU user accounts with read/
write access. (Default = Windows My Documents folder.)
Note:Afterinstallationiscomplete,theDataLocationcanberedefinedviathe
GeneralParametersMenuasdescribedinSection4.

Page-2
WTI Management Utility
5. When the installation process is complete, a prompt will be displayed which offers
the option to either start the WMU program or exit and start the program later. If
you choose to start the WMU program, a login prompt will be displayed. Refer to
the notes below and then enter your username and password.
Notes:
• TheUsernameandPasswordenteredmustmatchavalidaccounton
thetargetunit(s);the"Search"scanwillonlyfindunitsthatrecognizethis
UsernameandPassword.
• WhenloggingintotheWMU,itisrecommendedtouseanAdministratorlevel
password(e.g.,thedefault"super"account,)inordertoallowaccesstoall
plugsandportsondiscovereddevices.IfaUserlevelpasswordisentered
duringlogin,theWMUwillonlydisplayplugs,portsandservicesthatare
allowedforthataccount.
• WhentheWMUislaunchedforthefirsttime,theAddUnitsMenuwillbe
displayed.Atthispoint,youcaneitherproceedorcloseAddUnitsMenu
andaddunitslaterasdescribedinSection5.
3. Launching the WMU
After installation is complete, you can then launch the WMU as follows:
1. Launch the WMU application, the WMU will display a Username/Password prompt.
Notes:
• TheUsernameandPasswordenteredmustmatchavalidaccounton
thetargetunits;the"Search"scanwillonlyfindunitsthatrecognizethis
UsernameandPassword.
• WhentheWMUislaunchedforthefirsttime,theAddUnitsMenuwillbe
displayed,Atthispoint,youcaneitheraddunitsorcloseAddUnitsMenu
andaddunitslaterasdescribedinSection5.

Page-3
WTI Management Utility
4. Top Menu Bar Functions
The Menu Bar at the top of the WMU screen includes three links; File, Tools and Help.
These links provide access to the following functions:
• File: Provides access to submenus that can be used to export or import WMU
configuration parameters, reset to factory defaults or exit from the WMU program.
The Options submenu can be used to select the following parameters:
Options: Selects configuration parameters and other options for the WMU.
General Parameters:
SSH Port Range: (Start: Default = 22; End: Default = undefined)
SSH Connect Timeout: (Default = 10 Seconds)
SSH Connect Retries: (Default = 2)
SSH Read Timeout: (Default = 90 Seconds)
HTTPS Port: (Default = 443)
Enable/Disable Debug Log: (Default = Disabled)
Automatic Refresh Interval: (Default = 60 Minutes; Minimum = 5 Minutes)
FTP Connect Timeout: (Default = 30 Seconds)
Operation Batch Size: The maximum number of WTI devices that the WMU
will address simultaneously during a search operation. (Default = 100)
Reset Defaults: Resets WMU configuration parameters to default values.
WMU Data Location: The drive/directory where saved device inventory
data, saved Plug Group information, saved Device Group information and
other saved WMU information will be stored. (Default = Windows My
Documents folder.)
Note:IftheWMUwillbesharedbymultipleusers,thentheDataLocationmust
allowread/writeaccessbyAdministratorlevelWMUuseraccountsandread
accessbyallotherWMUuseraccounts.
Encrypt Audit Log Files: Encrypts the Audit Log files, which provide a
record of user activity and events at the WMU.
Notes:
• Although,theWMUcansearchgroupslargerthanthedefinedOperation
BatchSize,duringthesearchprocessthenumberofunitsaddressedwill
bebrokendownintoblocksasdefinedbytheOperationBatchSize.Ifyou
encounterdifficultiesduringthesearchprocedure,settingtheOperationsize
atalowernumberwilloftencorrecttheproblem.
• IfaDeviceGroupincludesmorethan200WTIdevices,theWMUwillnot
automaticallyrefreshtheManageInventoryscreenwhenthestatusofunitsin
theDeviceGroupchanges.Inthiscase,theManageInventoryscreenmust
berefreshedmanuallyasdescribedinSection6.

Page-4
WTI Management Utility
Firmware Upgrade Parameters:
From www.wti.com: Configures the WMU to search for Firmware Upgrades
at www.wti.com.
From Local Folder: Configures the WMU to search for Firmware Upgrades
in a local, user-specified drive/folder. (Default = Currently defined WMU
Data Location.)
Notes:
• WhenafirmwareupgradeisperformedonaWTIproductthatincludespower
controlcapabilities,theOn/OffstatusofpoweroutletsonupgradedWTI
deviceswillnotbeeffected.
• NotethattheWMUDataLocationcanbedefinedviatheGeneralParameters
menu,asdescribedonthepreviouspage.
• Theselectedlocalfoldermustbeinalocationthatisaccessibletoall
WMUusers.
Verification Timeout: If the WMU times out during upgrade verification, it
may be necessary to increase the Verification Timeout value. (Default = 7
Minutes; Minimum = 5 Minutes)
Reboot Before Upgrade: Determines whether or not devices in inventory
will be automatically rebooted prior to a firmware upgrade. In most cases,
it is recommended to leave this parameter in the default state.
(Default = WTI Required.)
Reboot Wait Timeout: (Default = 3 Minutes)
Notes:
• Inordertoensurethatsufficientmemoryisavailable,ConsoleServer
productsrunningfirmwareversions6.23to6.33andSwitchedPDUproducts
runningfirmwareversions1.48to1.58mustberebootedpriortostarting
theupgradeprocedure.Torebootadevicewithoutpoweringdown,itis
recommendedtouseeithertheresetbuttononthedevicefrontpanel
(asdescribedinthedeviceuser'sguide)orinvokethe/Icommandviathe
TextInterface.
• IftheWMUhasbeenconfiguredusingasavedWMUconfigurationfile,the
FirmwareVerificationTimeoutparameterwillbesetat8minutes.
Proxy Parameters:
Type: (Default = None)
Hostname: (Default = undefined)
Port: (Default = 0)
Username: (Default = undefined)
Password: Default = undefined)
Local Modem Settings:
Port: (Default = First Available COM Port)
Baud Rate: (Default = 115200)

Page-5
WTI Management Utility
Export Device Group Configuration: Exports a Device Group configuration file
for the currently selected Device Group and allows the user to choose a location
where the configuration file will be saved.
Import Device Group Configuration: Imports a previously saved Device Group
configuration file and sets WMU parameters to match that file.
Set Factory Defaults: When this item is selected, all WMU configuration
parameters will be reset to their default values. Note that a prompt will be
displayed before parameters are actually reset.
Exit: Closes the WMU program.
• Tools: Provides access to the Add Units Menu (see Section 5,) the Manage
Inventory Menu (see Section 6) and the Plug Group Control Menu
(see Section 7.)
Note:TheManageInventoryMenuandthePlugGroupControlMenucanalso
beaccesseddirectlyfromthetopbarmenu.
• Help: Provides access to the Tech Support Contact Information page, this User's
Guide, the most recently published Release Notes, the Check for Software Updates
function, the View Audit Log function and also displays information about the
WMU program.
5. Adding WTI Devices
The Add Units Menu allows you to find compatible WTI devices within a user-defined
range of IP addresses or port numbers. The Add Units Menu can be accessed via the
"Add Units" link in the Tools Menu or via the "Add Units" button in the Manage Inventory
Menu.
Notes:
• Inthedefaultstate,SSHisenabledateachtargetWTIdevice.Ifyouhave
disabledSSHatanytargetWTIdevice,pleaseenableSSHasdescribedin
theWTIuser'sguideforthatdevice.
• InorderfortheWMUtocommunicatewithWTIdevicesonyournetwork,it
maybenecessarytoupdatealltargetdevicestotheappropriatefirmware
version.ForConsoleServerproducts,usefirmwareversion6.23andabove;
forSwitchedPDUproducts,usefirmwareversion1.48andabove.For
moreinformation,pleasecontactWTICustomerServiceasdescribedin
AppendixA.

Page-6
WTI Management Utility
1. The Add Units menu offers the option to either search a user-defined range of
IP addresses or port numbers, or to import a CSV format file that contains the IP
addresses or port numbers for each WTI unit.
a) To add units based on a range of IP addresses or port numbers, enter the start
and end IP addresses or port numbers to define the IP address range or port
number range and then click on the Search Button.
Note:WhenaddingunitslocatedonaLANsegmentthatismanagedbya
3G/4G/LTEcellularrouter,makecertaintoindicatetheSSHPortNumber(or
rangeofSSHPortNumbers)forthedesireddevices.Somecellularroutersthat
utilizeportforwardingwillonlyrecognizeportnumbersfordevicesandwillnot
beabletofinddevicesifonlyIPaddressesareentered.
b) To add units from a list of IP addresses and port numbers, select "Import
IP File," enter the desired filename (or select the filename using the browse
button.) When creating an IP list, please refer to the note below for formatting
instructions.
Notes:
• IfyouhavenotpreviouslyaddedaWTIdevicewithintheselectedrangeofIP
addressesorportnumbers,theWMUwilldisplayaSecurityWarning,saying
thatsomeoftheIPaddressesorportnumberswithinthesearchrangedo
notmatchknownhosts.Toproceed,clickontheAcceptKeysbutton.
• WhenenteringarangeofIPaddressesorportnumberstosearch,notethat
theWMUcansearchmultiplesubnetsprovidingthattheIPaddressorport
numberrangeenteredincludesIPaddressesorportnumberswithinthe
desiredsubnet.
• WhenimportingaCSVformatfilethatcontainsIPaddressesorportnumbers
foreachdesiredunit,notethatthefilemustbecommadelimited.
• IftheWMUfindsWTIdevicesthatarerunningincompatiblefirmware
versions,anerrormessagewillbedisplayed.Click"OK"toproceed.
2. When the search process or "Import from File" process is complete, the Add Units
menu will display a list of newly discovered devices. To add a device from the list,
make certain that the box next to the desired device's IP address is checked.
3. After selecting devices from the list of newly discovered devices, you can either add
a tag to each device that you intend to add to the WMU's inventory, or tag devices
later as described in Section 6.
4. Click on the Add to Inventory button to add the selected units and then close the
Add Units Menu. When new units are added to inventory, the Manage Inventory
Menu will automatically be populated with the IP Address, Product Type, Site ID
Message and other data for each added unit as described in Section 5.1

Page-7
WTI Management Utility
5.1. Adding Unit Info
When WTI units are added to the WMU's inventory, data such as the IP Address,
Site ID and other information for each WTI device will also be automatically added to
the Manage Inventory Menu. This data will be derived from one of three sources as
summarized below:
1. Native Data - Determined by the characteristics of each WTI device:
• IP Address
• PortNumber
• Unit Type
• Number of Ports
• Number of Plugs
• Alarm Status
• CellStaticIP
• Serial Number
• Software Version
• ProcessorType/Generation
2. User-Defined Data from Unit - Information entered via the Unit Configuration
Menus on each WTI Device:
• Site ID - Defined via System Parameters Menu.
• Port Names - Defined via Port Configuration Menu; View via Port Control Menu.
• Plug Names - Defined via Plug Configuration Menu; View via Plug Control Menu.
• Phone Number / Public IP Address - Defined via each unit's System
Parameters Menu.
• Asset Tag - Defined via each unit's System Parameters Menu.
3. Data from the WMU - Information that was defined via the WMU:
• Tags - A user-defined text string that can be used to describe the location, function
or other information regarding each device. Tags are defined via the Manage
Inventory Menu's Tag Management function as described in Section 6.
Note:IfdataitemsaremissingforcertainWTIdevices,thisismostlikelydue
tothefactthatthedatahasnotyetbeendefinedviaeithertheWTIdevice's
configurationmenusortheWMU'sTagManagementfunction.

Page-8
WTI Management Utility
6. The Manage Inventory Menu
After you have added WTI devices, the WMU will return to the Manage Inventory
Menu. The Manage Inventory Menu is used to search for WTI devices, control power
switching, upgrade firmware, manage passwords and for other general management
tasks described below. To access the Manage Inventory Menu, click the "Manage
Inventory" button in the top menu bar or file menu. The Manage Inventory Menu offers
the following functions:
Note: TheManageInventorymenuwillonlydisplaydevices,plugsandports
thatareallowedbythepassword/usernameenteredwhenloggingintothe
WMU.Ifthepassword/usernamedoesnotallowaccesstoadevice,portor
plugthendevices,portsorplugsnotcoveredbythepassword/usernamewill
beshowninred.
• Search: The Search menu in the Manage Inventory screen allows users to employ
filters to quickly locate WTI devices in inventory based on various search criteria.
The Search menu includes the following options:
Saved Filters: Once filters have been defined and saved as described below,
this drop down menu can be used to select a saved filter in order to speed the
process of locating units in inventory.
Note:Whensavingafilter,theFilterManagementsubmenuofferstheoptionto
designatethefilterasthedefaultfilter.Whenadefaultfilterisselected,thisfilter
willautomaticallybeappliedeachtimetheManageInventoryMenuisdisplayed
andanasteriskwillappearnexttothefiltername.Thishelpstospeedlocation
ofregularlyaccessedWTIdevicesbyensuringthatthosedevicesappearwhen
theManageInventoryscreenisactivated.
Filter Management: After filters have been defined as described below, this
option can be used to save the filter, delete a previously saved filter or to
designate the default filter.
Note:Anasteriskwillappearnexttothedefaultfilter'sname.
Filter By: These two fields are used to define search criteria. The drop-down
menus on the left can be used to search a specific field or column of the
inventory list, or to search all fields/columns. The fields to the right of the drop-
down menus are used to enter search criteria; the presence of two fields allows
the definition of overlapping search criteria.
Match Case: When this item is selected, the search function will only display
results that match the case of the search criteria entered in the Filter By fields.
Show All: After the Search function has been employed to find specific devices
within the inventory, the Show All button can be used to display all WTI devices
currently in inventory.

Page-9
WTI Management Utility
Search: Executes a search of the currently selected Device Group based on
user-defined Filter By parameters.
Notes:
• TheasteriskcharactercanbeusedasawildcardcharacterintheFilterBy
searchstring.Theasteriskcharactercanbeenteredatthebeginningorthe
endofthesearchstring,butcannotbeenteredinthemiddleofthesearch
string.
• TheDeviceGroupManagementfunctioncanalsobeusedtosimplify
theprocessoffindingadesiredWTIdeviceininventoryasdescribedin
Section8.
• Device Group Management: Allows WTI devices in inventory to be sorted into
groups in order to simplify the process of finding a desired WTI device within a
large inventory of devices as described in Section 8.
• Export Units to Device Group: Adds selected units to an existing Device Group as
described in Section 8.1.
• Add Units: Displays the Add Units menu, which allows you to find any compatible
WTI device within a user defined range of IP addresses and if desired, Port
Numbers. For more information regarding the Add Units menu, please refer to
Section 5.
• Refresh: Reloads the Manage Inventory menu on demand.
Notes:
• InadditiontotheRefreshbutton,theWMUalsoincludesanAutoRefresh
functionthatwillregularlyrefreshtheInventoryDisplayatuser-defined
intervals.ToselecttheAutoRefreshInterval,pleaserefertoSection4.
• IfaDeviceGroupincludesmorethan200WTIdevices,theWMUwillnot
automaticallyrefreshtheManageInventoryscreenwhenthestatusofunitsin
theDeviceGroupchanges.Inthiscase,theManageInventoryscreenmust
berefreshedmanually.
• Upgrade Firmware: Checks for available firmware updates for selected WTI units,
and then downloads and applies any applicable updates to the selected units.
Notes:
• WhenafirmwareupgradeisperformedonaWTIproductthatincludespower
controlcapabilities,theOn/OffstatusofpoweroutletsonupgradedWTI
deviceswillnotbeeffected.
• TheUpgradeFirmwarefunctionofferstheoptiontoexportalistofall
selectedWTIdevicestoaCSV(MicrosoftExcel)formatfile.Thisfunctionis
providedforsystemdocumentationpurposes.
• TheDeviceGroupOperationsMenucanalsobeusedtomanage
firmwareupgradesforallunitsinaselectedDeviceGroupasdescribedin
Section8.4.

Page-10
WTI Management Utility
• Configure: Displays a submenu which can be used to send a configuration file to
the selected WTI devices.
Notes:
• TheConfigurefunctionofferstheoptiontoexcludeanyconfiguration
parametersrelatedtoSystemParameters,SerialPortParametersorPower
PlugParameters.Iftheseoptionsarenotselected,theWMUwillapplyall
parametersspecifiedbytheconfigurationfile.
• TheConfigurefunctionalsoofferstheoptiontoexportalistofallselected
WTIdevicestoaCSV(MicrosoftExcel)formatfile.Thisfunctionisprovided
forsystemdocumentationpurposes.
• Password Management: Displays a submenu which can be used to edit user
passwords on the selected WTI devices.
Notes:
• ThePasswordManagementfunctiondoesnotprovidetheabilitytocreate
newuseraccounts/passwords.
• ThePasswordManagementfunctionalsoofferstheoptiontoexportalistof
allselectedWTIdevicestoaCSV(MicrosoftExcel)formatfile.Thisfunction
isprovidedforsystemdocumentationpurposes.
• TheDeviceGroupOperationsmenucanalsobeusedtomanagepasswords
forallunitsinaselectedDeviceGroupasdescribedinSection8.4.
• Tag Management: Displays a submenu that can be used to assign user-defined
identification tags to each selected unit. Once units have been tagged, the Search
function can locate all units that share identical tags. The Tag Management menu
can also be used to delete tags for selected units, or clear all tags regardless on
selected units.
Note:IfWTIdevicesininventoryhavebeenassignedtoDeviceGroupsas
describedinSection8,thentagswillnotbesharedbetweenDeviceGroups.
EachDeviceGroupwillmaintainitsownseparatelistoftags.
• BackUp/Restore: When the BackUp function is selected, the WMU will save all
configuration parameters for the selected device(s) to an XML format file. Once
a BackUp file has been created, the Restore function can then be used to reload
saved parameters to the selected device(s.)
Note:TheBackUpfunctionofferstheoptiontoexportalistofallselected
WTIdevicestoaCSV(MicrosoftExcel)formatfile.Thisfunctionisprovidedfor
systemdocumentationpurposes.
• Launch Session: Initiates an SSH or Web (if enabled) connection to the selected
WTI unit. Once connected, the user is presented with the WTI device command
interface. When the command interface is displayed, the user can invoke WTI
control, configuration and display commands for the selected unit.

Page-11
WTI Management Utility
• Control All Plugs: This feature can be used to switch all plugs on selected units
that support power switching functions. To switch all plugs On, Off or to initiate a
reboot cycle, check the corresponding box(es) in the Manage Inventory Screen's
"Select" column to indicate the desired units, click on the "Control All Plugs" button
to display the Control All Plugs menu, select the desired operation (On/Off/Reboot)
and then click the "Execute" button.
Notes:
• TheDeviceGroupOperationsmenucanalsobeusedtocontrolpower
switchingandrebootfunctionsforallWTIdeviceswithinaselectedDevice
GroupasdescribedinSection8.4.
• ThePlugGroupControlmenucanalsobeusedtocontrolpowerswitching
andrebootfunctionsforalloutletswithintheselectedPlugGroup.
• Delete: Removes selected WTI units from the inventory.
• Export: Exports currently displayed WTI devices to a CSV (Microsoft Excel) format
file. This function is provided for system documentation purposes.
Note:WhendevicedataisexportedtoaMicrosoftExcelfile,apoundsign(#)
willbeaddedtothebeginningoftheserialnumberstringandthe
assettagstring.
• Ports: To display the Port Control Menu for any WTI device currently listed in
inventory, click on the Port cell/button for the desired device. In addition to
displaying the status of all available ports on the selected device, the Port Control
Menu can also be used to connect or disconnect ports on the selected device.
To connect ports, use the drop down menu to select "Connect" for the two
desired ports and then click on the Execute button.
To disconnect ports, use the drop down menu to select "Disconnect" for either of
two connected ports and then click on the Execute button.
• Plugs: To display the Plug Control Menu for any WTI device currently listed
in inventory, click on the Plug cell/button for the desired device. In addition to
displaying the status of all available plugs on the selected device, the Plug Control
Menu can also be used to control power switching and reboot functions for any
available plug on the selected device. To reboot, switch off or switch on power at
any available plug, use the drop down menu to select the desired power control
operation and then click on the Execute button.
Note:Insomecases,theupdatedOn/Offstatusofeachplugmaynotbe
immediatelydisplayedafterapowerswitchingorrebootcommandisinitiated.
Todisplayupdatedplugstatus,clickthe"Refresh"button.
• Alarm Status: This item can be used to view the Alarm Status of any WTI device
currently listed in the inventory display. If an alarm has been triggered at any listed
device, the Alarm Status for that device will read, "Active." If an alarm has not been
triggered, the Alarm Status will read, "None." To review the Alarm Status for any
listed device, click on "Active" or "None."

Page-12
WTI Management Utility
• Phone Number / IP Address: If a Modem Phone Number / IP Address has been
defined for any unit in the WMU's inventory, this item can be used to initiate a dial-
up connection to or from the corresponding unit. Note that two different types of
dial-up connections described below can be initiated by clicking on the Phone
Number/IP Address Field.
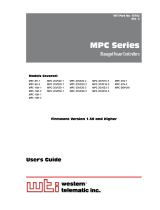
Call This Unit From COM Port: The WMU will use a modem installed at
currently selected COM Port on your PC to contact the selected WTI unit as
shown in Figure 1 below. This type of action is typically used to create an
out-of-band connection to a remote WTI device in the event that network
communication is temporarily unavailable.
Note:TheCOMPortusedforthisfeatureisselectedviatheOptionsMenu,
undertheLocalModemSettingstab.TheOptionsMenucanbeaccessedvia
theFileMenuasdescribedinSection 4.
WTI.COM
PC with Modem
at COM3
Remote WTI Device
with Modem
PSTN
WAN
Call from WMU
Figure 1: Call This Unit From COM Port - Example

Page-13
WTI Management Utility
Call From This Unit: The WMU will create an SSH connection to the selected
WTI device and then use the WTI device's internal modem to dial a user-defined
phone number as shown in Figure 2 below. This type of action is generally used
to allow a laptop or tablet that doesn't have access to a modem of its own to
"share" the internal modem of a remote WTI device.
Notes:
• PriortoexecutingaDial(Call)command,itisrecommendedtocheckthe
PortControlMenuinordertoverifythattheModemisFree.
• TheCallSetupmenualsoincludesaPhonebookfunction.Phonebook
entriescaneitherbemanuallyadded,oneatatime,usingtheAddEntry
button,orimportedfromthedevicesintheWMU'sinventoryusingthe
PhonebookMenu'sImportPhoneBookoption.
WTI.COM
Laptop
without Modem
WTI Device
with Modem
Target Device
at 555-555-555
PSTN
WAN
Call from
WTI Device ModemSSH
Figure 2: Call From This Unit - Example

Page-14
WTI Management Utility
7. Creating Plug Groups
After you have added WTI devices to the Managed Inventory List, you may then arrange
outlets on WTI remote power control products into Plug Groups. In applications where
individual network elements may draw power from two or more switched PDUs. This
provides administrators with a simplified means for controlling power switching and
reboot functions for networked elements.
User-defined Plug Groups can be defined to include only outlets on one individual WTI
power control device, or a selection of outlets scattered across multiple WTI power
control devices
To display the Manage Plug Group Control menu, click the Plug Group Control button in
the top menu bar. The Manage Plug Group Control menu offers the following functions:
• Add Plug Group: Displays a submenu which can be used to define a new group,
select a name for the group and then assign individual outlets on WTI devices to the
group.
Notes:
• TheAddGroupmenucanbeusedtodesignatespecificplugs(outlets)on
eachselectedunitthatwillbeincludedinthePlugGroup.
• WhenspecifyingunitsandoutletstobeincludedinaPlugGroup,youcan
eitherenterthenameornumberofeachdesiredunitoroutlet(comma
delimited)orselectthedesiredunitfromthedropdownmenu.
• TheAddPlugGroupsubmenualsoofferstheoptiontodefinetheBootDelay
period(theamountoftimethatwillelapsebetweenpoweroffandpoweron
duringarebootcycle.)
• Import From File: After the Manage Plug Group Control menu's "Export" function
has been used to save user-defined Plug Group information, the Import From File
option can be used to restore previously saved Plug Groups.
• Refresh: Re-loads/updates the Manage Plug Group Control menu to reflect recent
status changes.
• Control: The Control function is used to send power On, Off or Reboot commands
to outlets within a user-defined Plug Group.
• Modify: This item can be used to edit existing Plug Groups.
• Delete: Deletes currently selected Plug Group.
• Export: Saves current Plug Group definitions to a file. Once Plug Group definitions
have been exported and saved, the resulting file can be used to restore the saved
Plug Group definition via the Import From File function.

Page-15
WTI Management Utility
8. Device Groups
Device Groups can be used to simplify the process of finding desired WTI units within
the WMU's inventory. In cases where the WMU's inventory includes large numbers of
WTI devices spread across multiple installation sites, Device groups allow you to sort
units based on location, function or other factors.
Notes:
• WTIrecommendsthateachDeviceGroupshouldcontainlessthan
100WTIdevices.
• IfaDeviceGroupincludesmorethan200WTIdevices,theWMUwillnot
automaticallyrefreshtheManageInventoryscreen.Inthiscase,theManage
InventoryscreenmustberefreshedmanuallyusingtheManageInventory
screen'sRefreshfunctionasdescribedinSection6.
• Whenunitsareaddedtoinventory,theWMUwillautomaticallycreatea
defaultDeviceGroupnamed,"WMUDefault"whichincludesallWTIdevices
currentlyininventory.
• Tochangethedefaultdevicegroup,refertoSection8.1below.
• ThedefaultDeviceGroupisindicatedbyanasteriskcharacterthatappears
attheendoftheDeviceGroupnameintheSetDeviceGroupmenu.
• ThedefaultDeviceGroupwillalwaysbedisplayeduponlogintotheWMU.
8.1. Defining Device Groups
In order to create a Device Group, you must first create and name the group and then
add desired WTI units to the group:
1. From the Manage Inventory menu, click the Device Group Management button to
display the Device Group Management menu. The Device Group Management
menu allows you to select groups, add groups, rename groups, delete groups and
control power switching/reboot functions for the selected Device Group. To create
a new device group, click on the Select/Add Device Group button. The Select/Add
Device Group menu will appear.
2. At the Select/Add Device Group menu, click "New Device Group" and then key in a
name for the new Device Group.
3. If you wish to designate the newly created Device Group as the WMU's default
Device Group, check the "Set as Default" box.
4. After you have finished naming the new group, click "OK." When the Device Group
Management menu is displayed, click the "Close" button to return to the Manage
Inventory menu.

Page-16
WTI Management Utility
5. After a new device group has been named and created, you can add WTI units to
the device group using either or both of the two methods described below:
a) Add Units Function: Open the new Device Group as described in Section 8.2
and then add WTI units to the new Device Group as described in Section 5.
b) Export Units to Device Group: This function allows you to select units from
an existing Device Group, (e.g., the WMUDefault Device Group,) and then
export them to other device groups.
i. Select an existing Device Group that contains the units that you wish to
add, (e.g., the WMUDefault Device Group,) and then open that Device
Group as described in Section 8.2.
ii. When the Device Group is displayed by the Manage Inventory menu,
select the desired WTI unit(s) and the click on the "Export Units to Device
Group" button. The Export to a Device Group menu will be displayed.
iii. Use the Export to a Device Group menu to select the desired Device
Group (e.g., the new Device Group that you just created,) and then click
on the OK button.
iv. The selected WTI unit(s) will be added to the Device Group.
8.2. Selecting a Device Group
After you have defined one or more Device Groups, groups can be loaded using either
the Device Group Management menu's Select/Add Device Group button or the Current
Device Group Drop Down Menu:
1. Device Group Management Select/Add Device Group Button:
a) Click the Device Group Management button to display the Device Group
Management menu as described in Section 8.1.
b) To select a Device Group, click on the Select/Add Device Group button.
c) When the Select/Add Device Group menu appears, make certain that "Existing
Device Group" is checked, use the drop down menu to select the desired
Device Group and then click, "OK."
d) When the Device Group Management menu appears, click "Close" to return
to the Manage Inventory menu. Devices from the selected group will now be
displayed in the Manage Inventory Menu.
2. Current Device Group Drop Down Menu:
a) Click on the down arrow next to the Current Device Group field in the Device
Group area at the top center of the Manage Inventory menu.
b) When the drop down menu appears, select the desired Device Group.
c) After a brief pause, the selected Device Group will be displayed in the Manage
Inventory Menu.

Page-17
WTI Management Utility
8.3. Renaming or Deleting a Device Group
Once Device Groups have been created, you may wish to rename a device group or
delete the Device Group entirely.
1. Click the Device Group Management button to display the Device Group
Management menu as described in Section 8.1.
2. To rename or delete a Device Group, click on the Rename/Delete Device Group
button to display the Rename/Delete Device Group menu.
a) To rename a Device Group, click "Rename", use the drop-down menu to select
the desired group, key the new name for the Device Group into the Rename
Field and then click OK.
b) To delete a Device Group, click "Delete," use th drop down menu to select the
desired group and then click OK.
Note:TheWMUwillnotallowyoutodeleteorrenamethecurrentlyactive
DeviceGroup.

Page-18
WTI Management Utility
8.4. Device Group Operations
After Device Groups have been created, the Device Group Operations menu can be
used to upgrade firmware, manage passwords, control power switching and reboot
functions, change configuration parameters or back up configuration for one or more
user-selected Device Groups.
To access the Device Group Operations menu, first click on the Device Group
Management button. When the Device Group Management menu appears, click on
the Device Group Operations button. The Device Group Operations menu offers the
following options:
• Select: Prior to performing any of the functions available via the Device Group
Operations menu, you must first use the Select column to choose the Device
Group(s) that will be effected.
• Device Group Name: This column lists the names of all currently defined Device
Groups.
• Status: The status of each Device Group. If a device group is not in the process of
executing a previous command, this column will read "Ready."
• Results: After a Device Group Operations menu command has been executed, the
Results button can be used to display the results of that command, including any
error messages that may have been generated.
• Firmware Upgrade: Checks for available firmware updates for all WTI units in the
selected Device Group(s) and then downloads and applies any applicable updates
to all units in the group.
Note:WhenafirmwareupgradeisperformedonaWTIproductthatincludes
powercontrolcapabilities,theOn/OffstatusofpoweroutletsonupgradedWTI
deviceswillnotbeeffected.
• Configure: Provides access to a submenu that allows you to select individual WTI
devices in the currently active Device Group and then send an XML format file to
the selected WTI device(s) in order to change configuration parameters for selected
device(s). Note that the Configure submenu also allows you to exclude system
parameters, plug parameters and port parameters from the reconfiguration action.
• Password Management: Displays a submenu which can be used to change user
names and passwords for WTI devices in the selected Device Group(s.)
• Control All Plugs: This feature can be used to switch all plugs on all WTI Switched
PDU products within the selected Device Group(s.)
• Backup: When the BackUp function is selected, the WMU will save all
configuration parameters for the all WTI units in the selected Device Group(s) to
an XML format file. Once a BackUp file has been created, the Restore function
can then be used to reload saved parameters to the selected Device Group as
described in Section 6.

Apx-1
Appendix A. Customer Service
Customer Service hours are from 8:00 AM to 5:00 PM, PST, Monday through Friday.
When calling, please be prepared to give the name and make of the unit, its serial
number and a description of its symptoms. If the unit should need to be returned for
factory repair it must be accompanied by a Return Authorization number from Customer
Service.
WTI Customer Service
5 Sterling
Irvine, California 92618
Local Phone: (949) 586-9950
Toll Free Service Line: 1-888-280-7227
Service Fax: (949) 583-9514
Email: [email protected]
/