SVS-1001

Santec SVS-1001 Quick Installation Manual

  • Hello! I am an AI chatbot trained to assist you with the Santec SVS-1001 Quick Installation Manual. I’ve already reviewed the document and can help you find the information you need or explain it in simple terms. Just ask your questions, and providing more details will help me assist you more effectively!
  • What is the default username and password to access the SVS-1001's web interface?
    How do I reset the SVS-1001 to its factory default settings?
    What video formats does the SVS-1001 support for streaming?
    Does the SVS-1001 have a local storage option?
    What type of network connection does the SVS-1001 use?
SVS-1001
1
KURZANLEITUNG
QUICK INSTALLATION GUIDE
SVS-1001
Kurzbeschreibung
Brief description
1-Kanal IP-Videoserver
Lokale Speichermöglichkeit auf SD-Karte
Übertragung im MJPEG oder MPEG4
Format
RS-485 Schnittstelle zur Netzwerk-
Steuerung von PTZ-Kameras nach Pelco
D Protokoll
1-channel IP video server
Local storage on SD card
Transmission in MJPEG or MPEG4
format
RS-485 interface for network control of
PTZ cameras according to Pelco D
protocol
Standard Benutzername und Passwort / Default user name and password:
Benutzername / User name: admin
Passwort / Password: 9999
Steuerelemente und Anschlüsse / Controls and connections:
Gerätevorderseite / Front panel:
1. Act:
Zeigt den Netzwerk-Status des Videoservers an. Die Anzeige leuchtet grün, wenn das
Netzwerk aktiv ist.
Indicates the network status of the video server. Green light means that the network is
running.
Version 1.1sfi/0911/dt-engl/A5
SVS-1001
2
2. 10/100M:
Die Anzeige leuchtet grün, wenn Daten über das Netzwerk übertragen werden.
The indicator lights green when data is transmitted via the network.
3. Reset:
Zurücksetzen auf voreingestellte Werkseinstellungen. / Reset to default factory settings.
4. SD Card:
SD-Karten Leser/Schreiber. / SD card reader/writer.
5. USB:
USB-Kabelanschluss. / USB port.
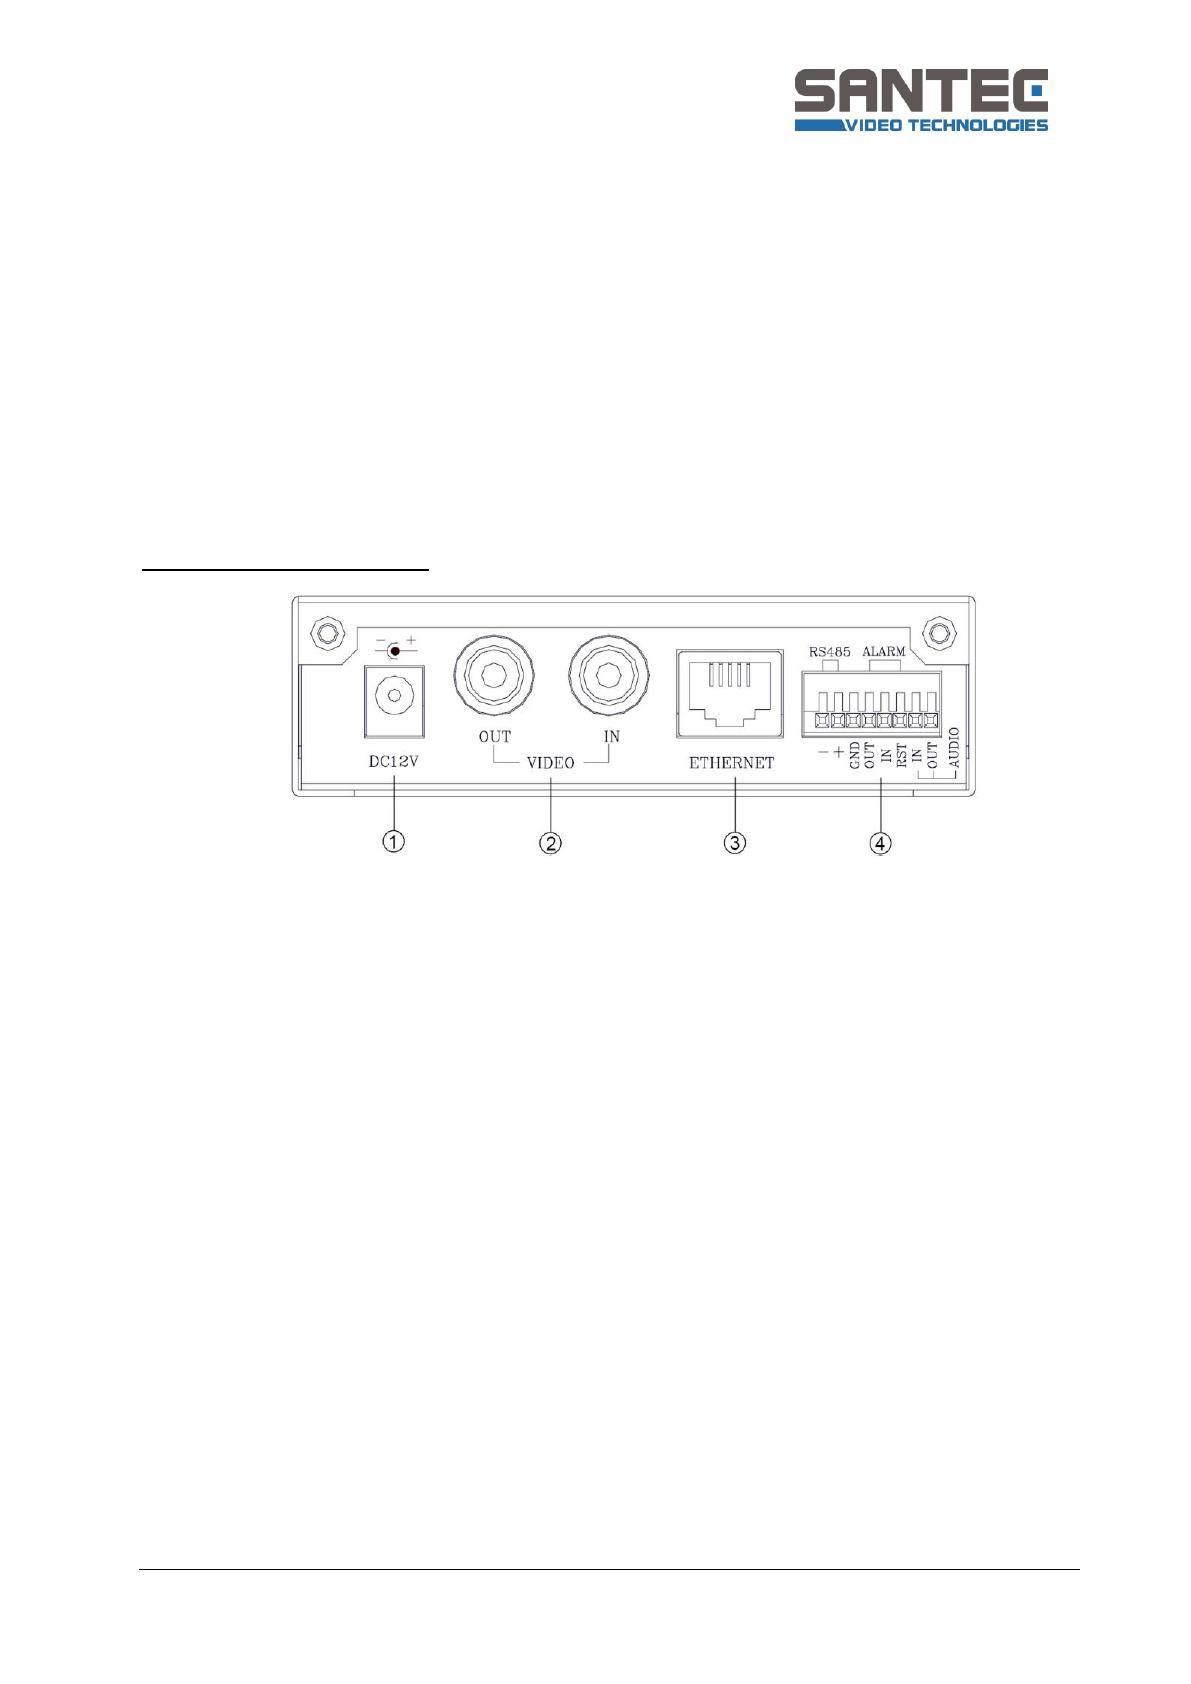
Geräterückseite / Rear panel:
1. DC 12V:
Anschluss für 12 V DC Betriebsspannung.
12 V DC connection.
2. Video IN/OUT:
BNC-Buches für das Kamera-/Video-Signal; Durchschleifausgang.
BNC sockets for camera/video signal; loop-through output.
3. Ethernet:
Standard (RJ-45) 10/100 Mb Ethernet-Anschluss.
Standard (RJ-45) 10/100 Mb Ethernet connection.
4. Alarm/RS-485:
RS-485: D-
RS-485: D+
GND: Erde-Kontakt / Ground
OUT: Alarmausgangskontakt / Alarm output contact
IN: Alarmeingangskontakt / Alarm output contact
RST: Reset-Kontakt / Reset contact
IN-AUDIO: Audioeingang / Audio input
OUT-AUIO: Audioausgang / Audio output
SVS-1001
3
IP-Adresse einstellen / Set the IP address:
Vorgehensweise
Procedure
Schalten Sie den Videoserver ein.
Drücken Sie die Reset-Taste.
Die Werkseinstellungen werden angezeigt
(siehe unten).
Switch on the video server.
Press the reset button.
The default factory settings are
displayed (see below).
Damit Sie die IP-Einstellungen ändern
können, schließen Sie bitte den Videoserver
über die USB-Schnittstelle an einen PC an.
Das Standard-Windows-Dialogfenster
erscheint:
In order to be able to change the IP
settings, please connect the video server to
a PC via the USB port. The standard
Windows dialogue window pops up:
SVS-1001
4
Wählen Sie “Programm ausführen”.
Das Dialogfenster für Netzwerkeinstellungen
des Servers erscheint:
Select „Run program“.
The window for the server network settings
pops up:
Um eine statische IP-Adresse einzugeben,
ändern Sie die Option DHCP (DynDNS) auf
OFF und definieren Sie folgende Felder:
IP-Address, Netmask, Gateway, DNS Server.
Die Option HTTP-Port muss auf 80
eingestellt bleiben.
In order to enter a static IP address, set the
DHCP (DynDNS) option to OFF and define
the following fields: IP-Adress, Netmask,
Gateway, DNS Server.
The setting for the HTTP port has to remain
at 80.
Irrtum und technische Änderungen
vorbehalten.
Subject to technical changes.
Errors excepted.
Version 1.1sfi/9811/dt-engl/A5
/