Axis Communications 241S User manual
- Category
- Video servers/encoders
- Type
- User manual
This manual is also suitable for

AXIS 241Q and AXIS 241S
Video Servers
User’s Manual
Installation instructions are also available in German, French, Italian and Spanish in this manual.

AXIS COMMUNICATIONS
<Product Name> Quick User’s Guide
2
About This Document
This manual is intended for administrators and users of the
AXIS 241Q/241S Video Server, and is applicable for
software release 4.20. It includes instructions for installing,
using and managing the AXIS 241Q/241S on your network.
Previous experience of networking will be of use when
installing and using this product. Some knowledge of UNIX
or Linux-based systems would also be beneficial, for
developing shell scripts and applications. Later versions of
this document will be posted to the Axis Website, as
required. See also the product’s online help, available via
the Web-based interface.
Safety Notices Used In This Manual
Caution! - Indicates a potential hazard that can damage the
product.
Important! - Indicates a hazard that can seriously impair
operation.
Do not proceed beyond any of the above notices until you
have fully understood the implications.
Intellectual Property Rights
Axis AB has intellectual property rights relating to
technology embodied in the product described in this
document. In particular, and without limitation, these
intellectual property rights may include one or more of the
patents listed at http://www.axis.com/patent.htm and one
or more additional patents or pending patent applications
in the US and other countries.
This product contains licensed third-party software. See the
menu item “About” in the product’s user interface for more
information.
Legal Considerations
Camera surveillance can be prohibited by laws that vary
from country to country. Check the laws in your local
region before using this product for surveillance purposes.
This product includes one (1) MPEG-4 decoder license. To
purchase further licenses, contact your reseller.
Electromagnetic Compatibility (EMC)
This equipment generates, uses and can radiate radio
frequency energy and, if not installed and used in
accordance with the instructions, may cause harmful
interference to radio communications. However, there is no
guarantee that interference will not occur in a particular
installation. If this equipment does cause harmful
interference to radio or television reception, which can be
determined by turning the equipment off and on, the user is
encouraged to try to correct the interference by one or
more of the following measures: Re-orient or relocate the
receiving antenna. Increase the separation between the
equipment and receiver. Connect the equipment to an
outlet on a different circuit to the receiver. Consult your
dealer or an experienced radio/TV technician for help.
Shielded (STP) network cables must be used with this unit
to ensure compliance with EMC standards.
USA - This equipment has been tested and found to
comply with the limits for a Class B computing device
pursuant to Subpart B of Part 15 of FCC rules, which are
designed to provide reasonable protection against such
interference when operated in a commercial environment.
Operation of this equipment in a residential area is likely to
cause interference, in which case the user at his/her own
expense will be required to take whatever measures may be
required to correct the interference.
Europe - This digital equipment fulfills the
requirements for radiated emission according to limit B of
EN55022/1998, and the requirements for immunity according
to EN55024/1998 residential, commercial, and light industry.
Liability
Every care has been taken in the preparation of this manual;
Please inform your local Axis office of any inaccuracies or
omissions. Axis Communications AB cannot be held responsible
for any technical or typographical errors and reserves the right
to make changes to the product and manuals without prior
notice. Axis Communications AB makes no warranty of any
kind with regard to the material contained within this
document, including, but not limited to, the implied warranties
of merchantability and fitness for a particular purpose. Axis
Communications AB shall not be liable nor responsible for
incidental or consequential damages in connection with the
furnishing, performance or use of this material.
Trademark Acknowledgments
Acrobat, Adobe, Boa, Ethernet, IBM, Internet Explorer, LAN
Manager, Linux, Macintosh, Microsoft, Mozilla, Netscape
Navigator, OS/2, UNIX, Windows, WWW are registered
trademarks of the respective holders. QuickTime™ is a
trademark of Apple Computer, Inc., registered in the U.S. and
other countries. Java and all Java-based trademarks and logos
are trademarks or registered trademarks of Sun Microsystems,
Inc. in the United States and other countries. Axis
Communications AB is independent of Sun Microsystems Inc.
UPnP™ is a certification mark of the UPnP™ Implementers
Corporation.
Support Services
Should you require any technical assistance, please contact
your Axis reseller. If your questions cannot be answered
immediately, your reseller will forward your queries through
the appropriate channels to ensure a rapid response. If you are
connected to the Internet, you can:
• download user documentation and firmware updates
• find answers to resolved problems in the FAQ database.
Search by product, category, or phrases
• report problems to Axis support staff by logging in to your
private support area
• visit the Axis Support Web at www.axis.com/techsup/
Safety Notice - Battery Replacement
The AXIS 241Q/241S uses a 3.0V CR2032 Lithium battery as
the power supply for its internal real-time clock (RTC). This
battery will, under normal conditions, last for a minimum of 5
years. Low battery power affects the operation of the RTC,
causing it to reset at every power-up. A log message will appear
when battery replacement is required.
The battery should not be replaced unless required!
If the battery does need replacing, observe the following points:
Caution!
• Danger of Explosion if battery is incorrectly replaced
• Replace only with the same or equivalent battery, as
recommended by the manufacturer.
• Dispose of used batteries according to the manufacturer's
instructions.
AXIS 241Q/241S User’s Manual
Revision 2.1
Dated: March 2005
Part No: 24241
Copyright© Axis Communications AB, 2004-2005

3
AXIS 241Q/241S
Table of contents
Product Description . . . . . . . . . . . . . . . . . . . . . . . . . . . . . . . . . . . . . . . . . . . . . . . . . . . . . . . . . . . . . . 6
Hardware Inventory . . . . . . . . . . . . . . . . . . . . . . . . . . . . . . . . . . . . . . . . . . . . . . . . . . . 6
AXIS 241Q Front Panel. . . . . . . . . . . . . . . . . . . . . . . . . . . . . . . . . . . . . . . . . . . . . . . . . 7
AXIS 241S Front Panel . . . . . . . . . . . . . . . . . . . . . . . . . . . . . . . . . . . . . . . . . . . . . . . . 8
AXIS 241Q/241S Rear Panel . . . . . . . . . . . . . . . . . . . . . . . . . . . . . . . . . . . . . . . . . . . . 9
Installation . . . . . . . . . . . . . . . . . . . . . . . . . . . . . . . . . . . . . . . . . . . . . . . . . . . . . . . . . . . . . . . . . . . . 10
Mounting. . . . . . . . . . . . . . . . . . . . . . . . . . . . . . . . . . . . . . . . . . . . . . . . . . . . . . . . . . . 10
Connecting video cameras. . . . . . . . . . . . . . . . . . . . . . . . . . . . . . . . . . . . . . . . . . . . . 11
Installation Methods . . . . . . . . . . . . . . . . . . . . . . . . . . . . . . . . . . . . . . . . . . . . . . . . . 11
AXIS IP Utility . . . . . . . . . . . . . . . . . . . . . . . . . . . . . . . . . . . . . . . . . . . . . . . . . . . . . . . 11
UPnP™ . . . . . . . . . . . . . . . . . . . . . . . . . . . . . . . . . . . . . . . . . . . . . . . . . . . . . . . . . . . . . 12
ARP and Ping in Windows . . . . . . . . . . . . . . . . . . . . . . . . . . . . . . . . . . . . . . . . . . . . 13
ARP and Ping in UNIX/Linux . . . . . . . . . . . . . . . . . . . . . . . . . . . . . . . . . . . . . . . . . . . 14
Using the video server . . . . . . . . . . . . . . . . . . . . . . . . . . . . . . . . . . . . . . . . . . . . . . . . . . . . . . . . . . . 16
Accessing the video server. . . . . . . . . . . . . . . . . . . . . . . . . . . . . . . . . . . . . . . . . . . . . 16
The Live View page. . . . . . . . . . . . . . . . . . . . . . . . . . . . . . . . . . . . . . . . . . . . . . . . . . . 17
Video Streams. . . . . . . . . . . . . . . . . . . . . . . . . . . . . . . . . . . . . . . . . . . . . . . . . . . . . . . . . . . . . . . . . . 19
Stream Types. . . . . . . . . . . . . . . . . . . . . . . . . . . . . . . . . . . . . . . . . . . . . . . . . . . . . . . . 19
MPEG-4 protocols and communication methods . . . . . . . . . . . . . . . . . . . . . . . . . . 20
How to stream MPEG-4?. . . . . . . . . . . . . . . . . . . . . . . . . . . . . . . . . . . . . . . . . . . . . . 20
The AXIS Media Control. . . . . . . . . . . . . . . . . . . . . . . . . . . . . . . . . . . . . . . . . . . . . . . 21
Other methods of accessing the video stream. . . . . . . . . . . . . . . . . . . . . . . . . . . . .21
Configuring the video server . . . . . . . . . . . . . . . . . . . . . . . . . . . . . . . . . . . . . . . . . . . . . . . . . . . . . . 23
Accessing the Setup tools . . . . . . . . . . . . . . . . . . . . . . . . . . . . . . . . . . . . . . . . . . . . . 23
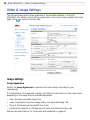
Video & Image Settings . . . . . . . . . . . . . . . . . . . . . . . . . . . . . . . . . . . . . . . . . . . . . . . . . . . . . . . . . . 24
Image Settings . . . . . . . . . . . . . . . . . . . . . . . . . . . . . . . . . . . . . . . . . . . . . . . . . . . . . . 24
Video Source Settings . . . . . . . . . . . . . . . . . . . . . . . . . . . . . . . . . . . . . . . . . . . . . . . . 25
Pan Tilt Zoom . . . . . . . . . . . . . . . . . . . . . . . . . . . . . . . . . . . . . . . . . . . . . . . . . . . . . . . 26
Advanced - MPEG-4 Settings . . . . . . . . . . . . . . . . . . . . . . . . . . . . . . . . . . . . . . . . . . 26
Quad Stream Settings (AXIS 241Q only) . . . . . . . . . . . . . . . . . . . . . . . . . . . . . . . . . 26
Overlay Image Settings . . . . . . . . . . . . . . . . . . . . . . . . . . . . . . . . . . . . . . . . . . . . . . . 27
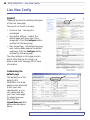
Live View Config. . . . . . . . . . . . . . . . . . . . . . . . . . . . . . . . . . . . . . . . . . . . . . . . . . . . . . . . . . . . . . . . 28
Layout . . . . . . . . . . . . . . . . . . . . . . . . . . . . . . . . . . . . . . . . . . . . . . . . . . . . . . . . . . . . .28
HTML Examples. . . . . . . . . . . . . . . . . . . . . . . . . . . . . . . . . . . . . . . . . . . . . . . . . . . . . . 31
External Video. . . . . . . . . . . . . . . . . . . . . . . . . . . . . . . . . . . . . . . . . . . . . . . . . . . . . . . 31
Sequence Mode . . . . . . . . . . . . . . . . . . . . . . . . . . . . . . . . . . . . . . . . . . . . . . . . . . . . . 31

4
AXIS 241Q/241S
Event Configuration . . . . . . . . . . . . . . . . . . . . . . . . . . . . . . . . . . . . . . . . . . . . . . . . . . . . . . . . . . . . . 32
Event Servers. . . . . . . . . . . . . . . . . . . . . . . . . . . . . . . . . . . . . . . . . . . . . . . . . . . . . . . . 32
Event Types . . . . . . . . . . . . . . . . . . . . . . . . . . . . . . . . . . . . . . . . . . . . . . . . . . . . . . . .33
Motion Detection . . . . . . . . . . . . . . . . . . . . . . . . . . . . . . . . . . . . . . . . . . . . . . . . . . . . 35
Port Status . . . . . . . . . . . . . . . . . . . . . . . . . . . . . . . . . . . . . . . . . . . . . . . . . . . . . . . . . 36
Pan Tilt Zoom . . . . . . . . . . . . . . . . . . . . . . . . . . . . . . . . . . . . . . . . . . . . . . . . . . . . . . . . . . . . . . . . . . 37
Installing PTZ Devices. . . . . . . . . . . . . . . . . . . . . . . . . . . . . . . . . . . . . . . . . . . . . . . . .39
System Options. . . . . . . . . . . . . . . . . . . . . . . . . . . . . . . . . . . . . . . . . . . . . . . . . . . . . . . . . . . . . . . . . 40
Security . . . . . . . . . . . . . . . . . . . . . . . . . . . . . . . . . . . . . . . . . . . . . . . . . . . . . . . . . . . .40
Date & Time . . . . . . . . . . . . . . . . . . . . . . . . . . . . . . . . . . . . . . . . . . . . . . . . . . . . . . . . 41
Network - Basic TCP/IP Settings . . . . . . . . . . . . . . . . . . . . . . . . . . . . . . . . . . . . . . . . 42
Network - Advanced TCP/IP Settings . . . . . . . . . . . . . . . . . . . . . . . . . . . . . . . . . . . .43
SOCKS . . . . . . . . . . . . . . . . . . . . . . . . . . . . . . . . . . . . . . . . . . . . . . . . . . . . . . . . . . . . . 44
SMTP (email). . . . . . . . . . . . . . . . . . . . . . . . . . . . . . . . . . . . . . . . . . . . . . . . . . . . . . . . 44
UPnP™ . . . . . . . . . . . . . . . . . . . . . . . . . . . . . . . . . . . . . . . . . . . . . . . . . . . . . . . . . . . . . 44
RTP (Multicast)/MPEG-4 . . . . . . . . . . . . . . . . . . . . . . . . . . . . . . . . . . . . . . . . . . . . . . 44
Ports & Devices. . . . . . . . . . . . . . . . . . . . . . . . . . . . . . . . . . . . . . . . . . . . . . . . . . . . . . 45
Maintenance. . . . . . . . . . . . . . . . . . . . . . . . . . . . . . . . . . . . . . . . . . . . . . . . . . . . . . . . 45
Support . . . . . . . . . . . . . . . . . . . . . . . . . . . . . . . . . . . . . . . . . . . . . . . . . . . . . . . . . . . . 46
Advanced. . . . . . . . . . . . . . . . . . . . . . . . . . . . . . . . . . . . . . . . . . . . . . . . . . . . . . . . . . . 46
Resetting to the Factory Default Settings . . . . . . . . . . . . . . . . . . . . . . . . . . . . . . . . 47
Unit Connectors . . . . . . . . . . . . . . . . . . . . . . . . . . . . . . . . . . . . . . . . . . . . . . . . . . . . . . . . . . . . . . . . 48
The D-Sub Connector. . . . . . . . . . . . . . . . . . . . . . . . . . . . . . . . . . . . . . . . . . . . . . . . .48
The I/O Terminal Connector . . . . . . . . . . . . . . . . . . . . . . . . . . . . . . . . . . . . . . . . . . . 49
Schematic Diagram - I/O Terminal Connector. . . . . . . . . . . . . . . . . . . . . . . . . . . . . 50
COM Ports RS-232 and RS-485 . . . . . . . . . . . . . . . . . . . . . . . . . . . . . . . . . . . . . . . . 50
Y/C to BNC Cable (AXIS 241S only) . . . . . . . . . . . . . . . . . . . . . . . . . . . . . . . . . . . . . 51
Troubleshooting . . . . . . . . . . . . . . . . . . . . . . . . . . . . . . . . . . . . . . . . . . . . . . . . . . . . . . . . . . . . . . . . 52
Checking the Firmware . . . . . . . . . . . . . . . . . . . . . . . . . . . . . . . . . . . . . . . . . . . . . . . 52
Upgrading the Firmware . . . . . . . . . . . . . . . . . . . . . . . . . . . . . . . . . . . . . . . . . . . . . . 52
Support . . . . . . . . . . . . . . . . . . . . . . . . . . . . . . . . . . . . . . . . . . . . . . . . . . . . . . . . . . . . 53
Technical Specifications. . . . . . . . . . . . . . . . . . . . . . . . . . . . . . . . . . . . . . . . . . . . . . . . . . . . . . . . . . 57
General performance considerations . . . . . . . . . . . . . . . . . . . . . . . . . . . . . . . . . . . . 59
Optimizing your system . . . . . . . . . . . . . . . . . . . . . . . . . . . . . . . . . . . . . . . . . . . . . . . 59
Frame rates - Motion JPEG . . . . . . . . . . . . . . . . . . . . . . . . . . . . . . . . . . . . . . . . . . . . 60
Frame rates - MPEG-4. . . . . . . . . . . . . . . . . . . . . . . . . . . . . . . . . . . . . . . . . . . . . . . .60
Bandwidth. . . . . . . . . . . . . . . . . . . . . . . . . . . . . . . . . . . . . . . . . . . . . . . . . . . . . . . . . .61

5
AXIS 241Q/241S
Installation . . . . . . . . . . . . . . . . . . . . . . . . . . . . . . . . . . . . . . . . . . . . . . . . . . . . . . . . . . . . . . . . . . . . 62
Montage . . . . . . . . . . . . . . . . . . . . . . . . . . . . . . . . . . . . . . . . . . . . . . . . . . . . . . . . . . . 62
Videokameras anschließen. . . . . . . . . . . . . . . . . . . . . . . . . . . . . . . . . . . . . . . . . . . . . 63
Installationsmethoden . . . . . . . . . . . . . . . . . . . . . . . . . . . . . . . . . . . . . . . . . . . . . . . . 63
AXIS IP Utility . . . . . . . . . . . . . . . . . . . . . . . . . . . . . . . . . . . . . . . . . . . . . . . . . . . . . . . 64
UPnP™ . . . . . . . . . . . . . . . . . . . . . . . . . . . . . . . . . . . . . . . . . . . . . . . . . . . . . . . . . . . . . 65
ARP und Ping unter Windows . . . . . . . . . . . . . . . . . . . . . . . . . . . . . . . . . . . . . . . . . . 65
ARP and Ping unter UNIX/Linux . . . . . . . . . . . . . . . . . . . . . . . . . . . . . . . . . . . . . . . . 67
Installation . . . . . . . . . . . . . . . . . . . . . . . . . . . . . . . . . . . . . . . . . . . . . . . . . . . . . . . . . . . . . . . . . . . . 70
Montage . . . . . . . . . . . . . . . . . . . . . . . . . . . . . . . . . . . . . . . . . . . . . . . . . . . . . . . . . . . 70
Connexion des caméras vidéo . . . . . . . . . . . . . . . . . . . . . . . . . . . . . . . . . . . . . . . . . . 71
Méthodes d’installation. . . . . . . . . . . . . . . . . . . . . . . . . . . . . . . . . . . . . . . . . . . . . . . 71
Application AXIS IP Utility. . . . . . . . . . . . . . . . . . . . . . . . . . . . . . . . . . . . . . . . . . . . . 71
UPnP™ . . . . . . . . . . . . . . . . . . . . . . . . . . . . . . . . . . . . . . . . . . . . . . . . . . . . . . . . . . . . . 73
ARP et Ping sous Windows . . . . . . . . . . . . . . . . . . . . . . . . . . . . . . . . . . . . . . . . . . . . 73
ARP et Ping sous UNIX/Linux . . . . . . . . . . . . . . . . . . . . . . . . . . . . . . . . . . . . . . . . . . 75
Installazione . . . . . . . . . . . . . . . . . . . . . . . . . . . . . . . . . . . . . . . . . . . . . . . . . . . . . . . . . . . . . . . . . . . 78
Montaggio. . . . . . . . . . . . . . . . . . . . . . . . . . . . . . . . . . . . . . . . . . . . . . . . . . . . . . . . . . 78
Connessione delle videocamere. . . . . . . . . . . . . . . . . . . . . . . . . . . . . . . . . . . . . . . . . 79
Metodi di installazione . . . . . . . . . . . . . . . . . . . . . . . . . . . . . . . . . . . . . . . . . . . . . . . 79
AXIS IP Utility . . . . . . . . . . . . . . . . . . . . . . . . . . . . . . . . . . . . . . . . . . . . . . . . . . . . . . . 79
UPnP™ . . . . . . . . . . . . . . . . . . . . . . . . . . . . . . . . . . . . . . . . . . . . . . . . . . . . . . . . . . . . . 81
ARP e Ping in Windows . . . . . . . . . . . . . . . . . . . . . . . . . . . . . . . . . . . . . . . . . . . . . . . 81
ARP e Ping in UNIX/Linux . . . . . . . . . . . . . . . . . . . . . . . . . . . . . . . . . . . . . . . . . . . . . 83
Instalación. . . . . . . . . . . . . . . . . . . . . . . . . . . . . . . . . . . . . . . . . . . . . . . . . . . . . . . . . . . . . . . . . . . . . 86
Montaje. . . . . . . . . . . . . . . . . . . . . . . . . . . . . . . . . . . . . . . . . . . . . . . . . . . . . . . . . . . . 86
Conexión de las cámaras de vídeo . . . . . . . . . . . . . . . . . . . . . . . . . . . . . . . . . . . . . . 87
Métodos de instalación . . . . . . . . . . . . . . . . . . . . . . . . . . . . . . . . . . . . . . . . . . . . . . . 87
AXIS IP Utility . . . . . . . . . . . . . . . . . . . . . . . . . . . . . . . . . . . . . . . . . . . . . . . . . . . . . . . 87
UPnP™ . . . . . . . . . . . . . . . . . . . . . . . . . . . . . . . . . . . . . . . . . . . . . . . . . . . . . . . . . . . . . 89
ARP y Ping en Windows . . . . . . . . . . . . . . . . . . . . . . . . . . . . . . . . . . . . . . . . . . . . . . 89
ARP y Ping en UNIX/Linux . . . . . . . . . . . . . . . . . . . . . . . . . . . . . . . . . . . . . . . . . . . . 90
Glossary. . . . . . . . . . . . . . . . . . . . . . . . . . . . . . . . . . . . . . . . . . . . . . . . . . . . . . . . . . . . . . . . . . . . . . . 92
Index . . . . . . . . . . . . . . . . . . . . . . . . . . . . . . . . . . . . . . . . . . . . . . . . . . . . . . . . . . . . . . . . . . . . . . . . . 94

6
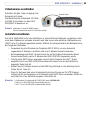
AXIS 241Q/241S - Product Description
Product Description
The AXIS 241Q/241S is a fully featured video server for security surveillance and remote
monitoring needs. Based on the AXIS ARTPEC-2 compression chip, it can digitize up to 4
analog video sources and make these available on the network as real-time, full frame rate
Motion JPEG and/or MPEG-4 video streams.
The AXIS 241Q has 4 BNC inputs for analog video devices and the AXIS 241S has 1 BNC
input and a matching loop-through output. The AXIS 241S can also accommodate Y/C
video using an Y/C to BNC cable (not included).
The AXIS 241Q/241S is equipped with RS-232 and RS-485 ports for the connection of
third party PTZ systems. It also has 4 alarm inputs and 4 alarm outputs, which can be used
to connect various third party devices, e.g. door sensors and alarm bells.
Up to 20 viewers can access the camera simultaneously when using Motion JPEG and
MPEG-4 unicast. If MPEG-4 multicast is used, the number of viewers is unlimited, but
when viewing with the AXIS Media Control (AMC), each viewer still needs a separate
MPEG-4 decoder license. The AXIS 241Q/241S includes one such decoder license.
Additional licenses can be purchased separately from your Axis dealer. If using other
clients to view the video stream, no further MPEG-4 decoder licenses are required.
Video can be viewed in 5 resolutions (up to 4CIF), and image compression is configurable.
The video server contains support for video motion detection, which allows the unit to
trigger on activity in the video image, and advanced scheduling tools which can also be
used to trigger an event. As the AXIS 241Q/241S is designed for use in security systems, it
is equipped with several security features, such as IP address filtering, several user levels
with passwords, and HTTPS.
The AXIS 241Q/241S has a built-in web server, providing full access to all features
through the use of a standard browser. The built-in scripting tool allows basic applications
to be created, providing basic surveillance solutions. For advanced functionality, the video
server can be integrated via the use of the AXIS HTTP API (see www.axis.com/developer).
Hardware Inventory
Check the items supplied with your AXIS 241Q/241S against the following list:
Video Server AXIS 241Q or AXIS 241S
Printed user documentation AXIS 241S/241Q User’s Manual This document
Warranty Document Warranty Document
Power adapter PS-K Country-specific
Terminal block connector 12-pin
Mounting kit For wall or rack mounting
Converter cable (optional) ACC Y/C to BNC cable AXIS 241S only. Not included.
MPEG-4 licences (optional) 10-user licence pack Not included
Item Title/variant Notes

7
AXIS 241Q/241S - Product Description
AXIS 241Q Front Panel
Indicators - After completion of the startup and self-test routines, the multi-colored
Network, Status, Power Indicators flash as follows:
Amber Flashes for activity on a 10 Mbit/s network
Green Flashes for activity on a 100 Mbit/s network
Red Flashes rapid red for hardware error, together with the Status indicator
None No connection
Green Normal operation
Amber Flashes during reset to factory default or at firmware upgrade
Red Flashes rapid red for a hardware error, together with the Network indicator
Green Normal operation
Amber Flashes green/amber during upgrade
DIP Switches - A corresponding line termination switch for each of the supported video
inputs. All units are shipped with the line termination enabled for each supported video
input; that is, with the DIP switches set in the down-position.
Note: If the AXIS 241Q is to be connected in parallel with other equipment, disable the input termination by turn-
ing the corresponding DIP switch to the up-position (OFF). Failure to do so may cause reduced image
quality.
Control Button - Press this button to restore the factory default settings, as described in
Resetting to the Factory Default Settings, on page 47, or to install using AXIS Internet
Dynamic DNS Service (page 15).
Video Inputs - Accommodates up to 4 separate video sources (VIDEO 1 - VIDEO 4)
simultaneously. Each supported video input is connected using a coax/BNC connector.
Physical connections made using e.g. 75 Ohm coax video cable have a recommended
maximum length of 800 feet (250 meters).
Network
Status
Power

8
AXIS 241Q/241S - Product Description
AXIS 241S Front Panel
Indicators - After completion of the startup and self test routines, the multi-colored
Network, Status, Power Indicators flash as follows:
Amber Flashes for activity on a 10 Mbit/s network
Green Flashes for activity on a 100 Mbit/s network
Red Flashes rapid red for hardware error, together with the Status indicator
None No connection
Green Normal operation
Amber Flashes during reset to factory default or at firmware upgrade
Red Flashes rapid red for a hardware error, together with the Network indicator
Green Normal operation
Amber Flashes green/amber during upgrade
DIP Switches - upon delivery the AXIS 241S is configured for composite video input.
1 2 3 4
on off on n/a
on on off n/a
Note: If the AXIS 241S is to be connected in loop-through with other equipment, disable the input termination by
setting switch 1 to the up-position (OFF). Failure to do this may cause reduced image quality.
Control Button - Press this button to restore the factory default settings, as described in
Resetting to the Factory Default Settings, on page 47, or to install using AXIS Internet
Dynamic DNS Service, see page 15.
Video Input - Coaxial BNC connector supporting a single composite video source. The
physical connection is made using 75 Ohm coax video cable with a recommended
maximum length of 800 feet (250 meters).
Note: The AXIS 241S supports conversion between composite video and Y/C (S-video) using an Y/C to BNC cable.
Video Output - A single video loopthrough (VIDEO OUT) connected in parallel with VIDEO
IN and terminated with a coax/BNC connector. Allows direct connection of e.g. an external
monitor. Set dipswitch to OFF when in use.
Network
Status
Power
Switch
Description
75 ohm video in
termination
75 ohm video out
termination
Connects video in and
video out
Not used
Composite video input
Y/C video input

9
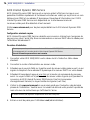
AXIS 241Q/241S - Product Description
AXIS 241Q/241S Rear Panel
The Serial Number is
located on the label
on the underside of
the unit.
Power Supply Connector - A single socket for connection of the PS-K power adapter.
I/O Terminal connector - The I/O Terminal connector provides the physical interface to 4
digital transistor outputs, 4 digital inputs and an RS-485 interface. See
Unit Connectors, on
page 48 for more information.
Note: The I/O Terminal connector also provides an auxiliary connection point for DC
power.
Network Connector - The AXIS 241Q/241S connects to the network via a standard
network cable. The AXIS 241Q/241S detects the speed of the local network segment
(10BaseT/100BaseTX Ethernet).
RS-232 Serial Connector - A 9-pin D-sub connector providing an RS-232 serial
connection. Typically used for connecting Pan/Tilt/Zoom devices. See
Unit Connectors, on
page 48 for more information.

10
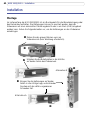
AXIS 241Q/241S - Installation
Installation
Mounting
The AXIS 241Q/241S is supplied with a mounting kit for wall or rack mounting. The
mounting brackets can be positioned for mounting the video server on a vertical surface or
in a rack (4U). Follow the instructions below to attach the brackets to the video server:
❷
❸
Position and attach the brackets on each
side, using the screws provided.
Insert the metal plates in the slots on
each side of the video server.
❶
❶
Slide the grey frame off the front panel
of the video server (no tools needed).
❸
❸
Alternative A
Alternative B

11
AXIS 241Q/241S - Installation
Connecting video cameras
Coaxial cable
Connect the video output of your
camera(s) to the AXIS 241Q/241S video
server using a standard 75 Ohm coaxial
video cable with BNC connectors.
Note: Use a RCA-to-BNC adapter if your camera has a standard phono-type (RCA) connector.
Installation Methods
The AXIS 241Q/241S is designed for installation on an Ethernet network. This involves
assigning it an IP address, either manually or via an automated network service (DHCP).
Select one of the following procedures depending on your network:
• In Windows, use AXIS IP Utility to discover a dynamic IP address, or to set the IP address
manually.
• If your network uses a DHCP server, view its administration pages to discover which IP
address has been assigned to your AXIS 241Q/241S.
• If your network uses a DHCP server and your computer is running UPnP™, the AXIS
241Q/241S will automatically be detected and displayed on your screen. See
page 12.
• Assign an IP address manually using the ARP/Ping method, as described on page 13.
• If your network has an Internet connection (with no HTTP proxy) and uses a DHCP server
to assign IP addresses, use the One-Click installation procedure. See
page 15.
Notes: • The AXIS 241Q/241S has a default IP address: 192.168.0.90
• DHCP is enabled by default in the AXIS 241Q/241S
• UPnP™ is enabled by default in the AXIS 241Q/241S
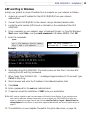
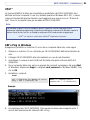
AXIS IP Utility
AXIS IP Utility is a free Windows
application that discovers and displays
Axis devices on your network. The
application can also be used to
manually set a static IP address.
Download AXIS IP utility from the
support pages at:
www.axis.com/techsup/software
Automatic discovery
1. Check that the network and power cables are connected to the AXIS 241Q/241S.
2. Start AXIS IP Utility. When the AXIS 241Q/241S appears in the window, double-click
it to open the home page.

12
AXIS 241Q/241S - Installation
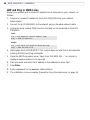
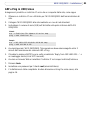
Set the IP address manually
If the AXIS 241Q/241S does not appear in the window, click the Refresh button to try
again. If it still does not appear, set the IP address manually.
1. Acquire an unused IP address. AXIS IP Utility detects the subnet your computer is
connected to. The AXIS 241Q/241S must be installed on the same network segment.
2. Click the button “Set IP address using serial number” and enter the serial number and
IP address for the AXIS 241Q/241S.
3. Click the Set IP button and then restart the AXIS 241Q/241S (within 2 minutes).
4. Click View Home Page to access the AXIS 241Q/241S Web pages.
5. Enter a password for the root user (administrator).
6. If required, accept the installation of AMC onto your workstation.
Notes: • AXIS IP Utility can also be used to change the IP address of a previously discovered Axis device.
• AMC (AXIS Media Control) must be installed to view live video in Microsoft Internet Explorer. If your
working environment restricts additional software components, you can configure your AXIS 241Q/241S to
use a Java applet for updating the images. See the help file Live View Config > Layout > Default Viewer for
Internet Explorer, or use another supported Web browser, see Technical Specifications, on page 57.
7. The installation is now complete. Proceed to Using the video server, on page 16.
UPnP™
UPnP
functionality is enabled by default in the AXIS 241Q/241S. If also enabled on your
computer (Windows ME or XP), the video server will automatically be detected and a new
icon will be added to “My Network Places.” Click this icon to access the AXIS 241Q/241S.
Note:
To install the UPnP service on your computer, open the Control Panel from the Start Menu and select
Add/Remove Programs. Select Add/Remove Windows Components and open the Networking Services
section. Click Details and then select UPnP as the service to add.
The serial number (S/N) is located on the label on the underside of the AXIS 241Q/241S
UPnP
TM
is a certification mark of the UPnP
TM
Implementers Corporation.

13
AXIS 241Q/241S - Installation
ARP and Ping in Windows
Assign your product a unique IP address from a computer on your network as follows:
1. Acquire an unused IP address for the AXIS 241Q/241S from your network
administrator.
2. Connect the AXIS 241Q/241S to the network using a standard network cable.
3. Locate the serial number (S/N) found on the label on the underside of the AXIS
241Q/241S.
4. From a computer on your network, open a Command Prompt, i.e. from the Windows
Start menu, select Run... and type cmd (command in Windows 98/ME). Click OK.
5. Enter the commands:
Syntax:
Example
6. Start/restart the AXIS 241Q/241S. This must be done no later than 2 minutes after
entering the ARP and Ping commands.
7. When ‘Reply from 192.168.0.125: ...’ is displayed (approximately 10-15 seconds), type
Ctrl+C to stop Ping.
8. Start a browser and enter the IP address in the Address/Location field.
9. Press Enter.
10. Enter a password for the root user (administrator).
11. If required, accept the installation of AMC onto your workstation.
Note:
AMC must be installed to view live video images in Microsoft Internet Explorer. If your working environ-
ment restricts additional software components, you can configure your AXIS 241Q/241S to use a Java
applet for updating the images. See the help file under Live View Config > Layout > Default Viewer for
Internet Explorer for information. Or use another supported Web browser, see Technical Specifications, on
page 57.
12. The installation is now complete. Proceed to Using the video server, on page 16.
arp -s <IP address> <Serial number>
ping -l 408 -t <IP address>
Note: The ping command is
followed by -l (lower case L)

14
AXIS 241Q/241S - Installation
ARP and Ping in UNIX/Linux
Assign your product with a unique IP address from a computer on your network, as
follows:
1. Acquire an unused IP address for the AXIS 241Q/241S from your network
administrator.
2. Connect the AXIS 241Q/241S to the network using a standard network cable.
3. Locate the serial number (S/N) found on the label on the underside of the AXIS
241Q/241S.
4. Start/restart the AXIS 241Q/241S. This must be done no later than 2 minutes after
entering the ARP and Ping commands.
5. Close the ARP/Ping session when ‘Reply from 192.168.0.125: ...’ (or similar) is
displayed (approximately 10-15 seconds).
6. Start a browser and enter the IP address in the Address/Location field.
7. Press Enter.
8. Enter a password for the root user (administrator).
9. The installation is now complete. Proceed to Using the video server, on page 16.
Syntax:
arp -s <IP Address> <Serial number> temp
ping -s 408 <IP address>
Example:
arp -s 192.168.0.125 00:40:8c:18:10:00 temp
ping -s 408 192.168.0.125

15
AXIS 241Q/241S - Installation
AXIS Internet Dynamic DNS Service
The AXIS Internet Dynamic DNS Service is a free service provided by Axis. The service
allows you to quickly and simply install your video server, which then receives a static
name (DNS name) and a dynamic IP address. More information about the AXIS Internet
Dynamic DNS Service is available at www.axiscam.net
The video server can be unregistered from the service at any time.
Please visit www.axiscam.net for more details on the AXIS Internet Dynamic DNS Service.
Requirements
Using the AXIS Internet Dynamic DNS Service requires an Internet connection that does
not require a proxy server for HTTP access. A DHCP server in the network for assigning IP
addresses is recommended.
Installation Procedure
1. Connect the AXIS 241Q/241S to your local network, using a standard network cable.
2. Connect power to the video server.
3. Wait for the Status indicator on the front of the video server to show a steady green,
whereupon it will have received a dynamic IP address from a DHCP server on your
network.
4. Wait 60 seconds and push the control button on the front panel once
. The Status
indicator on the front of the video server will flash green while it connects to the AXIS
Internet Dynamic DNS service. When the registration process is complete, the indicator
will return to steady green.
5. Visit www.axiscam.net where you will be guided through the remainder of the
installation. Please have the serial number of your product ready and follow the
instructions on the screen.
6. Enter a password for the root user (administrator).
7. If required, accept the installation of AMC onto your workstation.
Note:
AMC must be installed to view live images in Microsoft Internet Explorer. If your working environment
restricts additional software components, you can configure your AXIS 241Q/241S to use a Java applet for
updating the images. See the help file under Live View Config > Layout > Default Viewer for Internet
Explorer for information. See also the Technical Specifications, on page 57.
8. The installation is now complete. Proceed to Using the video server, on page 16.
Please note that this procedure will send the AXIS 241Q/241S’s IP address, firmware version, product type
and serial number to the Axis Internet Dynamic DNS Service. No personal information will be transferred.
The serial number (S/N) is located on the label on the underside of the AXIS 241Q/241S

16
AXIS 241Q/241S - Using the video server
Using the video server
The AXIS 241Q/241S can be used with most standard operating systems and supports
Microsoft Internet Explorer 5.x or later. Other browsers may impose limitations when
using the AXIS 241Q/241S. For more information please see www.axis.com/techsup
Accessing the video server
1. Start your browser.
2. Enter the IP address or host
name of the AXIS
241Q/241S in the
Location/Address field of your browser.
3. Enter the user name and password set by the administrator.
4. A video image is displayed in your Web browser.
Notes:
•To view streaming video in Microsoft Internet Explorer, you must set your browser to allow
ActiveX controls and allow AMC (AXIS Media Control) to be installed on your workstation. AMC
is required to view MPEG-4. If your workstation restricts the use of additional software compo-
nents, the AXIS 241Q/241S can be configured to use a Java applet for updating JPEG images.
Please see the online help for more information.
•User functions in the AXIS 241Q/241S may have been customized to meet the specific require-
ments of the application. Consequently, the examples and functions in this section may differ
from those displayed on your Live View page.

17
AXIS 241Q/241S - Using the video server
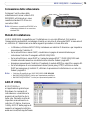
The Live View page
If the AXIS 241Q/241S has been customized, the buttons and other items described below
will be displayed accordingly on the Live View page. The following provides an overview
of each button:
To resize the displayed image, click the View Size buttons: half-size
(x
1
/2), full-size (x1), x2 or x4. This will not change the resolution of the
image (not available in Sequence Mode).
The Video Format drop-down list allows the video format on the Live
View page to be temporarily changed.
The Output buttons control an output directly from the Live View page. These
buttons are configured under Setup > Live View Config > Layout.
Pulse - click this button to activate the port for a defined period of time, e.g. to
switch on a light for 20 seconds.
Active/Inactive - click these buttons to manually start and stop a connected
device, e.g. switch a light on/off.
These buttons start/stop the Sequence Mode. This mode is created in Setup >
Live View Config > Sequence mode and automatically displays the view
from 2 or more video sources at set intervals.
From the Source list, select the desired video image(s). The list can
contain internal video sources, external video sources, or the Quad
Stream view (AXIS 241Q only). The Quad Stream option displays all
four video images in one stream.
The Action buttons trigger an event directly from the Live View page. These
buttons are configured under Setup > Live View Config > Layout. Click these
buttons to manually start and stop events.
Use the Snapshot button to capture a snapshot of the image currently being
displayed in the window. Right-click on the image to save it in on your
computer.
The AMC viewer toolbar (AXIS Media Control) is available in Microsoft Internet
Explorer only and displays the following buttons:
The Play/Stop buttons start and stop the live video stream.

18
AXIS 241Q/241S - Using the video server
Note that these AMC toolbar functions can also be accessed by right-clicking in the image.
For information on using Pan/Tilt/Zoom controls, please see page 37.
The Snapshot button takes a snapshot of the currently displayed image. The
Snapshot function and the target directory for saving snapshots can be configured
from AMC (AXIS Media Control), which is available from the Windows Control
Panel (Internet Explorer only).
Click the View Full Screen button and the video image will fill the entire screen
area. No other windows will be visible. Press Esc (Escape) on your keyboard to
cancel full screen view.

19
AXIS 241Q/241S - Video Streams
Video Streams
The AXIS 241Q/241S provides several different image and video stream formats. The type
to use depends on your requirements and on the properties of your network.
The Live View page in the AXIS 241Q/241S provides access to Motion JPEG and MPEG-4
video streams, as well as to single JPEG images. Other applications and clients can also
access these video streams/images directly, without going via the Live View page.
Stream Types
Motion JPEG
This format uses standard JPEG still images in the video stream. These images are then
displayed and updated at a rate sufficient to create a stream that shows constantly updated
motion.
The Motion JPEG stream uses considerable amounts of bandwidth, but also provides
excellent image quality and access to each and every individual image contained in the
stream.
Note also that multiple clients accessing Motion JPEG streams can use different image
settings.
MPEG-4
This is a video compression standard that makes good use of bandwidth, and which can
provide high-quality video streams at less than 1 Mbit/s.
Notes: •MPEG-4 is licensed technology. The AXIS 241Q/241S includes one viewing client license. Install-
ing additional unlicensed copies of the viewing client is prohibited. To purchase additional
licenses, contact your Axis reseller.
•All clients viewing the MPEG-4 stream must use the same image settings.
The MPEG-4 standard provides scope for a large range of different coding tools for use by
various applications in different situations, and the AXIS 241Q/241S provides certain
subsets of these tools. These are represented as Video object types, which are selected for
use with different viewing clients. The supported video object types are:
• Simple - sets the coding type to H.263, as used by e.g. QuickTime™.
• Advanced Simple - sets the coding type to MPEG-4 Part 2, as used by AMC (AXIS
Media Control)
When using MPEG-4 it is also possible to control the bit rate, which in turn allows the
amount of bandwidth usage to be controlled. CBR (constant bit rate) is used to achieve a
specific bit rate by varying the quality of the MPEG-4 stream. When using VBR (variable
bit rate), the quality of the video stream is kept as constant as possible, at the cost of a
varying bit rate.

20
AXIS 241Q/241S - Video Streams
MPEG-4 protocols and communication methods
To deliver live streaming video over IP networks, various combinations of transport
protocols and broadcast methods are employed.
• RTP (Realtime Transport Protocol) is a protocol that allows programs to manage the
real-time transmission of multimedia data, via unicast or multicast.
• RTSP (Real Time Streaming Protocol) serves as a control protocol, to negotiate which
transport protocol to use for the stream. RTSP is thus used by a viewing client to start a
unicast session, see below.
• UDP (User Datagram Protocol) is a communications protocol that offers limited service
for exchanging data in a network that uses the Internet Protocol (IP). UDP is an alterna
-
tive to the Transmission Control Protocol (TCP). The advantage of UDP is that it is not
required to deliver all data and may drop network packets when there is e.g. network
congestion. This is suitable for live video, as there is no point in re-transmitting old
information that will not be displayed anyway.
• Unicasting is communication between a single sender and a single receiver over a net-
work. This means that the video stream goes independently to each user, and each user
gets their own stream. A benefit of unicasting is that if one stream fails, it only affects
one user.
• Multicast is bandwidth-conserving technology that reduces bandwidth usage by simul-
taneously delivering a single stream of information to multiple network recipients. This
technology is used primarily on delimited networks (intranets), as each user needs an
uninterrupted data flow and should not rely on network routers.
How to stream MPEG-4?
Deciding on the combination of protocols and methods to use depends on your viewing
requirements, and on the properties of your network.
RTP+RTSP
This method (actually RTP over UDP and RTSP over TCP) should be your first
consideration for live video, especially when it is important to always have an up-to-date
video stream, even if some images do get dropped. This can be configured as multicast or
unicast.
Multicasting provides the most efficient usage of bandwidth, especially when there are
large numbers of clients viewing simultaneously. Note however, that a multicast broadcast
cannot pass a network router unless the router is configured to allow this. It is thus not
possible to multicast over e.g. the Internet.
Unicasting should be used for video-on-demand broadcasting, so that there is no video
traffic on the network until a client connects and requests the stream. However, if more
and more unicast clients connect simultaneously, the server will at some point become
overloaded. There is also a maximum of 20 simultaneous viewers to be considered.
Page is loading ...
Page is loading ...
Page is loading ...
Page is loading ...
Page is loading ...
Page is loading ...
Page is loading ...
Page is loading ...
Page is loading ...
Page is loading ...
Page is loading ...
Page is loading ...
Page is loading ...
Page is loading ...
Page is loading ...
Page is loading ...
Page is loading ...
Page is loading ...
Page is loading ...
Page is loading ...
Page is loading ...
Page is loading ...
Page is loading ...
Page is loading ...
Page is loading ...
Page is loading ...
Page is loading ...
Page is loading ...
Page is loading ...
Page is loading ...
Page is loading ...
Page is loading ...
Page is loading ...
Page is loading ...
Page is loading ...
Page is loading ...
Page is loading ...
Page is loading ...
Page is loading ...
Page is loading ...
Page is loading ...
Page is loading ...
Page is loading ...
Page is loading ...
Page is loading ...
Page is loading ...
Page is loading ...
Page is loading ...
Page is loading ...
Page is loading ...
Page is loading ...
Page is loading ...
Page is loading ...
Page is loading ...
Page is loading ...
Page is loading ...
Page is loading ...
Page is loading ...
Page is loading ...
Page is loading ...
Page is loading ...
Page is loading ...
Page is loading ...
Page is loading ...
Page is loading ...
Page is loading ...
Page is loading ...
Page is loading ...
Page is loading ...
Page is loading ...
Page is loading ...
Page is loading ...
Page is loading ...
Page is loading ...
Page is loading ...
-
 1
1
-
 2
2
-
 3
3
-
 4
4
-
 5
5
-
 6
6
-
 7
7
-
 8
8
-
 9
9
-
 10
10
-
 11
11
-
 12
12
-
 13
13
-
 14
14
-
 15
15
-
 16
16
-
 17
17
-
 18
18
-
 19
19
-
 20
20
-
 21
21
-
 22
22
-
 23
23
-
 24
24
-
 25
25
-
 26
26
-
 27
27
-
 28
28
-
 29
29
-
 30
30
-
 31
31
-
 32
32
-
 33
33
-
 34
34
-
 35
35
-
 36
36
-
 37
37
-
 38
38
-
 39
39
-
 40
40
-
 41
41
-
 42
42
-
 43
43
-
 44
44
-
 45
45
-
 46
46
-
 47
47
-
 48
48
-
 49
49
-
 50
50
-
 51
51
-
 52
52
-
 53
53
-
 54
54
-
 55
55
-
 56
56
-
 57
57
-
 58
58
-
 59
59
-
 60
60
-
 61
61
-
 62
62
-
 63
63
-
 64
64
-
 65
65
-
 66
66
-
 67
67
-
 68
68
-
 69
69
-
 70
70
-
 71
71
-
 72
72
-
 73
73
-
 74
74
-
 75
75
-
 76
76
-
 77
77
-
 78
78
-
 79
79
-
 80
80
-
 81
81
-
 82
82
-
 83
83
-
 84
84
-
 85
85
-
 86
86
-
 87
87
-
 88
88
-
 89
89
-
 90
90
-
 91
91
-
 92
92
-
 93
93
-
 94
94
-
 95
95


Axis Communications 241S User manual
- Category
- Video servers/encoders
- Type
- User manual
- This manual is also suitable for
Ask a question and I''ll find the answer in the document
Finding information in a document is now easier with AI
Related papers
-
Axis Communications 214 PTZ User manual
-
-
-
-
-
-
Axis Communications 250S Blade User manual
-
Axis Communications 31922 User manual
-
-
Axis 25735 User manual