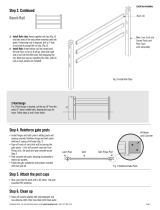
FENCING INSTALLATION: EVOLVER
17
WARRANTY
FortressBuildingProducts(“Fortress”)warrantstotheoriginal
residenalpurchaser(“Purchaser”,“you”or“your”)that,fora
periodoftwentyve(25)yearsfromthedateoforiginalpurchase,
undernormalresidenaluseandservicecondions,Evolver
CompositeFencing(“Evolver®”)shallbefreefrommaterialdefects
in workmanship and materials, and shall not split, splinter, rot, or
suerstructuraldamageresulngfromtermitesorfungaldecay.
Forpurposesofthiswarranty,a“residenalpurchaser”refersto
anindividualresidenalhomeowner.
Thiswarrantydoesnotcovercostsincurredwithremovalof
defecveEvolver®productsortheinstallaonofreplacement
materials,includingbutnotlimitedtolaborandfreight.
Fortress does not warrant against and is not responsible for any
condionaributableto:(1)improperinstallaonofEvolver®and/
orfailuretoabidebyFortressinstallaonguidelines,including
butnotlimitedtoimpropergapping;(2)useofEvolver® beyond
normalandproperuse,orinanapplicaonnotrecommendedby
Fortressguidelinesandlocalbuildingcodes;(3)movement,
distoron,collapseorselingofthegroundorthesupporng
structure on which Evolver® is installed; (4) any act of God (such as
ooding,hurricane,earthquake,lightning,etc.),
environmentalcondion(suchasairpolluon,mold,mildew,
etc.),stainingfromforeignsubstances(suchasdirt,grease,oil,
etc.),ornormalweathering(exposuretosunlight,weatherand
atmosphere which will cause any colored surface to gradually
fade,chalk,oraccumulatedirtorstains);(5)improperhandling,
storage, abuse or neglect by Purchaser, the transferee or third
pares;or(6)ordinary
wearandtear.
TheoriginalresidenalpurchasermustcontactFortressBuilding
Productscustomerservicedirectlyviaphoneat(866)323-4766or