plantings. In plotting out the sun’s
path, visit the site several times
during the day to note how shadows
fall. And don’t forget that the sun
follows a different path in the
summer than it does during the
other seasons. Use circles for
activity areas, arrows for traffic
paths, wavy lines for winds, a
yellow dotted line for sun path,
squiggly arrows for noise direction,
different color arrows for good and
poor views...or whatever other
symbols you find most practical.
Now walk the property with a
50- or 100-foot tape and someone
to hold the other end. Precision
counts. Take actual field measure-
ments and note them on your sketch.
Once you’re done, transfer your
field measurements to 1/4-inch
scale graph paper. Use light pencil
lines initially to plan your fence
line and only darken them when
everything is worked out to your
satisfaction. Also, it’s a good idea
to jot down the dimension next to
each line. Later on, it will be easier
to read than counting squares.
Make a rough layout
Once you have everything indi-
cated, it’s time to start looking at
fence lines. Since you’re just play-
ing with ideas at this point, don’t
overwork any one layout scheme.
Use tissue overlays to make various
rough fencing schemes (Fig. 1).
A good rule of thumb is to keep
spaces as large as possible. Most
people enjoy the expansiveness of
the great outdoors, so think twice
before you plot a fence line that
boxes people in.
If you have gates, don’t forget to
allow enough room for openings.
Three foot openings are generally
enough to accommodate one person
or a large piece of equipment. Four
feet will accommodate two people,
while 6 feet is generally sufficient
for a group. For vehicles, you want
to allow a minimum of 10 feet.
Once you’re satisfied that you
have what you want, trace your
rough layout and site plan on
another tissue overlay. Indicate
where the openings will be, and if
there’s a gate, the direction in which
it will swing. Completing this step
will help you calculate how much
lumber will be needed to build
your fence.
If you see ways to improve your
fence line, don’t be reluctant to
make new sketches until you feel
you’ve gotten everything just right.
Legal considerations
It’s a good practice to check out
the legal considerations associated
with building a fence, because local
codes and ordinances can vary
considerably from one community
to the next. Most communities have
height restrictions on boundary or
division fencing. There also may be
certain laws and codes that actually
require you to erect a fence, for
instance, around a swimming pool
or open well.
If there are any questions about
on whose land the fence is being
built, arrange for a survey.
Remember, if any part of the fence
encroaches on your neighbor’s
property, you may be asked to
move it.
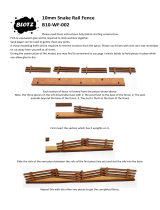
Build your
fence
At this point you’re ready to roll
up your sleeves and get to work.
Fence building is divided into three
stages. First, you physically plot the
fence by staking out the location of
the posts, then you install the posts
and finally, you add the rails and
fence boards.
Most people prefer to set all the
posts in place and then attach the
rails and fencing, especially when
posts are being set in concrete.
Another approach, however, is to
assemble the fence in sections by
filling in the rails and fence boards
whenever two posts are in place.
This has certain advantages when
you’re working with prefabricated
fences, or when you first build each
section on the ground and then lift
it into place.
Lumber grades and uses
No matter which approach you
follow, you need to start by decid-
ing what grades of redwood you
wish to work with. To calculate your
costs and materials, it is easiest to
determine first what it will take
to build one fence bay (usually 8
feet from post to post) and then to
multiply that by the number of bays
required to complete your fence. It
is also best to add another 8% to
your order so you don’t run out of
materials. Most fences use 4x4 posts
and 2x4 rails, with the boards
attached to the rails. You can choose
between garden grades of redwood
which are rugged, hard-working and
economical and architectural grades
which are preferred for fences or
screens that have a more decorative
Fig. 2:
LUMBER GRADES
AND CHARACTERISTICS
Heartwood Sapwood
Architectural Clear Clear All Heart Clear
Grades Limited Knots B Heart B Grade
Garden Knotty Construction Heart Construction Common
Grades Deck Heart Deck Common
Merchantable Heart Merchantable
or architectural function. (Fig. 2).
Garden grades
Construction Heart contains
knots of a limited size and is
recommended for work on or near
the ground and for posts, rails,
kickboards and fence boards. As
with all heartwood grades, it is
decay and termite resistant.