3
Carmanah Technologies
Corp. | 250 Bay St,
Victoria, BC V9A 3K5, Canada | 1.250.380.0052 |
customersup[email protected] | carmanah.comMX 300 & 400 SOLAR TO AC RETROFIT GUIDE
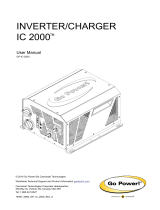
LEVEL 4
6. Install power supply DIN rail assembly in orientation shown using supplied nuts.
7. Fasten ground ring terminal to door stud with supplied nut. Secure and route wire in location shown using
supplied cable tie bases and cable ties.
8. Connect power supply output harness connector to circuit board shown. Secure and route harness using
cable ties.
The MX 300 AC cabinet accepts nominal input voltages of 120 V or 240 V and is equipped with a 4 A
input fuse.
The MX 300 AC provides supplementary overcurrent protection only. Ensure branch-rated
overcurrent protection is provided when installing.
Line
Neutral
Ground
9. Open fuse holder as shown.
10. Strip jacket of incoming AC cable by 5 –6". Strip insulation 0.35 –0.40" on the three wires.
11. Loosen terminal block and fuse holder screws and insert wires into terminals. Tighten to 6 in-lb. Pull test
wires to ensure they are secure. Install cable tie to incoming cable jacket.
12. Go to Section 2.0.