M101M8 Rugged Android Tablet Quick Start Guide
Inserting MicroSD Card
Your tablet supports Micro SDXS card.
To install Micro SDXS card:
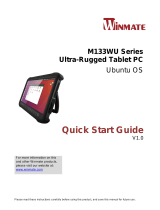
1. Open I/O protective cover by pulling out the latch.
2. Insert microSD card into slot with contacts facing down.
3. Press the card in to ensure that it is seated properly.
4. Close I/O protective cover.
To remove Micro SD Card:
1. Open I/O protective cover by pulling out the latch.
2. Push and release the micro SD card to unlock it.
3. Pull out the micro SD card.
Inserting Battery Pack
Caution
Discontinue using device immediately if you notice the battery is swelling, or looks puffy or
misshapen. Do not attempt to charge or use the device. Do not handle a damaged or leaking
battery. Do not let leaking battery fluid come into contact with your eyes, skin or clothing.
To insert the standard battery pack into the Tablet Computer:
1. Disconnect AC adapter and power cord from the tablet computer.
2. Turn the tablet computer over, back facing up.
3. Locate the Battery Lock Latch and push it to the “Unlocked” position.
4. Locate the Battery Release Slider that is spring-loaded. Pull back and hold.
5. Insert the battery on the connector-pins side first, and then lower the battery into the battery
compartment. Continue to hold the Battery Release Slider before battery is fully inserted.
6. Make sure the battery is completely lowered into the compartment before letting go the Battery
Release Slider. Battery will be flat against the housing once fully inserted.
To remove the standard battery pack into the Tablet Computer:
1. Power off the tablet computer (or put it to sleep). Disconnect any cords connected to the computer.
2. Turn the tablet computer over, back facing up.
3. Locate the Battery Lock Latch and push it to the “Unlocked” position.
4. Locate the Battery Release Slider that is spring-loaded. Pull back and hold.
5. Lift the battery out using the opening on side of battery compartment.