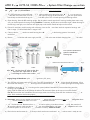
APEC Water Systems FILTER-MAX-ESPHUV-SS User manual
- Category
- Sanitary ware
- Type
- User manual

Use
Wrench
3rd
Stage
2nd
Stage
1st
Stage
STEP1 STEP2
W
1
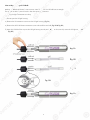
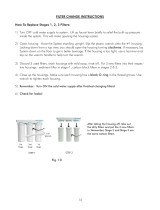
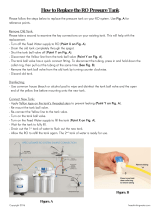
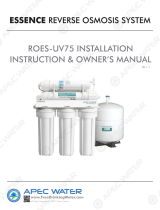
Changing Stage-4 Membrane: (should be changed every 2-3 years)
1) Turn OFF the cold water supply to RO system. Turn OFF the tank ball-valve by turning blue handle 90 degrees. Lift up
RO faucet lever briefly to relieve the built-up pressure inside the RO system. This will make opening the housings easier.
2) See Fig. C. Locate the Membrane housing on the system (labeled “Membrane”). Remove the tubing from the
housing’s cap at point D (see Fig C). To remove tubing, Push In and Hold Down on the collet ring square against the
fitting. With the collet held in this position the tube can be removed. Open up the cap (turn counter-clockwise) see
Fig. A1. Remove the used membrane. Discard.
Empty water from housing. Insert the new membrane using a pair of
pliers. Push membrane into housing tightly.
Avoid touching the Membrane with your hands to prevent contamination!
3) Important! Make sure the “double-ring” end of the membrane goes into the housing first as shown in Fig. A2. above.
The membrane cannot filter water if it’s inserted in the WRONG direction!
4) Close the housing cap. Reconnect the tubing to the cap by pushing it into the quick connect fitting, then gently pull
back on the tubing to make sure the connection was secure. Turn on the cold water supply and open the tank valve.
Let the RO system run to re-fill the tank (takes about 2-3 hours). Check for leaks!
5) Drain the first tank of water (through faucet) to flush out the new membrane! The 2
nd
tank of water is ready for use.
Option: Recommend to add a little bit lubricant on double o-rings.
Fig. A2
Correct direction
After Taking the housings off, take out the dirty
filters and put the new 3 pre-filters in. Remember,
Stage-2 and Stage-3 are the same carbon filters.
Fig. A1
Turn counter-clockwise to
open the membrane
housing cap.
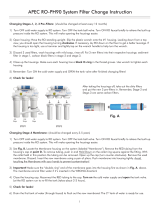
Changing Stages 1, 2, 3 Pre-Filters: (should be changed at least every 6-12 months)
1) Turn OFF cold water supply to RO system by turning the needle valve stem to the right until it stops, or you can turn
off the cold main water valve. Turn OFF the tank ball valve by turning the blue handle 90 degrees. Lift up RO faucet
lever briefly to relieve the built-up pressure inside the RO system. This will make opening the housings easier.
2) Open housing: Have the RO standing upright. Slip the plastic wrench onto the #1 housing. Looking down from a top
view, you should open the housing turning clockwise. If necessary, lay RO down on the floor to get a better leverage. If
the housing is too tight, use a hammer and lightly tap on the wrench handle to help turn the wrench.
3) Discard 3 used filters, wash housings with mild soap, rinse off. Put 3 new filters into their respective housings: sediment
filter in stage-1, Carbon block filters in stages 2 & 3.
4) Close up the housings. Make sure each housing has a black O-ring in the housing grooves. Use wrench to tighten
each housing.
5) Remember: Turn ON the cold water supply and OPEN the tank valve after finished changing filters! Check for leaks!
APEC ROES-UV75-SS / ROES-PHUV75 System Filter Change Instruction
Us
U
U
e
Wr
W
Wr
e
nc
h
3
r
d
S
ta
ge
2n
d
S
ta
ge
1
st
S
ta
g
e
ST
EP
1
ST
EP
2
W
W
W
1
C
Ch
anging Stage-4 Membrane:
(
sho
ul
l
d
d
be
be
c
c
ha
ha
nged every 2-3 years
)
1)
Turn OFF the cold water supply
to
o
RR
O
O
s
sy
stem. Turn OFF the tank ball-val
veve
b
b
y y
tutu
rn
r
i
in
g blue handle 90 degrees. Li
f
t up
RO
f
aucet lever brie
f
ly to
r
r
elel
ieie
veve
t
he
he
built-up pressure inside the RO sys
te
e
m.m.
T
T
hihi
s s
w
wi
ll make opening the housings easier
.
2)
See Fig.
C
.
Locate the
M
M
emem
brbr
an
an
e housing on the system
(
labeled “Membrane”
)
. Remove the tubing
f
rom the
housing’s cap
at
p
oint D
(
(s
ee
ee
F
ig C). To remove tubing, Push In and Hold Down on the collet ring square against the
f
itting. With the collet held in this position the tube can be removed. Open up the cap
(
turn counter-clockwis
e)
e)
s
s
e
ee
Fig. A
1
.
Remo
ve
the used membrane. Discard.
E
mpty water
f
rom housing.
I
nsert the new membrane using
aa
papa
ir
ir
o
f
pliers. Push membrane into housing tightly
.
Avoid touching the Membrane with your hands to prevent contamination!
g
y
p
3
)
Important!
Make sure the “double-ring” end of
th
h
e
e
meme
mb
rane goes into the housing first as sh
owow
n
n
inin
Fig. A
2
.
above.
Th
h
e e
m
me
mbrane cannot
f
ilter water i
f
it’s inser
te
d
d
in
n
t
t
he
he
WRONG direction!
4)
4)
CC
lolo
se
se
the housing cap. Reconnect the tu
bi
bi
ng
ng
tt
o
o
th
h
e cap by pushing it into the quick con
ne
e
ct
ct
f
it
t
ti
ti
ng, then gently pull
ba
ba
ck
on the tubing to make sure the co
nn
nn
ec
ec
ti
ti
o
on
was secure. T
u
rn
o
n
the cold water
su
u
pppp
lyly
a
a
n
nd
open
the tank
va
lv
e.
Let the RO system run to re-
f
ill the t
an
n
k
k
(t
(t
ak
ak
es about 2-3 hours
)
.
C
h
ec
k
fo
r l
ea
k
s!
5)
Drain the
f
irst tank o
f
water
(
th
ro
ro
u
ug
h
f
aucet
)
to
f
lush out the new membrane!
Th
Th
e
e
22
nd
nd
tank o
f
water is ready
f
or use
.
OpOp
titi
on
on
:
:
R
Re
commen
d
to a
dd
a
l
itt
l
e
b
it
l
u
b
ricant
on
n
d
d
ouou
blbl
e
e
o
-
ri
ngs
.
F
i
g.
g.
AA
22
C
Co
rr
rr
ec
t
di
re
ct
io
n
C
Co
rr
ec
t
di
re
ct
io
n
Af
te
r
r
TaTa
ki
ki
n
ng
the housings o
ff
, take out the dirt
y
fi
fi
ltlt
erer
s
s
an
an
d put the new 3 pre-
f
ilters in. Reme
mb
b
erer
,
St
St
ag
ag
e
e-
2 and Stage-3 are the same carbon
fifi
lt
lt
ers.
F
i
g. A1
Tu
rn
c
ou
nt
er
-c
lo
ck
wi
se
t
o
open the membrane
housing cap.
C
h
an
n
gi
g
ng
S
S
t
ta
ges 1, 2, 3 Pre-Filters:
(should be c
ha
ha
ngng
e
ed
at least every 6-12 months)
y
1)1)
TT
ur
ur
n OFF cold water supply to RO syst
em
m
bb
y y
tutu
rn
r
in
in
g the needle valve stem to the right
u
u
ntnt
ilil
ii
t t
st
st
o
op
s, or you can turn
of
of
f
the cold main water valve. Turn OF
F
F
th
th
e
e
ta
ta
nk
nk
ball valve by turning the blue handle 9
0
0
de
de
gr
gr
ees. Li
f
t up RO
f
auc
et
lever brie
f
ly to relieve the built-up pres
su
u
rere
i
i
nsns
id
id
e the RO system. This will make opening the housings easier.
2)
Open housing: Have the RO standing upright. Slip the plastic wrench onto the #1 housing. Looking down
f
rom a top
view, you should open the housing turning
c
l
oc
kwi
se
.
I
f
necessary, lay RO down on the
f
loor to get a better leverage. I
f
the housing is too tight, use a hammer and lightly tap on the wrench handle to help turn the wrench
.
3
)
Discard 3 used
f
ilters, wash housings with mild soap, rinse o
ff
. Put
3
3
new
f
ilters into their respective housings: sedi
me
me
nt
nt
f
ilter in stage-1, Carbon block
f
ilters in stages 2 & 3
.
4)
Close up the ho
us
us
inin
gs
gs
. Make sure each housing has a
b
l
ac
c
k
k
O-O-
riri
n
ng
in the housing grooves. Use wrench
t
t
o
o
ti
ti
gh
gh
t
te
n
each housi
ng
ng
.
.
5)
Remem
be
be
r:
r:
Tu
Tu
rn ON the cold water supply and OP
EN
EN
tt
he
he
tank valve a
f
ter
f
inished changing
f
ilter
s!
s!
CC
hehe
ck
ck
f
or leaks!
A
PEC R
O
O
EE
S
S
-
-
UV75-SS / ROES-PH
U
U
V
V
77
5
5
System Filter Chang
e
e
I
I
nn
ss
tt
r
r
uctio
n

2
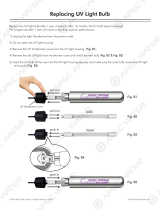
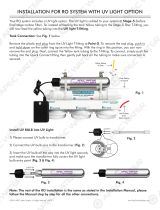
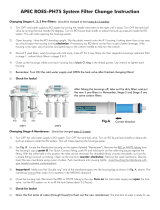
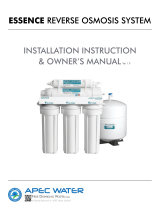
How to Replace Stage-5 UV Bulb:
Replace the UV light bulb after 1 year of service. After 12 months, the UV bulb loses its strength.
Pro-longed use after 1 year will result in less than optimal performance.
1) Unplug the light Transformer from the power outlet.
2) Do not open the UV light housing.
3) Remove the UV transformer cover from the UV light housing. (Fig. B1).
4) Remove the old UV bulb from transformer cover and install the new bulb (Fig. B2 & Fig. B3)
5) Insert the UV bulb all the way into the UV light housing securely and make sure the cover fully covers the UV light entry point
(Fig. B5).
Fig. B1
Fig. B2
Fig. B3
Fig. B5
Fig. B4
2
How to Rep
la
la
ce
ce
S
S
ta
ta
ge-5 UV Bulb:
R
eplace
th
th
e
e
UV
UV
l
ight bulb a
f
ter 1 year o
f
service. A
f
ter 12
mo
mo
nt
nt
hs
h
, the UV bulb loses its strength.
P
ro-
lo
o
n
ng
ed use a
f
ter 1 year will result in less than opt
im
m
al
al
p
p
er
er
f
ormance.
1)1)
UU
npnp
lug the light Trans
f
ormer
f
rom the p
ow
er
er
oo
utut
lele
t.
t.
2)
2
Do not open the UV light housing.
3
) Remove the UV trans
f
ormer cover
f
rom the UV light housing.
(
Fig. B
1
)
.
4
) Remove the old UV bulb
f
rom trans
f
ormer cover and install the new bulb (F
i
g. B2 & F
i
g. B3
)
5) Insert the UV bulb all the way into the UV light housing securely and
mm
akak
e e
su
s
re the cover
f
ully covers the UV light ent
ry
y
p
p
oi
oi
ntnt
(
F
i
g. B
5
)
.
Fi
g. B
1
Fi
g. B
2
Fi
Fi
g.g.
B
B
3
Fi
g. B
5
5
F
F
F
F
F
F
i
g. B4

3
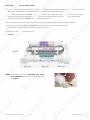
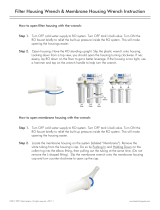
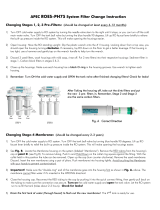
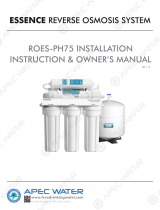
Changing Stage-6 Carbon TCR Filter: (should be changed with the membrane every 2-3 years)
1) Remove the OLD filter: See Fig.C. Disconnect the tubing from Point K and tubing at Point H. To remove tubing,
Push In and Hold Down on the collet ring square against the fitting. With the collet held in this position the tube can
be removed. Discard the used filter. The new 6th stage filter will come with 2 plastic end caps. Please use a flat head
screwdriver to remove the caps before proceeding.
2) Sanitize: Use some mild bleach solution to rinse the 2 plastic fittings and the 2 ports of the new filter.
This is to prevent contamination.
NOTE: Only this filter change needs bleach sanitizing. Do Not apply chlorine/bleach
in any way to Membrane or it will damage the membrane!
3) Connect the 2 fittings and tubing to the new filter as before. Make sure the “FLOW ” on the filter is pointing to
Point H.
4) Check for leaks!
Fig. C
To Storage
Tank
Yellow Tubing
Red Tubing From Water Source
3
C
hanging S
ta
ta
gege
-6
-6
C
arbon TCR Filter:
(should be cha
ng
g
ed
ed
ww
it
it
h
h
t
th
e membrane every 2-3 years)
y
y
1)
Remove the OLD
f
ilter: See Fig.
C
.
Disconnect the tubing
f
r
om
m
PoPo
inin
t
t
K
a
nd tubing at P
o
int H
.
To remove
tu
tu
bi
bi
ngng
,
,
Push In and Hold Down on the collet ring square against
th
h
e
e
fi
fi
tttt
in
in
g. With the collet held in this position
t
t
hehe
t
ub
ub
e
e
can
be removed. Discard the used
f
ilter. The new 6th stage
f
f
il
il
te
te
r
r
wiwi
ll
ll
come with 2 plastic end caps. Pleas
e
e
us
us
e
e
a
a
fl
f
at head
screwdriver to remove the caps be
f
ore proceeding.
2)
S
an
a
itit
iziz
e:
e:
U
U
se some mild bleach solution to rinse
th
h
e
e
2
2
pl
p
astic
f
ittings and the 2 ports o
f
the
ne
e
w
w
f
i
lt
lt
er
er
.
ThTh
isis
i
i
ss
t
to
prevent contamination.
N
O
TE: Only this
f
ilter change nee
ds
s
b
b
le
e
ac
ac
hh
sanitizing. D
o
N
ot
apply chlorine/bl
ea
ea
chch
in any way to Membrane
o
o
r
r
it
it
ww
il
il
l
l
damage the membrane!
3
)
Connect the 2
f
ittings and tubing
t
t
o
o
thth
ee
new
f
ilter as be
f
ore. Make sure th
e
e
“F
F
L
L
OWOW
” on the filter is pointing to
P
o
int H
.
4)
C
h
ec
k
fo
r l
ea
k
s!
g
Fi
g
.
C
T
o Storag
e
Ta
nk
T
ubingYellow
T
Sourc
e
Red Tubing
FrFr
omom
W
W
ater

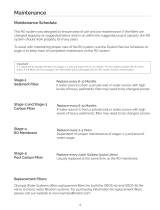
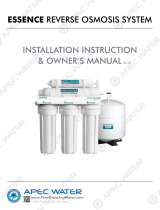
How to Replace Stage-7 pH Mineral Filter:
1) Turn OFF cold water supply to RO system. Turn OFF tank ball-valve by turning the blue handle clockwise 90 degrees. Turn ON
RO faucet to relieve pressure inside the RO system. It will make removing the tubing easier.
2) Remove the CLEAR outlet tubing at Point P. See Fig. D. To remove the tubing Push In and hold down on the collet ring square
against the fitting. With the collet held in this position the tube can be removed Once the outlet tubing is disconnected,
please remove inlet tubing at Point O. Remove old filter and discard.
3) The new PH filter will come with 2 End Plugs. Please remove the plugs before connecting the tubing to the filter.
4) To reconnect the tubing to Point O and Point P, push the tubing into the Quick Connect fitting, then
gently pull back on the tubing to make sure the connection was secured.
5) Please drain a full tank of water before use.
6) Check for leaks!
P
Fig. D
O
NOTE: The QC fittings come with an End Plug that needs
to be removed before the tubing can be connected.
See Fig. D.
Fig. D
©2018 APEC Water Systems. All rights reserved. v1.2018.Dec www.FreeDrinkingWater.com
4
How to Rep
la
a
ce
ce
S
S
ta
ta
ge-7 pH Mineral Filter:
1) Turn
OF
OF
F
F
c
co
ld
ld
water supply to RO system. Turn OFF t
an
an
k k
ba
ba
ll
l
-valve by turning the blue handle clockw
is
s
ee
9090
d
egrees. Turn ON
RO
RO
f
aucet to relieve pressure inside the RO system
.
It
It
w
w
ilil
l
l
make removing the tubing easier.
2)2)
RR
emem
ov
e the CLEAR outlet tubing at Point
P.
P.
SS
eeee
F
F
ig
ig
.
D
D.
To remove the tubing Push In and h
ol
ol
dd
dodo
wnwn
on the collet ring square
against the
f
itting. With the collet held in
tt
hihi
ss
popo
sisi
ti
t
on the tube can be removed Once the ou
tl
et
t
t
t
ub
ub
ing is disconnected,
please remove inlet tubing at
Po
in
t
O
. Re
mo
mo
ve
ve
o
o
ld
f
ilter and discard.
3
) The new PH
f
ilter will come with 2 End Plugs. Please remove the plugs be
f
ore connecting the tubing to the
f
ilte
r.
4
) To reconnect the tubing t
o
P
oi
nt
O
a
n
d
Po
i
nt P, push the tubing into the Quick Connect
f
itting, then
gently pull back on the tubing to make sure the connection was secur
ed
d
.
.
5) Please drain a
f
ull
t
t
an
an
k k
of
water be
f
ore us
e.
6
)
C
h
ec
k
fo
r
le
le
akak
s!s!
P
F
i
g. D
O
NO
NO
TETE
:
:
T
T
he QC
f
ittings come with an End Plug
tt
ha
h
t
t
ne
ed
s
t
o
be
r
e
m
o
v
ed
be
f
ore the tubing
ca
ca
n
n
be
be
c
c
onnected.
See
F
i
g. D.
Fig.
D
©2018 APEC Water Systems. All rights reser
ved
d
. v
. v
1.21.2
018
018
.Dec www.FreeDrinkingWater
.co
o
mm
4
-
 1
1
-
 2
2
-
 3
3
-
 4
4


APEC Water Systems FILTER-MAX-ESPHUV-SS User manual
- Category
- Sanitary ware
- Type
- User manual
Ask a question and I''ll find the answer in the document
Finding information in a document is now easier with AI
Related papers
-
 APEC Water Systems UVBULB-SS Operating instructions
-
 APEC Water Systems WFS-1000 User guide
-
 APEC Water Systems FI-PHPLUS-QC-38 User manual
-
 APEC Water Systems RO-Hi User manual
-
 APEC Water Systems FILTER-MAX90 Installation guide
-
 APEC Water Systems UG-UVSET-1-4-SS User manual
-
 APEC Water Systems WRENCH-HALF User manual
-
 APEC Water Systems TANK-14 User manual
-
 APEC Water Systems MEM-ES-75 Operating instructions
-
 APEC Water Systems ROES-PH75 User guide


Other documents
-
 APEC ESSENCE RO Series Operating instructions
-
 Olympia Water Systems OROS-6PK-80 User manual
-
 Olympia Water Systems OROS-5PK-80 User manual
-
 Olympia Water Systems OROS-50 User manual
-
 APEC Water ROES-UV75 Installation guide
-
APEC Water WFS-1000 Installation guide
-
 APEC ESSENCE ROES-UV75 Installation Instructions & Owner's Manual
-
 APEC Water ROES-PH75 Installation guide
-
 APEC Water CS-2500 Installation guide
-
 APEC Water ROES-50 Installation guide


