Page is loading ...

Viper Faceplate Spacer Kit Installation Instructions
© 2020, Cornelius Inc. - 1 - Publication Number: 629097945INS
INSTALLATION INSTRUCTIONS
VIPER FACEPLATE SPACER INSTALLATION
SAFETY INSTRUCTIONS
!
WARNING:
Before starting installation, read and understand all safety label and warnings on the machine. Also review and
understand all safety instructions in the owners, installation and service manuals.
Failure to comply could result in serious injury, death or damage to the equipment.
QUALIFIED SERVICE PERSONNEL
!
WARNING:
Only trained and certified electrical, plumbing and refrigeration technicians should service this unit.
All wiring and plumbing must conform to national and local codes. Failure to comply could
result in serious injury, death or equipment damage.
SAFETY PRECAUTIONS
This unit has been specifically designed to provide protection against personal injury. To ensure continued
protection observe the following:
!
WARNING:
Disconnect power to the unit before servicing. Follow all lock out/tag out procedures established by the user. Verify all
power is off to the unit before performing any work.
Failure to comply could result in serious injury, death or damage to the equipment.
!
CAUTION:
Always be sure to keep area around the unit clean and free of clutter.
Failure to keep this area clean may result in injury or equipment damage.
Revision Date: July 22, 2020 www.cornelius.com Revision: A

Viper Faceplate Spacer Kit Installation Instructions
Publication Number: 629097945INS - 2 - © 2020, Cornelius Inc.
FACEPLATE SPACER INSTALLATION
NOTE: Install Faceplate Spacers to prevent potential barrel damage and align the Faceplate evenly
on the barrel’s 4 threaded rods. The Faceplate Spacers are part of a kit or can be acquired
individually; see below for all available configurations.
PART NUMBERS OF ALL AVAILABLE CONFIGURATIONS:
KIT Part List:
Please contact Marmon Link at 1-800-238-3600 with questions regarding the purchase of Faceplate Spacers.
UNIT PREPARATION FOR FACEPLATE SPACER UPGRADE:
Table 2.
Table 1.
Sl. No. Part No. Description
1. 629097945-2 2 Flavor Faceplate Spacer Kit
2. 629097945-3 3 Flavor Faceplate Spacer Kit
3. 629097945-4 4 Flavor Faceplate Spacer Kit
4. 620072813 - Individual Part Number
Step Action
1. Defrost the barrel and purge the product.
2. When purging is complete, disconnect power from the unit.
3.
Open the relief valve on the front of the barrel to ensure that pressure is released.
NOTE: BARREL PRESSURE MUST BE RELIEVED BEFORE REMOVING THE
FACEPLATE!
4.
Remove the four (4) 3/4 in. nuts from the faceplate and slowly remove the faceplate
from the unit.

Viper Faceplate Spacer Kit Installation Instructions
© 2020, Cornelius Inc. - 3 - Publication Number: 629097945INS
INSTALLATION INSTRUCTION
Table 3. Installation Procedure
Step Action
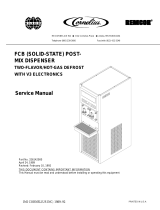
1.
Install four (4) new Faceplate Spacers over
the threaded rods. Push the spacers back
until they are flush with the foam pack. if the
spacers are difficult to push in then the
installation of faceplate will ensure they are
seated properly.
Figure 1. Faceplate Spacers Installation
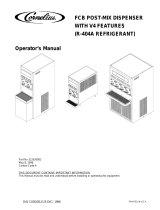
2.
Slide the faceplate into place until it contacts
all 4 Faceplate Spacers and the gasket is
fully compressed against the inside of the
barrel.
Figure 2. Faceplate Installation
3.
Install the four (4) washers and hand tighten
the four (4) mounting nuts. Additional turns
might be required if the spacers are not flush
with the foam pack, as per Step 1. After con-
firming the spacers are flush with the face-
plate and the foam pack, use a ¾” wrench to
tighten the nuts an additional ¼ turn. Be
careful not to over-tighten the nuts or crack-
ing of the faceplate may result.
A properly installed Faceplate will have all
four (4) mounting nuts flush with the
threaded rods, See Figure 3. An improperly
installed Faceplate will have over-tightened
mounting nuts, See Figure 4. This scenario
needs to be avoided to prevent barrel dam-
age, even though it’s highly unlikely with the
Faceplate Spacers installed.
4. Sanitize the system per the “Sanitizing the System” procedure below.
5. Refill the barrel with product.
6. Perform a motor calibration.
7. Faceplate Spacer and Faceplate installation is completed.
Figure 3. Properly
Figure 4. Over
Tightened nut
Tightened nut

Viper Faceplate Spacer Kit Installation Instructions
Publication Number: 629097945INS - 4 - © 2020, Cornelius Inc.
SANITIZING THE SYSTEM
The sanitizing process consists of emptying the barrel, washing the lines and barrel, cleaning the BIB connectors,
rinsing and refilling the system.
Suggested Sanitizers
KAY-5® Sanitizer/Cleaner (100 PPM)
Mix one packet of KAY-5® Sanitizer/Cleaner per 2.5 gallons of tap water [70°-100°F (24°-35°C)] according to
manufacturer's instructions to ensure 100 PPM of available chlorine.
Household Bleach (200 PPM)
For 6% Sodium Hypochlorite bleach, mix 2.5 fl oz (75mL) in 5 gallons of tap water [70°-100°F (24°-35°C)]. For
5.25% Sodium Hypochlorite bleach, mix 2.2 fl oz (66mL) of bleach in 5 gallons of tap water [75°-95°F (24°-35°C)].
This will ensure a bleach solution of 200 PPM of available chlorine.
SANITIZING THE BARREL
Sanitize the syrup system and barrel by performing the procedure shown below Table.
Table 4. Sanitizing the Barrel
Step Action
1.
Use a clean 5-gallon bucket filled with a sanitizing solution and water at a temperature of 90º
F to 110º F (32º C to 43º C) Prepare the sanitizing solution according to the instructions in the
“Suggested Sanitizers” section above.
2.
Connect a sanitizing fitting (p/n cc 28688) to the BIB connector. Put the connector in the
bucket of sanitizing solution.
3. Make sure the Product/BRIX valve is in the BRIX position.
4.
Hold waste container under the BRIX tube to collect flush water from the syrup line and open
the manual syrup flow valve to start filling the syrup line with sanitizing solution. Continue to
hold the syrup flow valve open until sanitizing solution starts coming out of the BRIX tube.
5. Turn the Product/BRIX valve in the Product position.
6. Manually override (open) the syrup flow valve to fill the barrel with sanitizing solution.
7.
Fill the barrel with sanitizing solution by opening the faceplate relief valve until sanitizing solu-
tion comes out of the relief port.
8.
Hold a 16 oz. cup under the dispense valve. Hold the dispense valve fully open until the cup
is full.
9.
Use the brush provided with the unit to clean the relief port and clean the outlet of the dis-
pense valve with sanitizing solution.
10.
From the Barrel Status menu, press the SPIN button while highlighting the appropriate barrel.
This starts the scraper blades. Allow blade to operate for minimum of 10, but no more than
15 minutes. Turn the scrapper blade off by pressing the OFF button.
11.
Place a large container under the dispense valve and drain as much sanitizing solution as
possible from the barrel.
12.
When the pressure in the barrel drops, from the Barrel Maintenance menu, press the PURGE
button to re-pressurize the barrel with CO
2. As sanitizing solution level lowers in the barrel,
partially close the valve to avoid spurting.

Viper Faceplate Spacer Kit Installation Instructions
© 2020, Cornelius Inc. - 5 - Publication Number: 629097945INS
FLUSHING THE SYSTEM
Flush the wash water from the system by performing the procedure in Below Table.
!
CAUTION:
Flush the system thoroughly, residual sanitizing solution left in the system may create a health hazard.
Table 5. Flushing the System
Step Action
1. Turn the Product/BRIX valve to the Product position.
2.
Manually open the manual water flow valve to start filling the barrel with wash water. At the
same time, open the faceplate relief valve until water comes out.
3.
From the Barrel Status menu, press the SPIN button while highlighting the appropriate bar-
rel. This starts the scraper blade. Allow the blade to operate for fifteen seconds, then turn
barrel OFF by pressing the OFF button.
4. To drain the water from the system, turn the barrel OFF.
5.
Place a container under the barrel dispensing valve. Open the dispensing valve and dis-
pense all rinse water from the barrel. When the pressure in the barrel drops, from the Barrel
Maintenance menu, press the PURGE button to re-pressurize the barrel with CO
2. As the
wash water level lowers in the barrel, partially close the valve to avoid spurting.
6.
Remove the sanitizing fitting (p/n cc 28688) from the BIB connector and connect a BIB con-
taining syrup to the syrup line.
7.
Rotate the Product/BRIX valve to the BRIX position and open the valve at the end of the
tube.
8.
Hold a waste container under the BRIX tube to collect the sanitizing solution from the syrup
line and open the manual syrup flow valve to start filling the syrup line with syrup. Continue
to hold open the syrup flow valve until syrup starts coming out of the BRIX tube.
9. Perform a BRIX setup.

Viper Faceplate Spacer Kit Installation Instructions
Publication Number: 629097945INS - 6 - © 2020, Cornelius Inc.
/