Redback A 4500C/A 24 Hour 7 Day Timer User guide

Type
User guide

Redback A 4500C/A 24 Hour 7 Day Timer is a versatile and feature-rich device designed to automate and simplify your daily routines. With its advanced capabilities, it offers precise timekeeping, flexible event scheduling, and a wide range of audio output options to suit your specific needs.

Redback A 4500C/A 24 Hour 7 Day Timer is a versatile and feature-rich device designed to automate and simplify your daily routines. With its advanced capabilities, it offers precise timekeeping, flexible event scheduling, and a wide range of audio output options to suit your specific needs.

www.redbackaudio.com.au Redback® Proudly Made In Australia 1
A 4500C/A 4505C Software Programming Guide
User manual revision number: 1.1 08/08/2022
Software Programming Guide
A 4500C Evacuation Timer
A 4505C Lockdown Timer
Redback® Proudly Made In Australia
A 4500C
A 4505C
www.redbackaudio.com.au
Redback® Proudly Made In Australia2
A 4500C/A 4505C Software Programming Guide
CONTENTS
Page
1.0 Running The Programming Software 3
2.0 Programming The Timing Events 3
3.0 Selecting The Audio Files For The Output Folders 6
4.0 Adding Audio Files To The Library 8
5.0 Random Play Of Audio Files 10
6.0 Saving The Event Program 10
7.0 Remote Access To The Timer 11
8.0 Download Event Program From The Timer 12
9.0 Manage Audio Files Remotely 13
10.0 Upload Event Program To The Timer 13
11.0 Possible Reason For Connection Failure 14
12.0 Sync Time 15
13.0 Notes 16
www.redbackaudio.com.au Redback® Proudly Made In Australia 3
A 4500C/A 4505C Software Programming Guide
1.0 RUNNING THE PROGRAMMING SOFTWARE
The PC software is provided on the supplied Micro SD Card and is named
“REDBACKWEEKLYTIMERPROGRAMMERXXXX.exe”
In order to access the software, the Micro SD card will need to be connected to a PC. You will need a PC or laptop equipped
with an Micro SD card reader to do this. If a Micro SD slot is not available then the Redback D 0371B USB Memory Card
Reader or similar would be suitable (not supplied).
You will rst need to put the timer in “Standby” mode or disconnect power. Next remove the Micro SD card from the front
of the unit. To remove the Micro SD card push the card in and it will eject itself.
Make sure the PC is on and card reader connected and correctly installed. Then insert the Micro SD card into the reader.
Go to “My Computer” or “This PC” and open the Micro SD card which is usually marked “Removable disk”.
The software required to program the Timer is stored on the root folder of the Micro SD Card.
The program can be run on the Micro SD card or it could be copied to the PC desktop or another folder and run from there.
Double click on the le - REDBACKWEEKLYTIMERPROGRAMMERXXXX.exe.
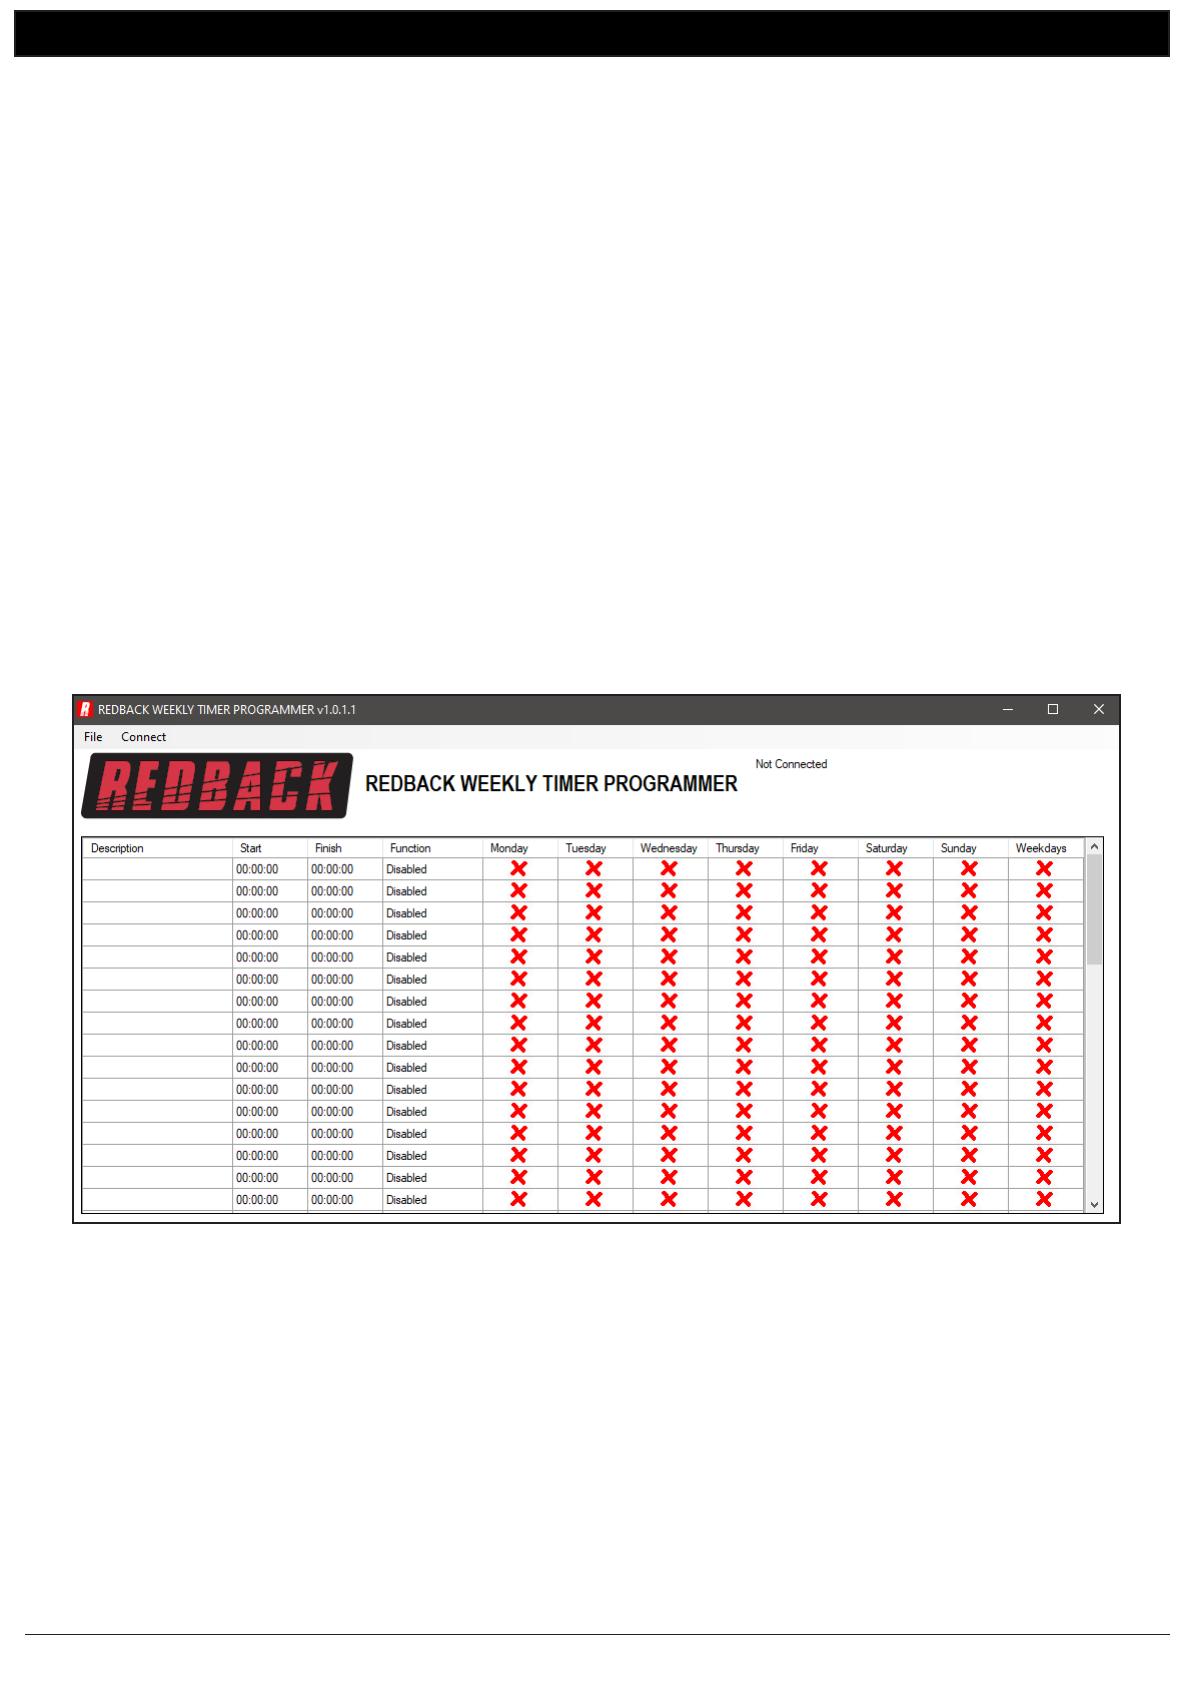
The programming screen should appear as shown in gure 1.0.
If the program doesn’t run then the .NET Framework might need to be updated on your PC.
This must be updated to the .NET Framework 4, available on the microsoft website.
Fig 1.0 Programming Screen
All 50 events can be accessed on the screen by scrolling up and down.
If timing information was previously saved using the buttons on the front of the timer (refer to the Timer Instruction Manual),
then these times should be displayed. Otherwise the timing information should all be blank as shown.
2.0 PROGRAMMING THE TIMING EVENTS
Entering the timing events is very straight forward.
Double click on any line and a new window should pop up as shown in g 2.1, which has the event details outlined.
www.redbackaudio.com.au
Redback® Proudly Made In Australia4
A 4500C/A 4505C Software Programming Guide
Fig 2.1 Program an Event
An event can now be programmed from this window. A description of the event can be added if desired such as Pre bell,
Morning Tea etc. The start time, nish time and days of the week can all be entered. Selecting the days of the week is as
simple as clicking the desired days or selecting the weekdays box.
There are 99 output folders available to choose from, which include the Bell, Prebell, Music and output folders 5 - 99. These
folders contain the audio les to be played on event activation.
NOTE: The “Alert” and “Evac” folders can have only one audio le installed. The remaining folders can have unlimited
audio les (depending on available storage) and will then randomly play the audio les in the folder any time the corre-
sponding output is activated.
The “Relay Only” Output option only activates the Bell 24V DC output without outputting any audio.
Figure 2.2 shown below illustrates an example. This event is the prebell for a primary school and is programmed to activate
5 minutes before the rst bell of the day.
The audio track uploaded into the “Prebell folder” will be played at 8:55:00 and continue to play until 08:59:59.
Fig 2.2 Prebell Example
Once all of the details have been entered press “OK”
The event should now appear in the programming window such as shown in g 2.3.
www.redbackaudio.com.au Redback® Proudly Made In Australia 5
A 4500C/A 4505C Software Programming Guide
Fig 2.3 Pre Bell Event Entered
Another event is added by following the same steps. Double click on a blank line and then enter the details required as illus-
trated in g 2.4. This example is the rst bell of the day for a primary school. The audio track uploaded into the “Bell folder”
will be played at 9:00:00 and continue to play for 2 seconds.
Fig 2.4 Bell Event Entered
Press the OK button and the second event now appears in the programming screen as shown in g 2.5.
www.redbackaudio.com.au
Redback® Proudly Made In Australia6
A 4500C/A 4505C Software Programming Guide
Fig 2.5
As the events are added they will be listed in chronological order. (I.e. In time order). If a new event is programmed, to start
at 08:45:00 for instance, this new event would appear before the prebell event.
Continue to enter more events in this manner.
To save the program navigate to the le tab and then select save or save as.
Any number of programs and any name can be used for the saved le but it must have the .cnf extension. This might be
handy if more than one program is required in a school year for example and these could be stored on a PC or elsewhere.
But note that the program that the timer will access must be saved as cong.cnf and be saved to the Micro SD card.
3.0 SELECTING THE AUDIO FILES FOR THE OUTPUT FOLDERS
As mentioned previously there are a total of 99 output folders to select from for event playback. To move audio les to these
folders the “Card Manager” will need to be opened. With the PC software running as outlined in section 1.0, navigate to
the “File” tab as shown in gure 3.1.
Fig 3.1
www.redbackaudio.com.au Redback® Proudly Made In Australia 7
A 4500C/A 4505C Software Programming Guide
Select “Card Manager” and then a browsing window should appear as shown in gure 3.2.
Fig 3.2
The output folders are listed on the left side and the audio les available in the Library on the right.
From here the audio les in the library can be dragged into the required folders for the events programmed.
By default the output folders Alert, Bell, Evac, Music, Prebell and Voice should all house an audio le.
The timer checks these folders on power up, and if any of these folders are empty the timer will not operate.
Note: The alert and evac audio les meet the Australian standard for evacuation tones.
To check the contents, click on the folders and they should open and list the audio les inside as shown in gure 3.3.
Fig 3.3
To add a le to a folder simply drag the le from the library to the SD card output folders, such as the example shown in
gure 3.4 in which the le “Dream of You” is copied to folder 10.
www.redbackaudio.com.au
Redback® Proudly Made In Australia8
A 4500C/A 4505C Software Programming Guide
Fig 3.4
4.0 ADDING AUDIO FILES TO THE LIBRARY
To add MP3 audio les to the Library, navigate to the “File” tab and select “Card Manager” as outlined in section 3.0.
Press the “Add Files” button and navigate to the location of the MP3 les to be added to the library. In the example below
the Music folder is selected.
Note: The audio les must be of the .MP3 type.
Fig 4.1
From here a single le, or multiple les as illustrated in gure 4.2 can be selected.
www.redbackaudio.com.au Redback® Proudly Made In Australia 9
A 4500C/A 4505C Software Programming Guide
Fig 4.2
Once the required MP3 les are selected press the open button. The selected les should now appear in the Library as
illustrated in gure 4.3.
Fig 4.3
These audio les are now available for use in the output folders.
www.redbackaudio.com.au
Redback® Proudly Made In Australia10
A 4500C/A 4505C Software Programming Guide
5.0 RANDOM PLAY OF AUDIO FILES
The timer has the ability to random play audio les when a particular output is selected for an event. This is available with
all folders except the Alert and Evac folders. These folders can have multiple audio les allocated which will play randomly
when the output is activated. In the example illustrated in gure 5.1 extra audio les are ddragged into the Music and
prebell folders.
Fig 5.1
6.0 SAVING THE EVENT PROGRAM
Once programming is complete the conguration will need to be saved to the Micro SD card. The conguration le needs
to be saved as cong.cnf for the timer to recognise the program. The name of the open le is shown in the header bar of
the programming window as shown in gure 6.1.
If the user wants to keep copies of different programs, use the Save As option and name the le something else while
keeping the .cnf extension.
With the events now programmed on the Micro SD card, the card can be removed from the PC following windows safe card
removal procedures. Make sure the timer is OFF and insert the Micro SD card into the slot in the front; it will click when fully
inserted.
The timer can now be switched back On. If all is well, after the startup screen is displayed the current time and next event
should be displayed on the screen.
Fig 6.1

www.redbackaudio.com.au Redback® Proudly Made In Australia 11
A 4500C/A 4505C Software Programming Guide
7.0 REMOTE ACCESS TO THE TIMER
Note: An IT administrator or someone experienced with network protocols wil be required to setup the net-
work access.
With the addition of the A 4498 Connection Pack, the timer can be accessed over an ethernet network (The connection
details are covered in section 3.0 of the accompanying Timer Instruction Manual and the A 4498 manual).
This will make it possible to edit the timer events program remotely.
Note: MP3 Audio les cannot be added to the library using the remote connection. The Micro SD card needs to be re-
moved from the timer and the procedures in section 1.0 and 4.0 followed to add additional les.
Once the connection has been setup the PC software will need to be run from a computer with access to the network.
The software executable le “REDBACKWEEKLYTIMERPROGRAMMERXXXX.exe” can be copied from the Micro SD Card
and then run from the PC. Navigate to the top left corner and press the “Connect” button and the connection window
should appear as shown in gure 7.1.
Fig 7.1
This is where the IP address and port number supplied by the IT administrator are entered. (These were setup when the A
4498 connection pack was congured).
Enter the IP address and port number and the default password of 1234 as shown in gure 7.2. (The password can be
changed by editing a text le named PASS.txt which is located on the Micro SD Card. Open the le using a text editor and
change the password to another 4 digit number).
Fig 7.2
www.redbackaudio.com.au
Redback® Proudly Made In Australia12
A 4500C/A 4505C Software Programming Guide
If the connection is successful, then the programming screen should look like that shown in gure 7.3 with the green
“Timer Enabled” box visible. The connection address and time of connection are shown in the top right corner, and new
options are now listed on the top left.
If the connection is not successful there could be a number of reasons which are covered in section 11.0.
Fig 7.3
8.0 DOWNLOAD EVENT PROGRAM FROM THE TIMER
In order to make changes to the event program stored in the timer, the conguration le will need to be downloaded from
the timer. Navigate to and select the “Download Cong” tab at the top of the programming window.
A prompt window will appear to conrm the download as shown in gure 8.1. After downloading the le, the timing
events will be displayed and can then be edited in exactly the same manner as outlined in section 2.0.
The le can be saved to the PC at any time, using the Save or Save As functions if a copy is required. If changes are re-
quired to the audio output folders refer to the Manage Files section 9.0 or if the program is to be uploaded back to the
timer use the Upload Cong option outlined in section 10.0.
Fig 8.1
www.redbackaudio.com.au Redback® Proudly Made In Australia 13
A 4500C/A 4505C Software Programming Guide
9.0 MANAGE AUDIO FILES REMOTELY
The library is accessed by selecting the “Manage Files” tab which will bring up the Remote Card Manager window as
shown in gure 9.1. This shows the folders and audio les available on the SD card in the timer.
The les are simply dragged into the required folders in the same manner as that outlined in section 3.0.
Note: MP3 Audio les cannot be added to the library using the remote connection as the le transfer is too slow. The
Micro SD card needs to be removed from the timer and the procedures in section 1.0 and 4.0 followed to add additional
les.
Fig 9.1
10.0 UPLOAD EVENT PROGRAM TO THE TIMER
The Event Program is uploaded back to the timer, by navigating to and selecting the “Upload Cong” tab at the top of
the programming window. A prompt window will appear to conrm the upload as shown in gure 10.1.
Fig 10.1
The progress bar will display the progress of the upload and a popup window will notify the successful upload.
The timer is now updated with the new Event Program.
www.redbackaudio.com.au
Redback® Proudly Made In Australia14
A 4500C/A 4505C Software Programming Guide
11.0 POSSIBLE REASONS FOR CONNECTION FAILURE
There are a number of scenarios where the timer might not be accessible to the programmign software.
ERROR MESSAGE: No connection available to your device
Fig 11.1
This error could occur if there is an issue with the physical connections ,or the power to the timer or Serial-To-Ethernet
Converter. If this error occurs try the following remedies.
Check Timer power
1) Check the timer has power. If the unit already has power, put the unit into standby mode and then switch back ON. Try
connecting again.
2) If the unit still doesn’t connect, try removing power from the timer completely by unplgging the power supply. Recon-
nect power and try again.
Check connecting leads:
1) Check the leads connecting the timer to the adaptor board and D 4231 Serial-To-Ethernet Converter.
Check D 4231 power:
1) Check that the Serial-To-Ethernet Converter (D 4231) has power. If the unit has power, disconnect and reconnect power
and try again.
If none of the above remedies work then the error might be because the IP address is incorrect. Check the IP address is
correct with the IT administrator.
ERROR MESSAGE: Please enter the correct password
Fig 11.2
www.redbackaudio.com.au Redback® Proudly Made In Australia 15
A 4500C/A 4505C Software Programming Guide
This error will occur when the password entered doesn’t match the password stored in the timer.
The password can be found in a text le named PASS.txt which is located on the Micro SD Card.
In order to access the text le, the Micro SD card will need to be connected to a PC. You will need a PC or laptop equipped
with an Micro SD card reader to do this. If a Micro SD slot is not available then the Redback D 0371B USB Memory Card
Reader or similar would be suitable (not supplied).
You will rst need to put the timer in “Standby” mode or disconnect power. Next remove the Micro SD card from the rear
of the unit. To remove the Micro SD card push the card in and it will eject itself.
Make sure the PC is on and card reader connected and correctly installed. Then insert the Micro SD card into the reader.
Go to “My Computer” or “This PC” and open the Micro SD card which is usually marked “Removable disk”.
To change the password open the PASS.txt text le using a text editor and change the password to another 4 digit num-
ber. Save the le and then remove the Micro SD card from the PC following safe removal procedures. Insert the SD card
back into the timer and try connecting again using the correct password.
12.0 SYNC TIME
When the timer is connected to the PC through the ethernet connection, the clock time on the timer can be synchronised
with the PC. The times are visible on the programming window as shown in gure 12.1. The timer time is located to the
right of the “Sync Time” button, while the PC time is located in the connection details above. Press the “Sync Time” but-
ton to sycnhronise the times.
Fig 12.1
www.redbackaudio.com.au
Redback® Proudly Made In Australia16
A 4500C/A 4505C Software Programming Guide
13.0 NOTES
  • Page 1 1
  • Page 2 2
  • Page 3 3
  • Page 4 4
  • Page 5 5
  • Page 6 6
  • Page 7 7
  • Page 8 8
  • Page 9 9
  • Page 10 10
  • Page 11 11
  • Page 12 12
  • Page 13 13
  • Page 14 14
  • Page 15 15
  • Page 16 16

Redback A 4500C/A 24 Hour 7 Day Timer User guide

Type
User guide

Redback A 4500C/A 24 Hour 7 Day Timer is a versatile and feature-rich device designed to automate and simplify your daily routines. With its advanced capabilities, it offers precise timekeeping, flexible event scheduling, and a wide range of audio output options to suit your specific needs.

Ask a question and I''ll find the answer in the document

Finding information in a document is now easier with AI