Tyco 4100ES-S1 Installation guide
- Category
- Fire protection
- Type
- Installation guide
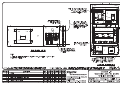
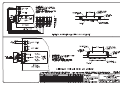
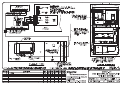
Tyco 4100ES-S1 is a brigade interface door kit that enables the connection of various brigade devices to the 4100ES-S1 Fire Alarm System. It provides a secure and reliable interface between the fire alarm system and the brigade equipment, ensuring effective communication and control during emergency situations.
The kit includes all the necessary components for installation, including a 4U hinged door, interface module, wiring, and mounting hardware. The interface module connects to the 4100ES Alarm Relay Card, allowing for seamless integration with the fire alarm system.


-
 1
1
-
 2
2
-
 3
3
-
 4
4


Tyco 4100ES-S1 Installation guide
- Category
- Fire protection
- Type
- Installation guide
Tyco 4100ES-S1 is a brigade interface door kit that enables the connection of various brigade devices to the 4100ES-S1 Fire Alarm System. It provides a secure and reliable interface between the fire alarm system and the brigade equipment, ensuring effective communication and control during emergency situations.
The kit includes all the necessary components for installation, including a 4U hinged door, interface module, wiring, and mounting hardware. The interface module connects to the 4100ES Alarm Relay Card, allowing for seamless integration with the fire alarm system.
Ask a question and I''ll find the answer in the document
Finding information in a document is now easier with AI
Related papers
Other documents
-
 Simplex 4100ES-S1 Installation & Maintenance
-
Whirlpool ASE 568 Installation guide
-
Whirlpool ASE 526 Installation guide
-
 Simplex MINIPLEX 4100ES Series Installation & Maintenance
-
 Simplex 4100ESi Installation guide
-
LST FWI016-1 User manual
-
 Simplex 4100ES-S1 Programming Manual
-
Mettler Toledo O2 transmitter 4100e FF Operating instructions
-
 Simplex MINIPLEX 4100ES Series Installation guide
-
 Simplex 4100ES Operating Instructions Manual


