Page is loading ...

Instruction
Manual
Electrical Measuring
Device for Strain Gage
Sensors
Strain Gage Meter
Type 4703B
ä
4703B_002-502e-06.19

Instruction
Manual
Electrical Measuring
Device for Strain Gage
Sensors
Strain Gage Meter
Type 4703B
ä
4703B_002-502e-06.19


Foreword
4703B_002-502e-06.19 Page 1
Foreword
We thank you for choosing a Kistler quality product
distinguished by technical innovation, precision and long
life.
This manual refers to the electronic measuring device for
strain gage sensors, Strain Gage Meter Type 4703B.
Information in this document is subject to change without
notice. Kistler reserves the right to change or improve its
products and make changes in the content without
obligation to notify any person or organization of such
changes or improvements.
© 2011 … 2019 Kistler Group. Kistler Group products are
protected by various intellectual property rights. For more
details visit www.kistler.com. The Kistler Group includes
Kistler Holding AG and all its subsidiaries in Europe, Asia,
the Americas and Australia.
Headquarter
Kistler Group
Eulachstrasse 22
8408 Winterthur
Switzerland
Tel. +41 52 224 11 11
www.kistler.com

Strain Gage Meter Type 4703B
Page 2 4703B_002-502e-06.19
Content
1.Introduction ................................................................................................................................... 3
1.1Display ................................................................................................................................. 4
1.2Keypad functions ................................................................................................................. 4
2.Important information .................................................................................................................... 5
2.1For your safety ..................................................................................................................... 5
2.2Electromagnetic Compatibility (EMC) ................................................................................... 5
2.3Tips for using the instruction manual .................................................................................... 6
2.4Nomenclature used .............................................................................................................. 6
2.5Disposal instructions for electrical and electronic equipment ................................................ 6
3.Setting up ranges (Ranges) ............................................................................................................ 7
3.1General ................................................................................................................................ 7
3.2Keypad functions for setting up........................................................................................... 7
3.3Device setup ...................................................................................................................... 11
4.Calibration by load (Calibration) .................................................................................................. 12
5.Sensor connector .......................................................................................................................... 15
6.Error messages ............................................................................................................................. 16
7.Application note........................................................................................................................... 17
8.Setup Diagram ............................................................................................................................. 18
9.Basic information about the instrument ....................................................................................... 19
9.1Unpacking .......................................................................................................................... 19
9.2Storage ............................................................................................................................... 19
9.3Ordering key ...................................................................................................................... 20
9.4Included accessories ........................................................................................................... 20
9.5Optional accessories ........................................................................................................... 20
10.Technical data .............................................................................................................................. 21
11.Index ............................................................................................................................................ 22
Total pages 22

Introduction
4703B_002-502e-06.19 Page 3
1. Introduction
It concerns the electronic measuring device Strain Gage
Meter Type 4703B for strain gage sensors.
Scope of use:
The handheld device displays forces or loads sensed by
strain gage load cells. It must not be used as the only
device for safety relevant measurements.
Operation:
The battery operated device supplies a stabilized excitation
voltage for a strain gage full bridge. A load change
exposed to the sensor results to a change of his output
signal. The device digitizes the signal and compares it to
the adc-data stored in the Ranges memory. By this loads
can be displayed, stored or put out by the USB-Interface to
a PC. The user can store up to 16 Ranges. In each of these
data set, the features of a certain sensor but also display
options can be stored. The setup of ranges and also a load
calibration can be carried out also with the PC-software
ASTAS delivered together with the device.
Power supply:
The display can be powered either by:
3 batteries AA (HR6 Mignon) or
3 rechargeable batteries of the same size (1,2 V) or
USB power supply (battery display indicates full battery)
or
USB cable to a powered on PC
(battery display indicates USB)
If powering via the USB, the mounted batteries are
disconnected automatically. The backlight is switched on
permanently. If powered by batteries the device is switched
off after 2 hours of operation (default setting).
The device will be delivered with batteries mounted. To
exchange the batteries open the battery compartment with
a Philips screw driver. Remove the batteries if they might
not be used for a very long time e.g. than powering by
USB only.
Battery charger, rechargeable batteries and USB power
supply can be purchased from your dealer or from the
manufacturer.

Strain Gage Meter Type 4703B
Page 4 4703B_002-502e-06.19
1.1 Display
1.2 Keypad functions
Key Description Function
Max/Min/Current
Value
To switch between the display of
max/min/current value
Zero (Tare) Zero load to display net value
Zero max or min value
Unit Scroll between units
(if available)
Backlight
On/Off (***)
+ Ranges Scroll to next range
(if available)
+
Gross/net Toggle between not zeroed and
zeroed display
***: press for 1 second
Status max./min.
current value
Name of range
Battery status /
USB display
Dis
p
lay uni
t
Status zeroed

Important information
4703B_002-502e-06.19 Page 5
2. Important information
Please consider implicitly the following advices; this is for
your personal safety when working with the Strain Gage
Meter Type 4703B and guarantees long lasting failure-free
operation.
2.1 For your safety
The unit left the factory in a safe and perfect condition. To
maintain this condition and to ensure hazard-free
operation, the notes and warning comments in this
instruction manual and on the unit must be heeded.
Also adhere to the local safety regulations which govern
the handling of electrical and electronic devices.
If it can be assumed that hazard-free operation of the
instrument is no longer possible, it must be taken out of
operation and secured against accidental operation.
Hazard-free operation is no longer possible:
if the instrument shows any signs of damage
if the instrument does not work correctly
after prolonged storage under unfavorable conditions
following severe shipping conditions
If hazard-free operation is no longer guaranteed as a result
of the above-mentioned points, the instrument must be
sent immediately to the responsible Kistler Sales Company
or representative for repair.
2.2 Electromagnetic Compatibility (EMC)
The Strain Gage Meter Type 4703B is designed to be ä-
compliant. This instrument fulfills safety engineering
requirements with respect to electromagnetic compatibility
in accordance with EN 61000-6-2 (noise immunity) and EN
61000-6-4 (noise immunity in the industrial sector).

Strain Gage Meter Type 4703B
Page 6 4703B_002-502e-06.19
2.3 Tips for using the instruction manual
We recommend that you read the entire instruction
manual thoroughly.
Keep this instruction manual in a secure location where it is
available at all times. If the manual is lost, please contact
the responsible Kistler Sales Company or representative
and ask for a replacement.
Instrument modifications (rebuilds, retrofits, etc.) normally
also result in changes to the instruction manual. In this
event, inquire into the updating options for your
documentation from the responsible Kistler Sales Company
or representative.
2.4 Nomenclature used
Here you will find explanations of the nomenclature and
abbreviations used in this instruction manual:
Active sensor Torque sensor with active electronics
DMS Strain gage
2.5 Disposal instructions for electrical and electronic equipment
Do not discard old electronic instruments in munici
p
al
trash. For disposal at end of life, please return this product
to an authorized local electronic waste disposal service or
contact the nearest Kistler Instrument sales office for
return instructions.

Setting up ranges (Ranges)
4703B_002-502e-06.19 Page 7
3. Setting up ranges (Ranges)
3.1 General
A range is a stored data set connected to a certain sensor.
It can be identified by a name displayed on top of the
display. There is no connection between two ranges. If
more than one range is defined the user needs to choose
the range related to the used sensor. Up to 16 ranges can
be stored in the device memory.
3.2 Keypad functions for setting up
***: press long
Key Description Function
+
Setup (***) Set up, edit and calibrate a range
▲ up One line up or raise value by one
ENTER Activate menu or function
save value and exit
► right Move cursor to the right by one digit
(loop)
▼ down One line down or lower value by one
Escape Exit menu or function
without saving

Strain Gage Meter Type 4703B
Page 8 4703B_002-502e-06.19
Create/edit a measuring range
Press ▲▼ simultaneously to get into the setup mode.
Press ENTER to proceed to Ranges.
Use the keys ▲▼ ► and ENTER to input the password
(default: "0000").
Move the cursor to "Create a new range" and press Enter
or choose an existing range. Use the keys ▲▼ to move to
the parameter you want to edit and press ENTER to get to
the editing mode.
There is always one current range. In the list of ranges it is
marked with two #. The range used for the latest
measuring is the current range.
Parameters
Base unit:
(mandatory input)
This unit is used for calibration. When choosing another
unit in measuring mode the displayed value will be
computed from the base unit value. The display of the base
unit may be deactivated.
Ran
g
e of Values:
N Newton
kN kilonewton (1 kN = 1 000 N)
g gram (1 g = 0,009807 N)
kg kilogram (1 kg = 9,807 N)
t
ton (1 t = 9 807 N)
lb
f
p
ound (1 lbf = 4,448221615 N)
oz ounce (1 oz = 0,278013851 N)
mV/V signal of strain gage bridge, not can be
calibrated
M300 MN/m² for
p
late load tester 300 mm
p
late (1 M300 = 70 685 N)
M600 MN/m² for
p
late load tester 600 mm
p
late (1 M600 = 282 743 N)
to long ton (brit.) (1 long ton = 9 964 N = 1 016 kg)
Uni
t
user defined uni
t
The unit mV/V is calibrated at the manufacturer’s
site. Re-calibration by the use is disabled. When using
mV/V as the base unit other units cannot be
activated.

Setting up ranges (Ranges)
4703B_002-502e-06.19 Page 9
Rated load :
(mandatory input) nominal load of the sensor in the base
unit. Only integer values can be put in
Select digits:
(mandatory input) resolution of display or decimal places
range of values 10 ... 99 999 steps
Sensitivity:
(mandatory input) output at rated load. This value will be
overwritten by a more correct value acquired during
calibration by load. If a calibration exists this value cannot
be edited. Range of values: 0 ... 5 mV/V, default 2 mV/V
Overload (+):
Overload warning in positive force direction in percent of
the rated load refers to the gross value.
The warning "Overload" will be displayed if the measured
force exceeds the defined overload limit in positive force
direction. Range of values: 0 ... 999 %, default 120 %
Overload (–):
Overload warning in negative force direction in percent of
the rated load refers to the gross value
The warning "Underload" will be displayed if the
measured force exceeds the defined Overload (–) limit in
negative force direction. Range of values: 0 ... 999 %,
default –120 %
Averaging:
Output values per second. The ADC takes 3 200
samples/second. A moving average filter reduces the
number of values and improves the accuracy. Use a low
value for static measurements and a high value for
dynamic measurements. A high value improves the quality
of the Min/max value display but also allows more noise
and distortions and therefore might lead to a unsteady
display. Changing Average has no effect to Sensitivity.
range of values:
6,25; 12,5; 25; 50; 100; 200; 400; 800; 1 600 /s
default: 50 / s
Units:
Units that can be displayed by the user defines the units
that can be chosen by the user. No = unit is not accessible
by the user; Yes = unit is accessible by the user
Values: see base unit default = only, base unit = Yes
Name:
Name/description of the measuring range this text is
displayed in the head of the display to allow easy
assignment of the sensor to a measuring range Values:
text, 22 characters default ##: (sequential number of
range)

Strain Gage Meter Type 4703B
Page 10 4703B_002-502e-06.19
User unit:
Characterization of a user defined unit
User text: displayed symbol or text of the unit Values: text,
4 characters Default: "Unit"
User factor: conversion factor of the user unit 1* base unit
= user factor* user unit Values: 0 ... 9 999 in steps of
0,001... default: 1,0
Delete range:
Deletes the measuring range (possible only if no calibration
exists on this range and the range to be deleted is not the
only range)
Change password:
To define a 4 character password to protect the set up data
of this range change the password with the keys ▲▼ ►.
Press ENTER to save the new password.
Default "0000" (After calibration at the manufacturer site,
a password will be applied)
Conversion of units:
Units will be converted according to the SI-system. Please
note that when converting force into weight the
gravitational acceleration of 9,8107 m/s² (valid for
Germany 3) is used. The gravitational acceleration varies
according to the position on the globe. To ensure weight
display accuracy of better than 0,1 %, a load calibration
should be carried out at the production site.

Setting up ranges (Ranges)
4703B_002-502e-06.19 Page 11
3.3 Device setup
Point for setting up:
T switchoff:
(Auto off)
Auto power off of the device after (1 … 999) minutes
(0 min means the device never switches off automatically)
Default: 120 min
If the device is owered via the USB the function is changed
to standby to keep the current values
Duration:
Automatic switch off of the display backlight (1 ... 239)
seconds (0 sec means the backlight is never switched off
default: 60 s
Brightness:
Brightness of the display backlight % (10 % steps)
default: 80 %
Serial-No:
Serial number of the device (entered by the manufacturer),
read only
Firmware: Version of the firmware, read only

Strain Gage Meter Type 4703B
Page 12 4703B_002-502e-06.19
4. Calibration by load (Calibration)
The calibration is carried out by means of a known load for
the current range. The calibration with a strain gage
simulator is possible too. The calibration always uses the
base unit. The first calibration point is zero load. A former
calibration as well as the value Sensitivity will be
overwritten by the new calibration. The calibration can be
cancelled until the last step to keep the old data.
Calibration means assigning two display values to two
sensor signals. All other points will we extrapolated.
Dis
p
la
y
Ke
y
Fun
c
tion Hint
>Calibration< ENTER O
p
en menu
>Start calib: No<
Delete calib: No
ENTER,▲▼ New calibration
>Start calib: Yes< ENTER Confirm Star
t
Place zeroload, then ENTER ENTER Calibration of zero load:
Unload the sensor!
Confirm that the
sensor is unloaded
Enter calibration load ▲▼ ►, ENTER In
p
ut of load dis
p
lay
relating to calibration load
Refers to base uni
t
Rated load proposed
Place ca.-load, then ENTER ENTER Calibration by load, a
pp
ly
a known load!
Load should be at least
50 % and max. 150 %
of the rated load
ENTER = Store / ESC =
cancel
ENTER Confirmation of the
calibration
Press ESC to restore old
values
>Start calib: No<
Delete calib: No
ESC Back to menu "Ranges"

Calibration by load (Calibration)
4703B_002-502e-06.19 Page 13
Example for a load calibration (5 000 g scale)
Range setup:
Base Unit: g
Rated load: 5 000
Sel. Digits: 5 000
Sensitivity 2.0000
Overload (+): +120 %
Underload (–): –10 %
Conv. Rate: 6,25
Used units: g, N
Name: 5 000 g
Known calibration load 4 993 g
Delete calibration
To delete a Range the calibration must be deleted
beforehand. After deletion of a calibration, zero and
Sensitivity stay unaffected. The unit still displays correctly.
Potential calibration point in between zero and related load
(linearization points) will be removed.
Dis
p
la
y
Ke
y
Fun
c
tion Hint
>Calibration< ENTER En
t
er menu
>Start calib: No<
Delete calib: No
▲▼
ENTER, Start new calibration
>Start calib: Yes< ENTER Confirm Star
t
Place zeroload, then ENTER ENTER Unload the scale Confirm that the
scale is free of
load
Enter calibration load
5000
Numerical entry: 4993;
ENTER
In
p
ut of load dis
p
lay
relating to calibration load
Place ca.-load, then ENTER ENTER Press key after a
pp
lied load
has settled
ENTER=Store / ESC = cancel ENTER Confirm calibration
>Start calib: No<
Delete calib: No
ESC,ESC,ESC; ESC Back to load dis
p
lay Test your
calibration
Dis
p
la
y
Ke
y
Fun
c
tion Hint
>Calibration< ENTER Enter menu
>Load calib: No<
Delete calib: No
▲▼
>Delete calib: No<
Start calib: No
ENTER,
>Delete calib: No< ▲▼
>Delete calib: Yes< ENTER Delete calibration
>Delete calib: is deleted<
Start calib: No
ESC Back to menu Ranges

Strain Gage Meter Type 4703B
Page 14 4703B_002-502e-06.19
ZeroLoad cal
Corrects a zero deviation of the sensor itself of/or a dead
load. Please note: the overload indication is moved by the
same offset. There is a risk of overload warning failure.
The zero load calibration shifts the zero position of the load
curve which slope is defined by sensitivity. It should be
applied after load calibration. The function is not allowed if
the load calibration contains more than two points
(linearization).

Sensor connector
4703B_002-502e-06.19 Page 15
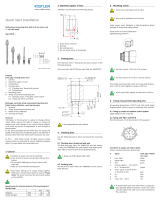
5. Sensor connector
Wiring diagram for sensor (outside view at Type 4703B)
Pin Signal
1 Excitation – (–EX)
2 Excitation + (+EX)
3 Not connected (TEDS data)
4 Signal + (+SI)
5 Signal – (–SI)
6 Not connected (TEDS ground)

Strain Gage Meter Type 4703B
Page 16 4703B_002-502e-06.19
6. Error messages
Massage Description Possible causes
"ADC overload"
The input signal exceeds the
input range of the ADC
No sensor connected
Damaged sensor cable
Moisture in or at the sensor connector
Sensor extremely overloaded
"Overload/
Underload"
The in
p
ut signal exceeds the
span as defined in Ranges with
the parameters Overload (+) and
Overload (–)
Sensor overloaded/under loaded
Display of current
value is flashing
The unit tries to dis
p
lay more
than 99 999 parts. The decimal
point disappears, the last digit is
not displayed.
Example: value to be displayed:
103,888, actual flashing display:
10 388 kN
Current value
display shows minus
signs only (-----)
The calculation result in
incomputable values
(mathematic overflow).
Sensitivity exceed the calculable range
Other causes see ADC overload

Application note
4703B_002-502e-06.19 Page 17
7. Application note
Sensor that have different sensitivities in tension and
pressure:
Create and calibrate a second range for the same sensor
Plate load test for soil according to DIN 18134
The device supports load plates with diameters 300 mm
(unit M300) and 600 mm.
Setup a ordinary range for the sensor used (e.g.
KAM/100kN) and activate the units M300 and M600 if
needed. When the user chooses one the special units the
force value in kN is converted to the axial stress unit
MN/m² according to the DIN 18134. The display
resolution can be adjusted by parameter Select digits.
Calibration of the measuring chain can be carried out in
kN, but also in M300 if set as base unit. If calibration has
been done in kN this unit might be deactivated afterwards
to prevent it from being displayed after starting up the
Type 4703B in the field.
Example: KAM/100kN
Base unit: kN
Rated load 100
Selected digits: 100,0
Units: M300 = YES, M600 = Yes
Resolution of display
kN 100,0
M300 0,001 (MN/m²)
M600 0,0001(MN/m²)
Use the Type 4703B as a calibration tool and remove dead
loads at the master sensor
Solution:
Load calibration of the master set without the dead load
Zero load calibration of the master set with the dead load
Linearization of nonlinear sensors
/