Page is loading ...

IPC115D (V.2.0)
APPLICATION GUIDE


1592025050 iProChill v2.0 10D00 AG v1.2 GB 21.05.2015.docx iProCHILL 3/154
INDEX
1. IMPORTANT RECOMMENDATIONS 6
1.1 PRODUCT DISPOSAL (WEEE) 7
2. GENERALITIES 8
3. AVAILABLE APPLICATION CONFIGURATIONS 8
3.1 MAIN FUNCTIONS 9
4. SUPERVISION FROM LOCAL AND REMOTE 12
5. USER INTERFACE 13
5.1 HOW TO SWITCH ON/OFF THE UNIT AND CHANGE CHILLER/HEAT PUMP WORK MODE
FROM KEYBOARD 16
5.1.1 Unit switch-ON/OFF from the keyboard ...................................................................................... 16
5.1.2 Unit switch-ON/OFF from digital input ........................................................................................ 18
5.1.3 Select the working mode: chiller-heat pump ............................................................................... 18
5.1.4 Change over function .................................................................................................................. 19
5.2 UNIT SWITH ON/OFF BY RTC 19
5.2.1 Working with clock disabling digital input .................................................................................... 19
5.2.2 Working with “ventilation only” digital input (air-air unit only) ...................................................... 22
5.2.3 Working with unit in OFF from RTC if ON is forced from key ..................................................... 22
5.3 OPERATION IN CONDENSING UNIT WORKING MODE 22
5.3.1 Working with digital input configuration as temperature control request .................................... 23
5.3.2 Working with digital input configured as cooling request ............................................................ 23
5.3.3 Working with digital input configured as heating request ........................................................... 23
5.4 HOW TO MODIFY THE INFORMATION PRESENT IN THE MAIN SCREEN 23
5.4.1 Select probes for display ............................................................................................................. 23
5.5 SET KEY IN MAIN SCREEN 23
5.6 PROBES KEY IN MAIN SCREEN 25
5.7 ALARM KEY IN MAIN SCREEN 27
5.8 CIRC KEY IN MAIN SCREEN 29
5.9 SERVICE KEY IN MAIN SCREEN 32
5.9.1 Parameters programming ........................................................................................................... 34
5.9.2 Time/Time bands ........................................................................................................................ 36
5.9.3 Compressors ............................................................................................................................... 37
5.9.4 Water pump................................................................................................................................. 38
5.9.5 Alarms display ............................................................................................................................. 40
5.9.6 Historical alarms ......................................................................................................................... 40
5.9.7 Defrost ......................................................................................................................................... 42
5.9.8 Heaters/Liquid line solenoid valve .............................................................................................. 43
5.9.9 I/O status ..................................................................................................................................... 44
5.9.10 Thermostatic ............................................................................................................................... 45
5.9.11 Heat recovery .............................................................................................................................. 47
5.9.12 Auxiliary outputs .......................................................................................................................... 48
5.9.13 Free-cooling ................................................................................................................................ 49
5.9.14 Screw compressor ...................................................................................................................... 52
5.9.15 Discharge compressor temperature ........................................................................................... 53
5.9.16 Domestic hot water (Sanitary water) ........................................................................................... 53
5.9.17 Auxiliary heating .......................................................................................................................... 55
5.9.18 Control panel ............................................................................................................................... 56
6. USE WIZMATE TO CONFIGURE PARAMETERS 60
6.1 HOW TO INSTALL WIZMATE 60

1592025050 iProChill v2.0 10D00 AG v1.2 GB 21.05.2015.docx iProCHILL 4/154
6.2 LOGIN WIZMATE 63
6.3 WIZMATE CONFIGURATION 65
6.3.1 Configuration menu ..................................................................................................................... 65
6.3.2 Language configuration .............................................................................................................. 66
6.3.3 Import/export maps and libraries ................................................................................................ 66
6.4 HOW TO USE WIZMATE 68
6.4.1 Scan for device ........................................................................................................................... 68
6.4.2 Read parameters value ............................................................................................................... 69
6.4.3 Change parameters value ........................................................................................................... 70
6.4.4 Save/Open map .......................................................................................................................... 71
7. PARAMETERS IN TABLE FORM 73
8. ANALOGUE - DIGITAL INPUTS/OUTPUTS CONFIGURATIONS 109
8.1 DI1 – DI20 DIGITAL INPUTS CONFIGURATION (DI TYPE) 110
8.2 RL1- RL15 DIGITAL OUTPUTS CONFIGURATION (DO TYPE) 112
8.3 ANALOGUE INPUTS PB1 - PB10 CONFIGURATION (AI TYPE) 115
8.4 CONFIGURATION OF THE OUT1 / OUT4 PROPORTIONAL OUTPUTS (AO TYPE) 116
8.5 CONFIGURATION OF THE OUT5 / OUT6 PROPORTIONAL OUTPUTS 117
8.6 ANALOGUE INPUTS CALIBRATION 117
8.7 ANALOGUE INPUTS RANGE 117
8.8 FURTHER CONNECTIONS 118
9. ALARMS 118
9.1 PROBE BREAKDOWN 118
9.2 HIGH PRESSURE PRESSURE SWITCH ALARM 119
9.3 COMPRESSOR HIGH DISCHARGE THERMOSTAT ALARM FROM DIGITAL INPUT 120
9.4 LOW PRESSURE PRESSURE SWITCH ALARM 121
9.5 OIL FLOAT/PRESSURE SWITCH ALARM 122
9.6 CONDENSATION HIGH TEMPERATURE/ PRESSURE ALARM 123
9.7 LOW CONDENSATION TEMPERATURE/PRESSURE ALARM (IF THE EVAPORATOR
PRESSURE PROBES ARE NOT CONFIGURED) 124
9.8 LOW EVAPORATION PRESSURE ALARM (IF THE EVAPORATOR PRESSURE PROBES ARE
CONFIGURED) 125
9.9 AIR/AIR UNIT LOW TEMPERATURE ALARM & ANTI-FREEZE ALARM IN CHILLER MODE 126
9.10 AIR/AIR UNIT LOW TEMPERATURE ALARM & ANTI-FREEZE ALARM IN HEAT PUMP MODE 127
9.11 AIR/AIR UNIT LOW TEMPERATURE ALARM & ANTI-FREEZE ALARM 128
9.12 EVAPORATOR SIDE FLOW SWITCH ALARM (DIFFERENTIAL PRESSURE SWITCH) 129
9.13 HOT SIDE FLOW SWITCH ALARM (DIFFERENTIAL PRESSURE SWITCH) 131
9.14 SUPPLY FAN OVERLOAD ALARM 132
9.15 DOMESTIC HOT WATER PUMP FLOW SWITCH ALARM 132
9.16 SOLAR PANELS WATER PUMP FLOW SWITCH ALARM 133
9.17 COMPRESSOR OVERLOAD ALARM 133
9.18 COMPRESSOR HIGH DISCHARGE TEMPERATURE ALARM FROM ANALOGUE INPUT 134
9.19 EVAPORATOR WATER INLET HIGH TEMPERATURE ALARM 134
9.20 CONDENSATION FAN OVERLOAD ALARM 135
9.21 DEFROST ALARM 135
9.22 UNLOADING ALARM DUE TO HIGH CONDENSATION TEMPERATURE/PRESSURE IN
COOLING WORKING MODE 136
9.23 HEAT RECOVERY DISABLING SIGNAL DUE TO HIGH CONDENSATION
TEMPERATURE/PRESSURE IN COOLING WORKING MODE 137
9.24 UNLOADING SIGNAL DUE TO LOW EVAP. PRESSURE IN HEATING WORKING MODE 137
9.25 UNLOADING SIGNAL DUE TO EVAPORATOR WATER INLET HIGH TEMPERATURE 138
9.26 PUMP DOWN ALARM WITH LOW PRESSURE PRESSURE SWITCH/TRANSDUCER IN
STOPPING 138
9.27 PUMP DOWN ALARM WITH LOW PRESSURE TRANSDUCER IN START-UP 139
9.28 EVAPORATOR WATER PUMP OVERLOAD ALARM 139
9.29 CONDENSER WATER PUMPING OVERLOAD ALARM 140
9.30 GENERIC ALARM 1 141

1592025050 iProChill v2.0 10D00 AG v1.2 GB 21.05.2015.docx iProCHILL 5/154
9.31 GENERIC ALARM 2 141
9.32 COMPRESSORS MAINTENANCE ALARM 141
9.33 EVAPORATOR FAN/ PUMPS MAINTENANCE ALARM 141
9.34 CONDENSER PUMPS MAINTENANCE ALARM 142
9.35 POWER SUPPLY FREQUENCY ALARM 142
9.36 XEV20D NOT CONNECT ALARM 142
9.37 EXPANSION MOUDLE NOT CONNECT ALARM 143
9.38 PHASES SEQUENCE ALARM 143
9.39 ANTI-FREEZE ALARM IN FREE-COOLING 143
9.40 BOILER OVERLOAD ALARM 144
9.41 BOILER LOCK ALARM 144
9.42 UNIT CONFIGURATION 145
9.43 FUNCTION NOT AVAILABLE ALARM 149
9.44 NOTE: ALARM RELAY AND BUZZER 150
10. NO VOLTAGE 150
11. AUTOMATIC TO MANUAL RESRT ALARMS DIAGNOSTICS 150
12. OUTPUTS BLOCK TABLE 151
12.1 CIRCUIT “A” OUTPUTS ALARM BLOCK TABLE 151
12.2 CIRCUIT “B” OUTPUTS ALARM BLOCK TABLE 153
12.3 COMPRESSOR "C" ALARMS OUTPUTS BLOCK TABLE 154

1592025050 iProChill v2.0 10D00 AG v1.2 GB 21.05.2015.docx iProCHILL 6/154
1. IMPORTANT RECOMMENDATIONS
The symbol alerts the user of non-insulated “dangerous voltage” within the product
area that is sufficiently high to constitute a risk of electric shock to persons.
The symbol alerts the user of important operating and maintenance (assistance)
instructions found in the documentation attached to the device.
Dixell Srl cannot accept any liability for damages caused by modems that are not supported.
Dixell Srl reserves the right to modify this manual without prior notice. The documentation can
be downloaded from www.dixell.com even prior to purchase.
This manual forms part of the product and must always be kept near the device for easy and
quick reference. The device cannot be used as a safety device. Verify the limits of application
before using the device.
Verify that the power supply voltage is correct before connecting the device. Do not expose it to
water or humidity: use the controller only within the operating limits, avoiding sudden changes
in temperature and high atmospheric humidity in order to prevent condensation from forming.
Recommendation: disconnect all the electric connections before performing any maintenance.
Insert the probe where it cannot be reached by the End User. The device must not be opened.
Consider the maximum current that can be applied to each relay. Make sure that the wires for
the probes, the loads and the electrical power supply are separated and sufficiently distant from
each other, without crossing or intertwining with each other. In the case of applications in
industrial environments, it may be useful to use the main filters (our mod. FT1) in parallel to the
inductive loads.
The customer shall bear full responsibility and risk for product configuration in order to achieve
the results pertaining to installation and/or final equipment/system. Upon the customer's
request and following a specific agreement, Dixell s.r.l. may be present during the start-up of
the final machine/application, as a consultant, however, under no circumstances can the
company be held responsible for the correct operation of the final equipment/system.
Since Dixell products form part of a very high level of technology, a
qualification/configuration/programming/commissioning stage is required to use them as best
as possible. Otherwise, these products may malfunction and Dixell cannot be held responsible.
The product must not be used in any way that differs from that stipulated in the documentation.
The device must always be inserted inside an electrical panel that can only be accessed by
authorised personnel. For safety purposes, the keyboard must be the only part that can be
reached.
The device must never be hand-held while being used.

1592025050 iProChill v2.0 10D00 AG v1.2 GB 21.05.2015.docx iProCHILL 7/154
It is good practice to bear the following in mind for all Dixell products:
o Prevent the electronic circuits from getting wet as contact made with water, humidity or any
other type of liquid can damage them. Comply with the temperature and humidity limits
specified in the manual in order to store the product correctly.
o The device must not be installed in particularly hot environments as high temperatures can
damage it (electronic circuits and/or plastic components forming part of the casing). Comply
with the temperature and humidity limits specified in the manual in order to store the product
correctly.
o Under no circumstances is the device to be opened - the user does not require the internal
components. Please contact qualified service personnel for any assistance.
o Prevent the device from being dropped, knocked or shaken as either can cause irreparable
damage.
o Do not clean the device with corrosive chemical products, solvents or aggressive detergents.
o The device must not be used in applications that differ from that specified in the following
material.
Separate the power of the device from the rest of the electrical devices connected inside
the electrical panel. The secondary of the transformer must never be connected to the
earth.
Dixell Srl reserves the right to change the composition of its products, even without notice,
ensuring the same and unchanged functionality."
1.1 PRODUCT DISPOSAL (WEEE)
With reference to Directive 2002/96/EC of the European Parliament and of the Council of 27 January
2003 and to the relative national legislation, please note that:
There lies the obligation not to dispose of electrical and electronic waste as municipal
waste but to separate the waste.
Public or private collection points must be used to dispose of the goods in accordance
with local laws. Furthermore, at the end of the product's life, it is also possible to return
this to the retailer when a new purchase is made.
This equipment may contain hazardous substances. Improper use or incorrect disposal
can have adverse effects on human health and the environment.
The symbol shown on the product or the package indicates that the product has been
placed on the market after 13 August 2005 and must be disposed of as separated
waste.
Should the product be disposed of incorrectly, sanctions may be applied as stipulated in
applicable local regulations regarding waste disposal.

1592025050 iProChill v2.0 10D00 AG v1.2 GB 21.05.2015.docx iProCHILL 8/154
2. GENERALITIES
iProCHILL is a programmable controller for application on Air Conditioning units up to 4 circuits and 4
compressors per circuit.
It is possible to manage the following units:
Air/air (for very simple unit)
Air/water
Water/water
Condensing Units
All types with:
Heating with gas reversibility
Free cooling function
Recovery function
Domestic hot water function
3. AVAILABLE APPLICATION CONFIGURATIONS
The controller can manage various of equipments and functions, find the table below for possible
combinations:
Application
Chiller
water/
water
Chiller
air/water
Heat
pump
Domestic
hot water
Free
cooling
Heat
recovery
Motor
cond.unit
Type
compres.
to
manage
Hermetic steps
√
√
√
√
√
√
√
Screw steps
√
√
√
√
√
√
Screw Stepless
√
√
√
√
√
√
Inverter 0/10 volt
√
√
√
√
√
√
Inverter Refcomp
√
√
√
√
√
√
Type of
Thermo-
regulation
Proportional
Step
√
√
√
√
√
√
√
Neutral zone
√
√
√
√
√
√
Step-less
√
√
√
√
√
√
Inverter
√
√
√
√
√
√
Principal
Functions
Anti-freeze
√
√
√
√
√
√
√
Auxiliary relay
√
√
√
√
√
√
√
Energy saving
√
√
√
√
√
√
√
Dynamic setpoint
√
√
√
√
√
√
√
Auxiliary heating
√
√
√
√
√
√
√
Evaporator pump
√
√
√
√
√
√
√
Condenser pump
√
√
√
√
√
Condensation fan
√
√
√
√
√
√
Pump down
√
√
√
√
√
√
√
Unloading
√
√
√
√
√
√
√
Defrost
√
√
Anti-Legionella
√
Family groups to consider
CF -CO-
IO- RA-
CA- AL-
ES-SD-
US -PA-
PD -UN
CF -CO-
IO- RA-
CA- AL-
ES-SD-
US –PA-
PD -UN -
FA
CF -CO-
IO- RA-
CA- AL-
ES-SD-
US –PA-
PD -UN –
FA - DF
CF -CO-
IO- RA-
CA- AL-
ES-SD-US
–PA-PD -
UN –FA –
DF -FS
CF -CO-
IO- RA-
CA- AL-
ES-SD-
US –PA-
PD -UN
–FA –FC
CF -CO-
IO- RA-
CA- AL-
ES-SD-
US –PA-
PD -UN –
FA- AR
CF -CO-
IO- RA-
CA- AL-
ES-SD-
US –PA-
PD -UN –
FA

1592025050 iProChill v2.0 10D00 AG v1.2 GB 21.05.2015.docx iProCHILL 9/154
3.1 MAIN FUNCTIONS
Management of the cooling/heating unit with:
Single-circuit up to four compressors
Four circuits up to 16 compressors
Screw compressors
Start-up of configurable compressors:
Direct
Part winding
Star delta ( not available)
Compressor management with inverter:
1 compressor per circuit
Configurable soft start-ups:
Start-up with unloading valve
Idle running valve
Unloaders management:
continuous working
step working
modulating working (screw compressors)
Compressors rotation and temperature control configurable from parameter:
by fix sequence
by FIFO sequence
by balance
by saturation
Step-less compressor management:
with neutral-zone regulation
Compressors liquid injection function
Control with dedicated PTC probe
Compressors discharge high temperature alarm function
Control with dedicated PTC probe
Complete management of two water side pumping units:
2 pumps evaporator side
2 pumps condenser side
Customised default display of all variables
Temperatures
Pressures
Other displays available
Status of the digital inputs
Compressor running hours
N° compressor start-ups
Evaporator/condenser water pump running hours
Time remaining before defrost
Percentage of the proportional outputs
Compressors discharge temperature
Reset alarms using customised password
Historical alarms
Compressor thermal overload alarms
Possibility of enabling/disabling the individual circuit
Allows maintenance of the circuit
Allows "partialised" working of the unit
Possibility of enabling/disabling the individual compressor
Maintenance of the individual compressor
Malfunction
Complete management of pump down function:
With dedicated pressure switch
Timed
Via the low pressure switch
Via the low pressure transducer
Circuit unloading function:
From high evaporator inlet water temperature

1592025050 iProChill v2.0 10D00 AG v1.2 GB 21.05.2015.docx iProCHILL 10/154
From low evaporator outlet water temperature
From high condensing temperature/pressure
From low evaporator pressure
Anti-freeze function:
From low evaporator temperature
From low condenser temperature
From digital input as anti-freeze alarm
Active with four heaters
Domestic hot water production function:
From low temperature of domestic hot water control probe
Take effects by compressors and heaters working with step regulation
Manage domestic hot water pump and valves
Antilegionella function:
From RTC time band setting
Take effects by domestic hot water production
Solar panels water pump management:
From high solar panel NTC temperature probe temperature
Manage solar panel water pump and solar coil enabling/exclusion ON/OFF valve
Free-cooling function:
From high system water inlet temperature and low external air temperature
Manage Free-cooling ON/OFF valve and Free-cooling ON/OFF fan
Mange modulating output free-cooling mixer valve and hot water three-way valve
Controlled loads maintenance signal function:
Compressors
Evaporator pumps
Condenser pump
Circuit auxiliary relay function:
Four completely configurable relay outputs, also released from normal working of the unit controlled,
managed by means of NTC or PTC temperature probes or with 4÷20mA – 0.5 Volt pressure transducer
Weekly working in energy saving mode:
Up to three daily time bands (devices with RTC option)
From digital input
Weekly working with automatic switch on and switch off:
Up to three daily time bands (devices with RTC option)
Dynamic set-point function:
Managed by NTC or 4÷20mA input
Changeover function:
Automatic changeover between cooling and heating by NTC input
Remote OFF function:
From configurable digital input
Remote heating cooling function:
From digital input with configurable logic
Supply fan hot start function:
Air/air unit
Defrost management:
In temperature in pressure or with both (combined control)
Forced defrost for start-up with low external air temperatures
From digital input or timed
Manual using the relevant key
By hot gas or fan only
Auxiliary heating function:
With integration heaters
Four outputs for the proportional control of the condensing fan speeds via external module (inverter
or single/three phase phase cut) with configurable signal:
PWM
0÷10 Volt
4÷20 mA
Complete alarms management:
With internal data logger alarms (up to 100 events)

1592025050 iProChill v2.0 10D00 AG v1.2 GB 21.05.2015.docx iProCHILL 11/154
Work as motor-condensing unit:
Response to cooling/heating request from digital input
Capacity controlled by digital input
No temperature regulation
Expansion module:
up to 4 IPROEX60D
for each expansion module, including: 3 DI, 7 AI, 3 AO and 6 DO.
Electronic thermostatic valve driver:
up to 4 XEV20D
driving up to 8 electronic expansion valves
each XEV20D includes 4 probes.

1592025050 iProChill v2.0 10D00 AG v1.2 GB 21.05.2015.docx iProCHILL 12/154
4. SUPERVISION FROM LOCAL AND REMOTE
Supervision/tele-assistance/remote monitoring for complete control and supervision from local and
remote
By means of network output with ModBus TCP / IP protocol (INTERNET / INTRANET)
Directly by telephone line (MODEL WITH INTERNAL MODEM)
Indirectly by means of GSM modem or XWEB serial modem (MODEL WITH RS232 OUTPUT
PREPARATION)
Via RS485 slave output with ModBus protocol to Dixell XWEB300D / XWEB500D supervision systems

1592025050 iProChill v2.0 10D00 AG v1.2 GB 21.05.2015.docx iProCHILL 13/154
5. USER INTERFACE
Using the VISOGRAPH LCD graphic keyboard, it is possible to monitor and modify the status of the unit.
Main screen
Display
Unit status
Time and date
Probes value
Equipments status
Display
Probes value of all
configured circuits
Display
Set point
Display
Current alarms
Display
Equipments status in all circuits
Compressor
Water pump
Fan
Parameters Programming
Time/Time periods
Compressors Water pump (Supply fan) Alarms Historical alarms
Defrost
Heaters/Liquid line
solenoid valve
I/O status
Thermostatic Valve
Heat recovery Auxiliary outputs
Free-cooling
Screw compressor
Discharge comp. temp.
Domestic hot water
Auxiliary heating
Control panel

1592025050 iProChill v2.0 10D00 AG v1.2 GB 21.05.2015.docx iProCHILL 14/154
The information that appears in the main screen is:
to indicate that at least one of the compressors is working.
to indicate that the evaporator pump and/or the condenser pump are working (the
condenser pumps are present in the case of WATER-WATER configuration).
to indicate that the condenser fans are working
(in the case of AIR-AIR or AIR-WATER unit configuration)
If the alarms occur or particular working modes sub-enter, the following icons will be shown on the main
screens:
flashing to indicate that an alarm is active
to indicate that the UNLOADING mode is in progress
on to indicate that the defrost cycle is in progress, flashing during the count down
to indicate that the anti-freeze/support heaters are active
automatic switch-off and/or energy saving is enabled during the current day
to indicate that the unit is working within the energy saving period or that the dynamic set-
point is active

1592025050 iProChill v2.0 10D00 AG v1.2 GB 21.05.2015.docx iProCHILL 15/154
to indicate that the domestic hot water production is active
to indicate that the auxiliary heating is active (it will display in the same place with domestic
hot water production icon)
On unit power-on, the main screen will be the following (Displyed probes are selectable):
When the keyboard shows “Remote OFF”, “OFF through clock” or “Stand-by”, they all mean the unit is OFF
now but with different causes.
When the keyboard shows “Unit ON: Cool Mode” or “Unit ON: Heat Mode”, they all mean the unit is ON now
but in different working mode.
Below find a typical screen during working in chiller mode:

1592025050 iProChill v2.0 10D00 AG v1.2 GB 21.05.2015.docx iProCHILL 16/154
5.1 HOW TO SWITCH ON/OFF THE UNIT AND CHANGE CHILLER/HEAT PUMP WORK MODE FROM
KEYBOARD
Firstly, we will talk about No Motor Condensing Unit. Set Par CF04 = 0.
UNIT SWITCH-ON AND SWITCH-OFF CAN TAKE PLACE:
From the keyboard
From digital input configured as remote ON/OFF
By time bands (see unit switch on/off by RTC)
5.1.1 Unit switch-ON/OFF from the keyboard
The unit can be configured as chiller only, heat pump only or as chiller with heat pump mode by par CF02.
For different type of units, the switch ON/OFF procedures are different.
CF 2
Selection of unit working
1 = chiller only
2 = heat pump only
3 = chiller with heat pump
1
3
Note: If user wants change CF02 value, please switch off the unit to “Stand-by” status first. Otherwise, it may
take no effect.
When only the heating is enabled, the ACF1 alarm is not generated if the reverse valves in the envisioned
circuits are not configured.
SWITCH THE UNIT ON/OFF IN COOLING- HEATING MODE FROM THE KEYBOARD
The configuration should be:
CF04 = 0, (not Motor condensing unit)
CF02 = 3, (chiller with heat pump)
SP09 = 0, (from the keyboard)
In the beginning, the device is in stand-by mode, and the keys and are all visible. One is placed
in key 3, another is placed in key 6, depends on Par SP08.
(The keyboard has eight keys in all. They are key 1, key 2, key 3…and key 8 from left to right.)
SP08 = 0: placed in key 3, placed in key 6.
SP08 = 1: placed in key 3, placed in key 6.
No matter how to place, key 3 is always used for cooling mode. Key 6 is always used for heating mode.
Suppose SP08 = 0, press key (key 3) can switch on the unit to work in cooling mode. At this moment
is hidden.
Press the key again, the unit is switch OFF and return to status stand-by. The key and are
all visible now. In this case, user can press key to switch to heating mode or press to restart the
cooling mode.
The device is in stand-by when both and keys are visible. The stand-by mode is obtained every
time that the unit is off from cooling or heating working mode. Also in stand-by mode, the controller gives the
possibility to:
display the variables detected
manage the alarm situations, displaying and signalling them.

1592025050 iProChill v2.0 10D00 AG v1.2 GB 21.05.2015.docx iProCHILL 17/154
When unit is ON in chiller mode, the status in the screen is “Cool Mode”:
When unit is ON in heat pump mode, the status in the screen is “Heat Mode”:
SWITCH THE UNIT ON/OFF IN COOLING MODE FROM THE KEYBOARD
The configuration should be:
CF04 = 0, (not Motor condensing unit)
CF02 = 1, (chiller only)
SP09 = 0, (from the keyboard)
In the keyboard, key 3 is always visible and key 6 is hidden. Key 3 will be shown as when SP08 = 0
and shown as when SP08 = 1.
Press key 3 can switch the device status between cooling mode and stand-by.
SWITCH THE UNIT ON/OFF IN HEATING MODE FROM THE KEYBOARD
The configuration should be:
CF04 = 0, (not Motor condensing unit)
CF02 = 2, (heat pump only)
SP09 = 0, (from the keyboard)
In the keyboard, key 6 is always visible and key 3 is hidden. Key 6 will be shown as when SP08 = 0
and shown as when SP08 = 1.
Press key 3 can switch the device status between heating mode and stand-by.

1592025050 iProChill v2.0 10D00 AG v1.2 GB 21.05.2015.docx iProCHILL 18/154
5.1.2 Unit switch-ON/OFF from digital input
If the unit is switch off by remote digital input, the screen will be:
From digital input configured as remote ON/OFF (DI type =1). When deactivate, on the basis of the polarity
selected, the input determines the OFF status
It has priority with respect to the keyboard
The unit can only be switched-on and off with input activated
With input activated, the device goes back to the status previous to activation
5.1.3 Select the working mode: chiller-heat pump
The parameter SP09 allows selecting and enabling the selection of the unit switch-on mode in the three
working modes.
Par SP09 = 0
The switch-on selection of a unit configured for cooling and heating takes place from the keyboard. (See
chapter 17.1)
AUTOMATIC WORKING SELECTION IN COOLING-HEATING MODE FROM DIGITAL INPUT
Par SP09 = 1
The switch-on selection of a unit configured for cooling and heating takes place from digital inputs configured
as Remote cooling/heating(DI type=2). With digital input activated, cooling mode is selected, with digital
input deactivated, heating mode is selected.
The selection is enabled if a digital input is configured as cooling request or as heating request. If no
digital input has been configured, the unit REMAINS in stand - by
the cooling/heating selection from the keyboard is disabled. The unit can only be switched-on/off in the
working status selected from the digital input
CF02 is the precondition. If only CF02=3 the cooling/heating selection from digital input is available.
Otherwise, the device working mode will be set by CF02.
In the keyboard, keys for cooling/heating will be shown according to digital input status. E.g., digital
input=cooling, key 3 is visible and key 6 is hidden. By pressing key 3, the unit can switch between
cooling and stand-by.
AUTOMATIC WORKING SELECTION IN COOLING-HEATING MODE FROM ANALOGUE INPUT
Par SP09 = 2
Selection from analogue input (change over function) has priority with respect to the digital input. For
temperature of the external air included in the SP11 differential, it is allowed to change the working mode
from the keyboard.

1592025050 iProChill v2.0 10D00 AG v1.2 GB 21.05.2015.docx iProCHILL 19/154
5.1.4 Change over function
SP10
Automatic chiller / heat pump mode changeover setting
-50.0
-58
110
230
°C
°F
Dec
int
SP11
Automatic chiller / heat pump mode changeover differential
0.1
1
25.0
45
°C
°F
Dec
int
The status change over can only take place if these necessary conditions are present at the same time,
otherwise the unit REMAINS in stand - by:
1. CF02=3 (chiller with heat pump)
2. SP09=2 is an NTC probe configured as an Dynamic/boiler function/change over set-point external
air temperature NTC temperature probe(AI type=35)
3. the regulation probe selected must not be in error conditions
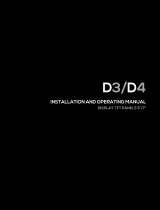
AUTOMATIC CHANGE OVER REGULATOR GRAPHICS
PBr
CHILLER
HEAT PUMP
SET SP10
Diff. SP11
Parameters that regulated the change over function
SP10 allows setting the change over set point. If the selection of the working mode from analogue input is
enabled, it represents the temperature value detected by the regulation probe below which the device
imposes the working in heating mode
SP11 allows setting the change over differential. If the selection of the working mode from analogue input is
enabled, it represents the temperature differential on the basis of which the device imposes the working in
cooling mode
For temperature of the external air included in the SP11 differential, it is allowed to change the working mode
from the keyboard.
NTC external air temperature regulation NTC probe > SP10+ SP11, the unit is switched-on in cooling mode.
NTC external air temperature regulation NTC probe < SP10, the unit is switched-on in heating mode.
5.2 UNIT SWITH ON/OFF BY RTC
5.2.1 Working with clock disabling digital input
ES 1
Start of working time band 1 (0-24)
0
24.00
Hr
10 Min
ES 2
End of working time band 1 (0-24)
0
24.00
Hr
10 Min
ES 3
Start of working time band 2 (0-24)
0
24.00
Hr
10 Min
ES 4
End of working time band 2 (0-24)
0
24.00
Hr
10 Min
ES 5
Start of working time band 3 (0-24)
0
24.00
Hr
10 Min
ES 6
End of working time band 3 (0-24)
0
24.00
Hr
10 Min
ES18
Monday automatic shutdown time band
0
7
ES19
Tuesday automatic shutdown time band
0
7
ES20
Wednesday automatic shutdown time band
0
7
ES21
Thursday automatic shutdown time band
0
7
ES22
Friday automatic shutdown time band
0
7
ES23
Saturday automatic shutdown time band
0
7
ES24
Sunday automatic shutdown time band
0
7
If the unit is switch off during switch-off time bands, the screen will be:

1592025050 iProChill v2.0 10D00 AG v1.2 GB 21.05.2015.docx iProCHILL 20/154
If a digital input is configured as Digital input working in RTC automatic enabling (time band)/manual
(keyboard) mode (DI type=91) and is active, the working via the internal clock is disabled. Otherwise, if this
digital input is not configured or configured but not active, enables the working via the internal clock.
The unit is forced to switch off within the time band.
Set the time band with Par ES01-ES06, and select weekly time band by Par ES18-ES24. If current time is
inside the setting band, the unit will be shut off automatically, and the keyboard shows “Unit OFF through
clock”.
The RTC time band also can be configured from keyboard.
Enter into the TIME/TIME PERIOD screen from SERVICE menu.
/