Page is loading ...

ST501-KC1KAR.112
Controller for cooling applications
Order number 900390.001
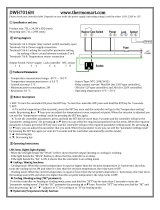
Wiring diagram
Product description
Themicro-processedcontrollerST501-KC1KAR.112isusedfor the thermostatictemperaturecon-
trol of simple refrigerating plants. It is supplied with 230V AC and has two exit relays. The relays
can be used for different functions, e.g. for a compressor, a fan, a defroster, an alarm relay, etc.
Two resistance sensors can be connected. One sensor seizes the refrigerating chamber tempe-
rature, and the function of the second sensor can be differently parametered.
Networking of the controller takes place via the ST-Bus interface.
Sensor: PTC
Range: -50...150
◦
C
Front size: 106mm x 68mm
Panel cut-out: 87.5mm x 56.5mm
Tightness: front IP65
Connector: screw terminal


SOFTWARE
COOLING CONTROLLER ST501-xxx.112

GENERAL INFORMATION
The ST……112 controllers are designed for
general use in refrigerating plants.
Depending on the existing hardware, up to four
temperature sensors can be connected. These can
either be used for capturing the cold store
temperature, evaporator temperature, super-frost
core temperature, the temperature of a second
control circuit or the temperature of the condenser.
The type, function, offset and weighting of each
sensor can be configured separately via
parameters. Additionally, an analogue input
(4..20mA) can be made available for capturing
pressure levels, e.g. for condenser/fan control,
provided that the required hardware is available.
The max. four digital inputs can also be configured
separately, depending on the hardware installed.
Possible functions include: standby, door contact,
high-pressure or low-pressure switch.
Depending on the hardware, up to eight relay
outputs are possible the functions of which can be
configured as required via parameters. Please
refer to the specifications of the hardware installed
to ensure that the relays are not overloaded. Also
refer to the circuit diagram in the corresponding
device manual.
All parameters can also be accessed via the
RS485 interface. If an internal clock is provided in
the hardware, the corresponding functions, e.g.
defrosting or night-time increase/decrease of
setpoint, can be set and started via parameters.
CONTROL KEYS
Key T1: UP ( up-arrow )
By pressing this key the parameter or
parameter value is increased. A further
function of the key can be set with parameters
.
Key T2: DOWN ( down-arrow )
By pressing this key the parameter or
parameter value is decreased. A further
function of the key can be set with parameter
.
Key T3: Function key
The function of the key can be set with
parameter
.
Key T5: SET
While SET1 key is pressed, the setpoint is
indicated. The function of the key can be set
with parameter
(unchangeable in this case).
Key T6: STANDBY
The function of the key can be set with
parameter
. It is preset as standby key.
Thus the unit can be switched on or off (no mains
disconnection).
The cooling controller is generally controlled using
the buttons UP, DOWN and SET. The standard
display indicates the temperature of the cold store
(actual temperature value). Press SET button to
switch over the display to the required cold store
temperature (setpoint temperature).
The setpoint temperature can only be changed by
pressing buttons SET and UP or SET and DOWN
at the same time. While pressing the buttons, the
changing setpoint temperature is displayed. After
changing the setpoint temperature and releasing
the buttons, the actual temperature is displayed
again. This is the standard setting method.
If you press the STANDBY button during operation
(for at least 3 seconds), the cooling controller is
switched off and the message
will be
displayed. To switch on the controller again, press
the STANDBY button again.
T1
T2 T3 T4 T5 T6
1
2
3
4
5
6
7 8 9 10 11 12 13
SET

In addition to setting the temperature value, the
buttons UP and DOWN perform other functions,
too. Pressing the UP for 3 seconds will trigger a
non-standard defrosting operation of the
refrigerating plant. In the case of an alarm (with
buzzer triggered), the DOWN button can be used
for acknowledging the buzzer sound.
PARAMETERISATION
Parameterisation of the cooling controller is done
in the factory or during commissioning of a cold
store by qualified staff. Wrong or inappropriate
parameterisation can result in malfunction and
damage of the refrigerated goods. Parameter
setting is possible only after entering one or more
passwords. In the following list of parameters, all
parameters of a complex cooling controller are
listed. Please note, however, that the parameters
listed are only available in controller designs where
the relevant hardware (outputs, inputs, sensors
and internal clock) is available.
Parameterisation is possible at any time. The
control operation is not interrupted during
parameterisation, but can have a direct influence
on it. If no button is pressed for 2 minutes, the
operation is stopped and the actual value is
displayed again.
To activate parameterisation mode, press buttons
UP and DOWN at the same time. After approx. 3
seconds, the code word
. will be displayed.
Press UP or DOWN to switch between code words
and . All other settings / value
specifications in parameter setting mode are
performed using the default value setting method,
i.e. pressing buttons SET and UP / DOWN at the
same time.
NETWORK ADDRESS
Under code word
you can set a
network address. This is required for
commissioning networked systems.
ENTERING A PASSWORD
By selecting code word
, you can
enter a password required for
parameterisation. Once the password
has been entered
, the name of
the first group of parameters is
displayed
(alarms). Now, using
the buttons UP and DOWN you can
select any of the parameter groups
quickly.
ALARMS
Once you have selected a parameter
group, it will normally be sufficient if
you press the button SET (
will
be displayed) and then release the
button again. Now, the first parameter
of the group will be displayed
(parameter
in parameter group
, for example).
Using the buttons UP and DOWN you can scroll
the parameter group and change certain
parameter values using the default value setting
method. Press buttons UP and DOWN at the same
time to quit any parameter group and return to the
list of parameter groups. To quit the list of
parameter groups and return to the standard level,
press buttons UP and DOWN at the same time.
In some cases, certain parameter groups may be
protected by a password. In this case, you will
have to enter a specific password for the
parameter group like in the case of activation of
the parameterisation level.

Alarms
*
Buttons and switching inputs
Control circuits 1
Defrosting control circuits 1
Fan control circuits 1
Temperature sensors
*
Pre-defined sets of parameters
*
Networking and display
*
Relay contacts and lamps
*
Control circuit 2
*
These levels by default are protected by a password.

Alarms
Para-
meter
Description of function
Setting range
Values
default
Assignment of alarm sensors, detailed
description of sensors in parameters
through
0: none
1: Sensor F1
2: Sensor F2
3: Sensor F3
4: Sensor F4
5: weighted mean value from F1 and F2
1
Upper limit value
0.0: inactive
+0.1...+99.0°C
10.0
Lower limit value
-99.0...-0.1°C
0.0: inactive
-10.0
Switching mode of alarm relay
0: on if alarm present (normal)
1: off if alarm present (inverse)
1
Switching hysteresis for alarm
0.1...15.0°C
2.0
Alarm suppression time after temperature
alarm
0...240 min.
10
Alarm suppression time after defrosting
0...240 Min 15
Alarm suppression time after control ON or
change of setpoint and/or alarm limits
0...300 Min.
180
Alarm suppression time, door open
0: no alarm
1 ... 600 sec.
180
Behaviour if temperature alarm disappears
again
0: without buzzer, delete automatically
1: with buzzer, delete automatically
2: without buzzer, with acknowledgement
3: with buzzer, with acknowledgement
1
Function buzzer and/or display
in the case of alarm (temp. alarm see
)
0: no display, no buzzer
1: display flashing only
2: buzzer active only
3: display flashing, buzzer active
4: like 2., can be acknowledged
5: like 3., buzzer can be acknowledged
6: like 5., recurring after
5
Buzzer recurring after acknowledgement
1 ... 120 min.
30
Reset MIN / MAX memory
0: -
1: reset MAX memory
2: reset MIN memory
3: Reset MAX and MIN memory
0
Display of current MAX memory
Measured value, not adjustable
Display of current MIN memory
Measured value, not adjustable
Function of high-pressure switch
Releases until permanent alarm
0: no permanent alarm
1..10 : releases per 15 min.
0
Function of low-pressure switch
Releases until permanent alarm
0: no permanent alarm
1...300 sec.
0
Password of parameter level
-99 ... 999 0

Buttons and switching inputs (password-protected)
Para-
meter
Description of function
Setting range
Values
default
Function button T1
0: without function
1: controller on/standby
2: defrosting request
3: acknowledge alarm
4: relay function light 1,
not active in standby
5: relay function light 1
regardless of standby
6: relay function light 2,
not active in standby
7: relay function light 2,
regardless of standby
8: relay function window heating,
not active in standby
9: relay function window heating,
regardless of standby
10: relay function blade scraper,
not active in standby
11: relay function blade scraper,
regardless of standby
12: relay function door frame heating,
not active in standby
13: relay function door frame heating,
regardless of standby
14: relay function F, not active in standby
15: relay function F
regardless of standby
16: Set1 / Set2 change-over
17: day / night change-over
18: "super-frost“ on/off
19: evaporator fan on permanently
20: control circuit 1 on/off
21: control circuit 2 on/off
22: set for setpoint Y1
23: display MIN
24: display MAX
25: display sensor F1
26: display sensor F2
27: display sensor F3
28: display sensor F4
29: display sensor F5
30: reset both MIN/MAX
31: reset MIN
32: reset MAX
2
Function button T2
see
3
Function button T3
see
0
Function button T4
see
0
Function button T5
see
0

Para-
meter
Description of function
Setting range
Values
default
Function button T6
see
1
Function button T7
see
0
Function button T8
see
0
Function of external switching input E1
0: without function
1: controller on/standby
2: high-pressure alarm (see
)
3: low-pressure alarm (see
)
4: door contact (light on, fan off, see
)
5: relay function A (light 1),
not active in standby
6: relay function A (light 1),
regardless of standby
7: relay function B (light 2),
not active in standby
8: relay function B (light 2),
regardless of standby
9: relay function C (window heating),
not active in standby
10: relay function C (window heating),
regardless of standby
11: relay function D (blade scraper),
not active in standby
12: relay function D (blade scraper),
regardless of standby
13: relay function E (door frame heating),
not active in standby
14: relay function E (door frame heating),
regardless of standby
15: relay function F, not active in standby
16: relay function F, regardless of standby
17: Set1 / Set2 change-over
18: day / night change-over
19: "super-frost“ on/off (see
...
)
20: evaporator fan on permanently
21: defrosting request circuit 1
22: defrosting request circuit 2
23: control circuit 1 on/off
24: control circuit 2 on/off
0
Switching input E1 inverse / not inverse
0: normal
1: inverse
0
Function of external switching input E2
see
0
Switching input E2 inverse / not inverse
see
0
Function of external switching input E3
see
0
Switching input E3 inverse / not inverse
see
0
Function of external switching input E4
see
0
Switching input E4 inverse / not inverse
see
0
Password of parameter level
-99 ... 999
-19

Control circuit 1
Para-
meter
Description of function
Setting range
Values
default
Assignment of cold store sensors, detailed
description of sensors in parameters
through
0: none
1: Sensor F1
2: Sensor F2
3: Sensor F3
4: Sensor F4
5: weighted mean value from
F1 and F2
1
Setpoint for Set1
...
0.0
Night setpoint
(relative to current setpoint
/
)
-20 ... +20.0°C
5.0
Setpoint for Set2
...
2.0
Switching mode
0: heating
1: refrigerating
1
Hysteresis
0.1...15.0°C
2.0
Hysteresis mode
0: symmetrical
1: one-sided
1
Upper setpoint limit
...+99°C
50.0
Lower setpoint limit
-99°C...
-50
Start protection after compressor start
0 ... 900 sec.
300
Start protection after compressor stop
0 ... 900 sec.
180
Start protection compressor after mains on
0 ... 60 min.
0
On-time in emergency operation
0 ... 100% 50
Cycle time in emergency operation
5 ... 60 min.
10
Assignment of sensor for "super-frost"
(also core or product temperature)
detailed description of sensors in parameters
through
0: none
1: Sensor F1
2: Sensor F2
3: Sensor F3
4: Sensor F4
5: weighted mean value from
F1 and F2
1
"super-frost“: time limit
("shock-frost", "max. cooling power")
1 ... 36 hrs.
10
"super-frost“: temperature limit
("shock-frost", "max. cooling power")
-40 ... 0°C 0.0
"super-frost“: automatic off
("shock-frost", "max. cooling power")
0: none, manual only
1: controlled by time
2: controlled by time or temperature
2
Password of parameter level c
-99 ... 999 0

Defrosting control circuit 1
Para-
meter
Description of function
Setting range
Values
default
Assignment of evaporation sensors
(defrosting sensors)
detailed description of sensors in parameters
through
0: none
1: Sensor F1
2: Sensor F2
3: Sensor F3
4: Sensor F4
5: weighted mean value from
F1 and F2
2
Defrosting interval
0: no automatic defrosting
1...99 hrs.
8
Type of defrosting
0: no defrosting
1: compressor off only (circulating air)
2: electrical
3: with hot gas
2
Stop at defrosting temperature
0 ... +30.0°C
10.0
Defrosting time limitation
1...99 min.
30
Display of cold store temperature during
defrosting
0: normal
1: last temperature before defrosting
1
Temperature difference to cold store setpoint
in previous cooling
-15°C ... 0.0°C
0.0
Time limitation in previous cooling
1 ... 180 min.
10
Delay of start of defrosting after compressor
off
=2
0 ... 900 sec.
60
Dripping time
0 ... 15 min.
1
Stop delay drip tray heating
0 ... 60 min.
10
Password of parameter level
-99 ... 999 0
Fan control circuit 1
Para-
meter
Description of function
Setting range
Values
default
Fan speed control mode, Set1
0 ... 100% 80.0
Fan speed defrosting, Set1
0 ... 100% 80.0
Fan speed control mode, Set2
0 ... 100%
100
Fan speed defrosting, Set2
0 ... 100% 100
Start-up time
0 ... 60 sec.
5
Minimum speed
(output variable if result=0)
0 ... 100% 10.0

Para-
meter
Description of function
Setting range
Values
default
Evaporator fan
Fan mode normal operation
Remark: Control setpoint if
>4
is
or
0: off
1: continuous operation
2: like 1, with drip interruption
3: with compressor on
4: temperature-controlled
evaporator sensor only
5: temperature-controlled
difference between cold store and
evaporator sensor
3
Evaporator fan
Fan mode defrosting
0: off
1: on
0
Evaporator fan
Delay after compressor start
0 ... 600 sec.
0
Evaporator fan
Delay after defrosting
0 ... 600 sec.
120
Evaporator fan
Drip interruption time if =2
0 ... 600 sec.
180
Evaporator fan
Control offset if =4 or 5
-15.0 ... +15.0°C
0.0
Evaporator fan
Control hysteresis if =4 or 5
0.1 ... 15.0°C
2.0
Assignment of condenser sensors
detailed description of sensors in parameters
through
0: none
1: Sensor F1
2: Sensor F2
3: Sensor F3
4: Sensor F4
5:weighted mean value from
F1 and F2
0
Condenser fan
setpoint
-55...+150°C
60.0
Condenser fan
switching hysteresis
0.1...15.0°C
10.0
Condenser fan
delay after compressor start
0...300 sec.
60
Condenser fan
delay after compressor stop
(after-running)
0...600 sec.
300
Condenser fan
function
0: always off
1: always on
2: on if compressor on
3: after setpoint
4: like 3., as P controller
2
Proportional range P-controller
if set to =4
0.1 ... 30.0°C
10.0
Minimum speed
(output PWM if result =0)
0 ... 100% 10.0
Condenser fan start-up time
0 ... 60 sec.
10
Password of parameter level
-99 ... 999
0

Temperature sensors (password-protected)
Para-
meter
Description of function
Setting range
Values
default
Mains frequency
0: 50Hz
1: 60Hz
0
Act. value sensor F1
Measured value, not adjustable
Calibration sensor F1 (act. value correction)
-20...+20.0°C
0.0
Weighting factor sensor F1
0.50...1.50 1.00
Selection sensor F1
Depending on hardware, not all types are
available. Sensor will be deactivated in this
case.
0: not existing
1: PTC (-50..+150°C)
2: Pt100 2-wire (-100…+600°C)
3: Pt100 3-wire (-100…+500°C)
4: NTC (-40…+40°C)
5: Pt1000 2-wire (-100…+330°C)
6: Pt1000 3-wire (-100…+300°C)
7: 0-20mA
8: 4-20mA
1
Software filter sensor F1
1 ... 32 8
Display at 0/4mA and
sensor selection
=7/8
-99...+999 0.0
Display at 20 mA and
sensor selection
=7/8
-99...+999 100
Act. value sensor F2
Measured value, not adjustable
Calibration sensor F2 (act. value correction)
-20...+20.0°C 0.0
Weighting factor sensor F2
0.50...1.50 1.00
Selection sensor F2
see
1
Software filter sensor F2
1 ... 32 8
Display at 0/4 mA and
sensor selection
=7/8
-99..+999 0.0
Display at 20 mA and
sensor selection
=7/8
-99..+999 100
Act. value sensor F3
Measured value, not adjustable
Calibration sensor F3 (act. value correction)
-20...+20.0°C 0.0
Weighting factor sensor F3
0.50...1.50 1.00
Selection sensor F3
see
0
Software filter sensor F3
1 ... 32 8
Display at 0/4 mA and
sensor selection
=7/8
-99..+999 0.0
Display at 20 mA and
sensor selection
=7/8
-99...+999 100
Act. value sensor F4
Measured value, not adjustable
Calibration sensor F4 (act. value correction)
-20...+20.0°C 0.0
Weighting factor sensor F4
0.50...1.50 1.00
Selection sensor F4
see
0
Software filter sensor F4
1 ... 32 8
Display at 0/4 mA and
sensor selection
=7/8
-99…+999 0.0
Display at 20 mA and
sensor selection
=7/8
-99…+999 100

Para-
meter
Description of function
Setting range
Values
default
Display of weighted mean value of F1+F2
= (* + (100-)*)/100
Weighting of sensor F1 for
0 ... 100%
100
Password of parameter level
-99 ... 999
-19
Pre-defined parameter sets (password-protected)
Para-
meter
Description of function
Setting range
Values
default
Parameter set
1 ...5 (to be defined)
0
Recording interval
10 ... 900 sec.
120
Password for entering level selection (in
display )
-99 ... 999 -19
Password of parameter level
-99 ... 999
-19
Parameter is visible and can be adjusted only if data record is available.
Parameter
can only be viewed and set via ST-bus.
Warning: Changes made in the parameter set will change all parameter settings.
Networking and display (password-protected)
Para-
meter
Description of function
Setting range
Values
default
Own address ST-bus
Identical to setting
0: deactivated
1 ... 250
1
Temperature scale 0: °C
1: °F
0
Display mode 0: 3 digits, integers
1: 3 digits, rounded to 0.5
2: 3 digits, 0.1
3: 4 digits, integers
4: 4 digits, rounded to 0.5
5: 4 digits, 0.1
2
Display value
See act. value table
0
Software version
Display in standby mode 0: OFF
1: AUS
2: right decimal point
3: right decimal point flashing
4: time, OFF in case of an error
1
ST bus release mask for functions
0 ... 255
249
ST bus release mask for functions
0 ... 255
255
Password of parameter level
-99 ... 999
-19

Relay contacts and lamps (password-protected)
Para-
meter
Description of function Setting range Values
default
Function relay K1 0: no function (off)
1: compressor
2: defrosting circuit 1
3: evaporator fan
4: condenser fan
5: alarm
6: control contact circuit 2
7: defrosting circuit 2
8: relay function A (light 1)
9: relay function B (light 2)
10: relay function C (window heating)
11: relay function D (door frame heat.)
12: relay function E (blade scraper)
13: relay function F
14: drip tray heating
15: buzzer
16: on if controller active
17: on if control circuit 1 active
18: on if control circuit 2 active
19: on if Set 1 active
20: on if Set 2 active
21: on if day mode active
22: on if night mode active
1
Function relay K2
see
2
Function relay K3
see
3
Function relay K4
see
5
Function relay K5
see
0
Function relay K6
see
15
Function relay K7
see
0
Function relay K8
see
0

Para-
meter
Description of function
Setting range
Values
default
Function LED1
0: no function (off)
1: compressor/magnetic valve
2: defrosting control circuit 1
3: evaporator fan
4: condenser fan
5: alarm
6: control circuit 2
7: defrosting circuit 2
8: Light 1
9: Light 2
10: window heating
11: blade scraper
12: door frame heating
13: relay function F
14: drip tray heating
15: "super-frost“
16: "humidity"
17: control circuit 1 active
18: control circuit 2 active
19: set 1 active
20: set 2 active
21: day mode active
22: night mode active
23: display "MIN"
24: display "MAX"
1
Function LED2
see
2
Function LED3
see
3
Function LED4
see
0
Function LED5
see
19
Function LED6
see
20
Function LED week days 0: no function (off)
1: display weekday
2: see ...
0
Function LED7 (Mo)
see
0
Function LED8 (Tu)
see
0
Function LED9 (We)
see
0
Function LED10 (Th)
see
0
Function LED11 (Fr)
see
0
Function LED12 (Sa)
see
0
Function LED13 (Su)
see
0
Password of parameter level
-99 ... 999
-19

Control circuit 2 (password-protected)
Para
meter
Description of function
Setting range
Values
default
Assignment of sensors to control circuit 2
detailed description of sensors in parameters
through
0: none
1: Sensor F1
2: Sensor F2
3: Sensor F3
4: Sensor F4
5: weighted mean value from
F1 and F2
0
2nd control circuit: setpoint
...
10.0
First effective from version 1.6:
2nd control circuit: absolute setpoint or
DeltaW
0: absolute
1: DeltaW
1
2nd control circuit: switching mode
0: heating
1: refrigerating
1
2nd control circuit: hysteresis 0.1...99.0°C 2.0
2nd control circuit: hysteresis mode
0: symmetrical
1: one-sided
1
Upper setpoint limit
... +999°C 50.0
Lower setpoint limit
-99°C ...
-50
Function in the case of sensor fault
0: contact off
1: contact on
1
Defrosting interval control circuit 2
0: no defrosting
1...99 hrs.
0
Defrosting time limitation thermostat 2
1...99 min.
30
Password of parameter level
-99 ... 999 -19
MASTER PASSWORD
All passwords can be edited through
parameterisation. If you don't remember a
password, you can still parameterise the controller
and look up and/or edit the password via a master
password. To do that, follow these steps:
1. Switch off power supply (disconnect from mains
or switch off power supply unit)
2. Press buttons UP, DOWN and SET at the same
time and switch on power supply again.
3. Now, a ("Challenge") number will be displayed
for approx. 5s.
In no case disconnect the controller from power
supply now. Otherwise, the number will become
invalid. Using this number, you can call our sales
staff, phone +49 711 68661-0 to request the
master password ("Response"). Enter this master
password in the 1st control level in
.
Important: Even if you remember the password,
you must enter the master password here. If the
password is accepted, you will enter the parameter
selection levels and all passwords will be deacti-
vated. By pressing the SET button (display
)
you can switch to the relevant parameter level.
Now, the master password is no longer required.
The passwords will remain deactivated until the
controller is disconnected from power supply
again. In case you leave the parameter level now,
simply press the SET button in
in order to
access the parameter selection levels again.


STATUS DISPLAYS AND ERROR MESSAGES
Message
Cause
Remedy
Overtemperature, temperature above
alarm limit of parameter A1/A31
Undertemperature, temperature below
alarm limit of parameter A2/A33
Error on sensor F1, short-circuit
check sensor F1
Error on sensor F1, wire broken
check sensor F1
Error on sensor F2, short-circuit
check sensor F2
Error on sensor F2, wire broken
check sensor F2
Error on sensor F3, short-circuit
check sensor F3
Error on sensor F3, wire broken
check sensor F3
Error on sensor F4, short-circuit
check sensor F4
Error on sensor F4, wire broken
check sensor F4
Door open for too long
close door
High-pressure fault
Check: Condenser fan and check for dirt
accumulation
Low-pressure fault
Plant leaking, to little coolant
Internal error in control unit
Repair control unit
Error in parameter memory
Check all parameters
Error in data memory
Repair control unit
Error of internal clock
Set clock again. If error occurs again, the
controller must be repaired
Errors and will disable the controller. The controller will only be enabled again once the error has
been repaired. Error
(and ) can only be eliminated by repair. The errors and the current temperature
will be displayed alternately.

Alarms
Alarm sensor assignment
With this parameter, you can set which sensor input
is to be used as the alarm sensor.
Upper limit value
Lower limit value
The limit values are used for monitoring the cold
store temperature. They are relative values, i.e.
they always refer to the setpoint S1. If the tempera-
ture increases above or falls below the upper and
lower limits, respectively, an alarm as specified in
will be triggered. If [ = 0] and/or [ = 0], the
relevant limit alarm is deactivated.
Switching mode of alarm relay
With this parameter you can define if the relay is to
be closed or opened in the case of an alarm.
Switching hysteresis for alarm
The alarm contact hysteresis is set asymmetrically,
downward at the upper alarm value and upward at
the lower alarm point.
Alarm suppression time after temperature
alarm
If the temperature of the cold store exceeds the
limits set in
, , a temperature alarm should
normally be triggered. Based on the suppression
time set in
, triggering of the alarm can be
delayed.
Alarm suppression time after defrosting
Triggering of a temperature alarm is prevented for
the set time after defrosting so that the plant can
reach normal operating conditions again.
Alarm suppression time
after Refrigerating On
Triggering of an alarm is suppressed for the set
time after activation of refrigeration.
This is to allow the refrigerating plant to reach the
working temperature range without triggering of an
alarm.
Alarm suppression time, door open
With this parameter you can define after which time
an alarm is to be triggered when the door is
opened. If the door is closed again within the
specified time, no alarm will be triggered.
Behaviour when temperature alarm
disappears
Here, you can define if a temperature alarm can be
deleted automatically as soon as the temperature is
in the permissible range again or if it must be
acknowledged. This is to ensure, for example, that
a temperature alarm that occurred at night remains
present until the error is acknowledged the next
day. If the temperature alarm is still present when it
is acknowledged, the buzzer will be switched off as
set in
, the alarm message in the display,
however, will remain present until the temperature
is within the permissible range again. Then, the
acknowledged alarm will be deleted automatically.
Buzzer function and/or display in the case
of an alarm
Here, you can define if a temperature alarm is to be
displayed or not and if the buzzer is to sound.
Additionally, you can define if the buzzer is to
sound again after acknowledgement. The
corresponding time is indicated in
. The error
message and the temperature will be displayed
alternately as long as the alarm is present. If more
than one alarm messages are present, they will be
displayed alternately. The alarm relay will signal the
alarm at all times.
Buzzer recurring after acknowledgement
Alarms which have not been eliminated will be
switched on again by the buzzer after the set time.
This only applies if [
=6].
Reset MIN / MAX memory
With this parameter, you can delete the MIN and/or
MAX memory.
Display of current MAX memory
Here, you can view the current MAX memory.
Display of current MIN memory
Here, you can view the current MIN memory.
/