Page is loading ...

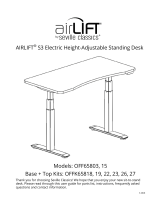
AIRLIFT™
S2 Electric
Height
-
Adjustable Standing Desk
Models: OFFK65824
Thank
you for
choosing Seville
Classics!
We hope that
you
enjoy
your new
s
i
t
-
to
-
sta
nd
desk. Please read through this user guide
for
parts
list,
i
n
structi
on
s,
frequently
a
ske
d
questions and contact
i
n
forma
ti
on
.
09-2017

2
Welcome!
We at
Seville Classics
®
are
thri
ll
ed
that you’ve
chosen
to
go
AIRLIFT™!
Our
desks
are
some
of
the easiest
to
us
e
,
most
ve
rs
at
il
e
and sophisticated electronic desks
on
the market.
With this,
you
can
stay active
throughout the
day
without
s
a
cr
i
fi
cing
produ
ctiv
it
y.
Choosing
a
h
e
ight
-
ad
ju
s
tab
le
desk
is not just a
co
nv
en
ie
nt
up
grad
e—it
’s
a
healthy
one! Too
much sedentary behavior can
present
a real
health
risk,
even
for
people
who are
al
read
y
healthy.
Simply
getting
up
throughout the
day
and moving
is
a
great
way
to fight the consequences
of too
much sitting.
AIRLIF
T
™
is
here
to
h
e
lp
.
Please read through
this
manual
for
more information reg
ard
in
g
your
AIRLIFT™
S3
Standing
De
s
k.
Thank you for
choosing Seville
Cl
ass
ic
s
®
!
We
hope
you will
enjoy
this
desk
for
many years
to
c
om
e
.

3
Table of
Conten
ts
SAFETY
IN
ST
RU
CT
IO
NS…
…………………………………
….
………………
….
…
….
.5
COMPONENT
DIAG
RAM…
………………………………………
.…
…………
.…
…
...
6
TOOLS &
HARDWARE
LI
ST
………………………………………………
..……
…
….
.7
ASSEMBLY
INSTRUC
T
IONS
………………………………
...…
……………………
…8
Prepare
Wo
rks
p
ace…
………………………………………………………
…...
8
Unpack
&
Unfold
…………………………………………………………………
..
9
Install
Was
he
rs
…………………………………………………………………
…10
Install
Support
Br
acket
s
.
………………………………………
….……
……
.1
1
Unlock
Be
am…
………………………
...…
……………………………………
….12
Mounting Seville Classics
®
T
op……
……………………………
.………
..13
Mounting Non
-
Seville Classics
®
T
op……
……………………
.………
..14
Installing
Fe
et
…………………………
...…
……………………………………
..15
Turn Desk
Ov
er……
…………………………………………………………
…..16
Connect
Cab
le
s
………………………………………………………………
…..17
INITIALIZING
S
Y
ST
EM…
……………………………………………………………
…18
CABLE
M
AN
AGE
MENT
………………………………………………………………
..19
T
RO
UBLE
SHO
O
T
ING…
……………………………………………………………
..…20
WARRANTY
INF
O
RMAT
IO
N
………………………………………………………
...21
SPE
CIF
ICAT
IONS
……
….
………………………………………………………………
..22
CUSTOMER SERVICE
INFO
R
MAT
I
O
N…
………………………………………
..22
MORE FROM
SEVILLE CLA
SSIC
S
………………………………………………
….
23

4

5
Safety
In
st
ru
cti
o
ns
FAILURE
TO
COMPLY WITH
OR
OBSERVE ALL ASSEMBLY, SAFETY
A
N
D
OPERATING INSTRUCTIONS
AND
WARNINGS REGARDING
THE USE OF
THIS
PRODUCT
MAY RESULT
IN
SERIOUS BODILY INJU
RY
R
e
ad
and understand this manual before attempting to
in
st
al
l
or
Assure that everyone
who
uses this product
is
i
n
for
m
e
d
of
the contents
of
this manual.
Th
is
is
the
r
e
sp
o
n
sib
il
it
y of
the
P
ur
ch
as
e
r
.
Not intended
for
use
by
young
c
h
il
dr
e
n
or for
those persons
who
require
sup
e
r
vi
si
o
n
.
Do
not open
any of
the components
– legs,
c
o
n
t
r
o
l
box, or
co
n
t
r
o
ll
e
r
.
T
h
e
r
e
is a risk
o
f
electric
sh
o
ck.
A
sse
mbl
e
desk
on a
flat and
level
sur
fa
ce
.
Use &
Li
ability
Safe use
of
this product
is
possible
only
when the operating instructions are read
c
om
p
l
ete
ly
and the instructions contained are
strictly
observed. Persons
who do
not have the
n
e
c
e
ssar
y
experience
or
k
n
o
w
l
e
d
g
e
of
this product must not use the product. Persons
with
r
e
du
c
e
d
physical
or
mental
ab
ili
t
ies
should not use this product, unless they are under supervision
o
r
they have been thoroughly instructed
in
the use
of
the apparatus
by a
person
who is
r
e
sp
o
n
si-
b
l
e
for
the safety
of
these persons.
Ch
il
dr
en
sh
o
u
l
d
be
closely
sup
e
r
vi
se
d
to ensure that
t
h
ey
do
not
play with
this
pr
o
du
ct.
Before
You
B
eg
in
Layout
all
components and hardware.
V
isu
al
ly
examine and make sure components are free o
f
damage.
If
there
is visual
damage to
any
c
om
p
o
n
e
n
t
,
it
must not be
in
st
al
led
.
Two
people are needed to turn
or
move the desk and some
of
i
t
’
s
components. When moving
o
r
turning the assembled desk, grab the
legs,
not the desk
t
o
p
.
Make sure to assemble
on a soft
and n
o
n
-
abr
asi
ve
surface to avoid
sc
r
at
ch
e
s.
Check all
c
o
nn
ec
t
i
o
ns
and
cab
l
es
.
Make sure
c
o
n
t
r
o
l
box is
connected to
a
power o
u
t
l
et.
If
the
c
o
n
t
r
o
l
box
makes unusual noises
or
e
m
i
t
s
an
o
d
o
r
,
switch power
off
i
mm
e
d
ia
te
ly
.
The
desk
MUST be
INITIALIZED
before first
us
e.
Read
the
INITIALIZATION
chapter
prior
to
o
perati
o
n.

6
Component
Di
ag
ram
C
o
n
tr
o
l
B
o
x
Top
Support
B
rac
k
et
Sup
p
o
rt
B
rac
k
et
Co
ntr
o
ll
e
r
Le
gs
Le
gs
F
oo
t
Support
B
e
am
F
oo
t

7
Parts List
A.
To
p
B.
Support Beam
(1)
D. Legs (2)
(
pre
-
in
sta
ll
ed
)
E.
Support Bracket
(2)
G.
Co
ntro
l
Box (1)
(
pre
-
in
sta
ll
ed
)
H.
Co
ntro
ll
er
(1)
F.
F
oo
t
(2)
Tools &
Hardware
L
ist
I.
A
ll
en
wr
en
c
h
-
3mm
J
.
Allen
wrench
-
5mm
K. Allen
wrench
-
6mm
P. Screw (10)
Q.
Bol
t
Sleeve
(4)
L. M8x25
Bolt
(4)
R.
Washer
(
12
)
M. M6x16 Bolt
(
6)
N. M6x40 Bolt
(
8)
O. M6x6 Bolt (8)
(
pre
-
in
sta
ll
ed
)
S.
F
a
stener
(6)
T. Zip Ties (8)
U. Sc
rew
dri
ver
Please make sure
you
have
all
the parts
on
this
li
st.
If you’re
missing
parts
,
contact
us for
replacements at
(800)
323
-
5565
or
send
an
ema
il
to
Su
ppo
rt@Sevi
ll
eCl
a
ss
ics
.c
o
m

8
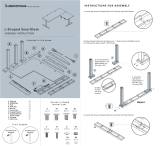
Assembly
I
nstr
uct
i
ons
:
Prepare
Wor
kspace
Place your
Seville Classics
®
Ergo
Desktop
(or your own
t
op
)
w
i
th
the
bo
tt
om
-
si
de
facing up on a soft, flat,
even surface.
Lay
down
a
bl
ank
et
beneath the top
to
protect the su
rf
a
ce
.
Layout all
components and hardware. Examine
ea
ch
and make sure components
are
without
dama
ge
.
Support Be
a
m
Feet
(x
2)
Support Bracket
(x
2)
L
eg
s
(x2)
(pr
e
-
i
n
sta
ll
ed
)
C
on
t
r
ol
Box
(pr
e
-
i
n
s
t
a
ll
ed
)
C
on
t
r
ol
l
er

9
Assembly
I
nstr
uct
i
ons
:
Unpack
&
Unf
old
STEP
1.
R
e
m
o
v
e
SUPPORT
BEAM
(B)
from
box
and set
on TOP (A)
w
i
t
h
l
e
gs
facing
up
war
d
.
STEP
2. U
n
f
o
l
d
l
e
g
s
un
t
il
t
he h
o
l
e
s
on
t
he
l
e
g
s
and beam
a
li
g
n
.
90°
90°

10
Assembly
I
nstr
uct
i
ons
:
Install
Was
her
s
STEP
3.
I
ns
e
r
t
WASHERS
(R)
t
hrough
t
he
t
op of
t
he h
o
l
e
s
on
b
o
t
h
SUPPORT
BRACKETS
(E).
Washer
(x
3)
Support
Bra
cke
t
Make sure
to
i
n
sta
ll
WASHERS
(R) to
every mounting point between
t
h
e
TOP (A)
and
t
he
SUPPORT
BRACKETS
(E)
and
SUPPORT
BEAM
(
B
)
.

11
Assembly
I
nstr
uct
i
ons
:
Install
Support
Bra
ckets
STEP
3.
Slide
SUPPORT
BRACKET
(E)
i
n
t
o
t
he
SUPPORT
BEAM
(
B
).
Ti
gh
te
n
/w
6mm Allen
Wren
c
h
Ti
ght
e
n
/w 6mm
Allen
W
rench
Ti
gh
te
n
/w
6mm
A
ll
e
n
W
rench
Sup
por
t
Br
acket
Bolt
Sle
ev
e
M8x25
Bolt
6mm
Allen
Wr
en
c
h
I
ns
e
rt
BOLT SLEEVES
(Q)
through
ho
l
e
s
on SUPPORT
BEAM
(B)
and
LEG
(D)
.
I
ns
e
rt
M8x25
BOLTS
(L)
i
n
t
o
s
l
ee
v
e
s
and
t
i
g
h
t
en
w
i
t
h
6mm
ALLEN
WRENCH
(K).
Then,
t
i
g
h
ten
i
nn
e
r
6mm
b
o
l
ts
with a
6mm
ALLEN WRENCH
(K)

12
Assembly
I
nstr
uct
i
ons
:
Unlock
Beam
STEP
4.
Unscrew
t
he
e
i
g
h
t
M6x6
BOLTS
(O)
m
a
r
k
ed
in
t
he d
i
a
g
r
a
m
b
e
-
low
from
SUPPORT
BEAM
(B) with
3mm
ALLEN WRENCH
(I).
This
un
l
o
cks
the
SUPPORT
BEAM
(B)
and allows
it to
be
e
xt
e
nd
e
d
,
or
shortened to
accommodate
d
i
ff
e
re
n
t
sizes
o
f
desk
top
s.
Screw
the
b
o
l
ts
back in to
ap
p
l
y
ten
s
i
o
n
aga
i
n
st
the
supp
o
rt
beam and
lock
the top's
wi
d
th
after
a
li
g
n
i
n
g
the base
with
th
e
desk
top
ap
propr
i
ate
l
y.
3mm
Allen
Wr
en
ch
Un
sc
r
e
w

13
Seville
C
la
ss
ics
®
Top
Assembly
I
nstr
uct
i
ons
:
Mou
nt
i
n
g
Ergo
To
p
STEP
5A.
W
i
t
h 2
p
e
o
p
l
e
,
pull or
push
t
he
SUPPORT
BEAM
(B) to align
t
h
e
mounting
h
o
l
e
s
on
the
SUPPORT
BRACKETS (E)
and the
SUPPORT
BEAM
(
B
)
to
the
pr
e
-
i
n
stall
e
d
anchors
on
the
TOP
(
A
)
.
5mm Allen Wrench
M6x16 Bolt
Screwdriver
Screw
Use
three
M6x16
BOLTS
(M)
to
secure each
SUPPORT BRACKET
(E) with
5mm
ALLEN WRENCH
(
J
)
.
Install
CONTROLLER
(H) with
two
SCREWS
(P) on
r
i
g
h
t
s
i
d
e
of
d
e
s
k
.

14
Non
-
Seville Classics
®
Top
Assembly
I
nstr
uct
i
ons
:
Mou
nt
i
n
g
Other Top
WARNING:
Seville Classics
®
does not take
re
spons
i
bili
ty
fo
r
damage
of
cu
st
om
e
r
-
supp
li
e
d
parts
or
desk
co
mp
on
e
n
ts.
WANRING:
Users
MUST
supply
th
e
i
r
own
wood screws when
i
n-
stall
i
ng
th
e
i
r
own
top.
BE
SURE
screws
ARE
NOT
l
o
nge
r
than
t
op
de
pth.
STEP
5B.
Push
or pull
t
he
LEGS
(D) on
t
he base frame
so
t
hat
t
he
a
s
-
semb
l
y is
centered
on
the
TOP (A) with
about
2"
to
3"
between
SUPPORT
BRACKETS
(E)
and
t
a
b
l
e
edge.
Screw SUPPORT
BRACKETS (E)
to
the
top with
wood screws
until
tig
ht.
Then,
i
n
stal
l
CONTROLLER
(H) with
two
SCREWS
(P) on right
s
i
d
e
of
th
e
d
e
skt
o
p
.
Use
the above
d
i
a
gram
to
p
o
s
i
tio
n
the
8
sc
re
ws
.

15
Assembly
I
nstr
uct
i
ons
:
Installing
Feet
STEP
6.
A
t
t
ach
FEET
(F) to
the bottom
of
ta
b
l
e
l
e
gs
w
i
t
h
four M6x40 BOLTS
(N)
and
5mm
ALLEN WRENCH
(J
)
.
Leveling Foot
(
pre
-
in
sta
ll
e
d)
5 mm Allen
Wr
e
nch
M6x40
B
olts

16
Assembly
I
nstr
uct
i
ons
:
Turn Desk
Over
WARNING:
TWO PEOPLE
ARE NECESSARY
TO TURN
TA
BL
E.
DESK
IS
HEAVY
.
LIFT WITH
EX
TRE
ME
CAUT
I
ON.
STEP
7. With
the help
of
at least one other person,
t
urn
t
he desk o
n
t
o
it's
feet.
Desk with top
we
i
gh
s
appro
x
i
m
ate
l
y 120
l
b
s
.
Lift with 2
peo
pl
e
PRO
TIP!
Screw
t
he
l
e
v
e
li
n
g
feet
i
n
and
out as
necessary
to ensure the
desk stands
l
e
v
e
l
.
DO NOT put
weight
on
desk yet.

17
Assembly
I
nstr
uct
i
ons
:
Connecting
Cab
les
110-120V
Sock
et
Po
w
er
Cab
le
Con
tr
oll
e
r
Cab
le
Mo
t
or
Cab
le
s
STEP
8. Plug
t
he
c
a
b
l
e
from
t
he
CONTROLLER
(H)
t
o
t
he
l
e
f
t
-side
port on
the
CONTROL
BOX. (G).
Then,
plug
the
ca
b
l
e
s
from the motors
i
n
t
o
the
two
r
i
g
h
t
-
si
d
e
ports
on
t
h
e
CONTROL
BOX (G).
NOTE:
Motor cables
can
connect to either port
in
ter
cha
ngea
bl
y.
Plug
Power
C
a
b
l
e
into
the other
side of
the
co
nt
ro
l
box
and
into a
120
V
power
o
u
tl
e
t.
DO NOT USE
UNTIL INITIALIZATION IS
CO
MP
LETED

18
Initialization
& Use
In
str
uct
ions
DESK
MUST
BE INITIALIZED BEFORE YOUR FIRST
USE
SAVE
MEMORY
Initiali
ze
ME
MOR
Y
1
/
2
/
3
/ 4
DIS
P
LAY
UP ARROW DOWN ARROW
Press and
h
o
l
d
the
UP
ARROW
and
DOWN
ARROW
si
m
ul
ta
n
e
o
us
l
y on
th
e
controller
un
t
il
three
b
li
n
k
i
n
g
zeros appear
on
the
d
i
sp
l
ay,
then re
l
e
ase
.
The desk
will
descend
to it's
l
o
we
st
h
e
i
ght
,
then rise
to it's
h
i
gh
e
st
h
e
i
g
h
t,
and then descend
to
mi
dd
l
e
-
he
i
ght.
When the number
38 (+
/
-
1)
appears
on
the display, the desk
is
r
e
a
dy.
I
t
may
be necessary
to
re
i
n
i
t
i
al
i
z
e
the desk from time
-
to
-
time due
to
p
ower
outages
or
s
im
p
l
y
due to use
over
t
i
me
.
If
necessary,
follow
the above
i
nstru
cti
o
ns
to r
e
-
i
ni
t
i
al
i
ze
.
Adjust
Heigh
t
Press and
h
o
l
d
the
UP
ARROW
to
li
ft.
Press and
h
o
l
d
the
DOWN
ARROW
button
to
l
o
wer
.
S ave
Height
Press and
h
o
l
d
the
M
button
+
Number button
for 1
t
o 3
seconds
un
t
il
the
d
i
splay
e
d
number starts b
li
n
k
i
n
g.
Re c all
Height
Press the desired
Number button
twice, or
press and hold
to
adjust
to
th
e
h
e
i
g
h
t
stored at that
nu
m
b
e
r.

19
Cable M
an
agement
Use
ZIP
-
TIES
(T)
t
o affi x
the
cab
l
e
s
from the
CONTROLLER
(H)
and
C
ON-
TROL
BOX (G)
t
o
t
he
SUPPORT
BEAM
(B) so
that the cables wont snag o
r
get in
the
way as
the desk moves
up
and d
o
wn
.
Fastener
Stick
FASTENERS
(S) to
the
und
e
rs
i
d
e
of
the desk
top
near the
controller. Thread the cable through the
clip on
the
FASTENER
(S) to
k
ee
p
the wires close
to
the
ta
b
l
e
.

20
Tr
oublesh
oot
ing
Problem
Action
Desk
does
not go up or
dow
n.
The
controller
does not
ill
um
i
n
a
t
e
when
any
button
is
pr
e
ss
e
d.
Check all
connections.
Make
sure power cord
is
plugged
into
t
he
control
box
and
a
power outlet. Press
any
button
on
the
c
ont
rolle
r
and make sure
it
illuminates. Re
-
initialize the
des
k.
Desk
does
not go up or
dow
n.
The
controller
illuminates
when any
button
is
pr
e
ss
e
d.
Unplug the power cord and re
-
plug after
10
seconds.
R
e
-
initialize
the desk.
If
the problem
p
e
rs
is
t
s
,
switch motor cables from
one
port
to
another at control
box
and re
-
initialize
ag
ain.
C
olu
mns
do not go up
e
v
e
nly.
Unplug the power cord and re
-
plug after
10
seconds.
R
e
-
initialize
the desk.
If
the problem
p
e
rs
is
t
s
,
switch motor cables from
one
port
to
another at control
box
and re
-
initialize
ag
ain.
Desk
wobbles
e
xc
e
ss
i
v
e
ly.
It is
norma
l
that desk moves
slightly at
standing height when in
use.
R
et
ig
ht
e
n
all
screws and bolts, and adjust
leveling
feet
t
o
make sure table stands level.
HOT is
displayed
on
the pane
l
.
The
desk motors
are
overheated. Stop using the desk
for
10
minutes and let them
cool
dow
n.
Desk legs are
nois
y
.
It is
norma
l
that desk makes noise when the stages move
pas
t
each other.
Apply
silicon
-
based lubricant
if it is
unusually
nois
y.
Error
Code
s
Code
Action
E-1:
System malfunc
t
io
n.
Please contact customer
s
e
rv
ic
e
.
E-2:
Starting current
e
xc
e
ption.
Please re
-
initialize the
s
ys
te
m.
Press and
hold
the
UP
ARROW
and
DOWN
ARROW
s
imult
ane
-
ously on
the controller
un
t
il
three blinking zeros appear
on
t
he
display, then release.
(see pg.
17
)
If
failure code still
shows, please contact customer
s
e
rv
ic
e
.
E-4: Main
power supply
ma
lfunc
t
io
n.
Please contact customer
s
e
rv
ic
e
.
E-5:
Motor
is not
running
on
the s
am
e
pos
it
ion.
Please re
-
initialize the
s
ys
te
m.
E-6:
Motor
A
s
t
alling
.
Please re
-
initialize the
s
ys
te
m.
E-7:
Motor
B
s
t
alling
.
Please re
-
initialize the
s
ys
te
m
.
E-8:
Motor
wiring
ma
lfu
nc
t
ion.
Please re
-
initialize the
s
ys
te
m
.
E-9:
Motor
A Hall
element ma
lfunc
t
ion.
Please re
-
initialize the
s
ys
te
m
.
E-10:
Motor
B Hall
element ma
lfu
nc
t
ion.
Please re
-
initialize the
s
ys
te
m
.
E-11:
Height record
e
rr
or.
Please re
-
initialize the
s
ys
te
m
.
E-12: Over
he
at
.
Let the system
cool
down then re
-
initialize the
s
ys
te
m.
/