Page is loading ...

ASSEMBLY OF YOUR ELECTRIC FREE-FLIGHT AIRPLANE
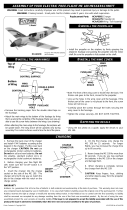
❶ Assembling the Wing and Tail
Remove the backing paper from the double-sided tape on the tail and wing sections indicated by the shaded areas on
the drawing. Assemble all parts shown by pressing them firmly into place to ensure good adhesion. Check to make sure
the wing and tail are in alignment as shown in the drawing.
❷ Charging
• Before charging your airplane, make
sure the “on-off” switch is in the
“off” position.
• Use a coin to open the charger. Install
the included 2 “AA” batteries according
to the diagram in the charger.
• Connect the charger into the charge
socket on the airplane. The charger
will only fit one way so match the
notches on the charge connector to
the airplane.
• On the first charge, only charge the
airplane for 30 seconds. For longer
flights, you may increase the charge
time to 60 seconds.
• Never charge for more than 60
seconds. If you do, you may overheat
your batteries or your charger and
damage them.
• When charging is complete, remove
the charger from the airplane.Read the
trimming and flying sections of this
manual before flying your airplane.
Entire Contents © Copyright 1999 HCAZ3085
Attaching the Tail
Attaching the Wing
Fuselage
Fuselage
Wing
CORRECT
INCORRECT
INCORRECT
Horizontal
Tail Section

TRIMMING YOUR ELECTRIC FREE-FLIGHT (Must be done before flying!)
FLYING YOUR ELECTRIC FREE-FLIGHT AIRPLANE
❶ It is important to test or trim your electric free-flight correctly. The
airplane should climb and turn efficiently.
❷ Using a hobby knife, carefully cut only the top and bottom of the
rudder and the inside and outside ends of both elevators.
❸ With the motor off, grasp your electric free-flight by the body and
gently toss the airplane into the wind. It should glide straight ahead
and settle gently to the ground. See diagram below.
❹ Repeat step 3 until proper flight is achieved.
A = Crash. Bend elevators upward 1-2mm.
B = Stall. Bend elevators down 1-2mm.
C = Correct flight path.
D = To veer left, bend rudder slightly to the left.
E = To veer right, bend rudder slightly to the right.
1. Take your electric free-flight out into the
middle of a field. Hold the airplane in your
hand over your head and turn the motor
“on” with your other hand.Toss the airplane
into the wind, keeping the airplane level.
2. The airplane should climb gently and turn
gradually. If it stalls or crashes, adjust the
elevator. If it does not turn, bend the rudder
1-2mm to the left or right. Refer to “Trimming
your electric free-flight” for details.
IMPORTANT THINGS TO REMEMBER
WHEN YOU ARE FLYING YOUR
ELECTRIC FREE-FLIGHT:
The most important thing that determines
how well your airplane flies is how well you
have trimmed it out.
Because it can fly high and far you must be in
a large area away from houses, streets,
trees, and overhead wires.
Closely inspect your airplane after every flight.
Make sure the wings are not broken and are
securely fastened to the airplane body. Make
sure the tail parts are in flying condition. See
the REPAIR section for details.
Always throw the electric free-flight into the
wind. Do not fly the airplane if it is too windy.
Never charge your batteries for more than 60
seconds. If you do, you may overheat your
batteries or your charger and damage them.
CAUTION
• DO NOT FLY NEAR POWER LINES.
• ALWAYS LAUNCH PLANE AWAY FROM
PEOPLE AND OBSTACLES.
• NEVER POINT THE PLANE AT ANYONE
OR ANYTHING.
• ALWAYS LAUNCH SKYWARD.
• DO NOT LAUNCH INDOORS
REPAIR
Repairs can be made to your model using
clear tape. You may also use white PVA
glues or epoxy. Never use polystyrene
cements or “super” glues as they will melt
the styrofoam.
/