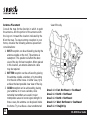
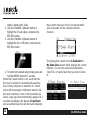
Sirius Satellite Radio SR-H550, Home Tuner User manual
- Category
- Video games
- Type
- User manual
This manual is also suitable for

SIRIUS Satellite Radio Home Receiver
SR-H550
User Guide

SR-H550 User Guide
2
CONGRATULATIONS! Your new SR-H550 SIRIUS
®
Satellite Radio Home Receiver lets you enjoy
SIRIUS Satellite Radio’s digital entertainment in your Home. Use this guide to familiarize yourself with
the SR-H550’s features and capabilities. For the latest information about this and other SIRIUS
products, please visit http://www.siriusradio.com.
Table of Contents
FCC Warning .................................................................... 4
Safety Precautions ............................................................ 5
Cleaning the Receiver ....................................................... 5
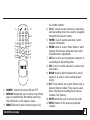
SR-H550 Receiver Controls and Features........................ 7
Remote Control ................................................................. 8
Installing Batteries in the Remote................................. 8
Introduction ..................................................................... 10
Installing Your SIRIUS Receiver...................................... 10
Installation/Wiring Precautions .................................. 10
Cabling Interconnections ........................................... 11
Installing/Positioning the Antenna .............................. 11
Connection Diagram .................................................. 11
Antenna Placement .................................................... 12
Testing Antenna Signal Strength ............................ 13
Operating the Receiver ................................................... 14
Activating your SIRIUS Subscription ......................... 14
CHANNEL Up/Down Buttons and ENT/SEL Button .. 15
Category Buttons Up/Down Buttons .......................... 15
Memory (MEMO) Button (S-SEEK Function) ............ 15
Display (DISP) Button ................................................ 16
Menu (MENU) Button ................................................ 16
BAND Button (BAND)/Preset Tune (P. TUNE).......... 16
Scan Button ............................................................... 16
Keypad Buttons 0-9.................................................... 16
Basic Operation .............................................................. 16
Tuning By Category.................................................... 17
Content Listing Options (Look Ahead) ....................... 17
Direct Tuning.............................................................. 18
Setting/Using Channel Preset Buttons....................... 18
Preset List Mode ........................................................ 19
Display Button (DISP) ................................................ 19
Memory Button (S-Seek Function) ............................. 20
Storing Song Titles or Sports Games ..................... 20
Replace/Cancel Options ........................................ 21
Viewing Programmed Information Stored in Memory . 22
Deleting a Artist/Song/Sports Team Stored in Memory ... 23
Activating the S-Seek Alert Option ......................... 23
Menu Display Operations ................................................ 25
Sirius ID ..................................................................... 26
Game Alert ................................................................. 26
Display Settings ......................................................... 27
Confirm Tone Options ................................................ 28

SR-H550 User Guide
3
Table of Contents (continued)
Add or Skip ................................................................ 28
Lock Options .............................................................. 28
Lock/Unlock Default Code Function........................... 29
Edit Code ................................................................... 29
Audio Level Options ................................................... 29
Antenna Aiming .......................................................... 29
Memory Options ......................................................... 30
Time Based Features ................................................. 30
Clock ...................................................................... 31
Format .................................................................... 31
Time Zone .............................................................. 31
Daylight Savings Time (DST) Observance............. 31
Alarm Clock: .............................................................. 32
Set Alarm (Default = Off) ....................................... 32
Alarm Time ............................................................. 32
Program Alert ............................................................. 32
Time/Day ................................................................ 33
Channel .................................................................. 33
Program Alert On/Off ............................................. 33
Sleep Mode ................................................................ 33
Factory Default ........................................................... 34
Troubleshooting............................................................... 35
Specifications .................................................................. 36
© 2005 SIRIUS Satellite Radio Inc. “SIRIUS”, the SIRIUS dog logo and channel names and logos are trademarks of SIRIUS Satellite
Radio Inc. “NFL” and the NFL Shield design are registered trademarks of the National Football League. NHL and the NHL Shield are
registered trademarks of the National Hockey League. “NBA” and the NBA silhouette logo are registered trademarks of NBA
Properties, Inc. All other trademarks, service marks and logos are the property of their respective owners. All Rights Reserved.
Hardware, subscription and activation fee required. For full Terms & Conditions, visit sirius.com. Prices and programming are subject
to change. Not available in HI and AK. Equipment and subscription sold separately. Installation required with some equipment.

SR-H550 User Guide
4
health. If the liquid crystal fluid contacts your
body or clothing, immediately wash it off with
soap and water.
• Do not open the Receiver.
• Do not install the Receiver in a position that
obstructs viewing of any home entertainment
component, such as a Television or stereo
system indicators and displays.
• Remember to provide a clear line-of-sight to
the front of the Receiver so that commands
from the Remote Control are not obstructed in
any way.
• By adhering to these safety precautions and
warnings, serious accidents and/or personal
injury can be avoided.
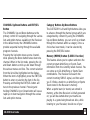
FCC Warning
This equipment may generate or use radio
frequency energy. Changes or modifications to
this equipment may cause harmful interference
unless the modifications are expressly approved
in this user guide. The user could lose the
authority to operate this equipment if an
unauthorized change or modification is made.
Safety Precautions
Warning
Take the following precautions to prevent fire and
avoid personal injury:
• The use suggestions contained in this user
guide are subject to any restrictions or
limitations that may be imposed by applicable
law—the purchaser should check applicable
law for any restrictions or limitations before
installing and/or operating this Receiver.
• Failure to follow these safety instructions and
warnings may result in a serious accident.
• To avoid short circuits, never put or leave any
metallic objects (coins, tools, etc.) inside the
Receiver.
• If the Receiver emits smoke or unusual odors,
turn the power off immediately.
• Do not drop the Receiver or subject it to strong
shocks.
• If the LCD display on the Receiver becomes
damaged or broken, do not touch the liquid
crystal fluid. The fluid can be dangerous to your

SR-H550 User Guide
5
Note: This Receiver complies with the
interference limits relative to a Class B digital
device, applicable under Part 15 of the FCC Rules
regarding installation in a residential environment.
These rules are designed to provide reasonable
protection against harmful interference. This
equipment may cause harmful interference to
radio communications if it is not installed and
used in accordance with these instructions.
However, there is no guarantee that interference
will not occur in a particular installation. If this
equipment does cause harmful interference to
radio reception, which can be determined by
turning the equipment off and on, the user is
encouraged to try to correct the interference by one
of more of the following measures:
• Reorient or relocate the receiving antenna.
• Increase the separation between the equipment
and the Receiver.
• Connect the equipment to a different circuit
from the one to which the Receiver is
connected.
• Consult the dealer or an experienced radio
technician for help.
Cleaning the Receiver
If the Receiver becomes dirty, turn its power off
and wipe it clean with a soft dry cloth. Do not use
hard cloths, paint thinner, alcohol, or other volatile
solvents to clean the Receiver. These may cause
damage to the plastic or remove indicator
characters.

SR-H550 User Guide
6
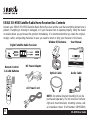
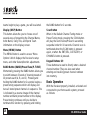
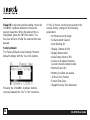
Unpack your SIRIUS SR-H550 Satellite Radio Home Receiver and be sure that everything shown here is
present. If anything is missing or damaged, or if your Receiver fails to operate properly, notify the dealer
or retailer where you purchased the product immediately. It is recommended that you retain the original
receipt, carton, and packing materials in case you need to return or ship your Receiver in the future.
SIRIUS SR-H550 Satellite Radio Home Receiver Box Contents
Remote Control
& 2 AAA Batteries
Window Sill Antenna
Audio Cable
DC Power Adapter
NOTE: An optional bracket mounting kit can be
purchased separately. The kit consists of left and
right rack mount brackets, mounting screws, and
an installation sheet. (Part Number: SRH550BK)
Digital Satellite Radio Receiver
Optical Cable
User Manual
AC Power Cord
User Guide
SIRIUS Satellite Radio Hom
e Rec
eiver
SR-H550
35(9
',5(&7
',63
&$7 6(/
&+
&+
&$7
0(02
%$1'0(18
65+
&+$11(/
6,*1$/
67$1'%<
32:(5
&$7(*25<
65+6LULXV6DWHOOLWH5DGLR7XQHU
6&$1 (176(/ ',63
0(02
0(18 %$1'

SR-H550 User Guide
7
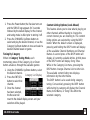
1. POWER Button : Turns the Receiver On
and Off.
2. Remote Control Receiver: Receives signals
from the wireless remote control.
3. CHANNEL Buttons (
∧ ∨∧ ∨
∧ ∨∧ ∨
∧ ∨
))
))
): Navigates through
channels and display screens, and highlights
items on the display. Pressing the
∧∧
∧∧
∧
button
increases or moves up in the menus. Pressing
the
∨∨
∨∨
∨
button decreases or moves down in the
menus.
4. CATEGORY Buttons (< >): Navigates through
the Category List Screen which displays SIRIUS
Channel Categories.
SR-H550 Receiver Controls and Features
Continued...
5. Signal Indicator: When lit this indicates that
the Receiver is receiving the SIRIUS signal from
the antenna.
6. Standby Indicator: When lit this indicates that
the Receiver is turned off, but not unplugged.
7. Display Screen: This area displays tuning and
information about the Receiver.
8. Preset Number Buttons (0-9): Sets and selects
preset channels.
9. SCAN button: Causes the Receiver play each
Channel/Preset in ascending order for 10
seconds. Scan is terminated when the SCAN,
&+$11(/
6,*1$/
67$1'%<
32:(5
&$7(*25<
65+6LULXV6DWHOOLWH5DGLR7XQHU
6&$1 (176(/ ',63
0(02
0(18 %$1'

SR-H550 User Guide
8
Remote Control
The wireless remote control supplied with the
Receiver is capable of operating most of the
features from a remote location. Each button on
the remote control functions in the same way as
the button on the Receiver. For a full description
of a keypad button or function, refer to the
sections in this user manual where they are
described. For optimal operation of the remote
control, always aim it toward the Remote Sensor
on the front panel of the Receiver.
Installing Batteries in the Remote:
1. Remove the battery cover.
2. Install the two AAA batteries as indicated.
3. Replace the battery cover.
ENT/SEL, CATEGORY, or CHANNEL button is
pressed.
10. ENT/SEL Button: Selects an option displayed
on the screen.
11. DISPLAY (DISP) Button: Toggles display
between category/channel name and time/date.
Holding this button down switches the display
to the channel list mode.
12. MEMORY (MEMO) Button (S-Seek
Function): Saves and recalls Artist Names/
Song Titles and Sports Teams. You can store
up to 20 Artist Name/Song Title combinations,
or Sports Teams.
13. MENU Button: Used to access menu options
to change the Receiver setup and features.
14. BAND Button (P.Tune): Pressing and releasing
switches between the three preset banks (A, B.
C), which hold ten presets each. Pressing and
holding enables the “Preset Tune Mode”, which
allows for viewing and listening of stored presets
with the Channel Buttons.

SR-H550 User Guide
9
1. POWER: Turns the Receiver ON and OFF.
2. DISPLAY: Allows the user to choose one of three
ways of presenting the Artist Name and Song
Title information on the display screen.
3. DIRECT: Allows for direct channel entry using
the number buttons.
4. CH+/-: Used to access channels in ascending
and descending order. Also used for navigation
through the Receiver’s menus.
5. MEMO: Used to capture and store current
program information.
6. MENU: Used to access “Menu Options” which
displays the Receiver setup menu plus other
feature/function adjustments.
7. CAT+/-: Used to access program categories in
ascending and descending order.
8. SEL: Used to confirm selection in various lists
and menus.
9. BAND: Used to switch between the 3 preset
bands (A, B, and C) and to activate preset
tuning.
10.0-9: These buttons are used to directly enter a
desired channel number. They are also used
when entering and recalling preset channel
numbers into memory.
11. MUTE: Allows the user to silence the audio.
12.PREV: Returns to the previously selected
channel.
35(9
',5(&7
',63
&$7 6(/
&+
&+
&$7
0(02
%$1'0(18
65+

SR-H550 User Guide
10
Introduction
The SIRIUS Home Satellite Radio Receiver must
be connected to the windowsill antenna (supplied)
to process the SIRIUS signal. The Receiver
recognizes and decodes the incoming SIRIUS
program information and provides an audio signal
to your stereo receiving equipment or other audio
output equipment.
NOTE: The SIRIUS signal can be received and
processed virtually anywhere as long as there are
no obvious obstructions such as nearby buildings,
high terrain, parking garages or tunnels which
would block the satellite antenna from having a
clear view of the sky. The Receiver is typically
installed in an accessible location close to your
stereo receiving equipment to permit integration
as part of your home stereo system.
Installing Your SIRIUS Receiver
You can begin to enjoy Sirius Satellite Radio as
soon as the Receiver installation is complete. Set
up your Receiver using the following installation
instructions.
Installation/Wiring Precautions
1. Make sure the power supply adapter cable is
not connected to an AC wall outlet until all
interconnections have been made and
verified. The power supply adapter cable
should be connected last.
2. Do not install the Receiver in the locations
exposed to direct sunlight or in areas subject
to extreme temperatures.
3. Incorrect installation may cause damage to
the system.
4. During antenna placement/installation, refer
to the Antenna Placement procedure on page
12.

SR-H550 User Guide
11
Cabling Interconnections
Set up your system using the diagram at the right
and by following the installation instructions, or
enlist the help of a professional installer.
Installing/Positioning the Antenna
For best reception, the supplied antenna should
be placed near a window; some repositioning may
be required to achieve optimum results. The
following guidelines are recommended:
1. Terrestrial repeaters are located in major cities.
In those areas, it may be possible to locate the
windowsill antenna away from a window and
still get satisfactory reception.
2. You can also place the antenna outside (on a
roof structure), provided it is clear of any
overhead obstructions.
NOTE: Because of the orbiting characteristics of
the SIRIUS satellites, the strength of the SIRIUS
signal may change over time. In most cases
however, the signal should be available
continuously. If you experience a loss of signal or
audio, reposition the antenna inside the home or
outside as necessary.
Connection Diagram
7RVOLQN'LJLWDO2XWSXW
WR'LJLWDO2SWLFDO
,QSXWRI6WHUHRRU
(QWHUWDLQPHQW6\VWHP
'&9,1
67(5(2287
237,&$/
287
5/
$17(11$
3RZHU6XSSO\
$QWHQQD
7R$X[LOLDU\$XGLR
,QSXWRI6WHUHRRU
(QWHUWDLQPHQW
6\VWHP

SR-H550 User Guide
12
Antenna Placement
Consult the map for the direction in which to point
the antenna. Aim the portion of the antenna with
the logo on it toward the location indicated by the
X on the map. To ensure strong reception in your
home, observe the following antenna placement
considerations:
1. BEST reception can be achieved by placing the
antenna outside on the roof. The antenna is
waterproof. This position will afford the best
view of the sky for best reception. When placed
in this location, an antenna extension cable
may be required.
2. BETTER reception can be achieved by placing
the antenna outside a window, or by mounting
it to the side of the house. In either case, try to
achieve the best possible clear view of the sky.
3. GOOD reception can be achieved by placing
your antenna in or near a window, since
terrestrial transmitters are used in major
metropolitan areas to boost signal strength. In
these cases, the antenna can be placed inside
the home. Try to achieve a clear unobstructed
view of the sky.
Area 1: Aim East, Northeast, or Southeast
Area 2: Aim North or Northeast
Area 3: Aim North or Northwest
Area 4: Aim West, Northwest or Southwest
Area 5: Aim Straight Up

SR-H550 User Guide
13
“DC12V IN” receptacle on the back of the
Receiver.
10.Plug the adapter into a 110VAC wall
receptacle. The front panel STANDBY LED will
light red.
11.You are now ready to enjoy SIRIUS
programming within your home.
Testing Antenna Signal Strength
The stronger the signal strength, the less likely it
is that you will experience an interruption of the
audio. In the menu options of the Receiver (refer
to page 25), there is an antenna aiming display
which shows two bar graphs indicating signal
strength. This can be a useful tool for positioning
the antenna in an optimal location for maximum
signal reception.
4. Turn the Receiver and listen for audio. If no
audio is heard, aim the antenna in different
directions until audio output is heard. This is
the desired antenna aiming position.
5. After determining the optimum antenna aiming
position, turn the Receiver off, disconnect the
power adapter from the wall outlet receptacle,
and disconnect the antenna cable.
6. Plan the routing of the antenna cable to the
Receiver. Be sure you avoid any obstructions
that could crimp, kink, or twist the cable. Use
protective grommets wherever rough openings
are encountered.
7.
If the antenna is mounted outside, route the
cable from the antenna position to the interior
of the home, working the cable through the
basement, under a window sill, etc., and make
adjustments and take up slack whenever
necessary.
8. Plug the antenna cable into the ANTENNA
connector on the back of the Receiver.
9. Plug the DC Adapter cable jack into the

SR-H550 User Guide
14
Operating the Receiver
When power is available to the Receiver, note that
the STANDBY LED lights red. In addition, the AC/DC
power adapter LED lights green when properly con-
nected to a AC wall outlet.
Activating your SIRIUS Subscription
Before you can listen to the SIRIUS service, you
must subscribe to the SIRIUS Satellite Radio
service.
1. Make sure that the Receiver is properly
connected and that its antenna is oriented to
receive the SIRIUS satellite signal.
2. Press the POWER button to turn the Receiver
on. After displaying the SIRIUS logo, the
Receiver will update all the SIRIUS channels.
The display will read “UPDATING CHANNELS”
on the top line and “X% Completed” (0%-20%-
40%-60%-80%-100%) on the bottom line until
the update completes.
NOTE: Don’t push any buttons or perform any
operations until updating has been completed.
3. Once updated and the SIRIUS channels are
received, the display will display, “To Activate
Call / 1-888-539-SIRIUS” and will place you in
The Preview Channel. Channel 184 is SIRIUS’
preview channel. You will not be able to tune to
any other channels until you activate your
SIRIUS subscription.
4. Press the MENU button to enter the “Menu
Options” mode. The “SIRIUS ID” menu option
will now be highlighted.
5. Push the Select button to select “SIRIUS ID”.
This will display your Receiver’s unique 12-digit
SIRIUS ID Number (SID). This SID number
should also be available on the SR-H550
packaging. Write the number down and have
your credit card handy. A space has been
provided at the end of this manual to write your
SID.
6. Contact SIRIUS on the Internet at:
https://activate.siriusradio.com/
Follow the prompts to activate your
subscription, or you can also call SIRIUS toll-
free at:
1-888-539-SIRIUS (1-888-539-7474)

SR-H550 User Guide
15
CHANNEL Up/Down Buttons and ENT/SEL
Button
The CHANNEL Up and Down buttons are the
primary control for navigating through the various
lists and option menus available on the Receiver.
In the default mode, the CHANNEL buttons
provide sequential tuning through the available
program channels.
Pressing the Up button tunes up one channel,
while pressing the Down button tunes down one
channel. When in the list mode, pressing the Up
and Down buttons scrolls up and down through
the various menus and lists. The current selection
from the list will be highlighted on the display.
When the item is highlighted, press the ENT/SEL
button to enter or selection the item in the list.
Pressing and holding the ENT/SEL button will
tune to the previous channel. Pressing and
holding CHANNEL Up or Down button will cause
rapid up or down navigation through the various
lists and option menus.
Category Buttons Up/Down Buttons
The CATEGORY Left and Right buttons allow you
to advance through the channel groups which are
categorized by content. By using the CHANNEL
Up and Down buttons, you can scroll up or down
through the channels within a category. Once a
choice has been made, it can be selected by
pressing the ENT/SEL button.
Memory (MEMO) Button (S-SEEK Function)
This feature allows you to capture and store the
current program Artist/Song or Sports Team
information from the currently tuned channel. You
can store up to 20 Artist/Song or Sports Team
combinations. The Receiver will search the
current incoming SIRIUS signal, and then alert
you if it finds a match to an Artist/Song or Sports
Team stored in the Receiver’s memory.
When a sports team (or teams) are stored in
memory, at the time Receiver is initially powered
on, you will be alerted when your teams are
playing in a game being broadcast. Also, while
listening to your Receiver, should one of your

SR-H550 User Guide
16
teams begin to play a game, you will be alerted.
Display (DISP) Button
This button allows the you to choose one of
several ways of presenting the Channel Name,
Artist Name, Song Title, and Sports Team
information on the display screen.
Menu (MENU) Button
The MENU Button is used to access “Menu
Options” which displays the Receiver’s setup
menu, and other feature/function adjustments.
BAND Button (BAND)/Preset Tune (P. TUNE)
Momentarily pressing the BAND button allows you
to switch between 3 bands of channel presets of
10 presets each (A, B, and C). Pressing and
holding the BAND button for 2 seconds begins a
preset tuning sequence which will display and
tune all stored preset channels in sequence. This
is indicated by a reverse image of the channel
number and band preset number on the display.
Preset tuning continues until you decide to
terminate this function by pressing and holding
the BAND button for 2 seconds.
Scan Button
When in the Default Channel Tuning mode or
Preset Tuning mode, pressing the SCAN button
will play the next Channel/Preset in ascending
sequential order for 10 seconds. Channel scan is
terminated when the SCAN button is pressed
again, or when the ENT/SEL, CATEGORY, or
CHANNEL button is pressed.
Keypad Buttons 0-9
These buttons are used to directly enter a desired
channel number. They are also used when
entering and recalling preset channel numbers
into memory.
Basic Operation
With the Receiver properly installed, activated and
connected to your home audio system, proceed
as follows:

SR-H550 User Guide
17
1. Press the Power button; the Receiver turns on
and the SIRIUS logo appears for 3 seconds
followed by the default display for the channel
and tuning mode in effect prior to turning it off.
2. Press the CHANNEL Up/Down buttons to
select and play the desired channel, or use the
Category Up/Down buttons to tune and select a
desired channel based on genre.
Tuning By Category
When in Category Tuning Mode, each
momentary press of the Category Up or Down
button advances through the available genres:
1. Using the CHANNEL Up/Down buttons, select
the desired channel.
2. Press the ENT/SEL
button to select that
channel.
3. Once the channel
has been selected,
the Receiver will
revert to the default display screen and your
selection will be played.
Category List Display
Content Listing Options (Look Ahead)
This feature allows you to view what is playing on
other channels without having to change the
current channel you are listening to. The content
listing options are selected by using the DISP
button. When the default screen is displayed,
pressing and holding the DISP button will display
all the available Channel Numbers and Channel
Names. A second press of the DISP button will
display all currently available Artists. A third press
of the DISP button will display Song Titles.
While in the Category List menu, pressing the
DISP button changes Channel List to Artist List.
The available content listing now displays
information by the Artist Name.
The DISP button is also used during category
tuning. Consecutively pressing the DISP button
while tuning by category will display the Channel
Name, Artist Name, or Song Title within the
selected category.

SR-H550 User Guide
18
While the preceding screens are displayed,
pressing the CHANNEL Up/Down buttons allow
navigation through the list. When the desired
selection is highlighted, press the ENT/SEL button
and your selection will be played.
Direct Tuning
Channels can also be directly accessed by
pressing the ENT/SEL button and using the 0-9
number keys on to numerically enter the desired
channel number. Once the desired channel
number has been entered, press the ENT/SEL
button again to select the channel and begin
playing.
Setting/Using Channel Preset Buttons
The Receiver uses 10 preset buttons, and there
are three banks of preset memory locations for a
total of 30 presets. These banks are designated A,
B, and C, and can be selected using the BAND
button. The display in the lower right hand side
changes to show the corresponding preset bank.
Each bank will store 10 user-preferred channel.
Select the desired channel you wish to save into
memory by using the CHANNEL Up/Down
buttons, by the direct tuning method, or by the
category tuning method. With the desired channel
playing, press and hold any of the numbered
keypad buttons (0-9). The corresponding preset
number will flash and a confirmation tone will be
heard, confirming that the preset has been stored.
Continue this procedure for storing all the desired
channels. To retrieve a preset channel,
momentarily press and release the number button
corresponding to the desired channel.
Category Artist
Name Display
Category Song
Title Display

SR-H550 User Guide
19
Preset List Mode
To search for a preset, press and hold the BAND
button to enter Preset Tune mode. When in the
Preset Tune mode, press and hold the DISP
button for 2 seconds. This exits normal preset
tuning and enters a 6-line menu mode which
displays the preset number (A-1) and the 20-
character channel name. While in the Preset List
menu mode, pressing the DISP button once will
change to Artist Name List, and a second press of
the DISP button changes to Song Title List.
While the contents of the preset listing are
displayed, press the CHANNEL Up/Down buttons
Press and
Hold BAND
Button
Press and
Hold BAND
Button
to navigate through the list. When the desired
selection is highlighted, press the ENT/SEL button
and the selected channel will be played.
Display Button (DISP)
Pressing the DISP button from the default display
toggles between the Artist Name/Song Title/Sports
Team screen, or large letter format. When the
letter size changes, the field will scroll. This
feature is useful when viewing the display at a
distance.
NOTE: The field will scroll only if the length of the
Artist Name, Song Title, or Sports Team cannot be
viewed in its entirety.

SR-H550 User Guide
20
Pressing and holding the Display button will enter
the Channel List mode. While in the Channel List
mode, any subsequent press of the DISP button
will display program information by Artist Name,
Song Title, Sports Team, or Channel Name.
Pressing and holding the DISP button will exit the
Channel List mode and return to the previously
selected tuning/display mode.
Memory Button (S-Seek Function)
This feature allows the user to capture and store
the current program data information (Artist
Name, Song Title, or Sports Team), up to a total
of 20 listings. The Receiver has the capability to
search the current incoming SIRIUS signal and
alert the user when a saved Song Title or Artist is
being played.
When a team (or teams) are stored in memory, at
the time the Receiver is initially powered on, you
will be alerted if your teams are playing in a game
being broadcast. Also, while listening to your
Receiver, should one of your teams begin to play
a game, you will be alerted.
Storing Song Titles or Sports Games
1. Song Titles: While the Receiver is in either of
the two standard display modes, momentarily
pressing and releasing the MEMO button
stores the current program data information to
the Receiver memory. A “Stored” pop-up
screen, followed by “X Used/ Y Empty” screen
will each appear for 1 second, X being the total
number of listings saved in memory, and Y
being the total number of memory listings still
available for storage.
To ensure that no duplicate entries are stored
in memory, the Receiver will check the stored
Page is loading ...
Page is loading ...
Page is loading ...
Page is loading ...
Page is loading ...
Page is loading ...
Page is loading ...
Page is loading ...
Page is loading ...
Page is loading ...
Page is loading ...
Page is loading ...
Page is loading ...
Page is loading ...
Page is loading ...
Page is loading ...
Page is loading ...
Page is loading ...
Page is loading ...
Page is loading ...
-
 1
1
-
 2
2
-
 3
3
-
 4
4
-
 5
5
-
 6
6
-
 7
7
-
 8
8
-
 9
9
-
 10
10
-
 11
11
-
 12
12
-
 13
13
-
 14
14
-
 15
15
-
 16
16
-
 17
17
-
 18
18
-
 19
19
-
 20
20
-
 21
21
-
 22
22
-
 23
23
-
 24
24
-
 25
25
-
 26
26
-
 27
27
-
 28
28
-
 29
29
-
 30
30
-
 31
31
-
 32
32
-
 33
33
-
 34
34
-
 35
35
-
 36
36
-
 37
37
-
 38
38
-
 39
39
-
 40
40


Sirius Satellite Radio SR-H550, Home Tuner User manual
- Category
- Video games
- Type
- User manual
- This manual is also suitable for
Ask a question and I''ll find the answer in the document
Finding information in a document is now easier with AI
Related papers
-
Sirius Satellite Radio SCFM1, Starbase User manual
-
Sirius Satellite Radio XTR8CK User manual
-
-
Tivoli Audio Model Satellite User manual
-
Polk Audio SRH1000 User manual
-
-
-
-
-
Other documents
-
HOME MAISON ALQWG=12 /12556 User guide
-
Advent SIRIUS CE1000SR User manual
-
-
Clarion Calypso User manual
-
-
JVC KT-SR2000 User manual
-
-
Audiovox 128-6812 User manual
-
-