Page is loading ...

Installation Guide
Toilet Seat with Bidet Functionality
and In-line Water Heater
M product numbers are for Mexico (i.e. K-12345M)
Los números de productos seguidos de
M corresponden a México (e.j.
K-12345M)
Français, page “Français-1”
Español, pagina “Español-1”
K-4709
1054180-2-F

Tools and Materials
Before You Begin
WARNING: Risk of electric shock, fire, or personal injury.
This product must be grounded. Connect only to a dedicated
120 VAC, 60 Hz circuit protected by a minimum 15 A
Ground-Fault Circuit-Interrupter (GFCI) or Residual Current
Device (RCD).
WARNING: Risk of electric shock. Do not immerse or flush
the product with water.
CAUTION: Risk of property damage. Damaged water
connections may leak. Do not push or pull on the water
connection between the seat and the water supply stop.
NOTICE: To avoid possible product malfunction, do not plug in the
seat until instructed to do so.
NOTICE: Do not install this seat in a location where: (1) water
might be splashed on the product or (2) excessive moisture, high
humidity levels, or condensation are present. This will avoid
damage to the electronic components.
Observe all local plumbing, electrical, and building codes.
Do not use an extension cord with this product.
Only connect the seat to a cold water supply of drinking quality
water at a pressure of 20-80 psi (139-551 kPa).
Unplug the seat and drain the seat if the functions of the seat will
not be operated for an extended period of time.
Blade
Screwdriver
Adjustable
Wrench
Drill
1054180-2-F 2 Kohler Co.

Wiring Requirements
WARNING: Risk of electric shock, fire, or personal injury.
This product must be grounded and connected only to a
dedicated, nominal 120 VAC, 60 Hz circuit protected by a
minimum 15 A Ground-Fault Circuit-Interrupter (GFCI) or
Residual Current Device (RCD).
NOTICE: Consult your local electrical codes before determining the
connection type and the electrical outlet location. The temporary
connection may not be permitted by local electrical codes and the
electrical outlet location may be specified.
NOTICE: To avoid possible product malfunction, do not plug in the
seat until instructed to do so.
Preferred Connection
WARNING: Risk of electric shock, fire, or personal injury.
This product must be grounded with a grounding plug with
grounding pin, as illustrated. Using another type of
grounding plug is dangerous and may result in electric shock,
fire, or personal injury.
Connect the grounding plug with grounding pin into the
grounded outlet.
Temporary Connection
NOTICE: The cover screw must be grounded through the house
wiring. Connecting the adapter with grounding screw tab to the
Grounded Outlet
Seat
Cover Screw
Adapter
Grounded Outlet Box
Grounding Pin
Grounding
Screw Tab
Temporary ConnectionPreferred Connection
Kohler Co. 3 1054180-2-F

Wiring Requirements (cont.)
cover screw will NOT ground the unit. If there is any doubt
whether the cover screw is grounded, have it checked by a qualified
electrician or service professional.
With the cover screw and adapter properly grounded,
temporarily connect the adapter with the grounding screw tab to
the grounded outlet.
1054180-2-F 4 Kohler Co.

1. Install an Electrical Outlet
WARNING: Risk of electric shock, fire, or personal injury.
This product must be grounded. Connect only to a dedicated
120 VAC, 60 Hz circuit protected by a minimum 15 Amp
Ground-Fault Circuit-Interrupter (GFCI) or Residual Current
Device (RCD).
Do not use an extension cord with the product.
NOTE: Follow local codes when determining the electrical outlet
location.
Route the electrical and install to a 120 V GFCI- or RCD-protected
receptacle. The electrical outlet should be located within 32″ (813
mm) of the toilet to accommodate the length of the power cord.
2. Preparation
If applicable, remove the existing toilet seat.
Turn off the water supply to the toilet.
Flush the toilet to relieve any pressure from the water supply
hoses.
Disconnect the water supply hose from the toilet fill valve.
Supply Stop
GFCI-Protected
Receptacle
Kohler Co. 5 1054180-2-F

3. Install the Mounting Plate
NOTE: Inspect the toilet mounting holes for threaded inserts.
Follow the steps applicable to your mounting hole type.
For Toilets with Threaded Inserts
Position the mounting plate over the mounting holes on the bowl.
Slide a washer onto each of the bolts (provided).
Insert a bolt through the mounting plate and position the washers
so they rest in the grooves of the mounting plates.
Loosely thread the bolts into the inserts. The nut must be loose
enough to allow the seat to be adjusted.
For All Other Installations
Position the mounting plate over the mounting holes on the bowl.
Insert each bolt through the mounting plate and into the
mounting holes.
Position the washers to rest in the grooves of the mounting plate.
Loosely thread a nut onto each of the bolts. The nut must be
loose enough to allow the seat to be adjusted.
Mounting Plate
Bolt
Washer
Nut
1054180-2-F 6 Kohler Co.

4. Install the Seat
Slide the seat onto the mounting plate until you feel it snap into
place.
NOTE: The mounting plate may need to be adjusted to properly
align the seat.
To adjust the seat position, remove the seat by pressing in the
release button and sliding the seat forward.
Reposition the mounting plate as needed.
Reinstall the seat. Repeat the adjustment procedure as needed
until the seat is properly aligned.
Once the seat is positioned as desired, remove the seat and
tighten the mounting plate.
Reinstall the seat.
Release Button
Mounting
Plate
Kohler Co. 7 1054180-2-F

5. Connect the Water Supply
NOTICE: Use care to avoid cross threading or overtightening the
connections. Use an adjustable wrench to tighten one-quarter turn
past hand-tight.
NOTICE: Use the supply hoses provided with the fixture. Do not
reuse any old hoses.
Connect the T-valve with gasket directly to the toilet fill valve.
Connect the T-valve to the seat with the hose.
Connect the water supply to the T-valve.
Turn on the water supply.
Check all connections for leaks and make any adjustments as
needed.
Hose
Supply Stop
T-Valve
Gasket
Hose
1054180-2-F 8 Kohler Co.

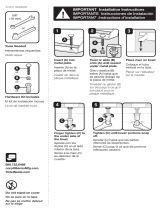
6. Install the Remote Control Holder
Choose a mounting location for the remote control holder that is
easily accessible while sitting on the seat.
The remote control holder can be installed using screws or
double-sided tape. Choose your preferred method for securing
the remote control holder. Follow only the instructions for your
chosen installation method.
Install Using Screws
NOTE: Anchors may not be needed for installation to certain
materials. Use the appropriate mounting hardware for your
particular installation surface.
Position the remote control holder at the desired mounting
location with the rectangular indent toward the bottom (as
shown).
Using a pencil, mark the two mounting hole locations. Set the
holder aside.
For installation to stud or other wood surface: Drill a 1/16″ hole
at each of the marked locations.
For installation using wall anchors: Drill a 1/4″ hole at each of
the marked locations. Install the wall anchors into the holes.
Position the remote control holder over the mounting holes so the
rectangular indent is toward the bottom.
Secure the remote control holder with the screws.
Remote Holder
If used, apply tape here.
Anchors
Screws
Remote
Covers
Kohler Co. 9 1054180-2-F

Install the Remote Control Holder (cont.)
Install the caps to cover the screws.
Position the remote control into the holder with the user preset
icons facing up.
Install Using Double-Sided Tape
Remove the paper from one side of each of the tape squares.
Install a tape square in each of the rectangular areas located on
the back of the remote control holder.
NOTE: Before mounting the remote control holder, verify the
rectangular indent is toward the bottom.
Remove the paper from the tape squares.
Press the remote control holder into place.
Position the remote control into the holder with the user preset
icons facing up.
1054180-2-F 10 Kohler Co.

7. Installation Checkout
Attach the clips (provided) evenly along the hose and power cord
to organize them.
Wrap the toilet seat with plastic wrap. This will prevent water
from spraying from the toilet during testing.
Plug the power cord into the GFCI- or RCD-protected receptacle.
When the seat is plugged in, the seat will go through a power-up
sequence where the wands will extend and retract, and the power
indicator LED will flash amber then green.
The seat is activated by skin-to-seat contact. Unless otherwise
stated, the seat must be occupied to activate the functions. To
activate the seat controls for testing purposes, when facing the
toilet, place your hand or a damp wash cloth on the right side of
the seat approximately 1/3 from the front of the seat (as
illustrated).
Supply Stop
GFCI-Protected
Receptacle
Kohler Co. 11 1054180-2-F
/