3
• Do not place an electronic or gas heater near the product or dispose of any burning materials such
as a lit cigarette in the toilet. This may result in fire or product deformation. Do not place any con-
tainers filled with water or other liquids, food, metallic objects, or any flammable material on top of
the product. If foreign material enters the product, this may result in electric shock or fire.
• Do not use the product in locations exposed to excessive moisture and do not splash water onto the
product.
• While cleaning the bathroom, pull the power plug out of the electrical outlet and exercise caution to
ensure that water or cleaning supplies do not splash onto the bidet. Failure to do so may result in
electric shock or fire.
• If foreign material enters the product, pull the power plug out of the electrical outlet, turn o the
main water valve, and call the Brondell Service Center.
• Do not disassemble, repair, or modify the product yourself.
• Do not use the product while wet from bathing or showering.
• Do not place or store the product where it can fall or be pulled into a tub or sink.
• Do not place in or drop the product into water or any other liquid.
• Do not reach for the product if it has fallen into water. Unplug the product immediately and call the
Brondell Service Center.
• Do not use the product if it is not working properly. Please unplug the product immediately, close
the main water supply valve, and call the Brondell Service Center at 888-542-3355. Failure to do so
may result in electric shock, fire, or flooding.
SAFETY INFORMATION (cont.)
IMPORTANT SAFEGUARDS
DANGER
SAVE THESE INSTRUCTIONS
Failure to observe the following warnings may result in electric shock, fire, personal injury, property
damage or product damage.
• Do not plug in, operate, or store the unit in locations where flammable or combustible materials are
used or kept.
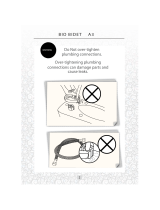
• Do not use industrial water, or gray water for the supply, as this may cause skin damage or disease.
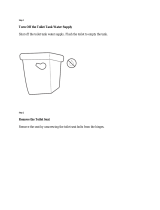
• Turn o the main water supply valve when cleaning.
• For children and seniors who may have diculties with adjusting temperatures or those with sen-
sitive skin or impaired heat sensitivity, set the temperature of the wash spray and seat to “low” or
“o” to prevent burning.
• Close supervision is necessary when this product is used by children, seniors, or persons requiring
general assistance.
• Do not press the buttons using excessive force.
• Do not stand on top of or place any heavy objects onto the seat cover.
• Use this product for its intended use only, as described in this manual. Do not use any attachments
that are not recommended by Brondell.
WARNING