Page is loading ...

Installation Guide
Toilet Seat with Bidet Functionality
and Tank Water Heater
M product numbers are for Mexico (i.e. K-12345M)
Los números de productos seguidos de
M corresponden a México (e.j.
K-12345M)
Français, page “Français-1”
Español, pagina “Español-1”
K-4737
1097712-2-B

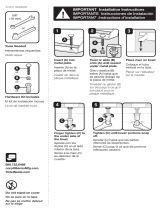
Tools and Materials
Before You Begin
WARNING: Risk of electric shock, fire, or personal injury.
This product must be grounded and connected only to a
dedicated, nominal 120 VAC, 60 Hz circuit protected by a
minimum 15 A Ground-Fault Circuit-Interrupter (GFCI) or
Residual Current Device (RCD).
WARNING: Risk of electric shock. Do not immerse or flush
the product with water.
NOTICE: Do not plug in the seat until instructed to do so. This will
avoid possible product malfunction.
NOTICE: Do not install this seat in a location where: (1) water
might be splashed on the product or (2) excessive moisture, high
humidity levels, or condensation are present. This will avoid
damage to the electronic components.
NOTICE: Do not use an extension cord with this product.
Observe all local plumbing, electrical, and building codes.
Only connect the seat to a cold water supply of drinking quality
water at a pressure of 20-80 psi (139-551 kPa).
Adjustable
Wrench
Flat-Blade
Screwdriver
Plus:
Plastic Wrap
GFCI or RCD Electrical Outlet
Damp Wash Cloth (optional)
Grounding Adapter with Cover Screw (optional)
1097712-2-B 2 Kohler Co.

1. Prepare Electrical Connections
WARNING: Risk of electric shock, fire, or personal injury.
This product must be grounded and connected only to a
dedicated, nominal 120 VAC, 60 Hz circuit protected by a
minimum 15 A Ground-Fault Circuit-Interrupter (GFCI) or
Residual Current Device (RCD).
NOTICE: This product is factory equipped with a specific electrical
cord and plug to permit connection to a proper electric circuit. Make
sure that the product is connected to an outlet having the same
configuration as the plug. Do not use an adapter with this product.
Do not modify the plug provided – if it will not fit the outlet, have
the proper outlet installed by a qualified electrician. If the product
must be reconnected for use on a different type of electric circuit, the
reconnection should be made by qualified service personnel.
NOTICE: Consult your local electrical codes before determining the
connection type and the electrical outlet location. The temporary
connection may not be permitted by local electrical codes and the
electrical outlet location may be specified.
Preferred Connection
Determine the electrical outlet location. The electrical outlet
should be located within 12″ (305 mm) of the toilet to
accommodate the length of the power cord. Do not use an
extension cord.
Cover Screw
Adapter
Temporary ConnectionPreferred Connection
Grounding
Screw Tab
12"
(305 mm)
Grounding Pin
Kohler Co. 3 1097712-2-B

Prepare Electrical Connections (cont.)
Route the electrical wires, then install and ground the electrical
outlet. This electrical outlet must be a dedicated, nominal 120
VAC, 60 Hz circuit protected by a minimum 15 A Ground-Fault
Circuit-Interrupter (GFCI) or Residual Current Device (RCD). Do
not plug the seat into the electrical outlet at this time.
Temporary Connection
NOTICE: Unless the outlet cover screw is grounded through the
house wiring, attaching the adapter grounding screw tab to the
cover screw will NOT ground the unit. If there is any doubt
whether the cover screw is grounded, have it checked by a qualified
electrician or service professional.
A temporary connection with a two-prong adapter may be made
where local codes permit, provided the adapter is grounded.
2. Prepare the Toilet
If applicable, remove the existing toilet seat.
Turn off the water supply to the toilet.
Flush the toilet to relieve any pressure from the water supply
hoses.
Disconnect the water supply hose from the toilet fill valve.
1097712-2-B 4 Kohler Co.

3. Install the Mounting Plate
NOTE: Inspect the toilet mounting holes for threaded inserts.
Follow the steps applicable to your mounting hole type.
For Toilets with Threaded Inserts
Position the mounting plate over the mounting holes on the bowl.
Slide a washer onto each of the bolts (provided).
Position each washer with the offset hole toward you and the
forward tab pointing down. Insert a bolt through each washer, as
shown. The bolt will freely spin.
Insert each bolt through the mounting plate and into the threaded
inserts. Position the washers to rest in the grooves of the
mounting plate.
Loosely thread the bolts into the inserts. The nut must be loose
enough to allow the seat to be adjusted.
For All Other Installations
Position the mounting plate over the mounting holes on the bowl.
Position the washer with the offset hole toward you and the
forward tab pointing up. Insert the bolt through the washer, as
shown. The bolt will not spin.
Insert each bolt through the mounting plate and into the
mounting holes.
Position the washers to rest in the grooves of the mounting plate.
Bolt
Washer
Nut
Bolt
Washer
Mounting
Plate
Threaded Inserts
All Other Installations
Mounting
Plate
Kohler Co. 5 1097712-2-B

Install the Mounting Plate (cont.)
Loosely thread a nut onto each of the bolts. The nut must be
loose enough to allow the seat to be adjusted.
1097712-2-B 6 Kohler Co.

4. Install the Seat
For All Installations
Slide the seat onto the mounting plate until you feel it snap into
place. Verify the seat is properly aligned.
Threaded insert alignment: Remove the seat by pressing in the
release button and sliding the seat forward. Reposition the
mounting plate and seat, then reinstall the seat. Repeat this
procedure until the seat is properly aligned.
All other alignment: With the seat still on the toilet, loosen the
nuts on the underside of the toilet. Reposition the seat, then
retighten the nuts. If the nuts cannot be loosened or tightened, it
is likely that the washers are positioned incorrectly, allowing the
bolt to spin. Refer to the ″Install the Mounting Plate″ section for
proper positioning of the washer.
For Toilets with Threaded Inserts
Remove the seat.
Using a flat-blade screwdriver, tighten the bolts to secure the
mounting plate.
Reinstall the seat.
For All Other Installations
Using an adjustable wrench, fully tighten the nuts.
Release Button
Mounting Plate
F
R
O
N
T
R
EAR
P
U
L
S
A
T
E
S
T
O
P
H
2
O
T
EM
P.
S
EA
T
Kohler Co. 7 1097712-2-B

5. Complete the Installation
WARNING: Risk of property damage. Do not push or pull
on the water connection between the seat and the water
supply stop. This will prevent water leakage.
NOTICE: Use care to avoid cross threading or overtightening the
connections. Use an adjustable wrench to tighten one-quarter turn
past hand-tight.
NOTICE: Use the supply hoses provided with the fixture. Do not
reuse any old hoses.
Connect the T-valve with gasket directly to the toilet fill valve.
Connect the thin hose to the T-valve.
Connect the thick hose to the T-valve and supply stop.
Turn on the water supply.
Check all connections for leaks and make any adjustments as
needed.
Thick Hose
Supply Stop
T-Valve
Gasket
Thin Hose
1097712-2-B 8 Kohler Co.

6. Installation Checkout
Attach the clips (provided) evenly along the hose and power cord
to organize them.
Wrap the toilet seat with plastic wrap. This will prevent water
from spraying from the toilet during testing.
Plug the power cord into the electrical outlet. The seat will go
through a power-up sequence where the power indicator LED
will flash amber. Once the power-up sequence is complete and
the tank is full, the indicator will turn green.
Face the toilet, then place your hand or a damp wash cloth on the
right side of the seat approximately one-third the way back from
the front of the seat (as illustrated).
Proceed to the ″Keypad and Panel Diagram″ and “Operation”
sections in the Homeowners Guide to test the various seat
functions.
Power Button
Plastic Wrap
Clips
Kohler Co. 9 1097712-2-B
/