Page is loading ...

TROFFER RETROFIT INSTALLATION
RTLED1X4, 2X2 & 2X4
Thank you for buying RAB lighting xtures. Our goal is to design the best quality products to get the job done right. We’d like to hear your comments.
Call the Marketing Department at 888-RAB-1000 or email: marketing@rablighting.com
SAFETY INSTRUCTIONS
WARNING - Risk of fire or electric shock. Luminaire wiring and electrical parts may be damaged when drilling for
installation of LED retrofit kit. Check for enclosed wiring and components.
WARNING - Risk of fire or electric shock. Install this kit only in luminaires that have the construction features and
dimensions shown in the photographs and/or drawings and where the input rating of the retrofit kit does not exceed the
input rating of the luminaire.
Only those open holes indicated in the drawings may be made or altered as a result of kit installation. Do not leave any
other open holes in an enclosure of wiring or electrical components.
Do not make or alter any open holes in an enclosure of wiring or electrical components during kit installation.
IMPORTANT
READ CAREFULLY BEFORE INSTALLING FIXTURE. RETAIN THESE INSTRUCTIONS FOR FUTURE REFERENCE.
RAB xtures must be wired in accordance with the National Electrical Code and all applicable local codes. Proper grounding
is required for safety. THIS PRODUCT MUST BE INSTALLED IN ACCORDANCE WITH THE APPLICABLE INSTALLATION CODE BY A
PERSON FAMILIAR WITH THE CONSTRUCTION AND OPERATION OF THE PRODUCT AND THE HAZARDS INVOLVED.
Make certain power is OFF before installing or maintaining xture.
WARNING - To prevent wiring damage or abrasion, do
not expose wiring to edges of sheet metal or other
sharp objects to lampholder lead wires by employing
applicable connectors.
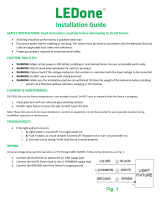
RECESSED CEILING MOUNTING
The xture is suitable only for INDOOR RECESSED CEILING
application. To mount in an insulated or non-insulated
ceiling exposed Flat Tee Grid Ceiling follow the steps below.
1. Remove existing lamps, door frame (if applicable),
reector and cover. Depending on clearance space,
ballast may need to be removed.
2. Gently lift the original luminaire housing and slide in both
side brackets between the housing and the T-grid. Lower
the housing to rest on the brackets, securing them in
place. (g. 1 & 2)
3. Hang the retrot kit body by hooking the T-hinges into
the respective on one mounting brackets. (g. 3)
4. Attach the safety cables to the original luminaire housing
using the self-tapping hex screws provided.
5. Connect the retrot kit power to the AC power. Insert the
black wire (line) from the power into the provided LED
quick connector marked with a black circle. Insert the
white wire (neutral) into the unmarked port. Connect the
power supply to the retrot kit.
6. Wire the existing xture’s green wire (ground) to the
retrot kit’s green wire. If a ground wire is missing from
the power supply, attach the retrot kit’s ground wire
directly to the luminaire housing.
7. For 4ft long xtures, secure the housing by locking to the
side bracket. Secure the left and center bracket together
and then right side latch. Be sure the side bracket is
pushed close to retrot kit.
T- Hinges
Tee-Grid Bar
Housing
Fig. 1
Fig. 2
Fig. 3

TROFFER RETROFIT INSTALLATION
RTLED1X4, 2X2 & 2X4
Thank you for buying RAB lighting xtures. Our goal is to design the best quality products to get the job done right. We’d like to hear your comments.
Call the Marketing Department at 888-RAB-1000 or email: marketing@rablighting.com
Easy Answers
rablighting.com
Visit our website for product info
Tech Help Line
Call our experts: 888 722-1000
e-mail
Answered promptly - [email protected]
Free Lighting Layouts
Answered online or by request
© 2018 RAB LIGHTING Inc.
Northvale, New Jersey 07647 USA
TROFFER RETROFIT -0918
Note: These instructions do not cover all details or variations in equipment nor do they provide for every possible situation during installation, operation
or maintenance.
CLEANING & MAINTENANCE
CAUTION: Be sure xture temperature is cool enough to
touch. Do not clean or maintain while xture is energized.
1. Clean polycarbonate lens & xture with non-abrasive
cleaning solution.
2. Do not open xture to clean the LEDs. Do not touch the
LEDs.
TROUBLESHOOTING
1. Check that the line voltage at xture is correct. Refer to
wiring directions.
2. Be sure the xture is grounded properly.
010V DIMMABLE WIRING
Universal voltage driver permits operation at 120V thru
277V, 50 or 60 Hz. 0-10V control wires must be rated for 300V
minimum. For 0-10V Dimming, follow the wiring directions
shown below.
1. Connect the black xture lead to the LINE supply lead.
2. Connect the white xture lead to the COMMON supply
lead.
3. Connect the GROUND wire from xture to supply ground.
Do NOT connect the GROUND of the dimming xture to
the output.
4. Connect the violet xture lead to the (V+) DIM lead.
5. Connect the gray xture lead to the (V-) DIM lead.

TROFFER RETROFIT INSTALLATION
RTLED1X4, 2X2 & 2X4
Thank you for buying RAB lighting xtures. Our goal is to design the best quality products to get the job done right. We’d like to hear your comments.
Call the Marketing Department at 888-RAB-1000 or email: marketing@rablighting.com
46.625
[1184,28]
47.750
[1212,85]
11.800
[299,72]
2.712
[68,87]
46.625
[1184,28]
47.750
[1212,85]
23.790
[604,27]
2.644
[67,16]
47.75” 47.75”46.625”46.625”
11.8”
23.79”
2.71”
2.64”
23.750
[603,25]
23.810
[604,77]
2.653
[67,39]
22.625
[574,68]
23.75”
23.81”
22.625”
2.653”
DIMENSIONS OF 1X4 KIT
DIMENSIONS OF 2X4 KIT
DIMENSIONS OF 2X2 KIT

19724 MICROWAVE SENSOR FOR D10
Thank you for buying RAB lighting xtures. Our goal is to design the best quality products to get the job done right. We’d like to hear your comments.
Call the Marketing Department at 888-RAB-1000 or email: marketing@rabweb.com
IMPORTANT
READ CAREFULLY BEFORE INSTALLING FIXTURE. RETAIN THESE INSTRUCTIONS FOR FUTURE REFERENCE.
19724 is used with a120-277VAC dimmable driver and comes with a sensor antenna. Sensor is shipped with Factory Settings
outlined below under DIP Switch Settings. If settings other than factory pre-sets are desired, the consumer may change DIP
Switch Settings. For more detailed control of the sensor, the consumer can purchase MVSREM wireless commissioning tool
(remote) to re-program sensor settings.
SPECIFICATIONS
Sensor is not suitable for wet locations.
DIP Switch Settings
Switch positions referred to as R for right position and L for left position when
looking at sensor in orientation shown in Fig. 2, in which all switches are R.
See Fig. 1 and 2 for each setting’s corresponding switches. Setting options for
each category are noted in (parenthesis) below.
Factory Settings: designated in bold for each category
Detection Area:
Time Delay: how long lamp remains on at 100% after last
recognized motion
• 100% (RR)
• 75% (RL)
• 50% (LR)
• 10% (LL)
• 5s (RRR)
• 30s (RRL)
• 1min (RLR)
• 5min (RLL)
• 10min (LRR)
• 20min (LRL)
• 30min (LLL)
Fig. 2
Adjustable
Detection Area
Time Delay
Daylight
Sensor
Cut O
Period
Dim Level
Sensor
Antenna
Interface
+
-
0-10V
L’ N N L
DIP Switches
Daylight Sensor:
Cut O Period: how long reduced light output lasts after
time delay period before xture switching o
Dim Level: light output level after time delay
• Disabled (RR)
• 5 fc (Daylight) (RL)
• 1 fc (Twilight) (LR)
• .2 fc (Darkness) (LL)
• 0s (RRR)
• 10s (RRL)
• 1min (RLR)
• 5min (RLL)
• 10min (LRR)
• 30min (LRL)
• 1hr (LLR)
• Always (LLL)
• 10% (RR)
• 20% (RL)
• 30% (LR)
• 50% (LL)
L R
DIP SWITCHES
Factory Settings shown below
L’ = driver
L = power source
Fig. 1
19724 Sensor Antenna

19724 MICROWAVE SENSOR FOR D10
Thank you for buying RAB lighting xtures. Our goal is to design the best quality products to get the job done right. We’d like to hear your comments.
Call the Marketing Department at 888-RAB-1000 or email: marketing@rabweb.com
SENSOR COVERAGE DIAGRAM
Below diagrams represent best average coverage from lab testing. Actual
coverage may vary as metal on the xtures can interfere with microwaves from
the sensor
Ceiling mounted detection pattern (m)
ceiling mounting height (m)
60
5
10%
30%
50%
75%
100%
OPERATION
Multi-level Dimming:
• 100% light
• Dimmed to: 10, 20, 30, 50*%
*50% not on remote
• O
Cut O Time Adjustment:
• Once room is vacated, light dims to selected % after
chosen hold time elapses
Daylight Sensing:
• Surrounding natural light keeps xture light o until
room is occupied and natural light levels drop to
selected level
8 Hour* Manual Mode:
• Turn xture o-on 3 times within 3 seconds
• Green LED on antenna will ash and xture will ash 3
times if done correctly
• Fixture will remain 100% for 8 hours, then sensor will
come on automatically
• To cancel, turn the xture o-on within 1 second
*Times out after one 8-hour cycle
Ambient Daylight Threshold*:
• Turn xture o-on 2 times within 2 seconds
• Green LED on antenna will ash slowly for 5
seconds and xture will blink twice if done correctly
• Surrounding fc will be measured and recorded for 1
second
• Green LED on antenna and xture will light for 10 sec-
onds to indicate successful fc recording
• Most recent fc measurement overwrites any prior
*DIP settings (pg 1) and ambient lux overwrite eachother depending on latest action
Scene Mode:
• 100% detection range and 10% cut o dimming
Scene 1 (SC1): 1 min hold-time, 10 min cut o period,
.2 fc daylight sensor
Scene 2 (SC2): 5 min hold-time, 10 min cut o period,
.2 fc daylight sensor
Scene 3 (SC3): 10 min hold-time, 30 min cut o
period, 1 fc daylight sensor
Scene 4 (SC4): 10 min hold-time, always on bi-level
cut o period, 5 fc daylight sensor
SENSOR TECHNICAL DATA
Capacitance Load: 400W at 120V, 800W at 230V, 1000W at 277V
Operating Temperature: -20°C to +60°C (-4°F to +140°F)
Relay: Zero-cross relay
Maximum Mounting Height: 5m
Customizable Detection Area: 10, 50, 75 or 100%
Time Delay: 5s, 30s, 1min, 5min, 10min, 20min, 30min
Cut O Period: 0s, 10s, 1min, 5min, 10min, 30min, 1hr, Bi-Level
Cut O Dimming Level: 10, 20, 30, 50%
Cut O Power: Less Than 1W
Daylight Threshold: About .2-5 fc or Disabled
Sensor Principle: High Frequency
Microwave Frequency: 5.8GHz +/- 75MHz
Microwave Power: <0.2mW
Detection Range Max: 16m across, 10m high
Detection Angle: About 30 to 150 degrees
9
0
4
10%
30%
50%
75%
100%
Wall mounted height (m)
Wall mounted detection pattern (m)
Fig. 3
Fig. 4

19724 MICROWAVE SENSOR FOR D10
Thank you for buying RAB lighting xtures. Our goal is to design the best quality products to get the job done right. We’d like to hear your comments.
Call the Marketing Department at 888-RAB-1000 or email: marketing@rabweb.com
TROUBLESHOOTING
If the sensor does not detect motion as expected:
• Check xture mounting to compare xture location and
sensor coverage with the coverage diagrams on pg 2
• Adjust xture location as necessary
Fixture will not light/sensor does not detect motion:
• Make sure ON/OFF button was not selected as this
results in disabling the sensor
• Check all settings to be sure there is no conicting
selection with the ambient light level
Fixture and sensor are too active:
• Check detection area setting and reduce coverage as
needed
• Increase time delay and/or adjust cut o period.
Basic Function Overview:
REMOTE CONTINUED
Detection Range Button Group: assigns detection range of
10, 50 or 100%; use coverage diagrams on pg 2 for guidance.
To limit area in which motion will set o sensor, use a smaller
percent. The sensor will not detect motion outside of 100%
and the xture will not light.
Time Delay Button Group: assigns hold time of 30 seconds,
1 minute, 5 minutes, 10 minutes, or 30 minutes
Cut O Button Group: assigns cut o period of 0 seconds,
10 seconds, 1 minute, 10 minutes, 30 minutes, or 1 hour. 0
seconds gives xture on/o control rather than dimming.
+ ∞ keeps the light on always (if daylight sensor is disabled)
with Bi-Level dimming control.
Dim Level: assigns level of 10, 20, or 30% for dimmed light
output after time delay passes
Note: These instructions do not cover all details or variations in equipment nor do they provide for every possible situation during installation operation or maintenance.
Easy Installation & Product Help
Tech Help Line
Call our experts 888 RAB-1000
©2016 RAB LIGHTING Inc.
No
rthvale, New Jersey 07647 USA
rabweb.com
Visit our website for product info
email
Answered promptly sales@rabweb.com
19724 IN 0616
REMOTE
Sensor will beep one time
to indicate remote recieved
signal successfully
Remote settings will override
DIP Switch settings
ON/OFF: disables sensor;
light is permanently* on or o
*un-do permanent on/o by
selecting either Auto-Mode, RESET,
or any Scene mode button
Auto Mode: sensor activates
and all previously selected
settings remain programmed
RESET: overrides selected
settings; reverts to DIP
settings
Dim buttons: + dims up and
- dims down, adjusting lamp
brightness
Black Button: no function
Test 2s: automatic* test mode with 2 second time delay;
disables cut o period and daylight sensor
*un-do automatic test mode by selecting either RESET, any Scene mode
button, or hold time
Power 100% & Power 80%: adjusts power output; to save
energy select Power 80%. Must return to full output after initial
10,000 hours of LEDs by pressing Power 100%.
Group B:
Yellow Sun Button: Ambient Daylight Threshold;
records surrounding lux level and overwrites previously
recorded value
.2, 1 and 5 fc: sets daylight sensor at respective ambient light
values
Disable: disables daylight sensor; any motion
registered by sensor activates xture light
SC1, SC2, SC3, SC4: assigns one of 4 pre-set scenes; see
“Operation” on pg 2 for scene descriptions
Fig. 5
100%
Reduced Level
Occupied Time Delay Cut O
Group B
Fig. 6
/