Page is loading ...

Cassette Systems
Fabrication & Installation Instructions
Cassette 80, 100, 120

2
All Cassette Components

3
Cassette Systems Tools Needed _______________________________________ page 4
Cassette 80 _____________________________________________________ page 5-12
System Diagram-Skyline _________________________________________ page 5
System Diagram-R-Series ________________________________________ page 6
Components Needed ____________________________________________ page 7
Fabrication Instructions ______________________________________ page 8-10
Installation Instructions _____________________________________ page 11-12
Cassette 100 ___________________________________________________ page 13-19
System Diagram-Skyline ________________________________________ page 13
System Diagram-R-Series _______________________________________ page 14
Components Needed ___________________________________________ page 15
Fabrication Instructions _____________________________________ page 16-17
Installation Instructions _____________________________________ page 18-19
Cassette 120 ___________________________________________________ page 20-27
System Diagram-Skyline ________________________________________ page 20
System Diagram-R-Series _______________________________________ page 21
Components Needed ___________________________________________ page 22
Fabrication Instructions _____________________________________ page 23-25
Installation Instructions _____________________________________ page 26-27
Inserting Zebra Fabric __________________________________________ page 28-29

4
All Cassette Systems
Tools Needed
Cutting Table for Fabric
Saw
Screwdriver/Power Drill
Screws (screw type dependent on surface you are installing
the shade)
Hammer/Mallet
Measuring Tape
Level
Ladder
Eye Protection
Gloves

5
Skyline
Cassette 80 System Diagram
1
Mounting Brackets
2
Cassette 80 Headrail
3
End Cap
4
RollEase Tube
5
Skyline Clutch
6
Skyline Bracket
7
Skyline Pin End (Idler)
8
Bead Chain or Cord
9
SafetyHold 3
10
Fabric
11
Internal Hem Bar
12
External Hem Bar
13
Hem Bar End Cap & Screw
Note: Use either Internal OR External Hem Bar
with End Cap & Screws
2
2
3
4
9
11
12
1
5
6
7
8
10
13
Cassette 80
Maximum Roll Diameter is 1-7/8”
Cassette 80 Headrail is
2.39” Tall x 2.94” Wide

6
R-Series
Cassette 80 System Diagram
1
Mounting Brackets
2
Cassette 80 Headrail
3
End Cap
4
RollEase Tube
5
R-Series Clutch
6
R-Series Brackets
7
R-Series End Plug (Idler)
8
Bead Chain or Cord
9
Safety Hold3
10
Fabric
11
Internal Hem Bar
12
External Hem Bar
13
External Hem Bar End Caps & Screws
1
2
4
6
3
7
5
8
10
11
12
13
9
Cassette 80
Note: Use either Internal OR External Hem Bar with End
Cap & Screws
Maximum Roll Diameter is 1-7/8”
Cassette 80 Headrail is
2.39” Tall x 2.94” Wide

7
Fabrication Instructions
Skyline & R-Series Cassette 80
Single & Multiple In-Line Shades
Components Needed
Quantity
Description
Item #
Image
1
Roller shade assembled to
tube with clutch and idler
inserted.
N/A
1
Cassette 80 Headrail
CRVXX
2
Cassette 80 End Caps
CRECXX
Skyline-
2 brackets
or R-Series-
1 set
Cassette Brackets
Choose R-Series or Skyline
CRUBKT – R-Series
CRUSLB - Skyline
R-Series Skyline
Varies by
Shade Width
(1 bracket
every 18”)
Cassette 80 Mounting
Brackets
VRBKT15
One per
linked shade
Intermediate Brackets
For use when using multiple
in-line manual shades
together with multiple
clutches
CRIMBKT – R-Series
CRUSLBI - Skyline
R-Series Skyline
Cassette 80

8
Skyline & R-Series
80 Cassette Fabrication
Step 1: Cut (use RollEase deduction charts to calculate width of cuts)
1a. Cut Headrail
1b. Cut Tube
1c. Cut Hem Bar
1d. Cut Fabric for shade and for Cassette Insert (Cassette insert should be cut 2-1/2”-2-9/16” wide,
and as long as the total length of the headrail)
Step 2: Assemble Shade per usual assembly method
2a. Attach Hem Bar to Fabric
2b. Attach Fabric to taped tube
2c. Attach Bead Chain or Cord to Clutch
2d. Attach Tension Device to Cord or Bead Chain (see Safety Hold3 Instructions)
Step 4: Insert Clutch and Idler
4a. Insert Clutch
4b. Insert Idler
4b
Step 3: Insert Fabric Strip into Cassette Headrail
3a. Apply two sided tape to headrail
3b. Insert fabric into groove in headrail, beginning on either side rolling fabric over the headrail
and slipping into the groove on the opposite side.
Slowly tuck in fabric starting at one side
of the cassette and moving to the other
3a
3b
Skyline
4a
R-Series
4b
4a
Cassette 80

9
Skyline & R-Series
Cassette 80 Fabrication
Step 5: Assemble Headrail and assembled shade
5a. Lay Cassette on table or flat surface. Insert one bracket by aligning bracket into grooves on
inside top of the headrail. Push bracket all the way in. (be careful not to bend bracket if using a
mallet or hammer to tap brackets in) If desired, use screws to hold brackets in place
5b. Insert clutch and idler end of tube onto the bracket. (see note for R-Series)
5c. Attach End Caps (if desired)
5a.
5a.
Skyline
For Skyline, insert idler side first. Push into bracket, and slip
clutch side down until the hooks engage in the holes in the
bracket and lock into place.
5b.
R-Series
5b.
5b.
5b.
5a.
Gently tap
bracket into
headrail
Push tip of
pin end into
hole in the
center of the
Skyline
bracket
Slide the
center of the
end plug into
the tab on
the R-Series
bracket
Engage the
hooks of the
Skyline clutch
into the slots
in the
bracket and
secure in
place
Slide the hole in
the center of the
clutch into the
tab on the R-
Series Bracket
When fabricating R-Series,
you must insert one bracket
and insert clutch or pin end,
and then simultaneously
insert other bracket into
the opposite end.
Lay plastic across cassette before
laying in tube with fabric. After
installing shade, tie around the top
of cassette to prevent shade from
falling during shipment to
customer.
Cassette 80

10
Skyline & R-Series
Cassette 80 Fabrication
Step 6: Pack and Ship
6a. Wrap Cassette in correct packaging material and box. Include Mounting Brackets and Screws
6b. Your Cassette is now ready to ship.
Note: Be sure that Safety Tags are attached and the shade is inoperable and compliant with the WCMA
Standards.
5c.
Cassette 80
Attach End Caps

11
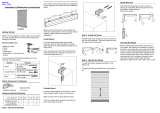
Skyline & R-Series – Inside & Outside Mount
Cassette 80 Installation
Step 1: Carefully remove shade from the box and package wrapping.
Step 2: Install Mounting Brackets using correct screws.
Tip: Mounting Brackets should be placed approximately every 18”
Step 3: Install Headrail
Snap Headrail into place by sliding groove in back of headrail into the bottom of the mounting
bracket. Push forward and up, snapping the headrail into the top of the mounting bracket.
TIP: Installation is the same in both Skyline and R-Series applications. However, deduction data will vary.
Inside Mount
Outside Mount
Inside Mount
Outside Mount
Cassette 80
For inside mount,
use holes on top
of bracket
For outside mount,
use holes on the back
of bracket
Be sure the hooked
part of the bracket is
fully engaged around
the headrail

12
Skyline & R-Series – Inside & Outside Mount
Cassette 80 Installation
Step 4: Install Tension Device (See instructions for Safety Hold3)
Installed Shade: Inside Mount
Cassette 80
Installed Shade: Outside Mount

13
Skyline
Cassette 100 System Diagram
1
Mounting Brackets
2
Cassette 100 Headrail
3
End Cap
4
RollEase Tube
5
Skyline Clutch
6
Skyline Bracket
7
Skyline Pin End (Idler)
8
Bead Chain or Cord
9
SafetyHold 3
10
Fabric
11
Internal Hem Bar
12
External Hem Bar
13
Hem Bar End Cap & Screw
7
12
1
2
3
4
5
6
8
9
10
11
13
Cassette 100
Note: Use either Internal OR External Hem
Bar with End Cap & Screws
Maximum Roll Diameter is 2-1/2”
Cassette 100 Headrail is
3.10” Tall x 3.72” Wide

14
R-Series
Cassette 100 System Diagram
1
Mounting Brackets
2
Cassette 100 Headrail
3
End Cap
4
RollEase Tube
5
R-Series Clutch
6
R-Series Bracket
7
R-Series End Plug (Idler)
8
Bead Chain or Cord
9
SafetyHold 3
10
Fabric
11
Internal Hem Bar
12
External Hem Bar
13
External Hem Bar End Caps & Screws
Note: Use either Internal OR External Hem Bar with End Cap
& Screws
Cassette 100
3
7
1
2
6
12
13
11
10
5
8
9
4
Maximum Roll Diameter is 2-1/2”
Cassette 100 Headrail is
3.10” Tall x 3.72” Wide

15
Fabrication Instructions
Skyline & R-Series Cassette 100
Components Needed
Quantity
Description
Item #
Image
1
Roller shade
assembled to tube
with clutch and idler
inserted.
N/A
1
Cassette 100 Headrail
CRV100XX
2
Cassette 100
End Caps
CREC100XX
Choose 2 -
Skyline
brackets
or 1 set -
R-Series
Brackets
Cassette Brackets
Choose R-Series or
Skyline
CRUBKT53 – R-Series
CRUSLB - Skyline
R-Series Skyline
Varies by
Shade
Width (1
bracket
every 18”)
Cassette 100
Mounting Brackets
HDBKTXX
Varies by
Shade
Width (1
bracket
every 18”)
Intermediate Brackets
For use when using
multiple in-line
manual shades
together with multiple
clutches
CRIMBKT53 –
R-Series
CRUSLB660I or
CRUSLB680I - Skyline
R-Series Skyline
Cassette 100

16
Skyline & R-Series
100 Cassette Fabrication
Step 1: Cut (use RollEase deduction charts to calculate width of cuts)
1a. Cut Headrail
1b. Cut Tube
1c. Cut Hem Bar
1d. Cut Fabric for shade and for Cassette Insert (Cassette insert should be cut 3”-3-1/8” wide, and
as long as the total length of the headrail)
Step 2: Assemble Shade
2a. Attach Hem Bar to Fabric
2b. Attach Fabric to taped tube
2c. Attach Bead Chain or Cord to Clutch
2d. Attach Tension Device to Cord or Bead Chain (see Safety Hold3 Instructions)
Step 4: Insert Clutch and Idler
4a. Insert Clutch
4b. Insert Idler
4b
Step 3: Insert Fabric Strip into Cassette Headrail
3a. Apply two sided tape to headrail
3b. Insert fabric into groove in headrail, beginning on either side rolling fabric over the headrail
and slipping into the groove on the opposite side.
Slowly tuck in fabric starting at one side of
the cassette and moving to the other
3a
3b
Skyline
4a
4a
R-Series
4b
Cassette 100

17
Skyline & R-Series
Cassette 100 Fabrication
Step 5: Assemble Headrail and assembled shade
5a. Lay Cassette on table or flat surface. Insert one bracket by aligning bracket into grooves on
inside top of the headrail. Push bracket all the way in. (be careful not to bend bracket if using a
mallet or hammer to tap brackets in) If desired, use screws to hold brackets in place
5b. Insert clutch and idler end of tube onto the bracket. (see note for R-Series)
5c. Attach End Caps (if desired)
5a.
Step 6: Pack and Ship
6a. Wrap Cassette in correct packaging material and box. Include Mounting Brackets and Screws
6b. Your Cassette is now ready to ship.
Note: Be sure that Safety Tags are attached and the shade is inoperable and compliant with the WCMA
Standards.
Skyline
For Skyline, insert idler side
first. Push into bracket, and
slip clutch side down until
the hooks engage in the
holes in the bracket and
lock into place.
5b.
Lay plastic across cassette before
laying in tube with fabric. After
installing shade, tie around the top
of cassette to prevent shade from
falling during shipment to
customer.
5c.
R-Series
5b.
5a.
5c.
5b.
Gently tap bracket into
headrail
Push tip of pin end into
hole in the center of the
Skyline bracket.
Engage the hooks of the
Skyline clutch into the slots
in the bracket and secure in
place.
5a.
5b.
When fabricating R-Series,
you must insert one bracket
and insert clutch or pin end,
and then simultaneously
insert other bracket into
the opposite end.
Cassette 100
5b.
Attach End Caps

18
Skyline & R-Series – Inside Mount & Outside Mount
Cassette 100 Installation
Step 1: Carefully remove shade from the box and package wrapping.
Step 2: Install Mounting Brackets using correct screws.
Tip: Mounting Brackets should be placed approximately every 18”
Step 3: Install Headrail
Snap Headrail into place by sliding groove in back of headrail into the bottom of the mounting
bracket. Push forward and up, snapping the headrail into the top of the mounting bracket.
TIP: Installation is the same in both Skyline and R-Series applications. However, deduction data will vary.
Inside Mount
Outside Mount
Cassette 100
For inside mount,
use holes on top
of bracket
For outside mount,
use holes on the back
of bracket
Be sure the hooked
part of the bracket is
fully engaged around
the headrail

19
Skyline & R-Series– Inside & Outside Mount
Cassette 100 Installation
Step 4: Install Tension Device (See instructions for Safety Hold3)
Installed Shade: Inside Mount
Installed Shade: Outside Mount
Cassette 100

20
Skyline
Cassette 120 System Diagram
1
Mounting Brackets
2
Cassette 120 Headrail
3
End Cap
4
RollEase Tube
5
Skyline Clutch
6
Skyline Bracket
7
Skyline Pin End (Idler)
8
Bead Chain or Cord
9
SafetyHold 3
10
Fabric
11
Internal Hem Bar
12
External Hem Bar
13
Hem Bar End Cap & Screw
1
2
3
4
5
6
7
8
9
10
11
12
13
Cassette 120
Note: Use either Internal OR External Hem Bar with
End Cap & Screws
Maximum Roll Diameter is 2-7/8”
Cassette 120 Headrail is
3.88” Tall x 4.43” Wide
/