Page is loading ...

6 7 8 9
3
1
2
4
5
LOAD OUT
L1
LOAD 2
IN L2
LOAD 2
OUT
L2
LINE
L1
NEUT. N
12VDC CLASS 1 OR 2 (SELV)
MAN
SW
NC NC
MS
+–+–
MS EM EM
EMER.
INPUT
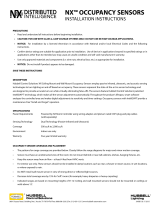
1. Line (Hot) - L1
2. Load - L1
3. Neutral - N
4. Load - L2
5. Load - L2
6. Manual Switch +
7. Manual Switch –
8. Emergency Interface +
9. Emergency Interface –
12VDC CLASS 1 OR 2 (SELV)
MAN
SW
NC NC
MS
+–+–
MS EM EM
EMER.
INPUT
Neutral
Neutral
Line
Line
Load
Load
LOAD OUT
L1
LINE
L1
NEUT. N
LOAD 2
IN L2
LOAD 2
OUT
L2
Emergency
Interface
Manual Switch
WARNINGS AND CAUTIONS:
For Occupancy Sensors installed to control Emergency Lighting Equipment:
If this equipment is being used for Emergency Lighting and Power Equipment, please adhere to the following information. This
equipment is rated for only 25C if used on Emergency Lighting Equipment. Apply the "Emergency Circuits" label (provided) to the
front cover.
IMPORTANT SAFEGUARDS
When using electrical equipment, basic safety precautions should always be followed, including the following:
a) READ AND FOLLOW ALL SAFETY INSTRUCTIONS.
b) DO NOT use outdoors.
c) DO NOT mount near gas or electric heaters.
d)
Equipment should be mounted in locations and at heights where it will not readily be subjected to tampering by unauthorized personnel.
e) The use of accessory equipment not recommended by manufacturer may cause an unsafe condition.
f) DO NOT use this equipment for other than the intended use.
SAVE THESE INSTRUCTIONS
All servicing shall be performed by qualified service personnel. If any Emergency Circuits are fed or controlled from this panel,
it must be located electrically where fed from a UPS, generator, or other guaranteed source of power during emergencies and
power outage situations.
Ceiling Mounted Line Voltage Vacancy Sensor
California Title 20 Compliant
No Minimum Load Required
INSTALLATION INSTRUCTIONS
WARNINGS AND CAUTIONS:
• TO AVOID FIRE, SHOCK, OR DEATH; TURN OFF POWER AT CIRCUIT
BREAKER OR FUSE AND TEST THAT POWER IS OFF BEFORE WIRING!
• To be installed and/or used in accordance with appropriate electrical codes
and regulations.
• If you are unsure about any part of these instructions, consult an electrician.
• Sensors must be mounted on a vibration free surface.
• Do not terminate using data type wire, such as Cat 5/5E.
• Do not mount sensors closer than 10 feet to each other.
• All sensors must be mounted at least 6 feet away from air vents, air handlers,
and reflective surfaces (windows/mirrors).
NOTES
• Do not touch the surface of the lens. Clean outer surface with a damp cloth only.
• Operating Temperature: 32˚ to 104˚F (0˚ to 40˚C)
• Compatible with electronic and magnetic ballasts, electronic and magnetic low-voltage transformers, incandescent lamps,
and fans.
PK-93874-10-00-2C
CATALOG ITEMS
Cat. No. Description Voltage
Range
Current
Consumption
Coverage Suggested Mounting
Location
O4C10-MDW
2-Way
Multi-Tech
120-277V,
50/60 Hz
60-30 ma 1000 sq. ft.
Mount in center of
room/area, 8-12 ft height
O4C15-IDW
Extended
Range
120-277V,
50/60 Hz
60-30 ma 1500 sq. ft.
Mount in center of
room/area, 8-12 ft height
O4C20-MDW
2-Way
Multi-Tech
120-277V,
50/60 Hz
60-30 ma 2000 sq. ft.
Mount in center of
room/area, 8-12 ft height
120 V
60 Hz
8 A, Electronic Ballast
277 V
60 Hz
5 A, Electronic Ballast
800 W/VA, Tungsten, Ballast 1200 VA, Ballast
1/4 Hp 1/3 Hp
Rating:
6A-6AX 250V 720-1440 W/VA 120-240 50HzM
The Line Voltage Vacancy Sensor monitors the space for vacancy. The lights can
be turned ON manually by pressing the low-voltage/momentary toggle switch.
The sensor turns the lights OFF when vacancy is detected and the delayed-
off time has expired. The sensor continually analyzes and adjusts to changing
conditions. The sensor uses the latest microprocessor-based technology which
permits it to continually adjust and optimize its performance. The combination of
ultrasonic (doppler shift) motion detection which gives maximum sensitivity and
infrared motion detection which gives higher false triggering immunity yields a
sensor with excellent performance.
TOOLS NEEDED TO INSTALL YOUR SENSOR
DESCRIPTION
• Slotted/Phillips Screwdriver
• Small Slotted Screwdriver
PARTS INCLUDED LIST
INSTALLING YOUR OCCUPANCY SENSOR
NOTE: Use check boxes when Steps are completed.
Step 1
WARNING: TO AVOID FIRE, SHOCK, OR DEATH; TURN
OFF POWER at circuit breaker or fuse and TEST that power is off
before wiring!
• Wire stripper
• Cutters
• Sensor (1)
• Mid-Range Lens (1)
• 360˚ Perforated Mask (1)
• 4" x 4" Mounting Plate (1)
• Emergency Label (1)
• Low Voltage Connector (1)
• #6-32 x 1-1/2" Screw (2)
• Half Mask (1)
• Tubing Barrier (1)
• Make sure that the ends of the wires from the electrical box are straight
(cut if necessary).
• Remove insulation from each wire in electrical box as shown.
• Wire per Specifications:
- Line, Neutral, Load Wires (Copper)
Wire range: #12-18 AWG, 3.3 - 0.75 mm square
Torque rating: 20 lb-in, 23 kgf-cm.
- Control Wires (Manual Switch and Emergency Interface)
Wire range: #16-26 AWG, 4.0 - 0.12 mm square
Torque rating: 2.5 lb-in, 2.88 kgf-cm.
Step 2 Identifying your wiring:
Step 3 Preparing and connecting wires:
Wire
Strip Gauge 3/4"
1. Insert wires into proper terminals. Use a screwdriver to turn terminal screws
clockwise and secure wires.
a) Line wire to Line terminal.
b) Neutral wire to Neutral terminal.
c) Load wires to Load terminals. NOTE: Both loads MUST be fed from the
same phase.
d)
Manual Switch and Emergency Interface to their respective marked terminals.
NOTE: When wiring Manual Switch and Emergency Interface Class 2, use
the provided tubing for insulation inside the junction box.
NOTE: Wires need to be inserted from the top through the wire holes
provided on the sensor and clamped down using the washer to the terminals.
Step 4 Installing your sensor:
Connect wires per WIRING DIAGRAM as follows:
Mount Sensor in Electrical Box
To mount inside 4" octagon 2.125" deep ceiling electrical box, refer to
Figure 1.
• Dress line voltage wires to provide
enough clearance in electrical box
when device is installed.
• Partially thread two #8-32 screws (not
included) into the mounting holes of
the electrical box.
• Pull out the two coasters that align with
the two screws.
• Align sensor so that it fits between the
mounting holes of the electrical box
and insert over mounting screws.
• Push in the two coasters that align with
the two screws.
• Tighten mounting screws firmly.
Figure 1
Light
pipe
Coaster
Wiring Diagram
Manual switch press will turn the lights ON. The sensor turns the lights OFF when
vacancy is detected and the delayed-off time has expired.
• Delayed-Off time: The sensor is designed to turn the lights OFF if no motion is
detected after a specified time. This length of time is called the delayed-off time
and is set using the timer (Black) knob on the sensor.
• Walk-through Mode: The walk-through feature is useful when a room is
momentarily occupied. The walk-through feature works as follows: When a
person enters the room and turns the lights ON with the manual switch. If the
person leaves the room before the default walk-through timeout of 2.5 minutes,
the sensor will turn the lights OFF 2.5 minutes later. If the person stays in the
room for longer than 2.5 minutes, the sensor will proceed with the standard
operation.
• Reset Device State: To reset Auto adapting settings to factory default.
• Manual ON/OFF Switch: Use to turn the lights ON or OFF by pressing the low
voltage momentary/toggle switch. Pressing manual switch will reset the time
delayed OFF timer and lights will turn OFF after the delayed-off timer expires.
• Emergency Interface: This input is intended for use with BMS (Building
Management System) or any contact closure to force the lights ON in case of
emergency. Lights will stay ON until emergency signal is cleared.
• Manual ON: Occupants must press the low voltage switch to turn the load ON.
When the occupancy sensor is the only input keeping the load ON, the load
turns OFF when the sensor time delay expires. If the sensor input re-triggers
within 30 seconds after the load turns OFF, the load turns ON again. After the
30 seconds expires with no sensor input, press the momentary switch to turn
the load ON.
Modes of Operation: Selectable using Bank B Dip Switches
Forced Mode: Both Loads will be overridden to a Forced ON or Forced OFF
State. Refer to Table 2 for switch settings.
1. Ensure power is ON.
2. Remove front cover.
3. Locate dip switch 1 in Bank B. B1 will be in the OFF position (Normal Mode)
from the factory.
4. To enable Forced Mode, move the switch to ON.
The Sensor continually analyzes the parameters of the motion detection signal
and adjusts its internal operation to maximize detection of motion while minimizing
the effects of noise (electrical noise, air currents, temperature changes, etc…).
Operation
When the sensor is first installed, the delayed-off time is based on the Time
adjustment settings. While the sensor is in use, the delayed-off time will change,
based on how the sensor adapts to the room conditions. The adapted settings can
be reset by moving B3 from OFF to ON to OFF position.
Occupancy Pattern Learning For Delayed-Off Time
The sensor will automatically change the Delayed-Off Time in response to
detected occupancy patterns. The Delayed-Off Time will be decreased if large
periods of vacancy are detected, which will result in energy savings. The Delayed-
Off Time will be increased if false-off conditions are detected.
Occupancy Pattern Learning for the Sensor
The sensor learns the occupancy patterns of a space during the course of a day,
for a seven day period. The sensor will adjust the sensitivity to make it less likely
to turn ON during a historically vacant time period.
Forced State: Override ON/Override OFF, Refer to Table 2 for switch settings.
1. Enable Forced Mode.
2. Locate dip switch 2 in Bank B. B2 will be in the OFF position from the factory.
3. To select the OFF state, move the switch to OFF. To select the ON state,
move the switch to ON.
Test Mode: To set the delayed-off time to 4 seconds for performing a walk test.
While the sensor is in test mode, the LED will flash YELLOW once every second.
Refer to Table 2 for switch settings.
1. Ensure power is ON.
2. Remove front cover.
3. Locate dip switch 3 in Bank B. B3 will be in the OFF position from the factory.
4. To enter Test mode, move switch to ON. If B3 is already in the ON position,
then Test mode can be entered by just moving it to the OFF and then ON
position. The timer will remain in the 4 second Test mode for 15 minutes,
then automatically exit Test mode and reset to the delayed-off time setting
as defined by the Black timer knob. To manually take the timer out of the
4 second Test mode, simply move switch B3 back to OFF. NOTE: Entering
Test mode will reset all adapted settings.
LEDs State: LEDs are enabled from the factory, to disable the LEDs move the
B4 dip switch to ON.
Reset Device State: If a sensor is moved to a new location it should be reset
before entering Test Mode.
Mount Sensor in Electrical Box with Mud Ring
To mount inside 4" square 1.5" deep ceiling electrical box with mud ring, refer to
Figure 2.
• Ensure that conduit/cable entry clamp is
located in corner of electrical box.
• Dress line voltage wires to provide
enough clearance in electrical box
when device is installed.
• Install a two-gang mud ring (not
included) on electrical box.
• Partially thread the two #6-32 screws
provided into the mounting holes of the
electrical box.
• Pull out the two coasters that align with
the two screws.
•
Align sensor so that it fits between the
mounting holes of the electrical box and
insert over mounting screws.
• Push in the two coasters that align with
the two screws.
• Tighten mounting screws firmly.
Figure 2
Light
pipe
Coaster
4" x 4"
Cosmetic
Adapter
VACANCY SENSOR OPERATION
AUTO ADAPTING
RED - Blinks upon PIR detection. LED can be disabled by moving
B4 to ON (See Table 2). Solid for 3 minutes then blinks for 3
minutes during photocell manual calibration. Solid when device
malfunctions.
GREEN - Blinks upon US detection. LED can be disabled by moving B4
to ON (See Table 2). Solid for 24 hours during photocell auto
calibration.
YELLOW - Blinks in test mode. Solid with emergency interface/BMS
input on.
BLUE - Blinks when the knob setting has changed.
LED INDICATORS
Default Settings:
Adjust knob settings as per "recommended manual settings,"
(refer to Figure 3 and Table 1).
All switches in the OFF position, except A3, A4 are set to ON
(refer to Table 2).
Figure 3 - Knob Settings
Delayed Off Time
(Black Knob)
PIR Sensitivity
(Red Knob)
US Sensitivity
(Green Knob)
30 sec
5 min
30 min
20 min
10 min
2.5x
AUTO
0.25x
SET/OFF
1x
SETPOINT
MIN%
25%
100%
75%
50%
MIN%
25%
100%
75%
50%
SETTINGS
TABLE 1: ADJUSTMENT KNOB SETTINGS
Knob
Color
Symbol Function Knob
Setting
Factory Default
Setting
Green
Set Ultrasonic
Range
Range Setting
Full CCW = min. (OFF)
Full CW = max.
50%
Red
Sets Infrared
Range
Range Setting
Full CCW = min. (OFF)
Full CW = max.
75%
Black
Delayed - OFF
Time
Full CCW = min. (30 sec)
Full CW = max. (30 min)
50%
(10 min)
TABLE 2: SWITCH SETTINGS
SWITCH SWITCH FUNCTIONS SWITCH SETTINGS
Bank A OFF ON
A1 Single/Multi-Tech Mode Multi-Tech Single Tech
A2 PIR/Ultrasonic Mode PIR Ultrasonic
A3 Manual Mode
Auto Adapting Enabled Auto Adapting Disabled
A4 Walk-Through
Walk-Through Enabled Walk-Through Disabled
Bank B OFF ON
B1 Forced Mode Normal Override Enabled (B2)
B2 Forced State Override OFF Override ON
B3 Test Mode Disabled Enabled OFF ON
B4 LEDs State LEDs Enabled LEDs Disabled
B5 Reset Device State OFF ON OFF

TROUBLESHOOTING
• Lights do not turn ON
- Circuit breaker or fuse has tripped.
- Forced Mode is enabled with the Forced State set to OFF. To disable
the Forced Mode
refer to Table 2 for switch settings.
• Lights stay ON
-
Constant motion. To Test: Reduce RED and/or GREEN knob by
25%; remove motion source. If unsatisfactory, move sensor
.
-
Infrared sensor can "see" into hallway. To Test: Put sensor in
Timer Test mode and walk hallway. If lights continue to come
ON, move sensor
.
- Forced Mode is enabled with the Forced State set to ON. To disable the
Forced Mode
refer to Table 2 for switch settings.
• Light turns ON too long
-
Timer setting too high. To Test: Check switch settings. Typical
setting is 10 minutes
.
-
LED illuminates solid RED for longer than 5 minutes, device
malfunction, contact technical assistance
.
• For technical assistance, contact us at 1-800-824-3005
• Visit our website at www.leviton.com
PRODUCT INFORMATION
PK-93874-10-00-2C© 2015 Leviton Mfg. Co., Inc.
This device complies with part 15 of the FCC rules. Operation is
subject to the following two conditions: (1) This device must not cause
harmful interference, and (2) This device must accept any interference
received, including interference that may cause undesired operation.
Any changes or modifications not expressly approved by Leviton could
void the user's authority to operate this equipment.
This product may be covered by US PAT. Nos. 8,154,154; 7,924,155;
8,227,731; 7,608,807 and 8,115,626.
FOR CANADA ONLY
For warranty information and/or product returns, residents of Canada
should contact Leviton in writing at Leviton Manufacturing of Canada
Ltd to the attention of the Quality Assurance Department, 165
Hymus Blvd, Pointe-Claire (Quebec), Canada H9R 1E9 or by
telephone at 1 800 405-5320.
PATENTS
FCC COMPLIANCE STATEMENT
LIMITED 5 YEAR WARRANTY AND EXCLUSIONS
Leviton warrants to the original consumer purchaser and not for the benefit of anyone else that this product at the time of its sale by Leviton is free of defects in materials and workmanship under normal and proper use for five years from the purchase date. Leviton’s only obligation is to correct such defects by repair or replacement, at its option. For details visit
www.leviton.com or call 1-800-824-3005. This warranty excludes and there is disclaimed liability for labor for removal of this product or reinstallation. This warranty is void if this product is installed improperly or in an improper environment, overloaded, misused, opened, abused, or altered in any manner, or is not used under normal operating conditions or not in
accordance with any labels or instructions. There are no other or implied warranties of any kind, including merchantability and fitness for a particular purpose, but if any implied warranty is required by the applicable jurisdiction, the duration of any such implied warranty, including merchantability and fitness for a particular purpose, is limited to five years.
Leviton is not liable for incidental, indirect, special, or consequential damages, including without limitation, damage to, or loss of use of, any equipment, lost sales or profits or delay or failure to perform this warranty obligation. The remedies provided herein are the exclusive remedies under this warranty, whether based on contract, tort or otherwise.
Figure 6 - (Cat. No. O4C15) - Field-of-View Ranges
Extended range lens (black frame), mounting height (8-12 ft)
Figure 5 (Cat. No. O4C20) Field-of-View Ranges
Extended range lens (black frame), mounting height (8-12 ft)
Figure 7 - (Mid-Range Lens) Field-of-View Ranges
Mid range lens (red frame), mounting height (13-20 ft)
Figure 4 (Cat. No. O4C10) Field-of-View Ranges
Extended range lens (black frame), mounting height (8-12 ft)
Figure 9 - Mounting Location Diagram
Mask
By masking
two sections, hallway
traffic can be blocked.
Masking is not required
in a corner mounting
application. The sensor
cannot see hallway traffic.
Figure 8 - Changing PIR Lens
To change lens, turn lens and line up arrows, then pull lens from sensor
Note: This lens is included with all PIR models
Arrows
TOP VIEW
Major Motion, IR
Minor Motion, Ultrasoni
c
Major Motion, Ultrasoni
c
20
11.5
8.5
0
8.5
11.5
20
8
0
0 335.65.699 1111 1515
1717
2020
2323
SIDE VIEW
TOP VIEW
20
11.5
16
0
8.5
11.5
20
8
0
0335.55.5991111 1515
22.522.5
2020
3232
SIDE VIEW
Major Motion, IR
Minor Motion, Ultrasoni
c
Major Motion, Ultrasoni
c
TOP VIEW
20
10
10
0
20
8
0
0 335.55.599 1111 1515 2020
SIDE VIEW
15
15
10
10
20
0510 15 20 2530 25 20 15 10 530
5
5
0
TOP VIEW
SIDE VIEW
/