Page is loading ...

Date Issued: 06/25/16 IS-49805-CB
We’re here to help 866-558-5706
Hrs: M-F 9am to 5pm EST
CAUTION – RISK OF SHOCK –
Disconnect Power at the main circuit breaker panel or main fuse
box before starting and during the installation.
INSTRUCTIONS
For Assembling and Installing Fixtures in Canada
Pour L’assemblage et L’installation Au Canada
LOOP/CHAIN LINK MOUNT
1) Pass fixture wire from each coupling on top of fixture
through one stem for each side and screw each stem into
each coupling. NOTE: Thread locking compound must be
applied to all stem threads as noted with symbol ( ) to pre-
vent accidental rotation of fixture during cleaning, relamp-
ing, etc.
2) Pass fixture wire through remaining stems and screw stems
together.
3) Thread one small threaded pipe into end of each small loop.
4) Pass fixture wire through first loop. Thread first loop onto
end of each last stem.
5) Attach one chain link to each small loop at end of each
stem. Then attach each chain link to one second small loop.
6) From each stem, pass fixture wire through each second
loop.
7) From each stem, pass fixture wire through each hole in
canopy. Then pass threaded pipe at end of each second
loop through each hole in canopy.
8) On one side, pass fixture wire from threaded pipe protruding
from inside canopy through hole in one lockwasher. Thread
lockwasher onto end of threaded pipe.
9) From the same side as step 8, pass fixture wire through hole
in hexnut. Thread hexnut onto end of threaded pipe.
10) On other side of fixture, pass fixture wire through loop on
end of safety cable. Slip loop on safety cable over end of
threaded pipe protruding from inside of canopy.
11) From the same side as step 10, pass fixture wire through
hole in lockwasher. Thread lockwasher onto end of threaded
pipe protruding from inside canopy.
12) Pass fixture wire through hole in hexnut. Thread hexnut onto
end of threaded pipe.
13) Find the appropriate threaded holes on mounting plate. As-
semble mounting screws into threaded holes.
14) Attach mounting plate to outlet box.
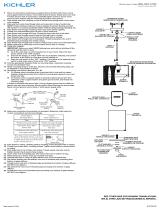
15) Make wire connections. Reference chart below for correct
connections and wire accordingly.
16) Carefully push wire connections back into outlet box making
sure all connections remain secure.
17) Slip canopy over mounting screws and mounting plate.
NOTE: Be certain wires do not get pinched between mount-
ing plate and canopy.
18) Thread lock-up knobs onto mounting screws. Tighten
knobs to secure canopy to mounting plate
19) Insert recommended bulbs. (Not supplied)
20) Raise glass up into fixture, passing glass over socket.
21) Slip the socket spacer over the socket, with the flat side
pressing against the glass.
22) Thread the socket ring onto the socket (curved edge face
up) until it presses against the socket ring and supports the
glass. DO NOT OVER TIGHTEN
Connect Black or
Red Supply Wire to:
Connect
White Supply Wire to:
Black White
*Parallel cord (round & smooth) *Parallel cord (square & ridged)
Clear, Brown, Gold or Black
without tracer
Clear, Brown, Gold or Black
with tracer
Insulated wire (other than green)
with copper conductor
Insulated wire (other than green)
with silver conductor
*Note: When parallel wires (SPT I & SPT II)
are used. The neutral wire is square shaped
or ridged and the other wire will be round in
shape or smooth (see illus.)
Neutral Wire
RIGID STEM MOUNT
1) Remove each small loop from the canopy. NOTE: The lock-
washers and hexnuts will be used in step 5.
2) Remove threaded pipe from each small loop.
3) Pass wire through stems and screw stems into each cou-
pling on top of fixture body. NOTE: Thread locking com-
pound must be applied to all stem threads as noted with
symbol ( ) to prevent accidental rotation of fixture during
cleaning, relamping, etc.
4) Pass fixture wire through remaining stems and screw stems
together.
5) On each side of fixture, pass fixture wire through the small
threaded pipe removed from each small loop. Thread one
small threaded pipe into end of last stem on each side of
fixture.
6) From each stem, pass fixture wire through each hole in can-
opy. Then pass threaded pipe at end of each stem through
each hole in canopy.
7) Follow steps 8-22 in Loop/Chain Link/Loop Installation
Instructions.
SAFETY CABLE
HEXNUT
LOCKWASHER
SMALL
THREADED
PIPE
STEM

Date Issued: 06/25/16 IS-49805-CB
We’re here to help 866-558-5706
Hrs: M-F 9am to 5pm EST
INSTRUCTIONS
For Assembling and Installing Fixtures in Canada
Pour L’assemblage et L’installation Au Canada
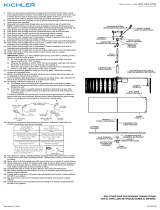
OUTLET BOX
WIRE
CONNECTOR(S)
STRAP
MOUNTING SCREW(S)
MOUNTING PLATE
MOUNTING SCREW(S)
HEXNUT & LOCKWASHER
SMALL
THREADED
PIPE
LOOP
CHAIN LINK
SMALL
THREADED
PIPE
STEM
SOCKET
GLASS
SOCKET
SPACER
SOCKET
RING
/