Page is loading ...

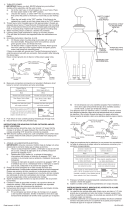
16) Make wire connections (connectors not provided). Reference
chart below for correct connections and wire accordingly.
17) Push fixture to ceiling, carefully passing threaded pipe
through hole in canopy.
18) Thread finial onto threaded pipe. Tighten finial to secure
fixture to ceiling.
19) Lower glass down over socket. Pass hole in glass over socket.
20) Lower larger washer down over socket. Pass hole in washer
over socket. Set washer down inside glass.
21) Thread socket ring onto socket. Tighten socket ring to hold
glass in place. (DO NOT over tighten.)
22) Insert recommended bulb. CAUTION: DO NOT touch bulb
with bare hands. If this happens, clean bulb with denatured
alcohol and a lint free cloth.
23) Lower glass sleeve down over bulb. Carefully thread glass
sleeve onto socket. (DO NOT over tighten.)
Connect Black or
Red Supply Wire to:
Connect
White Supply Wire to:
Black White
*Parallel cord (round & smooth) *Parallel cord (square & ridged)
Clear, Brown, Gold or Black
without tracer
Clear, Brown, Gold or Black
with tracer
Insulated wire (other than green)
with copper conductor
Insulated wire (other than green)
with silver conductor
*Note: When parallel wires (SPT I & SPT II)
are used. The neutral wire is square shaped
or ridged and the other wire will be round in
shape or smooth (see illus.)
Neutral Wire
IMPORTANT SAFETY INSTRUCTIONS
LIGHTED BULB IS HOT!
WARNING: To reduce the risk of FIRE or INJURY TO PERSON:
• Turnoffandallowtocoolbeforereplacingbulb.
• BulbgetsHOTQUICKLY!Contactswitchonlywhenturningoff.
• DONOTremaininlightifskinfeelswarm.(Lightisintense,
may cause “sunburn”)
• DONOTlookdirectlyatlightedbulb.
• Keepmaterialsawayfrombulbthatmayburn.
• UseONLYwithwattagespeciedorlower.
• DONOTtouchbulbatanytime,useasoftcloth.Oilfromskin
may damage bulb.
• DONOToperatexturewithmissingordamagedglass.
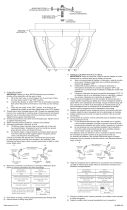
1) Pass wire through stems and screw one stem to each
coupling on top of fixture body. NOTE: Thread locking
compound must be applied to all stem threads as noted with
symbol (3) to prevent accidental rotation of fixture during
cleaning, relamping, etc.
2) Pass wire through remaining stems and screw stems
together.
3) Thread one small threaded pipe into end of each small loop.
4) Pass fixture wire from one last stem up through threaded
pipe in end of one small loop. Thread that small loop onto
the end of stem.
5) Repeat step 4 for other last stem.
6) Attach one chain link to each small loop at end of each last
stem.
7) Attach one small loop to end of each chain link.
8) Pass fixture wire from each stem through hole in each small
loop.
9) Pass fixture wire from each small loop through each hole in
canopy. Lower canopy down over stems. Pass holes in
canopy over each threaded pipe at end of each small loop.
10) From each small threaded pipe protruding from inside
canopy, pass fixture wire through hole in one lockwasher.
Thread lockwasher onto end of each threaded pipe.
11) From each small threaded pipe protruding from inside
canopy, pass fixture wire through hole in hexnut. Thread
hexnut onto end of each threaded pipe.
12) TURN OFF POWER.
IMPORTANT:Beforeyoustart,NEVERattemptanywork
without shutting off the electricity until the work is done.
a) Go to the main fuse, or circuit breaker, box in your
home. Place the main power switch in the “OFF”
position.
b) Unscrew the fuse(s), or switch “OFF” the circuit breaker
switch(s), that control the power to the fixture or room
that you are working on.
c) Place the wall switch in the “OFF” position. If the fixture
to be replaced has a switch or pull chain, place those in
the “OFF” position.
13) Thread hexnut onto threaded pipe so that 5 threads are
exposed above hexnut. Thread that end of the threaded
pipe into mounting strap and tighten hexnut against mounting
strap. Screw second hexnut onto end of threaded pipe
protruding from back of mounting strap.
14) Attach mounting strap to outlet box. (Screws not provided.)
15) Groundinginstructions:(SeeIllus.AorB).
A) On fixtures where mounting strap is provided with a
hole and two raised dimples. Wrap ground wire from
outlet box around green ground screw, and thread into
hole.
B) Onxtureswhereacuppedwasherisprovided.Attach
ground wire from outlet box under cupped washer and
green ground screw, and thread into mounting strap.
If fixture is provided with ground wire. Connect fixture
ground wire to outlet box ground wire with wire connector
(not provided.) after following the above steps. Never
connect ground wire to black or white power supply wires.
Date Issued: 3/28/14 IS-44009-US
GREEN GROUND
SCREW
CUPPED
WASHER
A
B
OUTLET BOX
GROUND
FIXTURE
GROUND
DIMPLES
WIRE CONNECTOR
(NOT PROVIDED)
OUTLET BOX
GROUND
GREEN GROUND
SCREW
FIXTURE
GROUND
SEE OTHER SIDE FOR SPANISH TRANSLATIONS.
VEA EL OTRO LADO DE TRADUCCIONES AL ESPAÑOL.
We’re here to help 866-558-5706
Hrs: M-F 9am to 5pm EST
MOUNTING STRAP
ABRAZADERADEMONTAJE
CANOPY
ESCUDETE
FIXTUREBODY
CUERPO DEL ARTEFACTO
FINIAL
CAPUCHON
SMALL LOOP
ARGOLLAPEQUEÑA
CHAINLINK
ESLABÓNDECADENA
3
STEM
VASTAGO
GLASS
VIDRIO
BULB
BOMBILLA
GLASSSLEEVE
CAMISA
DEVIDRIO
COUPLING
ACOPLAMIENTO
SOCKETRING
ANILLO DEL
CASQULLO
3
3
LOCKWASHER
ARANDELA DE
SEGURIDAD
HEXNUT
TUERCAHEXAGONAL
LARGE
WASHER
ARANDELA
MÁS GRANDE
HEXNUT
TUERCAHEXAGONAL

IMPORTANT SAFETY INSTRUCTIONS
LIGHTED BULB IS HOT!
WARNING: To reduce the risk of FIRE or INJURY TO PERSON:
• Turnoffandallowtocoolbeforereplacingbulb.
• BulbgetsHOTQUICKLY!Contactswitchonlywhenturningoff.
• DONOTremaininlightifskinfeelswarm.(Lightisintense,
maycause“sunburn”)
• DONOTlookdirectlyatlightedbulb.
• Keepmaterialsawayfrombulbthatmayburn.
• UseONLYwithwattagespeciedorlower.
• DONOTtouchbulbatanytime,useasoftcloth.Oilfromskin
maydamagebulb.
• DONOToperatexturewithmissingordamagedglass.
1) Passwirethroughstemsandscrewonestemtoeach
couplingontopofxturebody.NOTE:Threadlocking
compoundmustbeappliedtoallstemthreadsasnotedwith
symbol(3)topreventaccidentalrotationofxtureduring
cleaning,relamping,etc.
2) Passwirethroughremainingstemsandscrewstems
together.
3) Threadonesmallthreadedpipeintoendofeachsmallloop.
4) Passxturewirefromonelaststemupthroughthreaded
pipeinendofonesmallloop.Threadthatsmalllooponto
theendofstem.
5) Repeatstep4forotherlaststem.
6) Attachonechainlinktoeachsmallloopatendofeachlast
stem.
7) Attachonesmalllooptoendofeachchainlink.
8) Passxturewirefromeachstemthroughholeineachsmall
loop.
9) Passxturewirefromeachsmallloopthrougheachholein
canopy.Lowercanopydownoverstems.Passholesin
canopyovereachthreadedpipeatendofeachsmallloop.
10) Fromeachsmallthreadedpipeprotrudingfrominside
canopy,passxturewirethroughholeinonelockwasher.
Threadlockwasherontoendofeachthreadedpipe.
11) Fromeachsmallthreadedpipeprotrudingfrominside
canopy,passxturewirethroughholeinhexnut.Thread
hexnutontoendofeachthreadedpipe.
12)TURN OFF POWER.
IMPORTANT:Beforeyoustart,NEVERattemptanywork
withoutshuttingofftheelectricityuntiltheworkisdone.
a) Gotothemainfuse,orcircuitbreaker,boxinyour
home.Placethemainpowerswitchinthe“OFF”
position.
b) Unscrewthefuse(s),orswitch“OFF”thecircuitbreaker
switch(s),thatcontrolthepowertothextureorroom
thatyouareworkingon.
c) Placethewallswitchinthe“OFF”position.Ifthexture
tobereplacedhasaswitchorpullchain,placethosein
the“OFF”position.
13)Threadhexnutontothreadedpipesothat5threadsare
exposedabovehexnut.Threadthatendofthethreaded
pipeintomountingstrapandtightenhexnutagainstmounting
strap.Screwsecondhexnutontoendofthreadedpipe
protrudingfrombackofmountingstrap.
14)Attachmountingstraptooutletbox.(Screwsnotprovided.)
15)Connectxturegroundwiretooutletboxgroundwirewith
wireconnector.(Notprovided.)Neverconnectgroundwire
toblackorwhitepowersupplywire.
16)Makewireconnections(connectorsnotprovided.)Reference
chartbelowforcorrectconnectionsandwireaccordingly.
Connect Black or
Red Supply Wire to:
Connect
White Supply Wire to:
Black White
*Parallel cord (round & smooth) *Parallel cord (square & ridged)
Clear, Brown, Gold or Black
without tracer
Clear, Brown, Gold or Black
with tracer
Insulated wire (other than green)
with copper conductor
Insulated wire (other than green)
with silver conductor
*Note: When parallel wires (SPT I & SPT II)
are used. The neutral wire is square shaped
or ridged and the other wire will be round in
shape or smooth (see illus.)
Neutral Wire
DateIssued:3/28/14 IS-44009-CB
INSTRUCTIONS
For Assembling and Installing Fixtures in Canada
Pour L’assemblage et L’installation Au Canada
We’re here to help 866-558-5706
Hrs: M-F 9am to 5pm EST
SEE OTHER SIDE FOR CANADIAN FRENCH TRANS-
LATIONS.
VOIR L’AUTRE CÔTÉ POUR LES CANADIENS TRA-
DUCTIONS EN FRANÇAIS.
MOUNTINGSTRAP
PATTEDEFIXATION
CANOPY
CACHE
SMALLLOOP
PETITEBOUCLE
STEM
TIGE
CHAINLINK
MAILLONDELACHAÎNE
FIXTUREBODY
LUMINAIRE
3
GLASS
VERRE
BULB
L’AMPOULE
GLASS
SLEEVE
MANCHON
DEVERRE
SOCKETRING
ANNEAUDE
LADOUILLE
COUPLING
COUPLAGE
17) Pushxturetoceiling,carefullypassingthreadedpipe
throughholeincanopy.
18) Threadnialontothreadedpipe.Tightennialtosecure
xturetoceiling.
18) Lowerglassdownoversocket.Passholeinglassoversocket.
19) Lowerlargerwasherdownoversocket.Passholeinwasher
oversocket.Setwasherdowninsideglass.
20) Threadsocketringontosocket.Tightensocketringtohold
glassinplace.(DONOTovertighten.)
21) Insertrecommendedbulb.CAUTION: DONOTtouchbulb
withbarehands.Ifthishappens,cleanbulbwithdenatured
alcoholandalintfreecloth.
22) Lowerglasssleevedownoverbulb.Carefullythreadglass
sleeveontosocket.(DONOTovertighten.)
HEXNUT
ECROUHEXAGONAL
LOCKWASHER
RONDELLEDE
BLOCAGE
LARGE
WASHER
GRANDE
RONDELLE
3
3
/