Page is loading ...

2004 Buell Firebolt: Chassis 2-1
HOME
SPECIFICATIONS 2.1
NOTE
Gross Vehicle Weight Rating (GVWR) (maximum allowable
loaded vehicle weight) and corresponding Gross Axle Weight
Ratings (GAWR) are given on an information decal located
on the steering head.
11WARNING1WARNING
Do not inflate any tire beyond its maximum inflation pres-
sure as specified on tire sidewall. Overinflation may
cause tire to suddenly deflate which could result in death
or serious injury.
Table 2-1. Dimensions
DIMENSIONS IN. MM
Wheel base 52.0 1320.8
Seat height (XB9R/XB12R) 31.9 810.3
Ground clearance 4.35 110.0
Trail 3.3 83.8
Rake 21 Degrees
Table 2-2. Weight Specifications (XB12R)
WEIGHT-U.S. MODELS LBS. KG
Wet weight 460 204
GVWR 850 386
GAWR - front 325 147
GAWR - rear 525 238
Load capacity 400 181
Table 2-3. Weight Specifications (XB9R)
WEIGHT-U.S. MODELS LBS. KG
Wet weight 450 204
GVWR 850 386
GAWR - front 325 147
GAWR - rear 525 238
Load capacity 400 181
Table 2-4. Capacities
CAPACITIES U.S. LITERS
Fuel tank (inc. reserve) 3.7 gallons 14.0
Reserve/Low fuel light at 0.7 gallons 2.6
Oil tank
(wet - for normal oil change)
2.5 quarts 2.4
Fork oil 14 ounces 0.41
Transmission 1.0 quart 0.95
Table 2-5. Tire and Positions
TIRE AND POSITION
SOLO
RIDING
GVWR
Front
Dunlop Sportmax Radial II
120/70 ZR 17 D207FY
36 PSI
(248 kPa)
Same as
Solo
Rear
Dunlop Sportmax Radial II
180/55 ZR 17 D207U
38 PSI
(262 kPa)
Table 2-6. Brake Rotor Runout
RUNOUT IN. MM
Front radial 0.0177 0.45
Front lateral 0.0248 0.63
Rear radial 0.0177 0.45
Rear lateral 0.0154 0.39

2-2 2004 Buell Firebolt: Chassis
HOME
TORQUE VALUES
ITEM TORQUE NOTES
Airbox cover fasteners 12-36
in-lbs
1-4 Nm page 2-81
Airhorn fastener 72-96
in-lbs
8-10 Nm page 2-68
Axle pinch fastener, rear 40-45 ft-lbs 54-61 Nm page 2-17
Axle pinch fasteners, front 20-22 ft-lbs 27-30 Nm page 2-15
Axle, front 39-41 ft-lbs 53-56 Nm ANTI-SEIZE, Left handed thread, page 2-8
Axle, rear 48-52 ft-lbs 65.1-70.5 Nm ANTI-SEIZE, Follow special instructions, page 2-17
Bank angle sensor 12-36
in-lbs
1-4 Nm page 2-66
Brake hand lever housing fasteners 80-90
in-lbs
9-10 Nm page 2-28
Brake lamp switch fastener, front 7-10
in-lbs
0.8-1.0 Nm page 2-28
Brake line p-clamp fastener, front 36-60
in-lbs
4-7 Nm page 2-30
Brake line p-clamp fastener, rear 36-60
in-lbs
4-7 Nm page 2-39
Brake pedal fastener 22-24 ft-lbs 30-33 Nm LOCTITE 272, page 2-24
Brake pin hanger set, front 11-14 ft-lbs 15-19 Nm page 2-32
Brake pin hanger set, rear 11-14 ft-lbs 15-20 Nm page 2-41
Brake pin plug, rear 22-26
in-lbs
2-3 Nm page 2-41
Brake reservoir fastener, rear 96-120
in-lbs
11-14 Nm page 2-85
Caliper banjo bolt, front 16-20 ft-lbs 22-27 Nm metric, page 2-30
Caliper banjo bolt, rear 16-20 ft-lbs 22-27 Nm page 2-39
Caliper bleeder valves 36-60
in-lbs
4-7 Nm metric, page 2-25
Caliper carrier, rear 24-26 ft-lbs 32-35 Nm page 2-17
Caliper fasteners, front 15-19 ft-lbs 20-26 Nm page 2-32
Caliper mounting fasteners, front 35-37 ft-lbs 47-50 Nm page 2-32
Caliper mounting large fastener, rear 18-21 ft-lbs 24-28 Nm page 2-42
Caliper mounting small fastener, rear 14-18 ft-lbs 19-24 Nm page 2-42
Chin fairing fasteners 36-48
in-lbs
4-5 Nm page 2-80
Clutch cable p-clamp 12-36
in-lbs
1-4 Nm page 2-59
Clutch lever clamp pinch fastener 36-60
in-lbs
4-7 Nm page 2-64
Clutch lever pivot fastener 39-48
in-lbs
4-5 Nm page 2-64
Electronic control module fasteners 72-96
in-lbs
8-11 Nm page 2-67
Engine shroud air scoop 12-36
in-lbs
1-4 Nm page 2-82
Exhaust header mounting nut 72-96
in-lbs
8-11 Nm page 2-73
Fairing support bracket fastener 16-18 ft-lbs 22-26 Nm page 2-68
Flasher fastener 30-40
in-lbs
3-5 Nm page 2-66
Footpeg mount fasteners, rider 108-132
in-lbs
12-15 Nm page 2-74
Footpeg mount, passenger 25-28 ft-lbs 34-38 Nm LOCTITE 272 (red), page 2-75
Fork cap 22-30 ft-lbs 30-40 Nm page 2-49
Fork center bolt 22-30 ft-lbs 30-40 Nm page 2-48
Fork clamp, lower 13-15 ft-lbs 18-20 Nm LOCTITE 272 (red), page 2-50
Fork clamp, upper 17-19 ft-lbs 23-26 Nm LOCTITE 272 (red), page 2-52
Fork damper locknut 22-30 ft-lbs 30-40 Nm page 2-48
Front fender fasteners 12-36
in-lbs
1-4 Nm page 2-77
Front isolator bolt 49-51 ft-lbs 66-69 Nm page 2-59

2004 Buell Firebolt: Chassis 2-3
HOME
Front isolator bracket mounting fas-
tener
49-51 ft-lbs 66-69 Nm page 2-59
Front isolator snubber, upper 12-36
in-lbs
1-4 Nm page 2-59
Front isolator threaded frame insert 49-51 ft-lbs 66.4-69.1 Nm LOCTITE 222 (purple), page 2-59
Fuse block and relay fasteners 72-96
in-lbs
8-11 Nm page 2-68
Hand lever pivot fastener 60-120
in-lbs
9-14 Nm page 2-27
Handlebar clipon fastener, left 24-26 ft-lbs 33-35 Nm LOCTITE 272 (red), page 2-70
Handlebar clipon fastener, right 24-26 ft-lbs 33-35 Nm LOCTITE 272 (red), page 2-70
Headlight fasteners 20-25
in-lbs
2.3-2.8 Nm page 2-66
Headlight support bracket pivot fas-
teners
72-96
in-lbs
8-11 Nm page 2-67
Heel guard fasteners, passenger 48-72
in-lbs
5-8 Nm page 2-75
Heel guard fasteners, rider 72-96
in-lbs
8-11 Nm page 2-74
License plate fasteners 36-48
in-lbs
4-5 Nm page 2-86
Main battery ground fastener 72-96
in-lbs
8-11 Nm page 2-85
Master cylinder banjo bolt, front 16-20 ft-lbs 22-27 Nm page 2-30
Master cylinder banjo bolt, rear 16-20 ft-lbs 22-27 Nm page 2-39
Master cylinder cover fasteners, front 9-13
in-lbs
1.0-1.5 Nm page 2-28
Master cylinder mounting fasteners,
rear
72-96
in-lbs
8-11 Nm page 2-37
Mirror fasteners 72-96
in-lbs
(8-11 Nm) page 2-87
Muffler mounting block fastener,
front
16-18 ft-lbs 21.7-24.4 Nm page 2-73
Muffler mounting block fastener, rear 32-36 ft-lbs 43-49 Nm page 2-73
Muffler strap fastener, front 108-120
in-lbs
12-14 Nm page 2-73
Muffler strap fastener, rear 48-60
in-lbs
5-7 Nm page 2-73
Oil cooler air scoop 120-144
in-lbs
14-16 Nm page 2-82
Oil drain plug 29-31 ft-lbs 39-42 Nm page 2-57
Oil line fittings 29-31 ft-lbs 39-42 Nm page 2-57
Passenger seat latch 60-96
in-lbs
7-11 Nm page 2-86
Pivot shaft pinch bolt 17-19 ft-lbs 23-26 Nm page 2-58
Ram air scoop 12-36
in-lbs
1-4 Nm page 2-82
Rear fender fastener 12-36 ft-lbs 1-4 Nm page 2-77
Rear remote master cylinder reser-
voir fastener
48-72
in-lbs
11-14 Nm page 2-37
Rotor mounting fasteners, front 25-27 ft-lbs 34-37 Nm metric, Replace with new, page 2-14
Rotor mounting fasteners, rear 25-27 ft-lbs 34-37 Nm metric, Replace with new, page 2-17
Safety interlock fastener 7-10
in-lbs
0.8-1.1 Nm page 2-64
Seat fasteners 12-36
in-lbs
1-4 Nm page 2-88
Shock mounting fastener, lower 15-17 ft-lbs 20.3-23 Nm page 2-62
Shock mounting fastener, upper 49-51 ft-lbs 66-69 Nm page 2-62
Shock reservoir clamp, rear 120-144
in-lbs
14-16 Nm page 2-85
Sidestand bracket fasteners 25-27 ft-lbs 34-37 Nm page 2-91
Sidestand pivot bolt 18-20 ft-lbs 24-27 Nm page 2-91
Sidestand switch fastener 36-60
in-lbs
4-7 Nm page 2-91
Sprocket cover fastener 12-36
in-lbs
1-4 Nm page 2-76
Sprocket fasteners 35-37 ft-lbs 48-50 Nm Replace with new, page 2-17
ITEM TORQUE NOTES

2-4 2004 Buell Firebolt: Chassis
HOME
Steering stem cap 38-42 ft-lbs 52-57 Nm page 2-52
Steering stem pinch fastener 17-19 ft-lbs 23-26 Nm LOCTITE 272 (red), page 2-52
Swingarm brace mounting fasteners 25-27 ft-lbs 34-37 Nm page 2-58
Swingarm pivot shaft 24-26 ft-lbs 32-35 Nm page 2-58
Switch housing fasteners, right 25-33
in-lbs
3-4 Nm page 2-63
Tail body work, lower 36-48
in-lbs
4-5 Nm page 2-86
Tail body work, upper 12-36
in-lbs
1-4 Nm page 2-86
Tail frame to frame 21-23 ft-lbs 28-31 Nm LOCTITE 272 (red), page 2-85
Torca clamp 40-45 ft-lbs 54-61 Nm page 2-73
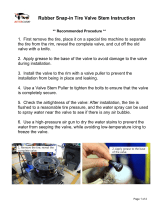
Valve stem nut 40-44
in-lbs
4-5 Nm page 2-21
Wear Peg, rider 36-48
in-lbs
4.1-5.4 m page 2-74
ITEM TORQUE NOTES

2004 Buell Firebolt: Chassis 2-5
HOME
TIRE SPECIFICATIONS 2.2
GENERAL
11WARNING1WARNING
Tires must be correctly matched to wheel rims. Only the
tires listed in the fitment tables below can be used for
replacement. Mismatching tires and rims can cause dam-
age to the tire bead during mounting. Using tires other
than those specified can adversely affect motorcycle
handling and could result in death or serious injury.
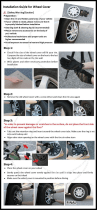
See Figure 2-1. Tire sizes are molded on the sidewall. Rim
size and contour are marked on the rim’s exterior surface.
Example:
MT 3.5 x 17.0 DOT
●
MT
designates the rim contour.
●
3.5
is the width of the bead seat measured in inches.
●
17.0
is the normal diameter of the rim in inches, mea-
sured at the bead seat diameter.
●
DOT
means that the rim meets Department of Transpor-
tation Federal Motor Vehicle Safety Standards.
See Table 2-7.
Figure 2-1. Rim Markings
8423
Table 2-7. Tire Fitment-Tubeless Cast Wheels
WHEEL SIZE
& POSITION
CONTOUR &
RIM SIZE
RIM VALVE
HOLE DIAMETER
DUNLOP SPORTMAX RADIAL II
TIRE SIZE
17 in. – Front MT 3.5 x 17.0 DOT 0.33 in. 120/70 ZR17 D207FY
17 in. – Rear MT 5.5 x 17.0 DOT 0.33 in. 180/55 ZR17 D207U

2-6 2004 Buell Firebolt: Chassis
HOME
VEHICLE IDENTIFICATION NUMBER 2.3
GENERAL
The full 17 digit serial or Vehicle Identification Number (V.I.N.)
is stamped on the steering head and on an information decal
at the same location.
See Figure 2-2. An abbreviated V.I.N. is stamped on the front
left side of the crankcase.
NOTE
See Figure 2-3. Always give the V.I.N. or abbreviated V.I.N.
when ordering parts or making inquiries about your Buell
motorcycle.
Figure 2-2. Abbreviated V.I.N. Location
b0304x2x
Figure 2-3. Vehicle Identification Number (V.I.N.)
4MZAX 12 J*4 3 400001
*Varies - can be 0-9 or X
Sample V.I.N. as it appears on the steering head - 4MZAX12J143400001
Sample abbreviated V.I.N. as it appears on the left side crankcase - AX124400001
Manufacturer: Buell Motorcycle Company
Horsepower Code
Engine
Model Year - 2004
Sequential
Number
400001-420000 = XB9R Domestic
420001-425000 = XB9R California
425001-445000 = XB12R Domestic
445001-450000 = XB12R California
600001-620000 = XB9R World
660001-680000 = XB12R World
Model Designation-Firebolt
3 - Manufactured in East Troy, WI
12 = 984cc World
14 = 1200cc World
57 = 984cc California
59 = 1200cc California
4 = Domestic
5 = International

2004 Buell Firebolt: Chassis 2-7
HOME
WHEELS 2.4
GENERAL
Good handling and maximum tire mileage are directly related
to the care of wheels and tires. Regularly inspect wheels and
tires for damage and wear. If handling problems occur, see
1.22 TROUBLESHOOTING or Table 2-8.
See 1.8 TIRES AND WHEELS for tire pressures. Keep tires
inflated to the recommended air pressure. Always balance
the wheel after replacing a tire.
11WARNING1WARNING
Do not inflate any tire beyond its maximum inflation pres-
sure as specified on tire sidewall. Overinflation may
cause tire to suddenly deflate which could result in death
or serious injury.
TROUBLESHOOTING
See Figure 2-4. Check tire inflation pressure at least once
each week. At the same time, inspect tire tread for punctures,
cuts, breaks and other damage. Repeat the inspection before
long trips.
Figure 2-4. Checking Tire Inflation Pressure
b0195x2x

2-8 2004 Buell Firebolt: Chassis
HOME
11WARNING1WARNING
To prevent death or serious injury, use the following
guidelines when installing a new tire or repairing a flat:
1. Always locate and eliminate the cause of the original
tire failure.
2. Do not patch or vulcanize a tire casing. These proce-
dures weaken the casing and increase the risk of a
blowout.
3. The use of tires other than those specified can
adversely affect handling which could result in death
or serious injury.
4. Tires and wheels are critical items. Since the servic-
ing of these components requires special tools and
skills, Buell recommends that you see your dealer
for these services.
11WARNING1WARNING
Buell recommends replacement of any tire punctured or
damaged. In some cases small punctures in the tread
area may be repaired from within the demounted tire by
your Buell dealer. Speed should not exceed 50 mph (80
km/h) for the first 24 hours after repair and the repaired
tire should NEVER be used over 80 mph (129 km/h). In
emergency situations, if a temporary repair is made, ride
slowly with as light of a load as possible until the tire is
permanently repaired or replaced. Failure to follow this
warning could result in death or serious injury.
11WARNING1WARNING
Replace excessively worn tires. Excessively worn tires
adversely affect motorcycle traction, steering and han-
dling and could result in death or serious injury.
At regular intervals of 5000 miles (8000 km) or whenever
handling irregularities are noted, perform the recommended
service checks. See Table 2-8.
If tires must be replaced, same as original equipment tires
must be used. Other tires may not fit correctly and may be
hazardous to use.
Table 2-8. Wheel Service
CHECK FOR REMEDY
Loose axles. Tighten front axle. See 2.5 FRONT WHEEL.
Tighten rear axle. See 2.6 REAR WHEEL.
Excessive side-play or radial (up-and-down)
play in wheel hubs.
Replace wheel bearings.
Rims and tires out-of-true sideways; should
not be more than 0.080 in. (2.03 mm).
Replace rims. See 2.8 TIRES.
Rims and tires out-of-round or eccentric
with hub; should not be more than 0.090 in.
(2.29 mm).
Replace rims. See 2.8 TIRES.
Irregular or peaked front tire wear. Replace as described under 2.5 FRONT WHEEL, 2.6 REAR WHEEL and
2.8 TIRES.
Correct tire inflation. Inflate tires to correct pressure. See 1.8 TIRES AND WHEELS.
Correct tire and wheel balance. Static balance may be satisfactory if dynamic balancing facilities are not
available. However, dynamic balancing is strongly recommended.
Steering head bearings. Check for proper torque and replace worn or damaged bearings. See 1.13
STEERING HEAD BEARINGS.
Damper tubes. Check for leaks. See 2.16 FRONT FORK.
Shock absorbers. Check damping action and mounts. See 1.12 SUSPENSION DAMPING
ADJUSTMENTS.
Swingarm bearings. Check for proper torque and replace worn or damaged bearings.
See 2.19 SWINGARM AND BRACE.

2004 Buell Firebolt: Chassis 2-9
HOME
FRONT WHEEL 2.5
REMOVAL
1. Place a scissor jack under jacking point and raise front wheel
off ground. For location of jacking point see Figure 2-104.
NOTE
Do not operate front brake lever with front wheel removed or
caliper pistons may be forced out. Reseating pistons requires
caliper disassembly.
2. Remove the right side fender fasteners. See 2.31 FEND-
ERS.
3. See Figure 2-5. Loosen front axle pinch fasteners (2)
(metric) on front fork.
4. Remove axle (1).
NOTE
The front axle is left handed thread.
CAUTION
To prevent cosmetic damage to the wheel, center caliper
between spokes before removal.
5. See Figure 2-6. Raise the wheel up until the rotor clears
the caliper and rotate the fork leg counterclockwise
allowing wheel clearance for removal.
6. Remove wheel.
Figure 2-5. Front Wheel Mounting
Figure 2-6. Front Wheel Removal and Installation
1. Axle (left handed thread)
2. Front axle pinch fasteners (2) (metric)
8419
1
2
8441

2-10 2004 Buell Firebolt: Chassis
HOME
DISASSEMBLY
Bearing Removal
NOTE
On single disc wheels, always remove the brake disc side
first. If the wheel has two brake discs, remove the left bearing
first.
1. See Figure 2-7. Remove wheel bearings using BUSH-
ING AND BEARING PULLER (Part No. B43993-7) and
WHEEL BEARING REMOVER AND INSTALLER (Part
No. HD-44060).
2. Sparingly apply Extreme Pressure Lubricant (J-23444-A)
to the threads of the short forcing screw (1) to prolong
service life and ensure smooth operation.
3. Assemble the short forcing screw (1), nut (2), Nice bear-
ing (3), washer (4) and bridge (5) from the WHEEL
BEARING INSTALLER/REMOVER (HD-44060).
4. See Figure 2-8. Insert the FRONT WHEEL BEARING
REMOVER COLLET (B-43993-7) into the wheel bearing
until it fully seats against the bearing.
5. Insert the ball bearing into the collet.
6. See Figure 2-9. Thread the puller assembly (1) into the
collet (2).
7. Hold the collet (2), and turn the forcing screw (3) to
expand the collet.
8. See Figure 2-10. Place the bridge (1) against the wheel
hub.
9. Hold the forcing screw (2), and turn the nut (3) clockwise
until the bearing is free of the hub.
Figure 2-7. Assemble Puller
i04277
1. Short forcing screw
2. Nut
3. Nice bearing
4. Washer
5. Bridge
3
1
2
4
5
Figure 2-8. Install Collet and Ball Bearing
Figure 2-9. Expand the Collet
i04276
Ball bearing
Collet
i04278
1
2
1. Puller assembly
2. Collet
3. Forcing screw
3

2004 Buell Firebolt: Chassis 2-11
HOME
10. See Figure 2-11. Loosen the nut (1), and back off the
bridge (2). Hold the forcing screw (3) while holding the
collet (4) to remove the forcing screw from the collet.
11. Remove the ball bearing (5) and wheel bearing (6) from
the collet (4).
12. See Figure 2-12. Remove the spacer.
13. Repeat Steps 4-12 for the bearing on the other side of
the wheel.
Front Rotor Removal
1. See Figure 2-18. Remove and discard rotor mounting
fasteners (7).
2. Remove and inspect brake rotor (6) for wear and warp-
ing. See 1.8 TIRES AND WHEELS.
3. Remove drive bushings (8) and discard.
4. Remove washers (9) and discard.
5. Remove rotor spring (4) and discard.
CLEANING AND INSPECTION
11WARNING1WARNING
Never use compressed air to “spin-dry” bearings. Very
high bearing speeds can damage unlubricated bearings.
Spinning bearings with compressed air can also cause a
bearing to fly apart, which could result in death or seri-
ous injury.
1. Inspect all parts for damage or excessive wear.
NOTE
XB wheel bearings are designed as sealed bearings which
are not intended to be disassembled, serviced or cleaned
with solvents.
11WARNING1WARNING
Always replace brake pads in complete sets for correct
brake operation. Never replace just one brake pad. Fail-
ure to install brake pads as a set could result in death or
serious injury.
2. Inspect brake rotor and pads. See 1.7 BRAKE SYSTEM
MAINTENANCE.
Figure 2-10. Remove the Bearing
Figure 2-11. Removing Bearing from Puller
i04279
3
1
2
1. Bridge
2. Forcing screw
3. Nut
i04282
1. Nut
2. Bridge
3. Forcing screw
4. Collet
5. Ball bearing
6. Wheel bearing
3
1
2
6
4
5
Figure 2-12. Remove the Spacer
i04280

2-12 2004 Buell Firebolt: Chassis
HOME
ASSEMBLY
1. See Figure 2-18. Install spacer (5).
2. Install
new
wheel bearings (2) into hub using suitable
driver. Press on outer race only.
NOTE
Press the rotor side bearings in first ensuring it is seated on
the shoulder of the wheel. Followed by pressing the alternate
side until it contacts the spacer.
11WARNING1WARNING
Do not allow brake fluid, bearing grease, lubricants, etc.
to contact brake rotor or reduced braking ability will
occur, which could result in death or serious injury.
Bearing Installation
NOTE
On single disc wheels, always install the brake disc side first.
If the wheel has two brake discs, install the left bearing first.
The following procedure describes the bearing installation for
the front wheel; the procedure for the rear wheel is the same.
1. See Figure 2-13. Install the Backing Plate (Part No. B-
43993-11) onto the long forcing screw from the Wheel
Bearing Installer/Remover (Part No. HD-44060), with the
smaller diameter toward the wheel hub. Insert the forcing
screw and backing plate into the wheel hub.
2. See Figure 2-14. Sparingly apply EXTREME PRES-
SURE LUBRICANT (Part No. J-23444-A) to the threads
of the long forcing screw (1) to prolong service life and
ensure smooth operation.
3. Insert a
new
wheel bearing (2) squarely into the hub,
with the lettered side pointing out (away from the wheel).
4. Slide the FRONT BEARING INSTALLER (Part No. B-
43993-9, from kit Part No. B-43993-50) (3) onto the forc-
ing screw (1), with the smaller diameter toward the bear-
ing bore.
5. Install a washer (4), Nice bearing (5) and nut (6) onto the
forcing screw (1).
6. While holding the forcing screw (1), tighten the nut (6)
until the bearing is seated firmly against the shoulder
inside the bearing bore in the wheel hub.
NOTE
The bearings in both front and rear wheels, will vary in depth
from wheel to wheel. Bearing depth is established when the
bearing is seated firmly against the shoulder inside the bear-
ing bore inside the wheel hub.
11WARNING1WARNING
Always install the brake side bearing first with the letter-
ing facing out from the hub.
7. Remove the nut, bearing, washer, FRONT BEARING
INSTALLER (Part No. B-43993-9) and forcing screw.
Figure 2-13. Install the Backing Plate (B-43993-11)
and Forcing Screw
i04281
1. Backing plate
2. Forcing screw
1
2
Figure 2-14. Installing Wheel Bearings
i04285
1. Long forcing screw
2. Wheel bearing
3. Front Wheel Bearing Installer (Part No. B-43993-9)
4. Washer
5. Nice bearing
6. Nut
5
1
6
3
4
2

2004 Buell Firebolt: Chassis 2-13
HOME
8. See Figure 2-15. Remove the BACKING PLATE (Part
No. B-43993-11) from the long forcing screw. Reinstall
the Backing Plate onto the forcing screw, with the smaller
diameter toward the hex-head.
9. Insert the forcing screw through the wheel hub on the
opposite side of the wheel.
10. See Figure 2-16. Install the spacer.
11. See Figure 2-17. Insert a
new
wheel bearing (1)
squarely into the hub, with the lettered side pointing out
(away from the wheel).
12. Slide the FRONT BEARING INSTALLER (Part No. B-
43993-9) (2) onto the forcing screw (3), with the smaller
diameter toward the bearing bore.
13. Install a washer (4), Nice bearing (5) and nut (6) onto the
forcing screw (3).
NOTE
See Figure 2-16. Center the spacer while installing the wheel
bearing. Failure to center the spacer could cause the bearing
not to pull in straight.
14. While holding the forcing screw (3), tighten the nut (6)
until the bearing is seated firmly.
15. Remove the nut, bearing, washer, FRONT BEARING
INSTALLER (Part No. B-43993-10) and forcing screw.
16. Install the wheel. See INSTALLATION under 2.5 FRONT
WHEEL.
Figure 2-15. Insert Forcing Screw and Backing Plate
Figure 2-16. Install the Spacer
i04283
1. Forcing screw
2. Backing Plate
1
2
i04286
1. Forcing screw
2. Spacer
2
1
Figure 2-17. Install the Bearing
i04287
1. Wheel bearing
2. Front Wheel Bearing Installer (B-43993-9)
3. Forcing screw
4. Washer
5. Nice bearing
6. Nut
5
1
6
3
4
2

2-14 2004 Buell Firebolt: Chassis
HOME
Front Rotor Installation
1. See Figure 2-18. Install
new
spring (4).
2. Install
new
washers (9).
3. Install
new
drive bushings (8) into rotor.
NOTE
Note the identifying mark of rotor is up and radius end of drive
bushing (8) toward center of wheel.
4. Align reference dot on front rotor with the valve stem.
5. Install
new
rotor mounting fasteners in a criss-cross pat-
tern around the wheel to insure proper fitting between
rotor, fastener and bushing. Tighten to 25-27 ft-lbs (34-
37 Nm).
1CAUTION
Rotor mounting fasteners must be seated into drive
bushings and drive bushings must be fitted into rotor
properly. Failure to comply may affect braking ability and
lead to brake failure which could result in death or seri-
ous injury.
Figure 2-18. Front Wheel Assembly
1. Front axle
2. Wheel bearing
3. Front wheel
4. Front brake springs (6)
5. Front wheel spacer
6. Front brake rotor
7. Rotor mount fastener (6)
8. Drive bushings (6)
9. Washers (6)
b0935x2x
7
8
1
2
3
4
5
2
6
9

2004 Buell Firebolt: Chassis 2-15
HOME
INSTALLATION
1. Raise front wheel to allow clearance for the caliper to
swing under and inside the front rotor.
CAUTION
To prevent cosmetic damage to the wheel, center caliper
between spokes before removal.
2. See Figure 2-19. Install caliper.
a. Align wheel so that rotor mounting fasteners strad-
dle caliper.
b. Rotate right front fork counterclockwise to align cali-
per with rotor.
c. Lower front wheel into caliper assembly.
3. Install front axle.
a. Apply LOCTITE ANTI-SEIZE LUBRICANT to axle.
b. See Figure 2-20. With pinch fasteners (metric)
loose, insert threaded end of axle (1) through left
side fork, wheel hub and thread into right fork.
c. Compress the front suspension to make sure it is
free and not binding.
d. Tighten axle (1) (metric) to 39-41 ft-lbs (53-56 Nm).
NOTE
The front axle is left handed thread.
4. See Figure 2-20. Tighten the front axle pinch fasteners
(2) to 20-22 ft-lbs (27-30 Nm).
5. Install right side fender fasteners. See 2.31 FENDERS.
Figure 2-19. Front Wheel Installation
Figure 2-20. Front Wheel Mounting
8441
1. Axle (left handed thread)
2. Front axle pinch fasteners (2) (metric)
8419
1
2

2-16 2004 Buell Firebolt: Chassis
HOME
REAR WHEEL 2.6
REMOVAL
1. Place a scissor jack under jacking point and raise rear
wheel off ground. For location of jacking point see 2.28
EXHAUST SYSTEM.
NOTE
Do not operate rear brake pedal with rear wheel removed or
caliper piston may be forced out. Reseating piston requires
caliper disassembly.
2. See Figure 2-21. Remove caliper carrier from swingarm
by removing caliper carrier fasteners. See 2.15 REAR
BRAKE CALIPER.
3. See Figure 2-22. Loosen rear axle pinch fastener (2).
4. Loosen rear axle (1) approximately 15 rotations to allow
partial tension to be removed from rear drive system.
5. Remove idler pulley assembly by removing nuts and
washers. See IDLER PULLEY REMOVAL in 6.6 DRIVE
BELT SYSTEM.
6. Remove rear axle.
7. Slide drive belt out of the way and remove rear wheel.
CLEANING AND INSPECTION
11WARNING1WARNING
Never use compressed air to “spin-dry” bearings. Very
high bearing speeds can damage unlubricated bearings.
Spinning bearings with compressed air can also cause a
bearing to fly apart, which could result in death or seri-
ous injury.
1. Inspect all parts for damage or excessive wear.
2. Inspect brake rotor. See 1.7 BRAKE SYSTEM MAINTE-
NANCE.
DISASSEMBLY
1. Remove sprocket.
a. Remove sprocket fasteners and washers. Discard
fasteners.
b. Remove sprocket from wheel.
2. Remove rear rotor.
a. See Figure 2-23. Remove and discard rotor mount-
ing fasteners (1).
b. Remove and inspect brake rotor for wear and warp-
ing. See BRAKE ROTOR THICKNESS in 1.7
BRAKE SYSTEM MAINTENANCE.
3. Remove rear wheel bearings using BUSHING AND
BEARING PULLER (Part No. B43993-8) and WHEEL
BEARING REMOVER AND INSTALLER (Part No. HD-
44060).
NOTE
The procedure for the rear wheel bearing removal is the
same as front wheel bearing removal. See Bearing Removal
in 2.5 FRONT WHEEL.
4. Remove rear wheel spacer (4).
NOTE
For wheel bearing removal follow identical procedure as used
for front wheel.
Figure 2-21. Rear Brake Caliper Carrier Fasteners
Figure 2-22. Rear Wheel Mounting, Right Side
8348
8420
2
1. Axle
2. Pinch bolt fastener
1

2004 Buell Firebolt: Chassis 2-17
HOME
Figure 2-23. Rear Wheel Assembly
1. Rotor mounting fastener (6)
2. Brake rotor
3. Wheel bearing
4. Wheel spacer
5. Wheel
6. Sprocket
7. Sprocket fastener
8. Axle
b0936x2x
1
3
5
4
3
2
6
7
8

2-18 2004 Buell Firebolt: Chassis
HOME
ASSEMBLY
11WARNING1WARNING
Do not allow brake fluid, bearing grease, lubricants, etc.
to contact brake rotor or reduced braking ability will
occur, which could result in death or serious injury.
NOTES
● See Figure 2-24. When installing rear wheel bearings it
is necessary to use the FORCING SCREW (1) from the
STEERING HEAD BEARING RACE INSTALLER (Part
No. HD-39302).
● The procedure for the rear wheel bearing installation is
the same as front wheel bearing installation. See Bear-
ing Installation in 2.5 FRONT WHEEL.
● Install rear wheel bearings using REAR BEARING
INSTALLER (Part No. B-43993-10) and WHEEL BEAR-
ING REMOVER AND INSTALLER (Part No. HD-44060)
and FORCING SCREW (Part No. HD-39302-2).
1. Install wheel bearing (3) on rotor side of motorcycle.
2. Install rear wheel spacer (4).
3. Install wheel bearing (3) on sprocket side of motorcycle.
4. Install sprocket.
a. Position sprocket (6) on wheel (5) keeping lip of
sprocket facing the inside.
b. Install new sprocket fasteners (7) and washers tight-
ening to 35-37 ft-lbs (48-50 Nm).
5. Install rear rotor (2).
a. Position rear brake rotor (2) on wheel (5).
b. Install brake rotor (2) with new rotor mounting fas-
teners (1) and tighten to 25-27 ft-lbs (34-37 Nm).
INSTALLATION
1. Center rear wheel in the swingarm at the same time slid-
ing the drive belt onto the rear sprocket.
2. With wheel centered in swingarm, lower bike to align
swingarm and wheel hub.
3. Apply ANTI-SEIZE LUBRICANT to hole in right side of
swingarm where rear axle slides through.
4. See Figure 2-25. Coat the axle with ANTI-SEIZE LUBRI-
CANT.
5. Slide axle through right side of swing arm and wheel hub
and thread partially into swingarm on left side.
6. Install idler pulley. See IDLER PULLEY INSTALLATION-
under 6.6 DRIVE BELT SYSTEM.
1CAUTION
Never tighten rear axle with swingarm brace removed.
7. See Figure 2-26. Tighten rear axle (1) to 23-27 ft-lbs
(31.2-36.6 Nm), back off two full turns and then retighten
to 48-52 ft-lbs (65.1-70.5 Nm).
8. Tighten pinch fastener (2) on right side of swingarm to
40-45 ft-lbs (54-61 Nm).
Figure 2-24. Forcing Screws Used for Front and Rear
Wheel Bearing Installation
10096
1. Rear wheel forcing screw
2. Front wheel forcing screw (Part No. 280856)
1
2
Figure 2-25. Anti-Seize Lubricant Location
Figure 2-26. Rear Wheel Mounting, Right Side
b1036x2x
8420
2
1. Axle
2. Pinch bolt fastener
1

2004 Buell Firebolt: Chassis 2-19
HOME
9. See Figure 2-27. Install caliper carrier and tighten fas-
tener to 24-26 ft-lbs (32-35 Nm). See 2.15 REAR
BRAKE CALIPER.
NOTE
The brake pads may become cocked and will not allow the
rotor to slide into the caliper. Press on the brake pad from the
outside of the caliper to straighten out the pad.
11WARNING1WARNING
Always test motorcycle brakes at low speed after servic-
ing or bleeding system. To prevent death or serious
injury, Buell recommends that all brake repairs be per-
formed by a Buell dealer or other qualified mechanic.
Figure 2-27. Rear Brake Caliper Carrier Fasteners
8348

2-20 2004 Buell Firebolt: Chassis
HOME
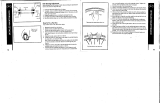
CHECKING CAST RIM RUNOUT 2.7
GENERAL
Check wheels for lateral and radial runout before installing a
new tire.
Rim Lateral Runout
1. See Figure 2-28. Install truing arbor in wheel hub and
place wheel in WHEEL TRUING AND BALANCING
STAND (Part No. HD-99500-80).
2. Tighten arbor nuts so hub will turn on its bearings.
3. Check rim lateral runout by placing a gauge rod or dial
indicator near the rim bead. Replace wheel if lateral
runout exceeds specification shown in Table 2-9.
Rim Radial Runout
1. See Figure 2-29. Install truing arbor in wheel hub and
place wheel in WHEEL TRUING AND BALANCING
STAND (Part No. HD-99500-80).
2. Tighten arbor nuts so hub will turn on its bearings.
3. Check radial runout as shown. Replace wheel if runout
exceeds specification shown in Table 2-9.
Table 2-9. Wheel Rim Runout
RUNOUT IN MM
Maximum lateral 0.040 1.02
Maximum radial 0.030 0.76
Figure 2-28. Checking Cast Rim Lateral Runout Using
Wheel Truing and Balancing Stand (HD-99500-80)
Figure 2-29. Checking Cast Rim Radial Runout Using
Wheel Truing and Balancing Stand (HD-99500-80)
b0757x2x
Gauge rod
b0758x2x
Gauge rod
/