Page is loading ...

2006 BUELL P3
SERVICE MANUAL
Part Number 99492-06Y
Section 1: Maintenance
Section 2: Chassis
Section 3: Engine
Section 4: Fuel System
Section 5: Starter
Section 6: Drive/Transmission
Section 7: Electrical
Appendix

1-2 Edit Me: Printed April 15, 2005 10:56 am

Appendix A: Tools A-1
HOME
TOOLS A.1
Part No. B-35316-5 12 Inch Bolt.
Used with Part No. HD-39302.
Part No. B-41174 Rear Wheel Support Stand and
Part No. B-41174-2 Replacement Pad.
Part No. B-41177 Front Fork Holding Tool
Part No. B-43933 Wheel Bearing Remover/Installer.
Use with Part No. HD-44060.
Part No. B-43982 Sprocket Locking Tool
Part No. B-43983 Main Drive Gear Cross Plate.
Used with Part No. HD-35316A.
Part No. B-43985 Transmission Remover/Installer
Part No. B-43987 Engine Cradle
Used with HD-42310

A-2 Appendix A: Tools
HOME
Part No. B-43991 Fork Seal/Bushing Driver
Part No. B-59000A Pro Level Oil Gauge
Part No. HD-25070 Robinair Heat Gun
Part No. HD-33446A Cylinder Torque Plates
and Torque Plate Bolts Part No. HD-33446-86.
Part No. HD-33223-1 Cylinder Compression Gauge
Part No. HD-33413-A Carburetor Idle Adjustment Tool
Part No. HD-33416 Universal Driver Handle
Part No. HD-33418 Universal Puller Forcing Screw

Appendix A: Tools A-3
HOME
Part No. HD-33813 Inductive Timing Light
Part No. HD-34623B Piston Pin
Retaining Ring Installer/Remover
Part No. HD-34643A Shoulderless Valve Guide
Seal Installer
Part No. HD-34723 Valve Guide Hone (8 mm)
Part No. HD-34731 Shoulderless Valve Guide
Installation Tool
Part No. HD-34736B Valve Spring Compressor
Part No. HD-34740 Driver Handle and Remover. Use with
Part No. HD-34643A and art No. HD-34731.
Part No. HD-34751 Nylon Valve Guide Brush

A-4 Appendix A: Tools
HOME
Part No. HD-34902-B Primary Bearing Race Remover/
Installer
Part No. HD-35102 Wrist Pin Bushing Hone (20 mm)
Part No. HD-35316-A Main Drive Gear Remover/Installer
and Main Drive Gear Bearing Installer.
Part No. HD-35381 Belt Tension Gauge
Part No. HD-35457 Black Light Leak Detector
Part No. HD-35500A Digital Multi-Meter (FLUKE 23)
Part No. HD-35518 Internal/External
Retaining Ring Pliers
Part No. HD-35667A Cylinder Leakdown Tester
CYLINDER LEAKDOWN TESTER
JHYUY
Guibikhf iugu iu ptr td6rd
Foihjolm oijfollkop Yuooifoihfm
knsdl hlno hslnslnnsdl hlno
bs npond bpdk kznh
odlbndpob npond bndb n
CYLINDER LEAKDOWN TESTER
Bdhgkjsbkdv ' ksjjlkn lk
knsdl hlno hslnsln nlslns finbp pffb
odlbndpob nponno[bho
knsdl hlno hslnsln nlslns finbp pffb
odlbndpob npdb ndbno[bho
knsdl hlno hslnslnnsdl hlno hso[bho
knsdl hlno hslnslp pffb
odlbndpob npond bndb ndbno[bho
Bdhgkjsbkdv ' ksjjlkn lk
knsdl hlno hslnsln nlslns finbp pffb
odlbndpob nponno[bho
knsdl hlno hslnsln nlslns finbp pklhb
odlbndpob npdb ndbno[bho
knsdl hlno hslnslnnsdl hlno hso[bho
bs npond bpdk kznh
odlbndpob npond bndb ndbno[bho
Bdhgkjsbkdv ' ksjjlkn lk
knsdl hlno hslnsln nlslns finbp pffb
odlbndpob nponno[bho
knsdl hlno hslnsln nlslns finbp pklhb
Bdhgkjsbkdv Majjlkn Nolk
knsdl hlno hslnsln
ndpob npond
Bdhgkjsbkdv hlno hslnslp
knsdl hlno hslnsln
ndpob npond

Appendix A: Tools A-5
HOME
Part No. HD-35758 Neway Valve Seat Cutter Set
Part No. HD-37842A Inner/Outer Main Drive Gear
Needle Bearing Installer
Part No. HD-38125-6 Packard Terminal Crimp Tool
(Sealed and non-sealed connectors)
Part No. HD-38125-7 Packard Terminal Crimp Tool
(Sealed connectors)
Part No. HD-38125-8 Packard Terminal Crimp Tool
Part No. HD-38361 Cam Gear Gauge Pin Set
(0.108 in. (2.74 mm) Diameter)
Part No. HD-38362 Sprocket Locking Link
Part No. HD-38515-A Clutch Spring Compressing Tool
and Part No. HD-38515-91 Forcing Screw.

A-6 Appendix A: Tools
HOME
Part No. HD-38871- 2 Reamer. Use with Part No. B-43988
Camshaft Bushing Reamer Fixture
Part No. HD-39151 Shift Drum Retaining Ring Installer
Part No. HD-39301-A Steering Head Bearing
Race Remover
Part No. HD-39302 Steering Head Bearing
Race Installer
Part No. HD-39458 Sprocket Shaft Bearing Outer
Race Installer
Part No. HD-39565 Engine Sound Probe
Part No. HD-39617 Inductive Amp Probe.
Use with Part No. HD-35500A.
Part No. HD-39621 Electrical Terminal Repair Kit
T
SPOR
ST
E
R
13
CC
40

Appendix A: Tools A-7
HOME
Part No. HD-39782 Cylinder Head Support
Part No. HD-39786 Cylinder Head Holding Fixture
Part No. HD-39800 Oil Filter Crusher, Small
Part No. HD-39823 Oil Filter Crusher, Large
Part No. HD-39847 Universal Ratcheting Tap/
Reamer Handle
Part No. HD-39932 (Steel) or HD-39932-CAR (Carbide)
Intake and Exhaust Valve Guide Reamer.
Part No. HD-39964 Reamer Lubricant (Cool Tool)
Part No. HD-39965 Deutsch Terminal Crimp Tool

A-8 Appendix A: Tools
HOME
Part No. HD-39969 Ultra-Torch UT-100
Part No. BU-44473 Tool Organizational System
Part No. HD-41137 Hose Clamp Pliers
Part No. HD-41155 VHS Video Shelf
Part No. HD-41183 Heat Shield Attachment.
Use with Part No. HD-25070.
Part No. HD-41185 Hose Cutting Tool
Part No. HD-41185-1 Oil Hose Cutter-Replacement Blade
Part No. HD-41405 Main Drive Gear Seal Installer

Appendix A: Tools A-9
HOME
Part No. HD-41496 Main Drive Gear Seal Installer
Part No. HD-41609 Amp Terminal Crimp Tool
Part No. HD-41675 Oil Pressure Sending Unit Wrench
Part No. HD-42310 Engine/Transmission Stand
Part No. HD-42310-150 Drip Tray.
Use with Part No. HD-42310.
Part No. HD-42320 Piston Pin Remover/Installer
Part No. HD-42322 Piston Support Plate
Part No. HD-42376 Battery/Charging System
Load Tester
600 200
Made in USA
PP-9606- 0001

A-10 Appendix A: Tools
HOME
Part No. HD-42579 Sprocket Bearing/Seal Installer
Part No. HD-42774 Sprocket Shaft Seal Installer
Part No. HD-43646 Engine Stand
Part No. HD-43984 Crankshaft Locking Tool
Part No. HD-44358 Flywheel Support Fixture
Part No. HD-43682-10 Drip pan.
Use with Part No. HD-43682 or Part No. HD-43646.
Part No. HD-44069 Timkin Snap ring remover and
installer. Use with Part No. HD-44404.
Part No. HD-44404 Timkin Bearing Remover. Use with
Part No. HD-44069.

Appendix A: Tools A-11
HOME
Part No. HD-94547-101 Crankshaft Bearing Outer Race
Remover. Use with Part No. HD-94547-102.
Part No. HD-94547-102 Drive Handle. Use with Part No.
HD-94547-101.
Part No. HD-94660-37B Mainshaft Locknut Wrench
Use with Part No. B-43982.
Part No. HD-94800-26A Connecting Rod Bushing
Reamers and Pilots
Part No. HD-94803-67 Intake Camshaft Bushing Reamer
Part No. HD-94804-57 Rocker Arm Bushing Reamer
Part No. HD-94812-1 Pinion Shaft Bushing Reamer.
Use with Part No. HD-94812-87.
Part No. HD-94812-87 Pinion Shaft Reamer Pilot.
Use with Part No. HD-94812-1.

A-12 Appendix A: Tools
HOME
Part No. HD-95017-61 Large External Retaining
Ring Pliers
Part No. HD-95635-46 All-Purpose Claw Puller
Part No. HD-95637-46A Wedge Attachment for
Claw Puller. Use with Part No. HD-95635-46.
Part No. HD-95760-69A Bushing/Bearing Puller Tool Set
Set includes items 1-7. Items 8 (HD-95769-69), 9 (HD-
95770-69) and 10 (HD-95771-69) are optional.
Part No. HD-95952-33B Connecting Rod
Clamping Tool
Part No. HD-95970-32D Piston Pin Bushing Tool
Part No. HD-96215-49 Small Internal Retaining
Ring Pliers
Part No. HD-96295-65D Timing Mark View Plug.
Use with Part No. HD-33813.

Appendix A: Tools A-13
HOME
Part No. HD-96333-51C Piston Ring Compressor
Part No. HD-96550-36A Valve Lapping Tool
Part No. HD-96710-40B Crankcase Main Bearing
Lapping Tool
Part No. HD-96718-87 Pinion Bearing Outer Race
Lapping Kit
Part No. HD-96796-47 Valve Spring Tester
Part No. HD-96921-52B Oil Pressure Gauge
Part No. HD-96921-58 Oil Pressure Gauge Adapter.
Use with Part No. HD-96921-52B.
Part No. HD-97087-65B Hose Clamp Pliers

A-14 Appendix A: Tools
HOME
Part No. HD-97273-60 Camshaft Bushing Installer
Part No. HD-97292-61 Two Claw Puller
Part No. J-5586 Transmission Shaft
Retaining Ring Pliers
Part No. HD-47248 Rocker Housing Wrench
˙HD-47248
Part No. HD-47250 Intake Manifold Wrench
Part No. HD-47258 Rocker Cover Wrench
HD-47250
HD-47258

Appendix B: Wiring B-1
HOME
ELECTRICAL CONNECTORS B.1
GENERAL
The following table provides a description of the connectors
found on your motorcycle.
Connector numbers are listed in [brackets] in this manual.
NOTE
Male ends of connectors are labeled “A” in text. Female ends
of connectors are labeled “B” in text.
Table B-1. Electrical Connectors
CONNECTOR DESCRIPTION COMPONENT(S) LOCATION
[7] 6-place Amp Multilock Tail Lamp/Rear Directionals Under Seat
[10] 6-place Deutsch Integrated Ignition Module Sensor
Left side of frame backbone on
T-stud
[22] 4-place Amp Multilock
Right Handlebar Switch Housing-
ignition power, module and starter
Behind windscreen
[20] 12-place Deutsch Indicators/Speedometer Behind windscreen
[24]
10-place Amp Multilock Left Handlebar Switch Housing-
turn signals, lights
Behind windscreen
[30] 3-blade relay connector Flasher Relay Under seat, to right of battery
[33] 4-place Deutsch Ignition/Headlamp Key Switch Behind windscreen
[38] 4-place Amp Multilock Headlamp Behind windscreen/headlamp
[39] 12-place Packard Speedometer/Indicators On back of speedometer
[46] 2-place barrel connector Voltage Regulator Above swingarm, left side
[60]
2-place Amp Multilock Side Stand Switch On top of swingarm, cable tied to
rear brake line
[61] 9-slot fuse block Fuse Block Under seat on right side
[65] 3-place Deutsch Speed Sensor Under seat, to right of shock
[83] 3-place Amp Multilock Ignition Coil Under frame backbone at coil
[88]
6-place Deutsch Throttle Position Sensor and Auto-
Enrichener
Under frame backbone, right side
[95] 2-place Amp Multilock Clutch Switch At left handlebar
[120]
Post Oil Pressure Switch Above oil filter, right lower side of
crankcase
[121]
2 blades Rear Stoplight Switch At switch, under frame by shock
absorber
[122] Blade Horn At horn, behind front fork
[123] 4-blade relay connector Starter Relay Under seat to right of battery
[128] Blade Starter Under starter solenoid
[131] Post Neutral Switch Behind sprocket cover, right side
[134] 3-place Packard Bank Angle Sensor Under Seat to right of battery
[170] 2 blades Front Brake Switch At right handlebar switch
[171] 4-blade relay connector System Relay Under seat, to left of battery
[172] 1-Place Bullet Neutral Switch to main harness Above sprocket cover, right side

B-2 Appendix B: Wiring
HOME
DEUTSCH ELECTRICAL CONNECTORS B.2
GENERAL
The Deutsch Connector features a seal to protect electrical
contacts from dirt and moisture.
Three and eight pin connectors are of similar construction
with one exception: eight pin connectors use two external
latches on the socket side.
NOTE
Use the DEUTSCH TERMINAL CRIMP TOOL (Part No. HD-
39965) to install Deutsch pin and socket terminals on wires. If
new
terminals must be installed, follow the instructions
included with the crimping tool or see CRIMPING INSTRUC-
TIONS.
REMOVING/INSTALLING
SOCKETS
1. See Figure B-1. Remove the secondary locking
wedge (6). Insert the blade of a small screwdriver
between the socket housing and locking wedge in—line
with the groove (in—line with the pin holes if the groove
is absent). Turn the screwdriver 90° to pop the wedge up.
2. Gently depress terminal latches inside socket housing
(3) and back out socket terminals (1) through holes in
rear wire seal (2).
3. Fit rear wire seal (2) into back of socket housing, if
removed. Grasp socket terminal approximately 1.0 in.
(25.4 mm) behind the contact barrel. Gently push sock-
ets through holes in wire seal into their respective cham-
bers. Feed socket into chamber until it “clicks” in place.
Verify that socket will not back out of chamber; a slight
tug on the wire will confirm that it is properly locked in
place.
4. Install internal seal (5) on lip of socket housing, if
removed. Insert tapered end of secondary locking wedge
(6) into socket housing and press down until it snaps in
place. The wedge fits into the center groove within the
socket housing and holds the terminal latches tightly
closed.
NOTES
●
The conical secondary locking wedge of the 3-pin con-
nector must be installed with the arrow pointing toward
the external latch. See Figure B-2.
●
If the secondary locking wedge does not slide into the
installed position easily, verify that all terminals are fully
installed in the socket housing. The lock indicates when
terminals are not properly installed by not entering its
fully installed position.
REMOVING/INSTALLING
PINS
1. See Figure B-1. Remove the secondary locking wedge
(7). Use the hooked end of a stiff piece of mechanic’s
wire or a needle nose pliers, whichever is most suitable.
2. Gently depress terminal latches inside pin housing (9)
and back out pin terminals (11) through holes in wire
seal (10).
3. Fit wire seal (10) into back of pin housing (9). Grasp
crimped pin approximately 1.0 in. (25.4 mm) behind the
contact barrel. Gently push pins through holes in wire
seal into their respective numbered locations. Feed pin
into chamber until it “clicks” in place. Verify that pin will
not back out of chamber; a slight tug on the wire will con-
firm that it is properly locked in place.
4. Insert tapered end of secondary locking wedge (7) into
pin housing (9) and press down until it snaps in place.
The wedge fits in the center groove within the pin hous-
ing and holds the terminal latches tightly closed.
ASSEMBLY/INSTALLATION
Insert socket housing (3) into pin housing (9) until it snaps in
place. To fit the halves of the connector together, the latch (4)
on the socket side must be aligned with the latch cover (8) on
the pin side.
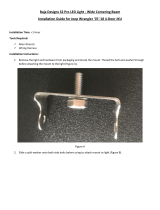
Figure B-1. 3-Pin Connector
11
10
9
8
7
6
5
4
3
2
1
a0266x7x
Pin Side
7. Secondary locking
wedge
8. Latch cover
9. Pin housing
10. Wire seal
11. Pin terminal
Socket Side
1. Socket terminal
2. Wire seal
3. Socket housing
4. External latch
5. Internal seal
6. Secondary lock-
ing wedge

Appendix B: Wiring B-3
HOME
CRIMPING INSTRUCTIONS
1. See Figure B-3. Squeeze the handles to cycle the
DEUTSCH TERMINAL CRIMP TOOL (Part No. HD-
39965) to the fully open position.
2. Raise locking bar by pushing up on bottom flange. With
the crimp tails facing upward and the rounded side of the
contact barrel resting on the concave split level area of
the crimp tool, insert contact (socket/pin) through middle
hole of locking bar.
3. Release locking bar to lock position of contact. If the
crimp tails are slightly out of vertical alignment, the crimp
tool automatically rotates the contact so that the tails
face straight upward. When correctly positioned, the
locking bar fits snugly in the space between the contact
band and the core crimp tails.
4. Strip lead removing 0.1562 in. (4.0 mm) of insulation.
Insert wires between crimp tails until ends make contact
with locking bar. Verify that wire is positioned so that
short pair of crimp tails squeeze bare wire strands, while
long pair folds over insulation material.
5. Squeeze handle of crimp tool until tightly closed. Tool
automatically opens when the crimping sequence is
complete. Raise up locking bar and remove contact.
NOTE
Inspect the quality of the core and insulation crimps. Distor-
tion should be minimal.
Figure B-2. 3-pin Locking Wedge Orientation
a0267x7x
Socket
housing
Pin housing
Arrow points to
external latch.
Figure B-3. Deutsch Crimping Procedure
1. Insert contact through middle
hole of locking bar.
2. Insert stripped lead until it
contacts locking bar.
3. Close and squeeze crimp tool.
4. Raise locking bar and
remove contact.
5. Inspect quality of core and
insulation crimps.
a0268x7x
Locking bar
Insulation crimp
Core crimp

B-4 Appendix B: Wiring
HOME
AMP MULTILOCK ELECTRICAL CONNECTORS B.3
SOCKET/PIN TERMINALS
Removal
1. If necessary, cut any surrounding cable straps to gain
access to the connector.
2. See Figure B-4. Depress the button (5) on the socket
housing (3).
3. Pull apart the pin and socket halves.
4. Bend back the latch slightly and free one side of second-
ary lock, then repeat the step to release the other side.
5. Rotate the secondary lock outward on hinge to access
terminals in chambers of connector housing.
6. Looking in the terminal side of the connector (opposite
the secondary lock), take note of the cavity next to each
terminal.
7. Remove socket terminal (Figure B-6.) or pin terminal
(Figure B-7.)
a. With the flat edge against the terminal, insert the
pick (Snap-On TT600-3) into the cavity until it stops.
b. Pivot the end of the pick away from the terminal to
release the tang.
c. Gently tug on wire to pull terminal from chamber. Do
not tug on the wire until the tang is released or the
terminal will be difficult to remove. A “click” is heard
if the tang is engaged but then inadvertently
released. Repeat the steps without releasing the
tang.
NOTE
An AMP TERMINAL CRIMP TOOL (Part No. HD-41609) is
used to install Amp Multi-lock pin and socket terminals on
wires. If
new
terminals must be installed, see CRIMPING
INSTRUCTIONS.
Figure B-4. Socket Housing
Figure B-5. Pin Housing
a0269x7x
1
4
2
2
1
3
1. Secondary lock open
2. Latch
3. Socket housing
4. Socket terminal
5. Button
5
1
3
4
2
1. Secondary lock open
2. Latch
3. Pin housing
4. Pin terminal
a0270x7x
/