Page is loading ...

[email protected] www.DiodeLED.com
INSTALLATION GUIDE
1 OF 4
EQUIFLUX® LED DISPLAY GRAPHICS LIGHT
IG031616-3.0
[email protected] www.DiodeLED.com1 OF 2
®
Indoor/Dry Location Models
DI-24V-EQUI-6500-12-1055
DI-24V-EQUI-6500-24-1055
Safety & Warnings
• Install in accordance with the National Electric Code, and local
regulations.
• This product is intended to be installed and serviced by a qualied,
licensed electrician.
• Install only with a Class 2 LED driver. Only use copper wiring.
• This product is not dimmable. Attaching to a dimming control wlll
damage the xture and void the product warranty.
• Proper heat dissipation will prolong the working lifespan of this product.
Install in a well-ventilated area free from explosive gases and vapors.
• This product is rated for indoor/dry locations and is not protected
against moisture.
• Ensure applicable wire is installed between driver, xture, and any
controls in between. When choosing wire, factor in voltage drop,
amperage rating, and type (in-wall rated, wet location rated, etc.).
Inadequate wire installation could overheat wires, and cause a re.
• Do not install if product has any visible damage.
• Do not modify or disassemble this product beyond instructions or the
warranty will be void.
Dry Location Only
Prior to installation, ensure all components are a compatible system. Congure and pre-test your LED system prior to permanent installation to ensure
all components are operating correctly. Install in accordance with the NEC and local regulations.
WARNING Shock Hazard. May result in serious injury or death.
1
Turn OFF High Voltage AC Power at the main breaker.
2
Aach ‘DC to Female Molex Adapter’ between rst xture and
adapter, then plug adapter into 120VAC electrical receptacle.
See ‘System Diagram’ for an example system design.
4
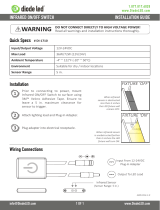
Quick Specs
Input Voltage 24VDC Constant Voltage
Power Consumption 12 in. Fixture: 9.4W / 390mA
24 in. Fixture: 18.8W / 785mA
Max Run
¹
12 in. Fixture: 9 Fixtures
24 in. Fixture: 4 Fixtures
Ambient Temperature
²
-4°F ~ 158°F (-20°C ~ 70°C)
Included Models
Note
¹ Each max run requires a dedicated power feed from the driver. If combining xtures of dierent lengths, do not exceed 90W in series.
Note
²
Do not install product in an environment outside the listed ambient temperature.
Before you begin, read all warnings and installation instructions thoroughly.
Mount EQUIFLUX xture to graphics panel using pop-in
fasteners (included), compression screws (included) or
alternave hardware.
3
Aach EQUIFLUX xtures in series, ulizing male and female
Molex connecons. Do not exceed 90W in series.
Installation
E469770
2
Cont.
WARNING!
When mounng with compression
screws or alternave hardware,
ulize included nylon washers
(included) to prevent screw
heads from short-circuing and
damaging EQUIFLUX luminaire.

[email protected] www.DiodeLED.com
INSTALLATION GUIDE
2 OF 4
EQUIFLUX® LED DISPLAY GRAPHICS LIGHT
IG031616-3.0
[email protected] www.DiodeLED.com2 OF 2
®
System Diagram
QUESTIONS? Visit www.DiodeLED.com or contact Customer Support at inf[email protected]
or 1.877.817.6028 Monday through Friday, 7:00am - 5:00pm PST.
V-
V+
V-
V+
V-
V+
V-
V+
V-
V+
V-
V+
24V Class 2 Low Voltage
Plug-In Adapter (Driver)
AC Power
50/60Hz
Insertion points for
Molex accessories
2x 5mm dia. mounting holes. per fixture.
The following diagram is provided as an example system design. Always review each component installation guide for detailed and up-to-date wiring
instructions. Install in accordance with NEC and local regulations.
Fixture does not illuminate
• See ‘System Diagram’. Ensure the system is wired correctly and
polarities are correct.
• Ensure a compatible 24VDC constant voltage driver is installed.
Fixture is slowly ashing • Ensure driver is not overloaded. An overloaded driver will cause the
internal auto-reset to trip repeatedly.
Some LEDs are not functional • Ensure xture has not been bent excessively, causing components
and solder to detach from circuit board.
Lights are ickering • Ensure no dimmer is installed. If lights continue to icker, check for
loose connections.
Troubleshooting
/