Page is loading ...

TYTO-02
INSTALLATION INSTRUCTIONS
AxxessInterfaces.com © COPYRIGHT 2019 METRA ELECTRONICS CORPORATION REV. 6/26/19 INSTTYTO-02
Product Info
INTERFACE FEATURES
INTERFACE COMPONENTS
OPTIONAL ACCESSORIES (sold separately)
TOOLS REQUIRED
• Cutting tool • Crimping tool • Tape • Connectors
(example: butt-connectors, bell caps, etc.)
TABLE OF CONTENTS
Connections ............................................................2
Installation .............................................................3
Programming .........................................................3
Toyota Amplifier Interface 2012-up
• Provides wires for multimedia radios (park brake, reverse)
•
Designed for amplified systems
• High level speaker input
• Retains balance and fade
• Prewired ASWC-1 harness (ASWC-1 sold separately)
• Pre-wired AX-CUSTOM-BT harness (AX-CUSTOM-BT sold separately)
• Micro-B USB updatable
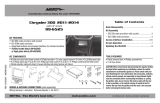
• TYTO-02 interface • TYTO-02 harness
• 16-pin harness with stripped leads
Steering Wheel Control Interface: ASWC-1
Vehicle Customization Interface: AX-CUSTOM-BT
APPLICATIONS
Toyota
4Runner 2014-up
Avalon 2013-up
Camry (with NAV) 2012-2017
Highlander 2014-up
Prius 3rd gen. (with NAV) 2012-2015
Prius PHV (with NAV) 2012-2015
Prius V 2012-2017
Rav-4 2014.5-2018
Sequoia (with NAV) 2013
Sequoia 2014-up
Sienna 2015-2017
Tacoma 2014-2015
Tundra 2014-up
Venza (with HDD based NAV) 2013-2014
Venza 2015

2
CONNECTIONS
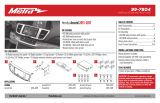
From the 16-pin harness with stripped leads to the aftermarket radio:
• Connect the Blue/White wire to the amp turn on wire.
• Connect the Gray wire to the right front positive speaker output.
• Connect the Gray/Black wire to the right front negative speaker output.
• Connect the White wire to the left front positive speaker output.
• Connect the White/Black wire to the left front negative speaker output.
• Connect the Green wire to the radio’s left rear positive speaker output.
• Connect the Green/Black wire to the radio’s left rear negative speaker output.
• Connect the Purple wire to the radio’s right rear positive speaker output.
• Connect the Purple/Black wire to the radio’s right rear negative speaker output.
• Tape off and disregard the following (6) wires, they will not be used in this application:
Brown, Light Green, Blue/Pink, Green/Purple, Orange/White, Red
From the TYTO-02 harness to the aftermarket radio:
• Connect the Black wire to the ground wire.
• Connect the Yellow wire to the battery wire.
• Connect the Red wire to the accessory wire.
• If the aftermarket radio has an illumination wire, connect the Orange/White wire to it.
The following (2) wires are only for multimedia/navigation radios that require these wires.
• Connect the Green/Purple wire to the reverse wire.
• Connect the Light Green wire to the parking brake wire
• Connect the Red and White RCA jacks to the audio AUX-IN jacks from the aftermarket radio.
12-pin pre-wired ASWC-1 harness & 3.5mm jack
This harness and 3.5mm jack are to be used with the ASWC-1 (sold separately) to retain
steering wheel audio controls. If the ASWC-1 is not being used, disregard this harness &
3.5mm jack. If it will be used, please refer to the ASWC-1 instructions for radio connections and
programming. Disregard the harness that comes with the ASWC-1.
16-pin pre-wired AX-CUSTOM-BT harness
This harness is to be used along with the AX-CUSTOM-BT (sold separately) to retain the
personalization menu that is lost when removing the factory radio. If the AX-CUSTOM-BT is not
being used, disregard this harness. If it will be used, refer to the AX-CUSTOM-BT manual for app
instructions. Disregard the harness that comes with the AX-CUSTOM-BT.

3
REV. 6/26/2019 INSTTYTO-02
With the key in the off position:
1. Locate the factory radio harness in the vehicle and complete all necessary connections to the
aftermarket radio.
2. Connect the 16-pin harness with stripped leads and the TYTO-02 harness into the TYTO-02
interface.
3. Connect the TYTO-02 harness to the factory radio harness in the vehicle.
• Turn the key (or push-to-start button) to the ignition position and wait until the radio comes on.
The factory amplifier should come on and you should hear sound at this point.
• Test all functions of the installation for proper operation, before reassembling the dash.
INSTALLATION PROGRAMMING

KNOWLEDGE IS POWER
Enhance your installation and fabrication skills by
enrolling in the most recognized and respected
mobile electronics school in our industry.
Log onto www.installerinstitute.com or call
800-354-6782 for more information and take steps
toward a better tomorrow.
®
Metra recommends MECP
certified technicians
AxxessInterfaces.com © COPYRIGHT 2019 METRA ELECTRONICS CORPORATION REV. 6/26/19 INSTTYTO-02
INSTALLATION INSTRUCTIONS
TYTO-02
Having difficulties? We’re here to help.
Contact our Tech Support line at:
1-800-253-TECH
Or via email at:
techsupport@metra-autosound.com
Tech Support Hours (Eastern Standard Time)
Monday - Friday: 9:00 AM - 7:00 PM
Saturday: 10:00 AM - 7:00 PM
Sunday: 10:00 AM - 4:00 PM

TYTO-02
INSTRUCCIONES DE INSTALACIÓN
AxxessInterfaces.com © COPYRIGHT 2019 METRA ELECTRONICS CORPORATION REV. 6/26/19 INSTTYTO-02
Información del producto
CARACTERÍSTICAS DE LA INTERFASE
COMPONENTES DE LA INTERFASE
Toyota Interfase amplificada 2012 y mas
• Proporciona cables para radios multimedia (freno de
estacionamiento, marcha atrás)
• Diseñado para sistemas amplificados
• Entrada de bocina de alto nivel
• Retiene el balance y la intensidad
• Arnés ASWC-1 precableado (el ASWC-1 se vende por separado)
•
Cableado AX-CUSTOM-BT precableado (AX-CUSTOM-BT se vende por separado)
• Micro-B actualizable USB
• Interfase TYTO-02 • Arnés TYTO-02
• Arnés de 16 pins con conectores pelados
APLICACIONES
Toyota
4Runner 2014 y mas
Avalon 2013 y mas
Camry (con NAV) 2012-2017
Highlander 2014 y mas
Prius 3rd gen. (con NAV) 2012-2015
Prius PHV (con NAV) 2012-2015
Prius V 2012-2017
Rav-4 2014.5-2018
Sequoia (con NAV) 2013
Sequoia 2014 y mas
Sienna 2015-2017
Tacoma 2014-2015
Tundra 2014 y mas
Venza (con NAV basado en HDD) 2013-2014
Venza 2015
ACCESORIOS OPCIONALES
(se vende por separado)
HERRAMIENTAS REQUERIDAS
• Cortador • Pelacables • Cinta • Conectores
(p. ej., conectores a tope, tapas acampanadas, etc.)
INDICE
Conexiones .............................................................2
Instalación ..............................................................3
Programación .........................................................3
Interfaz de control en volante: ASWC-1
Interfaz de Personalización de Vehículos: AX-CUSTOM-BT

2
CONEXIONES
Del arnés de 16 pins con conectores pelados al radio de mercado secundario:
• Conecte el cable azul/blanco con el encendido del amp/ antena eléctrica.
• Conecte el cable gris con la salida positiva de la bocina derecha del frente.
• Conecte el cable gris/negro con la salida negativa de la bocina derecha del frente.
• Conecte el cable blanco con la salida positiva de la bocina izquierda del frente.
• Conecte el cable blanco/negro con la salida negativa de la bocina izquierda del frente.
• Conecte el cable verde con la salida positiva de la bocina trasera izquierda del radio.
• Conecte el cable verde/negro con la salida negativa de la bocina trasera izquierda del radio.
• Conecte el cable púrpura con el cable positivo trasero de la bocina.
• Conecte el cable púrpura/negro con la salida negativa de la bocina trasera derecha del radio.
• Encinte e ignore los siguientes (6) cables, ya que no se utilizarán en esta aplicación:
marrón, verde claro, azul/rosa, verde/púrpura, anaranjado/blanco, rojo
Del arnés TYTO-02 al radio de mercado secundario:
• Conecte el cable negro con el cable de tierra.
• Conecte el cable amarillo a la cable de batería.
• Conecte el cable rojo con el cable de accesorios.
• Si la radio del mercado secundario tiene un cable de la iluminación, conecte el cable
anaranjado/blanco a ella.
Los siguientes (2) cables son para radios de mercado secundario con multimedios/navegación
que tienen estos cables.
• Conecte el cable verde/púrpura al cable de reversa.
• Conecte el cable verde claro al cable de freno de mano
•
Conecte los conectores RCA rojo y blanco con los conectores AUX-IN del radio de mercado secundario
.
Arnés ASWC-1 precableado de 12 pins y conector de 3.5 mm
Este arnés y el conector de 3.5 mm deben usarse con el ASWC-1 (se vende por separado) para
retener los controles de audio del volante. Si no se está utilizando el ASWC-1, ignore este
arnés y el conector de 3.5 mm. Si se va a utilizar, consulte las instrucciones de ASWC-1 para las
conexiones de radio y la programación. Ignore el arnés que viene con el ASWC-1.
Arnés AX-CUSTOM-BT precableado de 16 pines
Este arnés se debe utilizar junto con el AX-CUSTOM-BT (se vende por separado) para conservar el
menú de personalización que se pierde al retirar la radio de fábrica. Si no se está utilizando el AX-
CUSTOM-BT, ignore este arnés. Si se va a utilizar, consulte el manual de AX-CUSTOM-BT para obtener
instrucciones sobre la aplicación. No tenga en cuenta el arnés que viene con el AX-CUSTOM-BT.

3
REV. 6/26/2019 INSTTYTO-02
Con la llave en la posición de apagado:
1. Ubique el arnés de radio de fábrica en el vehículo y complete todas las conexiones
necesarias a la radio de posventa.
2. Conecte el arnés de 16 pins con cables pelados y el arnés TYTO-02 en la interfase TYTO-02.
3. Conecte el arnés TYTO-02 al arnés de radio de fábrica en el vehículo.
• Gire la llave (o el botón de empujar para comenzar) a la posición de encendido y espere hasta
que la radio se encienda. El amplificador de fábrica debería encenderse y debería escuchar el
sonido en este punto.
• Pruebe todas las funciones de la instalación para un funcionamiento correcto, antes de volver a
ensamblar el tablero.
INSTALACIÓN PROGRAMACIÓN

KNOWLEDGE IS POWER
Enhance your installation and fabrication skills by
enrolling in the most recognized and respected
mobile electronics school in our industry.
Log onto www.installerinstitute.com or call
800-354-6782 for more information and take steps
toward a better tomorrow.
®
Metra recomienda técnicos
con certificación del Programa
de Certificación en Electrónica
Móvil (Mobile Electronics
Certification Program, MECP).
EL CONOCIMIENTO ES PODER
Mejore sus habilidades de instalación y
fabricación inscribiéndose en la escuela de
dispositivos electrónicos móviles más reconocida
y respetada de nuestra industria. Regístrese en
www.installerinstitute.com o llame al
800-354-6782 para obtener más información y
avance hacia un futuro mejor.
AxxessInterfaces.com © COPYRIGHT 2019 METRA ELECTRONICS CORPORATION REV. 6/26/19 INSTTYTO-02
INSTRUCCIONES DE INSTALACIÓN
TYTO-02
¿Tienes dificultades? Estamos aquí para ayudar.
Póngase en contacto con nuestra
línea de soporte técnico en:
1-800-253-TECH
O por correo electrónico a:
techsupport@metra-autosound.com
Horario de Soporte Técnico (hora estándar del este)
Lunes - Viernes: 9:00 AM - 7:00 PM
Sábado: 10:00 AM - 7:00 PM
Domingo: 10:00 AM - 4:00 PM
/