Page is loading ...

CHTO-02
INSTALLATION INSTRUCTIONS
AxxessInterfaces.com © COPYRIGHT 2019 METRA ELECTRONICS CORPORATION REV. 10/9/19 INSTCHTO-02
Product Info
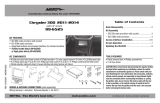
INTERFACE FEATURES
INTERFACE COMPONENTS
• CHTO-02 interface
• CHTO-02 harness
• 16-pin harness
TOOLS REQUIRED
• Cutting tool • Crimping tool • Tape
• Connectors (example: butt-connectors, bell
caps, etc.) • Small flat-blade screwdriver
TABLE OF CONTENTS
Connections ............................................................2
Installation .............................................................3
Programming .........................................................3
Audio level adjustment .........................................3
Chrysler/Dodge Data Interface 2002-2008
APPLICATIONS
• Provides accessory power (12-volt 10-amp)
• Retains R.A.P. (retained accessory power)
• Designed for amplified systems
• Provides NAV outputs (parking brake, reverse, speed sense)
• Pre-wired ASWC-1 harness (ASWC-1 sold separately)
• Adjustable gain control for overall volume
• High level speaker input
• Retains balance and fade
• Micro-B USB updatable
CHRYSLER
Pacifica 2004-2008
DODGE
Ram 1500 2002-2004
Ram 2500/3500 2003-2004

2
CONNECTIONS
From the 16-pin harness to the aftermarket radio, connect the:
• Red wire to the accessory wire.
• Blue/White wire to the amp turn on wire.
• Gray wire to the front right positive speaker output.
• Gray/Black wire to the front right negative speaker output.
• White wire to the front left positive speaker output.
• White/Black wire to the front left negative speaker output.
• Purple wire to the rear right positive speaker output.
• Purple/Black wire to the rear right negative speaker output.
• Green wire to the rear left positive speaker output.
• Green/Black wire to the rear left negative speaker output.
The following (3) wires are only for multimedia/navigation radios that require these wires.
• Blue/Pink wire to the VSS/speed sense wire.
• Green/Purple wire to the reverse wire.
• Light Green wire to the parking brake wire
• Tape off and disregard the following (2) wires, they will not be used in this application:
Brown, Orange/White
From the CHTO-02 harness to the aftermarket radio, connect the:
• Black wire to the ground wire.
• Yellow wire to the battery wire.
• Orange wire to the illumination wire (if applicable).
12-pin ASWC-1 harness & 3.5mm jack:
• The 12-pin ASWC-1 harness & 3.5mm jack is to be used with the ASWC-1 (sold separately) to
retain steering wheel audio controls. If the ASWC-1 is not being used, disregard this harness.
If it is to be used, refer to the ASWC-1 instructions for radio connections and programming.
Disregard the harness that comes with the ASWC-1.

3
REV. 10/9/2019 INSTCHTO-02
INSTALLATION AUDIO LEVEL ADJUSTMENT
1. Connect the 16-pin harness, and the CHTO-02 harness, to the CHTO-02 interface.
2. Connect the CHTO-02 harness to the wiring harness in the vehicle.
Attention! If the interface loses power for any reason, the following steps will need to be
performed again.
1. Cycle the ignition on and wait until the radio comes on.
Note: If the radio doesn’t come on within 60 seconds, cycle the key off, then unplug the
interface. Check all connections, reconnect the interface, then try again.
2. Cycle the ignition off, then back on.
3. Test all functions of the installation for proper operation.
1. With the vehicle and radio turned on, turn the volume up 3/4 of the way.
2. With a small flat-blade screwdriver, adjust the potentiometer clockwise to raise the audio
level; counterclockwise to lower the audio level.
3. Once at a desired level, audio level adjustment is complete.
PROGRAMMING

AxxessInterfaces.com © COPYRIGHT 2019 METRA ELECTRONICS CORPORATION REV. 10/9/19 INSTCHTO-02
INSTALLATION INSTRUCTIONS
CHTO-02
KNOWLEDGE IS POWER
Enhance your installation and fabrication skills by
enrolling in the most recognized and respected
mobile electronics school in our industry.
Log onto www.installerinstitute.com or call
800-354-6782 for more information and take steps
toward a better tomorrow.
®
Metra recommends MECP
certified technicians
Having difficulties? We’re here to help.
Contact our Tech Support line at:
386-257-1187
Or via email at:
techsupport@metra-autosound.com
Tech Support Hours (Eastern Standard Time)
Monday - Friday: 9:00 AM - 7:00 PM
Saturday: 10:00 AM - 7:00 PM
Sunday: 10:00 AM - 4:00 PM

CHTO-02
INSTRUCCIONES DE INSTALACIÓN
AxxessInterfaces.com © COPYRIGHT 2019 METRA ELECTRONICS CORPORATION REV. 10/10/19 INSTCHTO-02
Información del producto
CARACTERÍSTICAS DE LA INTERFASE
COMPONENTES DE LA INTERFASE
• Interfaz CHTO-02
• Arnés CHTO-02
• Arnés de 16-pins
HERRAMIENTAS REQUERIDAS
• Herramienta de corte • Pelacables • Cinta
• Conectores (ejemplo: conectores de extremo,
de campana, etc.) • Pequeño destornillador
INDICE
Conexiones .............................................................2
Instalación ..............................................................3
Programación .........................................................3
Ajuste del nivel de audio ......................................3
Chrysler/Dodge Interfaz de Datos 2002-2008
APLICACIONES
• Proporciona accesorio (12 voltios 10 amperes)
• Retiene R.A.P. (Corriente de accesorio retenida)
• Se usa en sistemas amplificados
• Proporciona salidas de NAV (freno de mano, reversa, sensor de la
velocidad del vehículo)
• Incluye arnés precableado ASWC-1 (el ASWC-1 se vende por separado)
• Alto nivel de entrada del altavoz
• Adaptable a USB
• Retiene el balance y la intensidad
CHRYSLER
Pacifica 2004-2008
DODGE
Ram 1500 2002-2004
Ram 2500/3500 2003-2004

2
CONEXIONES
Del arnés de 16 pins al radio de mercado secundario, conecte el:
• Cable rojo al cable de accesorios.
• Cable azul/blanco con el encendido del amplificador.
• Cable gris con la salida positiva de la bocina derecha del frente.
• Cable gris/negro con la salida negativa de la bocina derecha del frente.
• Cable blanco con la salida positiva de la bocina izquierda del frente.
• Cable blanco/negro con la salida negativa de la bocina izquierda del frente.
• Cable púrpura con la salida positiva de la bocina derecha de atrás.
• Cable púrpura/negro con la salida negativa de la bocina derecha de atrás.
• Cable verde con la salida de la bocina positiva izquierda de atrás.
• Cable verde/negro con la salida negativa de la bocina izquierda de atrás.
Los siguientes (3) cables son para radios del mercado de accesorios multimedia / de navegación
que proporcionan estos cables:
• Conecte el cable azul/rosa al cable de reversa (si aplica).
• Conecte el cable verde/púrpura al cable de reversa (si aplica).
• Conecte el cable verde claro al cable de freno de mano (si aplica).
• Encinte e ignore los siguientes (2) cables, ya que no se utilizarán en esta aplicación:
marrón, anaranjado/blanco
Desde el arnés Chrysler de 22-pin al radio de mercado secundario, conecte el:
• Cable negro al cable de tierra.
• Cable amarillo al cable de la batería.
• Conecte el cable anaranjado con el cable de iluminación. (si aplica)
Arnés de 12 pins precableado ASWC-1 y conector de 3.5mm:
• El arnés ASWC-1 de 12 pins y el conector de 3,5 mm se deben usar con el ASWC-1 (se vende
por separado) para retener los controles de audio del volante. Si no se utiliza el ASWC-1,
ignore este arnés. Si se va a utilizar, consulte las instrucciones de ASWC-1 para las conexiones
de radio y la programación. No tenga en cuenta el arnés que viene con el ASWC-1.

3
REV. 10/10/2019 INSTCHTO-02
INSTAL ACIÓN
1. Conecte el arnés de 16 pins y el arnés CHTO-02 a la interfaz CHTO-02.
2. Conecte el arnés CHTO-02 al arnés de cableado del vehículo.
Atención!
Si la interfase pierde energía por cualquier razón, tendrán que volverse a ejecutar los
siguientes pasos.
1. Encienda el encendido y espere hasta que se encienda la radio.
Nota: Si la radio no se enciende dentro de 60 segundos, gire la llave a la posición de
apagado, desconecte la interfase, compruebe todas las conexiones, vuelva a conectar la
interfase, y vuelva a intentarlo.
2. Apague y vuelva a encender el motor.
3. Pruebe todas las funciones de la instalación para su correcto funcionamiento.
1. Con el vehículo y la radio encendidos, suba el volumen 3/4 del camino.
2. Con un destornillador pequeño de punta plana, ajuste el potenciómetro en sentido horario
para aumentar el nivel de audio; en sentido antihorario para bajar el nivel de audio.
3. Una vez en el nivel deseado, se completa el ajuste del nivel de audio.
PROGRAMACIÓN
AJUSTE DEL NIVEL DE AUDIO

AxxessInterfaces.com © COPYRIGHT 2019 METRA ELECTRONICS CORPORATION REV. 10/10/19 INSTCHTO-02
INSTRUCCIONES DE INSTALACIÓN
CHTO-02
¿Tienes dificultades? Estamos aquí para ayudar.
Póngase en contacto con nuestra
línea de soporte técnico en:
386-257-1187
O por correo electrónico a:
techsupport@metra-autosound.com
Horario de Soporte Técnico (hora estándar del este)
Lunes - Viernes: 9:00 AM - 7:00 PM
Sábado: 10:00 AM - 7:00 PM
Domingo: 10:00 AM - 4:00 PM
KNOWLEDGE IS POWER
Enhance your installation and fabrication skills by
enrolling in the most recognized and respected
mobile electronics school in our industry.
Log onto www.installerinstitute.com or call
800-354-6782 for more information and take steps
toward a better tomorrow.
®
Metra recomienda técnicos
con certificación del Programa
de Certificación en Electrónica
Móvil (Mobile Electronics
Certification Program, MECP).
EL CONOCIMIENTO ES PODER
Mejore sus habilidades de instalación y
fabricación inscribiéndose en la escuela de
dispositivos electrónicos móviles más reconocida
y respetada de nuestra industria. Regístrese en
www.installerinstitute.com o llame al
800-354-6782 para obtener más información y
avance hacia un futuro mejor.
/