Page is loading ...

MITO-03
INSTALLATION INSTRUCTIONS
AxxessInterfaces.com © COPYRIGHT 2019 METRA ELECTRONICS CORPORATION REV. 9/25/19 INSTMITO-03
Product Info
INTERFACE FEATURES
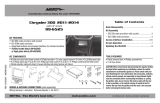
INTERFACE COMPONENTS
TOOLS & INSTALLATION ACCESSORIES REQUIRED
• Crimping tool and connectors, or solder gun,
solder, and heat shrink • Tape • Wire cutter
• Zip ties
TABLE OF CONTENTS
Connections ............................................................2
Installation .............................................................3
Programming .........................................................3
Adjustments ...........................................................3
Mitsubishi Amplifier Interface
2014-2019
APPLICATIONS
• Pre-wired ASWC-1 harness (ASWC-1 sold separately)
• Designed for amplified models
• Retains balance and fade
• Micro-B USB updatable
Mitsubishi
Lancer 2014-2017
Outlander 2014-2019
• MITO-03 interface
• MITO-03 harness
• 16-pin harness

2
CONNECTIONS
From the 16-pin harness to the aftermarket radio:
• Connect the Blue/White wire to the amp turn on wire.
• Connect the White wire to the left front positive speaker output.
• Connect the White/Black wire to the left front negative speaker output.
• Connect the Gray wire to the right front positive speaker output.
• Connect the Gray/Black wire to the right front negative speaker output.
• Connect the Green wire to the left rear positive speaker output.
• Connect the Green/Black wire to the left rear negative speaker output.
• Connect the Purple wire to the right rear positive speaker output.
• Connect the Purple/Black wire to the right rear negative speaker output.
• Tape off and disregard the following (6) wires , they will not be used in this application:
Blue/Pink, Brown, Green/Purple, Light Green, Orange/White, Red
From the MITO-03 harness to the aftermarket radio:
• Connect the Black wire to the ground wire.
• Connect the Yellow wire to the battery wire.
• Connect the Red wire to the accessory wire.
• Connect the Orange wire to the Illumination wire (If applicable).
12-pin pre-wired ASWC-1 harness & 3.5mm jack:
•
This harness and 3.5mm jack is to be used along with the optional ASWC-1 (sold separately) to
retain steering wheel audio controls. If the ASWC-1 is not being used, disregard this harness. If
it will be used, refer to the vehicle specific ASWC-1 instruction from Axxess Interfaces for radio
connections and programming. Disregard the harness that comes with the ASWC-1.

3
REV. 9/25/2019 INSTMITO-03
Audio Level Adjustment
1. Locate the potentiometer on the interface by the 16-pin harness.
2. Turn the volume of the radio up 3/4 of the way.
3. With a small flat-blade screwdriver, adjust the potentiometer clockwise to raise the audio
level; counterclockwise to lower.
4. Once at a desired level, audio level adjustment is complete.
INSTALLATION PROGRAMMING
Attention! The factory satellite radio and Bluetooth modules must be disconnected from the
vehicle. Failure to perform these steps will cause the factory amplifier to not play properly.
1. Find and disconnect the factory satellite radio module.
• The satellite module for the Lancer and Outlander can be located high in the passenger
side kick panel.
2. Find and disconnect the factory Bluetooth module.
• The Bluetooth module for the Lancer can be located behind the glove box, up high.
• The Bluetooth module for the Outlander can be located below the factory radio.
3. Connect the MITO-03 harness to the MITO-03 interface, and then to the wiring harness in
the vehicle.
4. If an ASWC-1 (sold separately) will be used, do not connect it until the MITO-03 is
programmed and fully functional.
Attention! If the interface loses power for any reason, the following steps will need to be
performed again.
•
Turn the key (or push-to-start button) to the ignition position and wait until the radio comes on.
Note: If the radio doesn’t come on within 60 seconds, turn the key to the off position,
disconnect the interface, check all connections, reconnect the interface, then try again.
• Turn the key to the off position, then to the accessory position. Test all functions of the
installation for proper operation, before reassembling the dash.
ADJUSTMENTS

KNOWLEDGE IS POWER
Enhance your installation and fabrication skills by
enrolling in the most recognized and respected
mobile electronics school in our industry.
Log onto www.installerinstitute.com or call
800-354-6782 for more information and take steps
toward a better tomorrow.
®
Metra recommends MECP
certified technicians
AxxessInterfaces.com © COPYRIGHT 2019 METRA ELECTRONICS CORPORATION REV. 9/25/19 INSTMITO-03
INSTALLATION INSTRUCTIONS
MITO-03
Having difficulties? We’re here to help.
Contact our Tech Support line at:
386-257-1187
Or via email at:
techsupport@metra-autosound.com
Tech Support Hours (Eastern Standard Time)
Monday - Friday: 9:00 AM - 7:00 PM
Saturday: 10:00 AM - 7:00 PM
Sunday: 10:00 AM - 4:00 PM

MITO-03
INSTRUCCIONES DE INSTALACIÓN
AxxessInterfaces.com © COPYRIGHT 2019 METRA ELECTRONICS CORPORATION REV. 9/25/19 INSTMITO-03
Información del producto
CARACTERÍSTICAS DE LA INTERFAZ
COMPONENTES DE LA INTERFASE
HERRAMIENTAS Y ACCESORIOS
DE INSTALACIÓN REQUERIDOS
• Herramienta de ponchadora y conectores, o
pistola de soldadura, soldadura y termocontracción
• Cinta • Cortacables • Zip lazos
INDICE
Conexiones .............................................................2
Instalación ..............................................................3
Programación .........................................................3
Adjustes ..................................................................3
Mitsubishi Interfaz de amplificada
2014-2019
APLICACIONES
• Arnés ASWC-1 precableado (el ASWC-1 se vende por separado)
• Diseñado para modelos amplificados
• Retiene el balance y la intensidad
• Actualizable Micro-B USB
Mitsubishi
Lancer 2014-2017
Outlander 2014-2019
• Interfase MITO-03
• Arnés MITO-03
• Arnés de 16 pins

2
CONEXIONES
Del arnés de 16 pins al radio de mercado secundario:
• Conecte el cable azul/blanco al cable de encendido del amplificador.
• Conecte el cable blanco con la salida positiva de la bocina izquierda del frente.
• Conecte el cable blanco/negro con la salida negativa de la bocina izquierda del frente.
• Conecte el cable gris con la salida positiva de la bocina derecha del frente.
• Conecte el cable gris/negro con la salida negativa de la bocina derecha del frente.
• Conecte el cable verde con la salida de la bocina positiva izquierda de atrás.
• Conecte el cable verde/negro con la salida negativa de la bocina izquierda de atrás.
• Conecte el cable púrpura con la salida positiva de la bocina derecha de atrás.
• Conecte el cable púrpura/negro con la salida negativa de la bocina derecha de atrás.
• Encinte e ignore los siguientes (6) cables, ya que no se utilizarán en esta aplicación:
azul/rosa, marrón, verde/púrpura, verde claro, anaranjado/blanco, rojo
Del arnés MITO-03 al radio de mercado secundario:
• Conecte el cable negro con el cable de tierra.
• Conecte el cable amarillo con el cable de la batería.
• Conecte el cable rojo con el cable de accesorios.
• Conecte el cable anaranjado con el cable de iluminación. (si aplicable)
Arnés ASWC-1 precableado de 12 pines y conector de 3.5mm:
• Este arnés y el conector de 3.5 mm se deben usar junto con el ASWC-1 opcional (se vende por
separado) para retener los controles de audio del volante. Si no se utiliza el ASWC-1, ignore
este arnés. Si se va a utilizar, consulte las instrucciones ASWC-1 específicas del vehículo de
Axxess Interfaces para las conexiones de radio y la programación. No tenga en cuenta el arnés
que viene con el ASWC-1.

3
REV. 9/25/2019 INSTMITO-03
Ajuste de nivel de audio
1. Localice el potenciómetro en la interfaz por el arnés de 16 pins.
2. Suba el volumen de la radio 3/4 del camino.
3. Con un destornillador pequeño de punta plana, ajuste el potenciómetro en sentido horario
para aumentar el nivel de audio; en sentido antihorario para bajar.
4. Una vez en el nivel deseado, se completa el ajuste del nivel de audio.
INSTALACIÓN PROGRAMACIÓN
Atención! La radio satelital fábrica y módulos Bluetooth deben estar desconectados del vehículo.
Si no se realizan estos pasos, hará que el amplificador de fábrica se reproduce correctamente.
1. Busque y desconecte el módulo de radio satelital de fábrica.
• El módulo de satélite para el Lancer y Outlander se encuentra enclavado en el panel
delantero del lado del pasajero.
2. Busque y desconecte el módulo Bluetooth de fábrica.
• El módulo Bluetooth para el Lancer puede ubicarse detrás de la guantera, en lo alto.
• El módulo Bluetooth para el Outlander se encuentra por debajo de la radio de fábrica.
3. Conecte el arnés MITO-03 a la interfaz MITO-03 y luego al arnés de cableado del vehículo.
4. Si se utilizará un ASWC-1 (se vende por separado), no lo conecte hasta que el MITO-03 esté
programado y sea completamente funcional.
Atención! Si la interfaz pierde potencia por algún motivo, los siguientes pasos deberán realizarse
nuevamente.
• Gire la llave (o el botón de inicio) a la posición de encendido y espere hasta que se encienda
la radio.
Nota: Si la radio no se enciende dentro de los 60 segundos, gire la llave a la posición de
apagado, desconecte la interfaz, verifique todas las conexiones, vuelva a conectar la interfaz
e intente nuevamente.
•
Gire la llave a la posición de apagado, luego a la posición de accesorios. Pruebe todas las
funciones de la instalación para que funcionen correctamente, antes de volver a armar el tablero.
ADJUSTES

AxxessInterfaces.com © COPYRIGHT 2019 METRA ELECTRONICS CORPORATION REV. 9/25/19 INSTMITO-03
INSTRUCCIONES DE INSTALACIÓN
MITO-03
¿Tienes dificultades? Estamos aquí para ayudar.
Póngase en contacto con nuestra
línea de soporte técnico en:
386-257-1187
O por correo electrónico a:
techsupport@metra-autosound.com
Horario de Soporte Técnico (hora estándar del este)
Lunes - Viernes: 9:00 AM - 7:00 PM
Sábado: 10:00 AM - 7:00 PM
Domingo: 10:00 AM - 4:00 PM
KNOWLEDGE IS POWER
Enhance your installation and fabrication skills by
enrolling in the most recognized and respected
mobile electronics school in our industry.
Log onto www.installerinstitute.com or call
800-354-6782 for more information and take steps
toward a better tomorrow.
®
Metra recomienda técnicos
con certificación del Programa
de Certificación en Electrónica
Móvil (Mobile Electronics
Certification Program, MECP).
EL CONOCIMIENTO ES PODER
Mejore sus habilidades de instalación y
fabricación inscribiéndose en la escuela de
dispositivos electrónicos móviles más reconocida
y respetada de nuestra industria. Regístrese en
www.installerinstitute.com o llame al
800-354-6782 para obtener más información y
avance hacia un futuro mejor.
/