Triad InWall & InCeiling 6SHDNHUs - Quick Start Guide 201
Speaker Installation: For 7ULDGInWall & InCeiling 6peakers
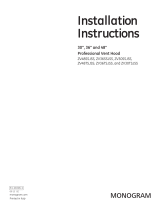
B/FX$POTUSVDUJPO3FUSP
On the speaker face, position the 4
retrobrackets horizontally or vertically so
they can extend clear of studs.
With retrobrackets retracted, snug the
screws for InWalls and leave them loose
for InCeilings. Remove the remaining
4 frame screws leaving their inserts open.
InWall & InCeiling Speaker - Installation Instructions
A3FUSP
Using pushpins or tape, position
speaker template on wall or ceiling.
Level or align. Trace template outline.
Cut out speaker hole and remove
sheetrock.
D
Connect speaker wires to binding posts,
keeping correct phase and polarity with
amp (Red+ to Red+ & Black– to Black–).
Make sure no loose strands are shorting
between binding posts or conductors.
Tighten binding posts.
C
With remaining 4 Frame screws, attach
frame very loosely to open inserts.
E"
Insert speaker into hole. Push enclosure
back far enough that retrobrackets can
clear the sheetrock when extended.
The frame keeps the enclosure from falling
back into the wall.
H*
Attach the Frameless grill over its
frame.
G
After leveling or aligning the speaker,snug
the other 4 Frame screws to sandwich the
sheetrock between the grill frame and
retrobrackets. Do NOT overtighten or you
can deform the grill frame.
Seat Frameless grill snugly all the
way around.
F
Loosen all 4 retrobrackets, make sure
they can slide clear of the sheetrock, extend
them fully behind the sheetrock, and tighten
them. If retrobrackets can not clear the back
of the sheetrock, loosen the 4 Frame
screws and push the enclosure further back
into the wall or ceiling until the retrobrackets
can slide behind the sheetrock.
InWallInCeiling 6SHDNHU,QVWDOO
1HZ&RQVWUXFWLRQ8VH7ULDG1HZ
&RQVWUXFWLRQ%UDFNHWV1&%V
HVSHFLDOO\LQWKHFHLOLQJIRUVDIHW\
5HWUR,Q:DOOVQHHGQRDGGLWLRQDO
EUDFNHWV)RU,Q&HLOLQJVXVHRXU
,Q&HLOLQJ5HWUR.LWVDYDLOLQVL]HV&
*6ZKLFKVXSSRUWVSHDNHUVIURP
FHLOLQJMRLVWVIRUVDIHW\
Frame Screws
Frame Screws
Retro Bracket
Insert
Frame Screw
All 4 Frame Screws-Very Loose
5-Way Binding Posts
:LWKVWDQGDUGOHQJWK)UDPHVFUHZVRXUVSHDNHUVILWRIZDOOFHLOLQJPDWHULDOHQRXJK
IRUOD\HUVRIVKHHWURFN5HSODFLQJWKHPZLWKVFUHZVILWVRIZDOOFHLOLQJPDWHULDO
I
(YHQLIWKHIUDPHLVQRWXVHG$//LQVHUWVRQWKHVSHDNHUIDFH
VKRXOGKDYHVFUHZVFRPSOHWHlyVHDWHGRUSHUIRUPDQFHZLOOVXIIHU