Page is loading ...

Metra. The World’s Best Kits.®MetraOnline.com © COPYRIGHT 2019 METRA ELECTRONICS CORPORATION REV. 12/17/19 INST99-7395B
INSTALLATION INSTRUCTIONS
99-7395B
Attention! Let the vehicle sit with the key
out of the ignition for a few minutes before
removing the factory radio. When testing the
aftermarket equipment, ensure that all factory
equipment is connected before cycling the
key to ignition.
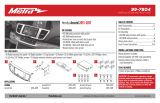
KIT FEATURES
• ISO DIN radio provision with pocket
• ISO DDIN radio provision
• Painted scratch resistant matte black
KIT COMPONENTS
• A) Radio trim panel • B) Cut template • C) Radio brackets • D) Pocket • E) Phillips screws (qty. 4)
TOOLS REQUIRED
• Panel removal tool • Phillips screwdriver
• Cutting tool • Scribe tool or silver marker
TABLE OF CONTENTS
Dash Disassembly ..................................................2
Kit Preparation .......................................................3
Kit Assembly
- ISO DIN radio provision .......................................4
- ISO DIN radio provision .......................................5
WIRING & ANTENNA CONNECTIONS
(sold separately)
Wiring Harness: 70-7303
Antenna Adapter: 40-KI11
Steering wheel control interface: ASWC-1
A B C D E
Hyundai Elantra Touring 2009-2012
Visit MetraOnline.com for more detailed information about the product and up-to-date vehicle
specific applications

1.800.221.0932
|
MetraOnline.com
2
DASH DISASSEMBLY
1. Open the pocket up top, then remove
the storage liner.
2. Remove (4) Phillips screws securing the
pocket, then unclip and remove.
(Figure A)
3. Remove (1) Phillips screw securing the
top of the radio trim panel. (Figure B)
(Figure A) (Figure C)
(Figure B) (Figure D)
4. Unclip, unplug, and remove the radio
trim panel. (Figure C)
5. Remove (4) Phillips screws securing the
radio. Slide the radio out, then unplug
and remove. (Figure D)
Continue to Kit Preparation

REV. 12/17/2019 INST99-7395B 3
KIT PREPARATION
Attention! The factory dash panel will no
longer be able to be reused with the factory
radio after the following modification has
been made.
1. Place the cut template over the factory
dash panel. (Figure A)
2. Using a scribe tool or silver marker, mark
the perforated area. (Figure B)
3. Remove and discard the cut template.
4. Using a cutting tool, cut the marked area
on the factory dash panel. (Figure C)
Continue to Kit Assembly
(Figure A) (Figure B) (Figure C)
Remove
shaded
area

1.800.221.0932
|
MetraOnline.com
4
KIT ASSEMBLY
ISO DIN radio provision
1. Secure the radio brackets to the pocket
using (4) Phillips screws provided.
(Figure A)
2. Remove the metal DIN sleeve and trim
ring from the aftermarket radio.
3. Slide the radio into the bracket/pocket
assembly, then secure using screws
supplied with the radio. (Figure B)
4. Locate the factory wiring harness and
antenna connector in the dash and
complete all necessary connections to
the radio. Metra recommends using
the proper mating adapter from Metra
and/or Axxess. Test the radio for proper
operation.
5. Slide the radio assembly into to the dash,
then secure using the factory screws.
6. Reassemble the dash in reverse order of
disassembly to complete the installation.
(Figure A) (Figure B)

REV. 12/17/2019 INST99-7395B 5
KIT ASSEMBLY
ISO DDIN radio provision
1. Secure the radio brackets to the radio
using screws supplied with the radio.
(Figure A)
2. Locate the factory wiring harness and
antenna connector in the dash and
complete all necessary connections to
the radio. Metra recommends using
the proper mating adapter from Metra
and/or Axxess. Test the radio for proper
operation.
3. Slide the radio assembly into to the dash,
then secure using the factory screws.
4. Reassemble the dash in reverse order of
disassembly to complete the installation.
(Figure A)

KNOWLEDGE IS POWER
Enhance your installation and fabrication skills by
enrolling in the most recognized and respected
mobile electronics school in our industry.
Log onto www.installerinstitute.com or call
800-354-6782 for more information and take steps
toward a better tomorrow.
®
Metra recommends MECP
certified technicians
Metra. The World’s Best Kits.®MetraOnline.com © COPYRIGHT 2019 METRA ELECTRONICS CORPORATION REV. 12/17/19 INST99-7395B
INSTALLATION INSTRUCTIONS
99-7395B
If you are having difficulties with the installation
of this product, contact our Tech Support line
either by phone at 386-257-1187, or email at
techsupport@metra-autosound.com. Before
doing so, look over the instruction booklet a
second time and ensure that the installation was
performed exactly as the instruction booklet
is stated. Have the vehicle apart and ready to
perform troubleshooting steps before contacting
Metra/Axxess Tech Support.

99-7395B
Metra. The World’s best kits.®MetraOnline.com © COPYRIGHT 2019 METRA ELECTRONICS CORPORATION REV. 12/17/19
SALES 386-257-2956
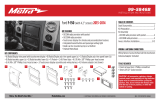
KIT COMPONENTS
• Radio trim panel
• Cut template
• Radio brackets
• Pocket (not shown)
• Phillips screws (4)
WIRING & ANTENNA CONNECTIONS
(sold separately)
• Wiring Harness: 70-7303
• Antenna Adapter: 40-K11
• Steering wheel control interface: ASWC-1
HARDWARE INCLUDED
ISO DDIN radio provision
ISO DIN radio provision with pocket
Painted scratch resistant matte black
D
S
P
Hyundai Elantra Touring
2009-2012
Visit MetraOnline.com for more detailed information about the product and
up-to-date vehicle specific applications.
/