Page is loading ...

equal
power to the enre
the aached cap.
Pre - Installation Notes
Follow all naonal and local building/electrical codes.
Transformer must be plugged into a GFCI outlet.
Transformer can support up to 50 was output.
Don’t cut any wires. Extra wire length can be coiled up.
Do not use extension cords.
Do not use within 10 feet of ponds, pools, or spas.
If using insulated wire staples to hold the wires in
place, be sure not to pierce or crush the wires.
Keep away from external heat sources.
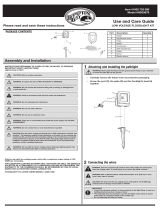
Step 1
Mount the Transformer and Photocell
1.1 Use (4) stainless steel screws (not included) to
mount the transformer a minimum of 12” above
the ground level and within reach of a 120V AC
GFCI outlet. The 120V AC power cord aached to
the transformer is 5 feet long. The transformer
can be mounted under the deck but the control
panel on the transformer should be accessible to
change sengs.
1.2 Plug the transformer into the GFCI outlet.
1.3 Use a stainless steel screw (not included) to
mount the photocell in a locaon that can sense
dusk and dawn (night and day) condions. The
aached photocell cord is 5 feet long.
onnector (optional but rec
ommended )
clos
ed loop connector. The closed loop connector
on each e
nd and is 6” long. The closed loop connector is
used to connect the Main Wiring back in
to the transformer. This reduces the voltage
in the system.
se a 2 output splier on the last ligh
t fixture of the run. Plug the last light fixture into one of the 2 outputs spliers
Plug an extension har
ness into the other male connecon of the 2 output splier. Run enough
end to end to rea
ch back to the Tee Connector of the transformer. Use the closed loop connector
to make the connecon between the
extension harness and the Tee Connector.
12 Volt 50 Watt DC Smart Transformer
INST#: XIS50WHS-REV 11-17
Step 3
Install the Lights and Finalize Installation
3.1 Connect the rest of the Main Wiring Connecons (not included) per their instrucons on reverse side of page.
3.2 Connect the desired light fixtures (not included) per their individual instrucons.
3.3 Refer to the included Control instrucons for operaon of the transformer. The Control instrucons should be retained
for future reference.
Tee Connector
Transformer
Photocell
2 Output
Splitter
equal
power to the enre
the aached cap.
Pre - Installation Notes
Follow all naonal and local building/electrical codes.
Transformer must be plugged into a GFCI outlet.
Transformer can support up to 50 was output.
Don’t cut any wires. Extra wire length can be coiled up.
Do not use extension cords.
Do not use within 10 feet of ponds, pools, or spas.
If using insulated wire staples to hold the wires in
place, be sure not to pierce or crush the wires.
Keep away from external heat sources.
Step 1
Mount the Transformer and Photocell
1.1 Use (4) stainless steel screws (not included) to
mount the transformer a minimum of 12” above
the ground level and within reach of a 120V AC
GFCI outlet. The 120V AC power cord aached to
the transformer is 5 feet long. The transformer
can be mounted under the deck but the control
panel on the transformer should be accessible to
change sengs.
1.2 Plug the transformer into the GFCI outlet.
1.3 Use a stainless steel screw (not included) to
mount the photocell in a locaon that can sense
dusk and dawn (night and day) condions. The
aached photocell cord is 5 feet long.
onnector (optional but rec
ommended )
clos
ed loop connector. The closed loop connector
on each e
nd and is 6” long. The closed loop connector is
used to connect the Main Wiring back in
to the transformer. This reduces the voltage
in the system.
se a 2 output splier on the last ligh
t fixture of the run. Plug the last light fixture into one of the 2 outputs spliers
Plug an extension har
ness into the other male connecon of the 2 output splier. Run enough
end to end to rea
ch back to the Tee Connector of the transformer. Use the closed loop connector
to make the connecon between the
extension harness and the Tee Connector.
12 Volt 50 Watt DC Smart Transformer
INST#: XIS50WHS-REV 11-17
Step 3
Install the Lights and Finalize Installation
3.1 Connect the rest of the Main Wiring Connecons (not included) per their instrucons on reverse side of page.
3.2 Connect the desired light fixtures (not included) per their individual instrucons.
3.3 Refer to the included Control instrucons for operaon of the transformer. The Control instrucons should be retained
for future reference.
Tee Connector
Transformer
Photocell
2 Output
Splitter
12 VOLT 50 WATT DC TRANSFORMER
INSTALLATION INSTRUCTIONS
Step 1: Use (4) stainless steel screws (not included) to mount the
transformer a minimum of 12” above the ground level and within reach
of a 120V AC GFCI outlet (fig. 1). The 120V AC power cord attached to
the transformer is 5 feet long. The transformer can be mounted under
the deck but the control panel on the transformer should be accessible
to change settings.
Step 2: Plug the transformer into the GFCI outlet (fig. 2).
Step 3: Use a stainless steel screw (not included) to mount the photocell
in a location that can sense dusk and dawn (night and day) conditions
(fig. 3). The attached photocell cord is 5 feet long. Do not install the
photo sensor behind shrubs. This will affect the photo sensor. The photo
sensor will not operate properly if installed too close to a light source.
Step 4: Run the 4 foot output power cable with the Tee Connector
attached to the location of the first light or a central location if lights will
be located in multiple directions. The Tee Connector can be secured
loosely using (2) #4 x 1” stainless steel screws (not supplied). Do not
tighten the screws completely as this can damage the Tee Connector
(fig. 4).
Step 5: If needed, all 3 of the output connectors on the Tee Connector
are active and will supply equal power to the entire system (fig. 5).
Step 6: Connect the female lead of light kit (not included) and install per
the light kit instructions.
Step 7: Refer to the included Control instructions for operation of the
transformer. The Control instructions should be retained for future
reference.
Installation Instructions
equal
power to the enre
the aached cap.
Pre - Installation Notes
Follow all naonal and local building/electrical codes.
Transformer must be plugged into a GFCI outlet.
Transformer can support up to 50 was output.
Don’t cut any wires. Extra wire length can be coiled up.
Do not use extension cords.
Do not use within 10 feet of ponds, pools, or spas.
If using insulated wire staples to hold the wires in
place, be sure not to pierce or crush the wires.
Keep away from external heat sources.
Step 1
Mount the Transformer and Photocell
1.1 Use (4) stainless steel screws (not included) to
mount the transformer a minimum of 12” above
the ground level and within reach of a 120V AC
GFCI outlet. The 120V AC power cord aached to
the transformer is 5 feet long. The transformer
can be mounted under the deck but the control
panel on the transformer should be accessible to
change sengs.
1.2 Plug the transformer into the GFCI outlet.
1.3 Use a stainless steel screw (not included) to
mount the photocell in a locaon that can sense
dusk and dawn (night and day) condions. The
aached photocell cord is 5 feet long.
onnector (optional but rec
ommended )
clos
ed loop connector. The closed loop connector
on each e
nd and is 6” long. The closed loop connector is
used to connect the Main Wiring back in
to the transformer. This reduces the voltage
in the system.
se a 2 output splier on the last ligh
t fixture of the run. Plug the last light fixture into one of the 2 outputs spliers
Plug an extension har
ness into the other male connecon of the 2 output splier. Run enough
end to end to rea
ch back to the Tee Connector of the transformer. Use the closed loop connector
to make the connecon between the
extension harness and the Tee Connector.
12 Volt 50 Watt DC Smart Transformer
INST#: XIS50WHS-REV 11-17
Step 3
Install the Lights and Finalize Installation
3.1 Connect the rest of the Main Wiring Connecons (not included) per their instrucons on reverse side of page.
3.2 Connect the desired light fixtures (not included) per their individual instrucons.
3.3 Refer to the included Control instrucons for operaon of the transformer. The Control instrucons should be retained
for future reference.
Tee Connector
Transformer
Photocell
2 Output
Splitter
Preparation
• Follow all national and local building and electrical codes.
• Transformer must be plugged into a GFCI outlet that is marked “wet
location.”
• Transformer can support up to 50 watts. (125) 0.4 watt lights.
• Do not cut any wires. Any extra wire length can be coiled up.
• Do not use extension cords.
• Do not use within 10 feet of ponds, pools, or spas.
• If using insulated wire staples to hold the wires in place, be sure not to
pierce or crush the wires.
• Keep away from external heat sources.
• There are no serviceable parts inside the power supply unit. Do not
disassemble.
• Set transformer mode to Always On to make sure the lights work while
testing. Refer to control instructions.
fig. 1 fig. 2
THE DIAGRAMS AND INSTRUCTIONS IN THIS BROCHURE ARE FOR ILLUSTRATION PURPOSES ONLY AND ARE NOT MEANT TO REPLACE A LICENSED PROFESSIONAL. ANY CONSTRUCTION OR USE OF THE PRODUCT MUST BE IN ACCOR-
DANCE WITH ALL LOCAL ZONING AND/OR BUILDING CODES. THE CONSUMER ASSUMES ALL RISKS AND LIABILITY ASSOCIATED WITH THE CONSTRUCTION OR USE OF THIS PRODUCT. THE CONSUMER OR CONTRACTOR SHOULD TAKE ALL
NECESSARY STEPS TO ENSURE THE SAFETY OF EVERYONE INVOLVED IN THE PROJECT, INCLUDING, BUT NOT LIMITED TO, WEARING THE APPROPRIATE SAFETY EQUIPMENT. EXCEPT AS CONTAINED IN THE WRITTEN LIMITED WARRANTY,
THE WARRANTOR DOES NOT PROVIDE ANY OTHER WARRANTY, EITHER EXPRESS OR IMPLIED, AND SHALL NOT BE LIABLE FOR ANY DAMAGES, INCLUDING CONSEQUENTIAL DAMAGES.
©2021 UFP Retail Solutions, LLC. Deckorators is a registered trademark of UFP Industries, Inc. in the U.S. All rights reserved.
68956 U.S. Highway 131, White Pigeon, MI 49099
13865 12/21
www.deckorators.com
equal
power to the enre
the aached cap.
Pre - Installation Notes
Follow all naonal and local building/electrical codes.
Transformer must be plugged into a GFCI outlet.
Transformer can support up to 50 was output.
Don’t cut any wires. Extra wire length can be coiled up.
Do not use extension cords.
Do not use within 10 feet of ponds, pools, or spas.
If using insulated wire staples to hold the wires in
place, be sure not to pierce or crush the wires.
Keep away from external heat sources.
Step 1
Mount the Transformer and Photocell
1.1 Use (4) stainless steel screws (not included) to
mount the transformer a minimum of 12” above
the ground level and within reach of a 120V AC
GFCI outlet. The 120V AC power cord aached to
the transformer is 5 feet long. The transformer
can be mounted under the deck but the control
panel on the transformer should be accessible to
change sengs.
1.2 Plug the transformer into the GFCI outlet.
1.3 Use a stainless steel screw (not included) to
mount the photocell in a locaon that can sense
dusk and dawn (night and day) condions. The
aached photocell cord is 5 feet long.
onnector (optional but rec
ommended )
clos
ed loop connector. The closed loop connector
on each e
nd and is 6” long. The closed loop connector is
used to connect the Main Wiring back in
to the transformer. This reduces the voltage
in the system.
se a 2 output splier on the last ligh
t fixture of the run. Plug the last light fixture into one of the 2 outputs spliers
Plug an extension har
ness into the other male connecon of the 2 output splier. Run enough
end to end to rea
ch back to the Tee Connector of the transformer. Use the closed loop connector
to make the connecon between the
extension harness and the Tee Connector.
12 Volt 50 Watt DC Smart Transformer
INST#: XIS50WHS-REV 11-17
Step 3
Install the Lights and Finalize Installation
3.1 Connect the rest of the Main Wiring Connecons (not included) per their instrucons on reverse side of page.
3.2 Connect the desired light fixtures (not included) per their individual instrucons.
3.3 Refer to the included Control instrucons for operaon of the transformer. The Control instrucons should be retained
for future reference.
Tee Connector
Transformer
Photocell
2 Output
Splitter
fig. 4
fig. 5
fig. 3
/