Page is loading ...

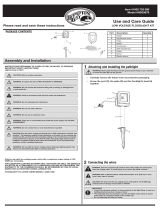
Prepare the Transformer and Photocell
1. Properly align the photocell plug and the transformer
receptacle and rmly push the plug into place.
2. Tighten the plastic nut by turning clockwise. If the
photocell is already attached, check to make sure plastic
nut is completely tight for a weatherproof seal.
Mount the Transformer
1. Mount near an outdoor GFCI outlet within reach of the
power cord.
Note: Mount at least 10 feet from ponds, pools, or spas. Do
not use extension cords. Follow all national and local building
and electrical codes.
2. Use screws (not supplied) to mount transformer to wall
surface or deck joist a minimum of 12” above ground level.
3. Plug the transformer into the GFCI outlet.
Mount the Photocell
1. Mount the round photocell holder to wall surface or deck
joist.
2. Ensure the photocell can sense dusk and dawn conditions
in the mounted location.
3. Peel off the protective lm covering the adhesive on the
top surface of the round photocell holder.
4. Align the photocell and press rmly onto the adhesive.
Prepare the Lighted Cap
1. Run the 5’ wiring harness included with the Lighted Cap
down the inside of the Post Sleeve with the smaller male
connector hanging out the top of the post.
Note: The small male connector will t through a 3/8”
hole if needed.
2. The large female connector should be hanging out of the
bottom or under the deck.
Note: The large female connector will t through a 1/2”
hole if needed.
Make the Connections
1. Run 9’ power cable from photocell to the location of the
rst light.
Note: If needed, the power cable can t through a 1/2”
hole. If using wire staples do not to pierce or crush the
wires.
2. Plug the output connector into the supplied T-Connector
pressing rmly until connection is fully engaged.
Note: Connection is fully engaged when there is little to no
gap between the output connector and the T-Connector.
3. Plug the large connector from Step 4b into the
T-Connector.
4. If other Lighted Caps are being installed, connect the 9’
harness from the T-Connector Kit at this time.
5. If no other lights are to be connected, cap the unused
T-Connector terminal with the attached cap.
6. Once all connections are made, the T-Connector can be
secured loosely using 2 screws (not supplied).
Note: Do not completely tighten the screws; this can
damage the T-Connector.
For the most up-to-date instructions, visit verandadeck.com.
Lighting Installation Instructions
1 2
3 4
5 6
7 8
9
11
13
10
12
14
VER-0044-LIT 6/14
/