Page is loading ...

1
HAMPTONBAY.COM
Please contact 1-855-HD-HAMPTON for further assistance.
Safety Information
WARNING: Risk of Electric shock. Do not install the path lights within
10 ft. (3m) of a pool, spa, or fountain.
WARNING: These path lights are for use with outdoor landscape
lighting systems only.
WARNING: Do not disassemble the power supply unit.
WARNING: Do not submerge the transformer.
WARNING: Do not connect two or more transformers in parallel.
WARNING: Do not use with a dimmer.
WARNING: Plug the power supply directly into a GFCI wet location
outlet.
WARNING: Do not use an extension cord.
WARNING: Do not overload the transformer. The maximum output of the
transformer is 30 watts. Ensure that the total cumulative wattage of all 12
volt xtures connected to the transformer is equal to or less than 30 watts.
WARNING: Do not install where airow around the unit is overly
restricted.
NOTE: This landscape lighting system must be installed in accordance
with all local codes and ordinances. If you are expecting problems, contact
a qualied electrician.
IMPORANT: The main low voltage cable is intended for shallow burial -
less than 6 in. (15.2 cm).
IMPORANT: Route xture unit low voltage cable in close proximity to the
luminaire or next to a building structure such as a house or deck.
IMPORANT: The xture low voltage cable is only intended for shallow
burial of less than 6 in. (15.2 cm) when connecting to the main low
voltage cable.
IMPORANT: The xture low voltage cable may be trimmed to make
an electrical connection within 6 in. (15.2 cm) from a building structure,
luminaire, or tting.
CABLE SELECTION
12 VOLT TAP
Cable Length
Total Fixture Wattage 0 - 50 ft. 51 - 100 ft. 101 - 150 ft.
0 - 30 Watts 18 AWG 18 AWG 16 AWG
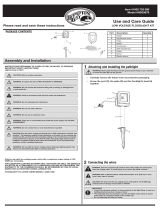
Use and Care Guide
Low Voltage Pathlight Kit
PACKAGE CONTENTS
A - Transformer x1 B - Bracket x1 C - Photocell x1 D - Dust cap x1 E - 4.8 x 30 Screw x4 F - 3.5 x 15 Screw x2 G - Wall anchor x4
H - Wire x1 I - Lamp body x6 J - Lamp post x6 K - Wire connector x6 L - Ground stake x6 M - Mounting template x1
Item #1002916252
Model #KECP10-LED

HAMPTONBAY.COM
Please contact 1-855-HD-HAMPTON for further assistance.
2
Assembly and Installation
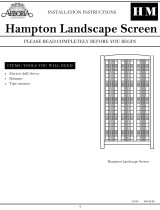
1
ASSEMBLING AND INSTALLING THE LIGHT
FIXTURE
WARNING: Do not push the xture into the ground by the lamp body
or use a hammer to insert the ground stake.
□ Screw the lamp body (I) into the lamp post (J).
□ Insert the wire with the wire connector (K) into the groove
located on the top of the ground stake (L), then screw the
lamp post (J) into the top of the ground stake (L).
□ Prepare a hole in the installation location. Ensure that the
hole is not larger than the ground stake (L).
□ Install the xture in the ground by pushing on the foot step
on the ground stake (L). Do not push on the lamp body (I).
I
J
L
K
2
WIRING THE TRANSFORMER
WARNING: Ensure that there is no wire insulation under the clamping
plate and that the terminal screws are rmly tightened.
□ Gently split the end of the wire (H). Strip 1/2 in. from both
wires and twist the ends.
□ With the transformer (A) on a at surface, insert one wire
into the clamping plate labeled “COM” and one wire in the
clamping plate labeled “12V”.
□ Gently pull on the wire (H) to verify that the connection is
strong.
□ Verify that there are no loose cable strands.
COM
12V
H
H
A
3
MOUNTING THE TRANSFORMER
□ Install the screws (E). The spacing between the screw
centers is 3.15 in. (80 mm). See the mounting template (M)
for correct spacing.
□ Hang the transformer (A) onto the screws (E).
□ Ensure that the transformer (A) is installed between 12 in.
and 48 in. from the ground.
A
12 in. – 48 in.
3.15 in.

HAMPTONBAY.COM
Please contact 1-855-HD-HAMPTON for further assistance.
3
Assembly and Installation (continued)
4
MOUNTING THE PHOTOCELL
□ Mount the photocell bracket (B) on the wall using the screws
(F) provided.
□ Snap the photocell (C) into the bracket (B). Route or coil the
excess wire to protect it. Avoid pointing the photocell at
nighttime light sources.
□ Cover the connection hole with the dust cap (D) when no
photocell control wire is connected.
NOTE: Replacement photocells may be purchased at your local
retailer.
C
F
B
A
D
5
CONNECTING THE LIGHT FIXTURES
□ Route the wire (H) to the light xtures. Be sure to leave
about 12 in. of wire after the last light xture.
□ Align the wire (H) in the slot of the wire connector (K).
□ Press the wire connector (K) together until it is locked
around the main wire (H). The metal contacts should pierce
the insulation of the wire (H).
□ Secure the connection with electrical tape (not included).
□ Cover the wire (H) with mulch or bury it up to 6 in.
WARNING: Be sure to leave a minimum of 10 ft. of wire between the
transformer and the rst light xture.
CAUTION: The wire connector contacts have sharp edges. To avoid
injury, do not touch the metal contacts.
K
K
H
H

HAMPTONBAY.COM
Please contact 1-855-HD-HAMPTON for further assistance.
4
Operation
1
SETTING THE ON AT DUSK/OFF AT DAWN
FUNCTION (FACTORY DEFAULT SETTING)
□ In this mode, the landscape lights will automatically come on
at dusk and turn off at dawn.
□ Press ON AT DUSK /OFF AT DAWN button. The related
indicator light will illuminate and “AU” (Auto) will display on
screen. This mode is now active.
NOTE: The photocell should be installed and secured tightly before
transformer operation is set.
MANUAL
ON/OFF
ON AT DUSK
OFF AT DAWN
(AUTO ON/OFF)
ON AT DUSK
RUN TIME (HRS)
2
SETTING THE ON AT DUSK /RUN TIME FUNCTION
□ In this mode, the landscape lights will automatically turn on
at dusk and off after the set time (hrs).
□ Press ON AT DUSK /RUN TIME button. The related indicator
light will illuminate. Increase RUN TIME by pressing ON AT
DUSK/RUN TIME button repeatedly until desired RUN TIME is
displayed (The time will be displayed as 1,2,...,12 hours).
NOTE: The photocell should be installed and secured tightly before
transformer operation is set.
MANUAL
ON/OFF
ON AT DUSK
OFF AT DAWN
(AUTO ON/OFF)
ON AT DUSK
RUN TIME (HRS)
3
SETTING THE MANUAL ON/OFF FUNCTION
□ In this mode, the landscape lights can be turned on & off
manually.
□ Press the MANUAL ON/OFF button. The related indicator light
will illuminate. The transformer has now entered MANUAL
ON/OFF MODE. Display will rst show OFF mode, press
button again to toggle landscape lights ON.
NOTE: After 30 seconds the transformer display will go into standby
mode, press any button to remove transformer from standby mode.
NOTE: Transformer will retain settings in the event of complete
power loss.
MANUAL
ON/OFF
ON AT DUSK
OFF AT DAWN
(AUTO ON/OFF)
ON AT DUSK
RUN TIME (HRS)
MANUAL
ON/OFF
ON AT DUSK
OFF AT DAWN
(AUTO ON/OFF)
ON AT DUSK
RUN TIME (HRS)
4
RESTORING THE FACTORY DEFAULT FUNCTION
□ In any mode, press & hold MANUAL ON/OFF button for 10
seconds. “88” will be displayed on the screen and all the
indicator lights will illuminate. The transformer will reset to
ON AT DUSK /OFF AT DAWN mode.
MANUAL
ON/OFF
ON AT DUSK
OFF AT DAWN
(AUTO ON/OFF)
ON AT DUSK
RUN TIME (HRS)
Hold

HAMPTONBAY.COM
Please contact 1-855-HD-HAMPTON for further assistance.
5
Care and Cleaning
□ Clean the light xture with a soft, dry cloth.
□ Do not use cleaners with chemicals, solvents, or harsh abrasives.
Troubleshooting
Problem Possible Cause Solution
The xture will not light. □ There is no power.
□ There is a disconnection, or break, in the wire.
□ The transformer setting is incorrect.
□ Check the outlet and ensure that the circuit breaker or
GFCI has not been tripped.
□ Check the wire.
□ Check the transformer settings.
One light xture ickers. □ There is a loose wire connector. □ Tighten the wire connector and ensure that the metal
contacts pierce the insulation on the wire from the
transformer.
All light xtures icker. □ There is a loose connection at the transformer. □ Unplug the transformer and check the wire connections.
The lights do not switch on at dusk. □ The photocell is mounted in an area that has
too much nighttime light.
□ Install the photocell in a place with little nighttime light.
Warranty
WHAT IS COVERED
The manufacturer warrants this lighting xture to be free from defects in materials and workmanship for a period of ve (5) years from date of purchase.
The manufacturer warrants this transformer to be free from defects in materials and workmanship for a period of two (2) years from date of purchase.
This warranty applies only to the original consumer and only to products used in normal use and service. If this product is found to be defective, the
manufacturer’s only obligation, and your exclusive remedy, is the repair or replacement of the product at the manufacturer’s discretion, provided that the
product has not been damaged through misuse, abuse, accident, modications, alterations, neglect or mishandling.
WHAT IS NOT COVERED
This warranty shall not apply to any product that is found to have been improperly installed, set-up, or used in any way not in accordance with the
instructions supplied with the product. This warranty shall not apply to a failure of the product as a result of an accident, misuse, abuse, negligence,
alteration, or faulty installation, or any other failure not relating to faulty material or workmanship. This warranty shall not apply to the nish on any portion
of the product, such as surface and/or weathering, as this is considered normal wear and tear.
The manufacturer does not warrant and specically disclaims any warranty, whether express or implied, of tness for a particular purpose, other than the
warranty contained herein. The manufacturer specically disclaims any liability and shall not be liable for any consequential or incidental loss or damage,
including but not limited to any labor / expense costs involved in the replacement or repair of said product.
Contact the Customer Service Team at 1-855-HD-HAMPTON or visit www.HamptonBay.com.
FCC Warning
Please note that changes or modications not expressly approved by the party responsible for compliance could void the user’s authority to operate the
equipment.
NOTE: This equipment has been tested and found to comply with the limits for a Class B digital device, pursuant to part 15 of the FCC Rules. These limits are
designed to provide reasonable protection against harmful interference in a residential installation. This equipment generates, uses and can radiate radio
frequency energy and, if not installed and used in accordance with the instructions, may cause harmful interference to radio communication.
If this equipment does cause harmful interference to radio or television reception, which can be determined by turning the equipment off and on, the user is
encouraged to try to correct the interference by one or more of the following measures:
□ Reorient or relocate the receiving antenna.
□ Increase the separation between the equipment and receiver.
□ Connect the equipment into an outlet on a circuit different from that to which the receiver is connected.
□ Consult the dealer or an experienced radio/TV technician for help.
NOTE: Most LED landscape lighting xtures can operate with full illumination from 15V down to as little as 8V. It is possible to have extended length runs with
LED xtures that go beyond the specications shown in the guidelines above.
/