Page is loading ...

Wiser Motion Sensor
Device user guide
Information about features and functionality of the device.
05/2023
www.pdl.co.nz

Legal Information
The Schneider Electric brand and any trademarks of Schneider Electric SE and its
subsidiaries referred to in this guide are the property of Schneider Electric SE or its
subsidiaries. All other brands may be trademarks of their respective owners.
This guide and its content are protected under applicable copyright laws and
furnished for informational use only. No part of this guide may be reproduced or
transmitted in any form or by any means (electronic, mechanical, photocopying,
recording, or otherwise), for any purpose, without the prior written permission of
Schneider Electric.
Schneider Electric does not grant any right or license for commercial use of the guide
or its content, except for a non-exclusive and personal license to consult it on an "as
is" basis. Schneider Electric products and equipment should be installed, operated,
serviced, and maintained only by qualified personnel.
As standards, specifications, and designs change from time to time, information
contained in this guide may be subject to change without notice.
To the extent permitted by applicable law, no responsibility or liability is assumed by
Schneider Electric and its subsidiaries for any errors or omissions in the informational
content of this material or consequences arising out of or resulting from the use of the
information contained herein.

Table of Contents
Safety information.......................................................................................4
Wiser Motion Sensor ..................................................................................5
About the device.........................................................................................5
Installing the device ....................................................................................5
Pairing the device .......................................................................................6
Pairing device manually.........................................................................6
Pairing Device with Auto scan................................................................8
Configuring the device ................................................................................9
Changing the device icon ......................................................................9
Renaming the device ..........................................................................10
Changing the device location ...............................................................10
Removing the device ................................................................................ 11
Resetting the device .................................................................................12
Using the Device ......................................................................................13
Sensor Setting....................................................................................13
Lux Setting .........................................................................................15
Checking the device history .................................................................16
Creating an automation .......................................................................17
Replacing the batteries .............................................................................22
LED Indications ........................................................................................23
Troubleshooting .......................................................................................23
Technical Data .........................................................................................24
Compliance................................................................................................25
Compliance information for Green Premium products..................................25
Trademarks..............................................................................................25
DUG_Motion_Sensor_PDL–00 3

Safety information
Safety information
Important information
Read these instructions carefully and look at the equipment to become familiar
with the device before trying to install, operate, service, or maintain it. The
following special messages may appear throughout this manual or on the
equipment to warn of potential hazards or to call attention to information that
clarifies or simplifies a procedure.
The addition of either symbol to a “Danger” or “Warning” safety label indicates
that an electrical hazard exists which will result in personal injury if the
instructions are not followed.
This is the safety alert symbol. It is used to alert you to potential personal injury
hazards. Obey all safety messages that accompany this symbol to avoid possible
injury or death.
DANGER
DANGER indicates a hazardous situation which, if not avoided, will result in
death or serious injury.
Failure to follow these instructions will result in death or serious injury.
WARNING
WARNING indicates a hazardous situation which, if not avoided, could result
in death or serious injury.
CAUTION
CAUTION indicates a hazardous situation which, if not avoided, could result in
minor or moderate injury.
NOTICE
NOTICE is used to address practices not related to physical injury.
4 DUG_Motion_Sensor_PDL–00

Wiser Motion Sensor
Wiser Motion Sensor
PDL595011
About the device
The Wiser Motion Sensor (hereinafter referred to as sensor) detects nearby
movement and measures the luminance of the environment.
The sensor sends the data to the Wiser Hub. The threshold of luminance settings
and/or detection of movement can be configured in the Wiser app.
Features of the sensor:
• Detect motion and send this information to the Wiser Hub.
• Detect and measure the lux level of the environment and passes the
information to the Wiser Hub.
• Sends the sensor battery level and offline status information to the Wiser
Hub.
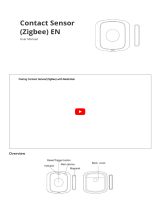
Operating elements
A. Function key
B. Status LED
C. Screws
A
C
B
Installing the device
Refer to the installation instruction supplied with this product.
See Wiser Motion Sensor.
NOTICE
RISK OF DAMAGE TO DEVICE
• Always operate the product in compliance with the specified technical data.
• Do not install the sensor in a place with strong sunlight or wind (for example,
close to ventilation).
• Temperatures greater than 32 °C degrade the sensor's ability to measure
sensitivity, detection range, and angle.
Failure to follow these instructions can result in equipment damage.
DUG_Motion_Sensor_PDL–00 5

Wiser Motion Sensor
Pairing the device
Using the Wiser app, pair your device with the Wiser Hub to access and control
the device. You can either add the device manually or do an auto-scan to pair it.
Pairing device manually
To pair the device manually:
1. On Home page, tap +.
2. Tap , select the required Wiser Hub on the slide-up menu.
3. Select an option to add the device (A):
–Add Device with Install Code
–Add Device without Install Code
Add Device
Install Code is Recommended
Add Device without Install Code
device.
If you are unable to scan or type the install
code, you can still add the device without it.
A
TIP: It is highly recommended to add the device with install code.
4. To pair the device with an install code, tap Add Device with Install Code to
display the slide-up menu. Select any one of the options (B):
–Scan Install Code - you can scan the device for the install code.
–Enter Install Code Manually - you can manually enter the install code
from the device.
After pairing the device with install code, proceed to Step 6.
Add Device
Install Code is Recommended
Add Device without Install Code
device.
If you are unable to scan or type the install
code, you can still add the device without it.
Add Device
Install Code is Recommended
device.
If you are unable to scan or type the install
code, you can still add the device without it.
Scan Install Code B
Cancel
5. To pair the device without install code, tap Add Device without Install Code.
6 DUG_Motion_Sensor_PDL–00

Wiser Motion Sensor
6. On the rear side of the sensor, short press (< 0,5 s) the function key 3 times.
The LED blinks orange.
7. In the app, select Confirm LED is flashing orange and tap Start
configuration (C).
Cancel
How to pair device
Short-press function key 3 times
x3
1 2
C
The app displays the progress of connecting the device.
8. After a few seconds, a solid green LED indicates that the sensor is
successfully paired to the Hub.
9. Tap Done when the pairing is successful.
DUG_Motion_Sensor_PDL–00 7

Wiser Motion Sensor
Pairing Device with Auto scan
Pairing the device with auto scan automatically discovers the device when the
corresponding device is powered on.
1. On the Home page, tap +.
2. Tap Auto scan > Confirm.
3. Enable permissions to Access location and Wi-Fi for scanning device and
tap Start scanning.
NOTE: If you have multiple hubs, do Step 4 or proceed to Step 5.
4. Tap Select hub and select the Wiser Hub from the slide-up menu.
5. Short press the setup/reset button 3 times (< 0,5 s) and wait for a few
seconds until the device search is complete.
The LED blinks orange.
TIP: If you want to pair multiple devices at once, perform step 5 on each
device and wait for a few seconds for them to be detected.
6. Tap Next (A) and select Motion Sensor.
Auto Scan
Available devices found
A
Next
Motion
Sensor
7. Once the device is added successfully, tap Done.
8 DUG_Motion_Sensor_PDL–00

Wiser Motion Sensor
Configuring the device
Changing the device icon
You can change the device icon using the Wiser app.
1. On the Home page, select the device for which you wish to change the icon.
2. At the top-right corner of the screen, tap .
3. Tap edit next to the device name.
4. Tap Icon to view the menu.
5. In the slide-up menu, select any one of the following (A) to change the device
icon:
–Take photo - allows you to take a photo with your device camera.
–Select from Icon Library - allows you to select an icon from the app
library.
–Select from Album - allows you to select a photo from the mobile gallery.
Location
Name
Icon
Select from album
Select from Icon Library
Take photo
Cancel
A
DUG_Motion_Sensor_PDL–00 9

Wiser Motion Sensor
Renaming the device
You can rename the device using the Wiser app.
1. On the Home page, select the device for which you wish to rename.
2. At the top-right corner of the screen, tap .
3. Tap edit next to the device name.
4. Tap Name, enter the new name (A) and then tap Save.
Changing the device location
You can change the device location using the Wiser app.
1. On the Home page, select the device for which you wish to change the
location.
2. At the top-right corner of the screen, tap .
3. Tap edit next to the device name.
4. Tap Location.
5. Select the desired location from the list (A) and then tap Save.
Location
Name
Icon
SaveCancel
Rename
A
Device location
Save
Living Room
Kitchen
Dining Room
Kids Room
Study Room
Master Bedroom
A
10 DUG_Motion_Sensor_PDL–00

Wiser Motion Sensor
Removing the device
You can remove a device from the device list using the Wiser app,
To remove the device:
1. On the Home page, tap All devices >Motion Sensor.
2. Tap to display more details.
3. Tap Remove and Factory Reset Device (A) and tap Confirm.
More
Motion Sensor
More
FAQ and Feedback
Moment and Automation
Add to home screen
No updates available.
Others
A
TIP: On the home page, you can tap and hold the Motion Sensor to
remove the device.
NOTE: By removing the device, you will reset the device. If you still have
a problem with the reset, then refer to resetting the device, page 12.
DUG_Motion_Sensor_PDL–00 11

Wiser Motion Sensor
Resetting the device
You can reset the sensor to factory default manually.
To reset the sensor:
1. Rotate the sensor counterclockwise to unlock it from the base plate.
2. Short-press the function key three times (<0.5 s) and then long-press the
function key once (>10 s); the LED blinks red after 10 s, then release the
function key.
Upon successful reset of the sensor, the LED stops blinking. The sensor
restarts and blinks green for a few seconds.
NOTE: After reset, the LED turns off to save the battery.
1
2
3× < 0,5 s + 1× 10 s
↓
…
↓
×7
12 DUG_Motion_Sensor_PDL–00

Wiser Motion Sensor
Using the Device
On the Home page, tap All devices >Motion Sensor to access the control
panel.
On the Sensor control panel page, you can see the following:
• Battery level (A)
• Motion detection status (B)
• Current lux level (C)
• History (D)
• Settings (E)
Motion Sensor
144 lux
Bright
History
D
E
A
C
B
Sensor Setting
Using Wiser app, you can do the setting such as Sensitivity and Detection delay.
Sensitivity
Using the Wiser app, you can set the sensitivity of the sensor (such as High,
Medium, Low).
To set the sensitivity:
1. On the Home page, tap All devices >Motion Sensor.
2. On the device control panel page, tap Settings.
3. Short press the function key 3 times or simulate the motion to wake up the
device.
DUG_Motion_Sensor_PDL–00 13

Wiser Motion Sensor
4. Tap Sensitivity and select one of the following levels (A):
–High
–Medium
–Low
NOTE: The high sensitivity level detects the slightest movement.
Detection delay
Using the wiser app, you can set the detection delay time.
To set the detection delay duration:
1. On the Home page, tap All devices >Motion Sensor.
2. On the device control panel page, tap Settings.
3. Short press the function key once or simulate the motion to wake up the
device.
4. Tap Detection Delay and select the time duration (A).
14 DUG_Motion_Sensor_PDL–00

Wiser Motion Sensor
5. Tap Detection Delay Customization (B) to customize your detection delay
time. You can set the time between 00:01 to 59:59 minutes.
NOTE:
• Modifying the detection delay time to long-interval will affect the
battery life of the sensor.
• Each detected motion resets the delay time. Thus the delay time
begins with the last motion detected.
EXAMPLE: If you set the detection delay time to 5 minutes and there is a
motion, the information "Occupied" will be sent to the Wiser hub. If there is no
motion detected in last 5 minutes (configured detection delay time), the
information "Unoccupied" will be sent to the Hub.
Lux Setting
Using the Wiser app, you can define the threshold value for lux ranges (such as
very dark, dark, bright, very bright) of the environment. This will prevent the false
alarm caused by changes in the light intensity.
To set the lux range value:
1. On the Home page, tap All devices >Motion Sensor.
2. On the device control panel page, tap Settings.
DUG_Motion_Sensor_PDL–00 15

Wiser Motion Sensor
3. Tap any of the following Lux ranges and drag the slider bar to define its
threshold value and tap Save:
–Very dark level - Lux value ranges from 1 lux to 100 lux
–Dark level - Lux level ranges from 6 lux to 300 lux
–Bright level - Lux level ranges from 101 lux to 2000 lux
NOTE: The Current Lux Value is the current light level present in the
environment, which the sensor can measure.
Checking the device history
You can monitor the motion detection status by accessing the device history in the
Wiser app.
1. On the Home page, tap All devices >Motion Sensor.
2. On the device control panel page, tap History.
3. In the History page, you can see the time when the motion was detected.
2022-09-24
29.4.2022 - 22:40:14 Occupied
29.4.2022 - 22:30:14 Occupied
29.4.2022 - 21:40:14 Occupied
29.4.2022 - 21:34:14 Occupied
29.4.2022 - 21:34:14 Occupied
History
16 DUG_Motion_Sensor_PDL–00

Wiser Motion Sensor
Creating an automation
An automation allows you to group multiple actions that are usually done together,
triggered automatically or at scheduled times. By using the Wiser app, you can
create automations based on your needs.
1. On the Home page, tap the .
2. Go to Automation >+to create an automation.
3. Tap Edit name , enter the name of the automation (A) and tap Save.
TIP: You can choose the cover image that represents your automation by
tapping .
Automation settings
Cancel Save
Any condition is met
Add Condition
Action
Add Task
All-Day
(0/10)
(Added 0/80)
My Automation
Automation settings
Cancel
Save
Any condition is met
Action
Add Task
All-Day
(0/10)
SaveCancel
A
4. Tap Any condition is met to select any one of the condition type (B):
–All conditions are met- The automation is triggered when all the
conditions are met.
–Any condition is met- The automation is triggered when at least one
condition is met.
Automation settings
Cancel Save
Any condition is met
Add Condition
Action
Add Task
(0/10)
(Added 0/80)
My Automation
Automation settings
Cancel
Save
Any condition is met
Add Condition
Action
Add Task
(0/10)
(Added 0/80)
Any condition is met
All conditions are met
Cancel
Select Condition type
B
5. Tap Add Condition to display the slide-up menu.
DUG_Motion_Sensor_PDL–00 17

Wiser Motion Sensor
6. In the Add Condition menu, you can do either or all of the following options
(C):
–When weather changes - Select various weather settings
–Schedule - Set the time and day
–When device status changes - Select the device and its function
NOTE: You can add one or more conditions using .
Any condition is met
Add Condition
(0/10)
My Automation
Automation settings
Cancel Save
Any condition is met
Add Condition
(0/10)
Automation settings
Cancel
Save
Add Condition
Schedule C
7. Tap When device status changes >Motion Sensor to select either or all of
the functions to add in the automation:
–Lux level - Select any level from Very dark to Very bright (D)
NOTE: The value for Very dark to Bright can be set in the Lux Setting,
page 15. The Very bright setting will take the maximum lux setting
value (2000 lux).
–Motion state - Occupied, if a motion is detected. Unoccupied, if there is
no motion (E)
–Current lux value - Select the condition (F) and the lux value (G)
Lux level
Very dark
D
Motion state
Occupied
Unoccupied
E
Current lux value Next
<>=
0
0lx 2000lx
lx
F
G
8. Tap Add task to display the slide-up menu.
18 DUG_Motion_Sensor_PDL–00

Wiser Motion Sensor
9. In the Add task menu, you can do either or all of the following options (H):
–Run the device- Select the devices that you want to trigger.
–Moment or Automation- Select the moment which you want to trigger or
select the automation that you want to enable or disable.
–Send notification- Turn on notification for the automation.
–Delay - Set the delay time.
NOTE: You can add one or more actions using icon.
10. Tap on Effective period to set the time range for the automation. You can
select any one of the following (I):
–All-day - 24 hours
–Daytime - From sunrise to sunset
–Night - From sunset to sunrise
–Custom - User defined time period
Next
I
Repeat
All-day
24 hours
From sunrise to sunset
From sunset to sunrise
Custom
City
11. Once all the actions and conditions are set, tap Save.
DUG_Motion_Sensor_PDL–00 19

Wiser Motion Sensor
Example of an automation
This demonstration shows you how to create an automation to switch on the light
with 50% brightness level when a motion is detected.
NOTE: The Dimmer will not be switched off automatically when the Sensor
sends the "Unoccupied" message. To switch off the dimmer when there is no
more motion, you must create a new automation.
1. Go to Automation >+to create an automation.
2. Tap Edit name , enter the name of the automation and tap Save.
TIP: You can choose the cover image that represents your automation by
tapping .
3. Tap Add Condition >When device status changes >Motion Sensor.
4. Tap Motion State >Occupied (A).
5. Tap Add task >Run the device > .
6. Tap Brightness (B), adjust the brightness to 50% and tap Save.
TIP: Setting the brightness level turns on the light the light when the
automation is triggered. You need not add a task to turn on the Dimmer
separately.
7. Tap Next.
A
Motion state
Occupied
Unoccupied
Dimmer
Brightness
Select function
Next
SaveCancel
Brightness
50%
B
20 DUG_Motion_Sensor_PDL–00
/